今天要回來介紹JSXGraph的多邊形(Polygon)和轉換(Transformation)。
Polygon是繼承自CoordsElement和GeometryElement兩個幾何元素類別,它的建構語法如下:
語法:board.create('polygon', [點元素陣列], 屬性物件)
// 點元素可以是座標陣列或建構的點元素
Polygon有borders(邊)和Vertices(頂點)兩個屬性,分別是直線元素和點元素構成的陣列,可控制多邊形的邊和頂點樣式和一些相關屬性。Polygon本身的color屬性是設定多邊形填滿的顏色,比較可惜的是JSXGraph好像無法處理自我相交多邊形的填滿和面積計算,也就是它會將自我相交的多邊形轉換成非自我相交的多邊形。
自我相交多邊形的處理比較麻煩,可以參照下圖,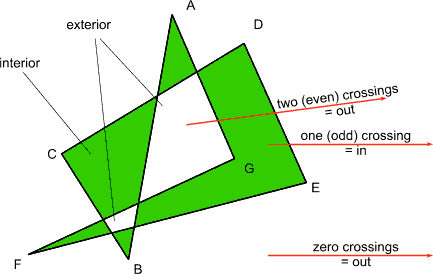
圖片來源:https://redirect.cs.umbc.edu/~rheingan/435/pages/res/gen-10.Vis2-page-10sub-1.html
GeoGebra可以處理自我相交的多邊形,
希望JSXGgraph未來也能處理,沒想到願望這麼快實現,JSXGraph最新版本1.4.6可以依even-odd-rule填色了。
Transformation的建構語法如下:
語法:board.create('transformation', [建構元素], 屬性物件)
JSXGraph提供的轉換種類有以下幾種,由屬性物件中的「type」屬性設定。
推移轉換比較少人使用,它的計算公式是x'=x+ay;y'=y+bx,a是水平推移量,b是垂直推移量。一個正方形經推移後,會形成平行四邊形。
Slider繼承自Glider類別,可以對我們的變換過程進行控制。
Slider的建構語法如下:
語法:board.create('transformation', [開始位置,結束位置,[最小值,設定值,最大值]], 屬性物件)
常用的屬性有:
const w = board.create('slider', [[5, -25], [20, -25], [0, 0, 1]], { visible: false, color: '#99AD9B', size: 3, precision: 1, baseline: { color: '#5C7173', strokeWidth: 3 }, withLabel: true, suffixLabel: '反射' })
const v = board.create('slider', [[5, -20], [20, -20], [0, 0, 1]], { color: '#435D60', size: 3, precision: 1, baseline: { color: '#435D60', strokeWidth: 3 }, highline: { color: '#435D60' }, withLabel: true, suffixLabel: '推移' })
const u = board.create('slider', [[5, -15], [20, -15], [0, 0, 1]], { color: '#9D6F6D', size: 3, precision: 1, baseline: { color: '#9D6F6D', strokeWidth: 3 }, highline: { color: '#9D6F6D' }, withLabel: true, suffixLabel: '縮放' })
const t = board.create('slider', [[5, -10], [20, -10], [0, 0, 1]], { color: '#9D846D', size: 3, precision: 1, baseline: { color: '#9D846D', strokeWidth: 3 }, highline: { color: '#9D846D' }, withLabel: true, suffixLabel: '旋轉' })
const s = board.create('slider', [[5, -5], [20, -5], [0, 0, 1]], { color: '#547A59', size: 3, precision: 1, baseline: { color: '#547A59', strokeWidth: 3 }, highline: { color: '#547A59' }, withLabel: true, suffixLabel: '平移' })
const pointA = board.create('point', [0, 0], { visible: true, withLabe: true })
const pointB = board.create('point', [10, 0], { visible: true, withLabe: true })
const pointC = board.create('point', [10, 10])
const pointD = board.create('point', [0, 10])
const squareABCD = board.create('polygon', [pointA, pointB, pointC, pointD], { visible: true, color: 'blue' })
const tTranslate = board.create('transform', [() => 12 * s.Value(), () => 20 * s.Value()], { type: 'translate' })
const tRotate = board.create('transform', [() => 2 * Math.PI * t.Value(), [0, 0]], { type: 'rotate' })
const tScale = board.create('transform', [() => 2 * u.Value(), () => 2 * u.Value()], { type: 'scale' })
const tShear = board.create('transform', [() => 2 * v.Value(), () => 0 * v.Value()], { type: 'shear' })
const tReflect = board.create('transform', [board.defaultAxes.y], { type: 'reflect' })

const tTranslateResult = board.create('polygon', [squareABCD, tTranslate], { color: '#547A59' })
const tRotateResult = board.create('polygon', [squareABCD, tRotate], { color: '#9D846D' })
const tScaleResult = board.create('polygon', [squareABCD, tScale], { color: '#9D6F6D' })
const tShearResult = board.create('polygon', [squareABCD, tShear], { color: '#435D60' })
const tReflectResult = board.create('polygon', [squareABCD, tReflect], { color: 'blue' })
每個滑桿都可以用Value()函式傳回目前滑桿的數值,我們將其和建構變換的的建構元素綁在一起,當滑桿移動的時候,我們的圖形也會一起移動。
記得滑桿值和幾何變換的建構元素綁定的時候,要用箭頭函數。
執行結果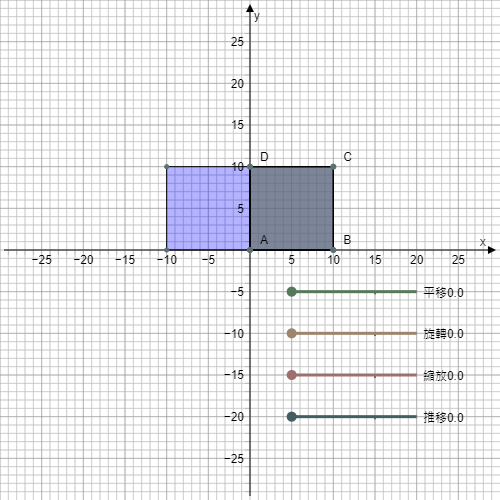
第十五天了,終於理解為何叫鐵人賽,快撐不下去了,今天只作了簡單的介紹,希望明天再加油!

