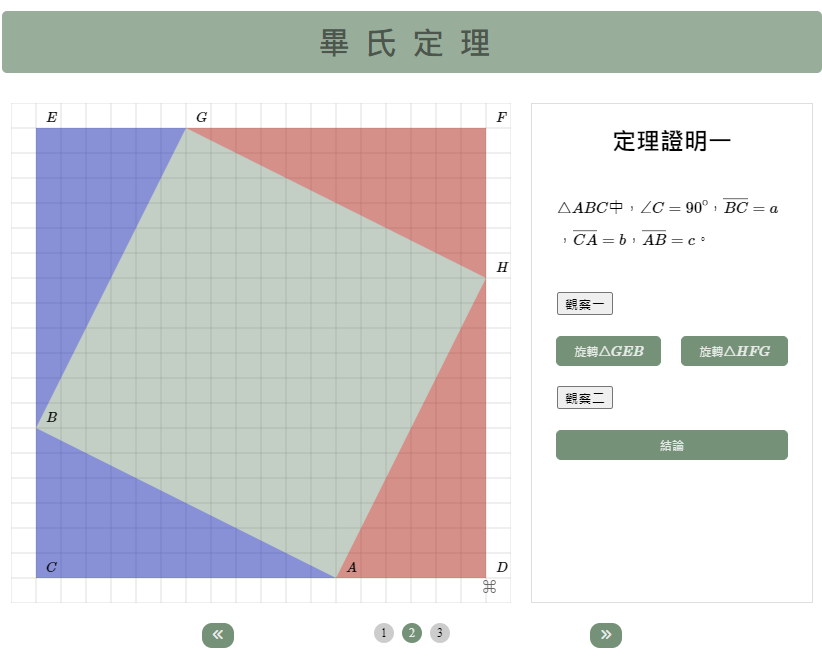
畢氏定理是國中階段最最重要的幾何性質,也是解析幾何的根本要素。大部分的人都能熟練的應用畢氏定理,但是,除了數學老師,卻少有人能證明畢氏理。有人曾收錄了數百個畢氏定理證明,今天,我們就利用圖形轉換的方法來證明畢氏定理。
<div class="swiper">
  <div class="swiper-wrapper">
    <div class="swiper-slide slide1">
      <div class="left">
        <div id="box1" class="jxgbox" style="width: 500px;height: 500px;"></div>
      </div>
      <div class="right">
        ...
      </div>
    </div>
    <div class="swiper-slide slide2">
      <div class="left">
        <div id="box2" class="jxgbox" style="width: 500px;height: 500px;"></div>
      </div>
      <div class="right">
        ...
      </div>
    </div>
    <div class="swiper-slide slide3">
      <div class="left">
        <div id="box3" class="jxgbox" style="width: 500px;height: 500px;"></div>
      </div>
      <div class="right">
        ...
      </div>
    </div>
  </div>
  <div class="swiper-pagination"></div>
  <a href="#" class="prev-btn"><i class="fa-solid fa-angles-left"></i></a>
  <a href="#" class="next-btn"><i class="fa-solid fa-angles-right"></i></a>
</div>
我們每一個跑馬燈(投影片)左邊都放置了一個JSXGraph的board在容器#box1、#box2和#box3
當程式愈來愈大,我們便需要將我們的程式加以組織並模組化,以方便我們管理我們的程式。Javascript自ES6支援了模組化系統,一個檔案就是一個模組,在模組中使用export(匯出)關鍵字來匯出模組中的常數或變數資料,也可以匯出函式,例如在檔案test1.js中,
export const A = 45
exprot let b = 20
export function add_b(x) {
    return x + b
}
然後在需要這些常數、變數或函式的檔案中使用import關鍵字匯入所需要的資料,例如在test2.js中
import {A, b, add_b} from 'test1.js'
如此便可以在test2.js中使用A、b和函式。
在畢氏定理證明的範例中,每個board各自獨立成一個模組(module),並建立一個物件放置所產生的幾何元素。以board2為例,
export const board2 = JXG.JSXGraph.initBoard('box2', boardOptions)
export const board2Elements = {}
board2Elements.pointC = board2.create('point', [-9, -9], { name: '\\(C\\)', size: 0, color: 'black', label: { color: 'black' } })
以下是slide2的初始畫面
我們創建了二個看不見的滑桿s和t,其值介於0和1。並讓三角形GEB以B點為軸順時針旋轉-Math.PI * t.Value() ;三角形FGH以H點為軸逆時針旋轉Math.PI * s.Value()
接著在旋轉三角形GEB和旋轉三角形HFG加入監聽,回呼函式中我們利用兩個滑桿的moveTo方法,將滑桿移到兩端點的位置進行三角形的旋轉,下面是旋轉三角形GEB的監聽和回呼函式。
let isRotateGEB = false
const rotateGEB = document.querySelector('.rotateGEB')
rotateGEB.addEventListener('click', (e) => {
  isRotateGEB = !isRotateGEB
  if (isRotateGEB) {
    board2Elements.t.moveTo([30, 5], 1000)
  } else {
    board2Elements.t.moveTo([0, 5], 1000)
  }
})
我們可以在畫板適當的位置加入需要的文字以幫助解釋圖案的意義。
board2Elements.textASquare = board2.create('text', [0, 0, '\\(c^2\\)'], {visible: false,color: '#E9EBE9', fontSize: 24, fontUnit: 'px'})
board2Elements.textBSquare = board2.create('text', [-3, 3, '\\(b^2\\)'], {visible: false,color: '#E9EBE9', fontSize: 24, fontUnit: 'px'})
board2Elements.textCSquare = board2.create('text', [6, 6, '\\(a^2\\)'], {visible: false,color: '#E9EBE9', fontSize: 24, fontUnit: 'px'})
但是不建議放入太多的文字解說,如此會讓畫板太過雜亂。
至於slide3的部分,基本上和slide2大同小異,只是用平移代替旋轉。
今天應用了昨天學習的旋轉與平移的JSXGraph轉換元素,也介紹了ES6支援的模組化系統,利用模組化系統,我們可以輕鬆的管理我們的程式,讓它更具有延伸性和擴展性。以今天的例子來說,我們可以隨時增加新的證明放入新的slide中,如果有興趣的朋友,也可以實作看看,明天見!
