在前兩天「上」篇及「中」篇的內容中,我們使用排程任務在指定時間取得大盤籌碼以及指數、個股行情數據,並且將資料以自動化的方式產生市場觀察報告,包含大盤籌碼、產業資金流向表、以及上市櫃個股漲跌幅、成交量值、法人進出排行等資訊。在今日「下」篇的部分,我們要設定在指定的時間以 Excel 檔案格式匯出市場觀察報告,並以 Email 附件的方式,透過 Gmail SMTP 寄到我們的電子郵件信箱。
現在大多數人都有使用 Google 服務,透過 Gmail SMTP 寄送電子郵件是比較簡單、容易、快速的方式。根據 Google 的 安全標準,不再建議僅使用者名稱和密碼登入 Google 帳戶服務。因此,我們會設定一個 Gmail OAuth2 應用程式產生令牌(Access Token)來存取 Gmail 帳戶,避免遇到 Google 提示低安全性應用程式的警告。
首先,登入 Google 帳戶後,到 Google Cloud Platform。在網站導航列可以找到「選取專案」。
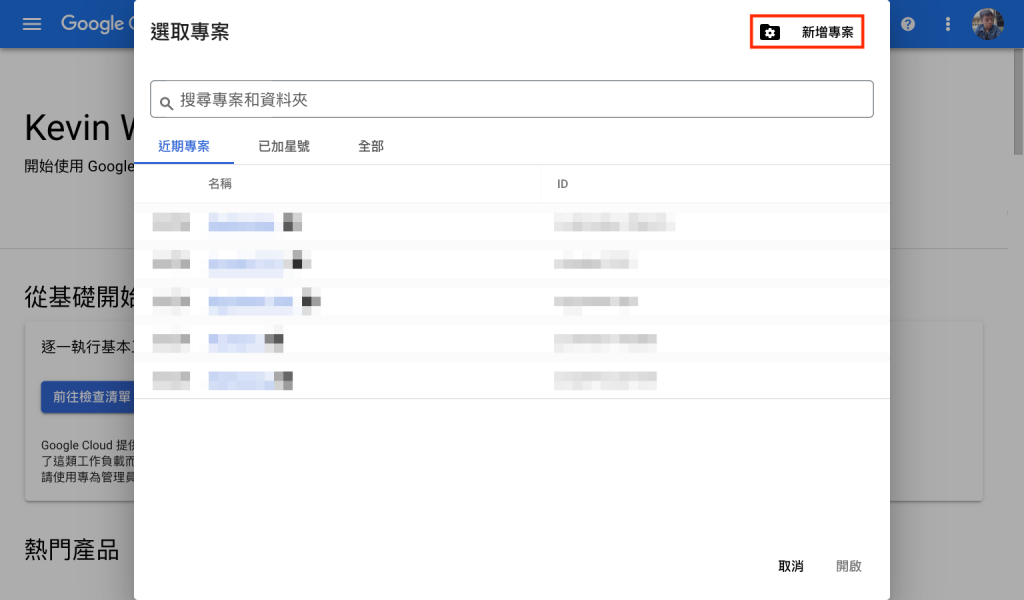
按右上方「新增專案」。
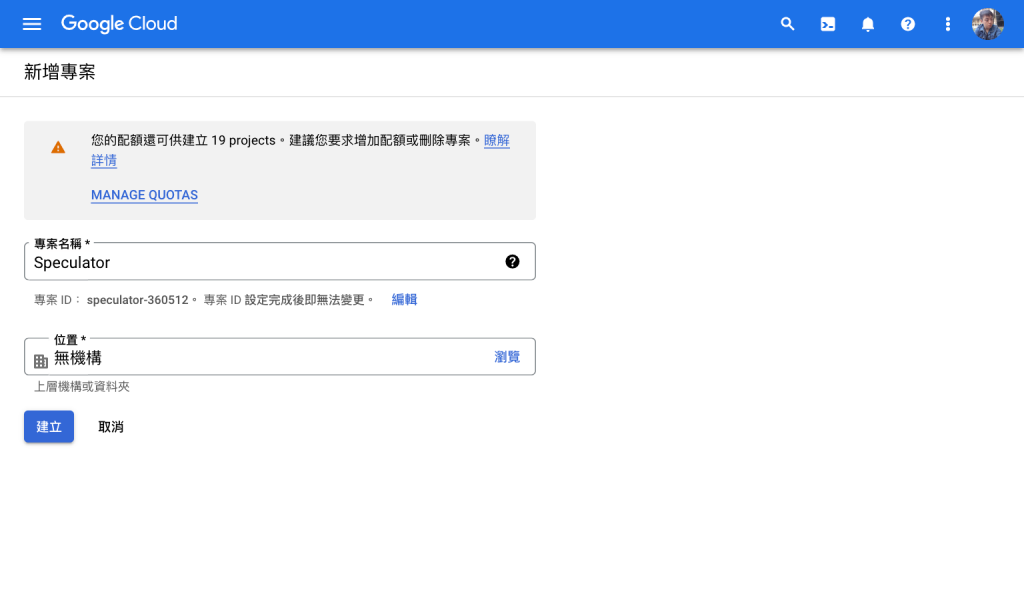
輸入你想要命名的專案名稱後建立新專案。位置可以先選「無機構」,日後再行更改。
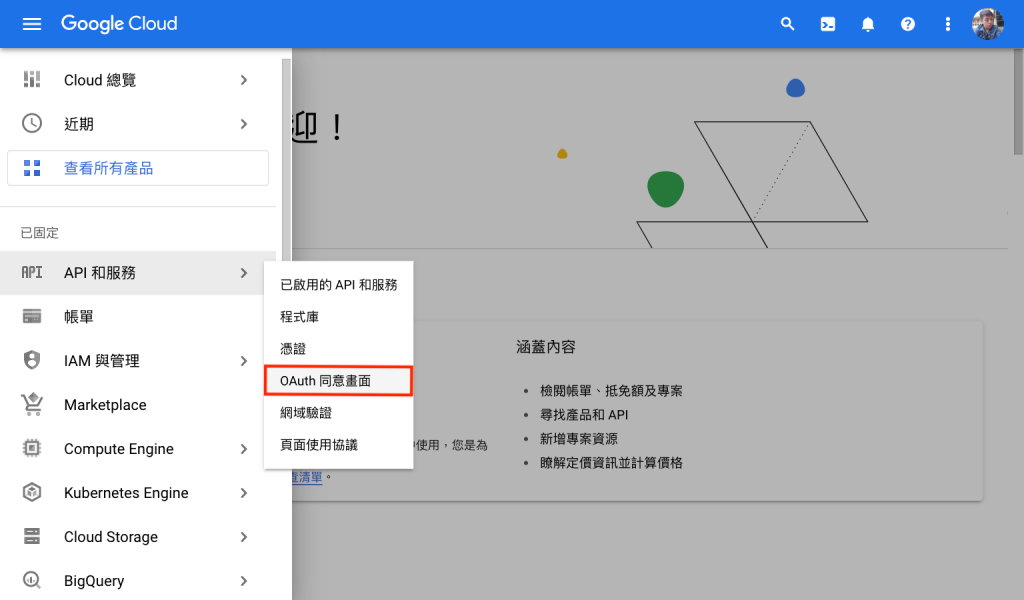
建立專案後,在左側選單找到「API 與服務」,然後點選「OAuth 同意畫面」。
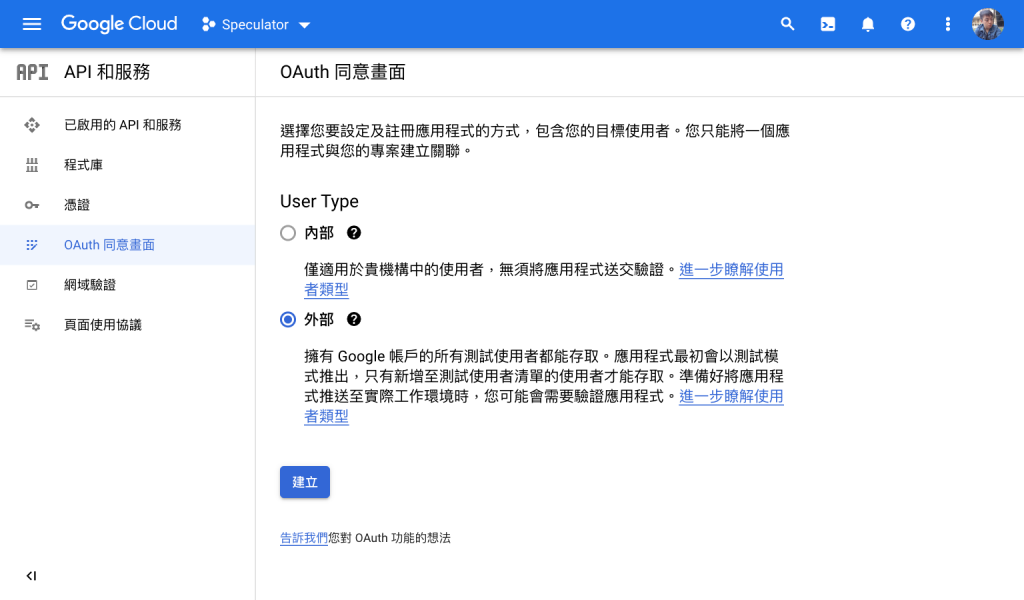
進入「OAuth 同意畫面」頁面後,在「User Type」下選擇「外部」,然後按下「建立」鈕。
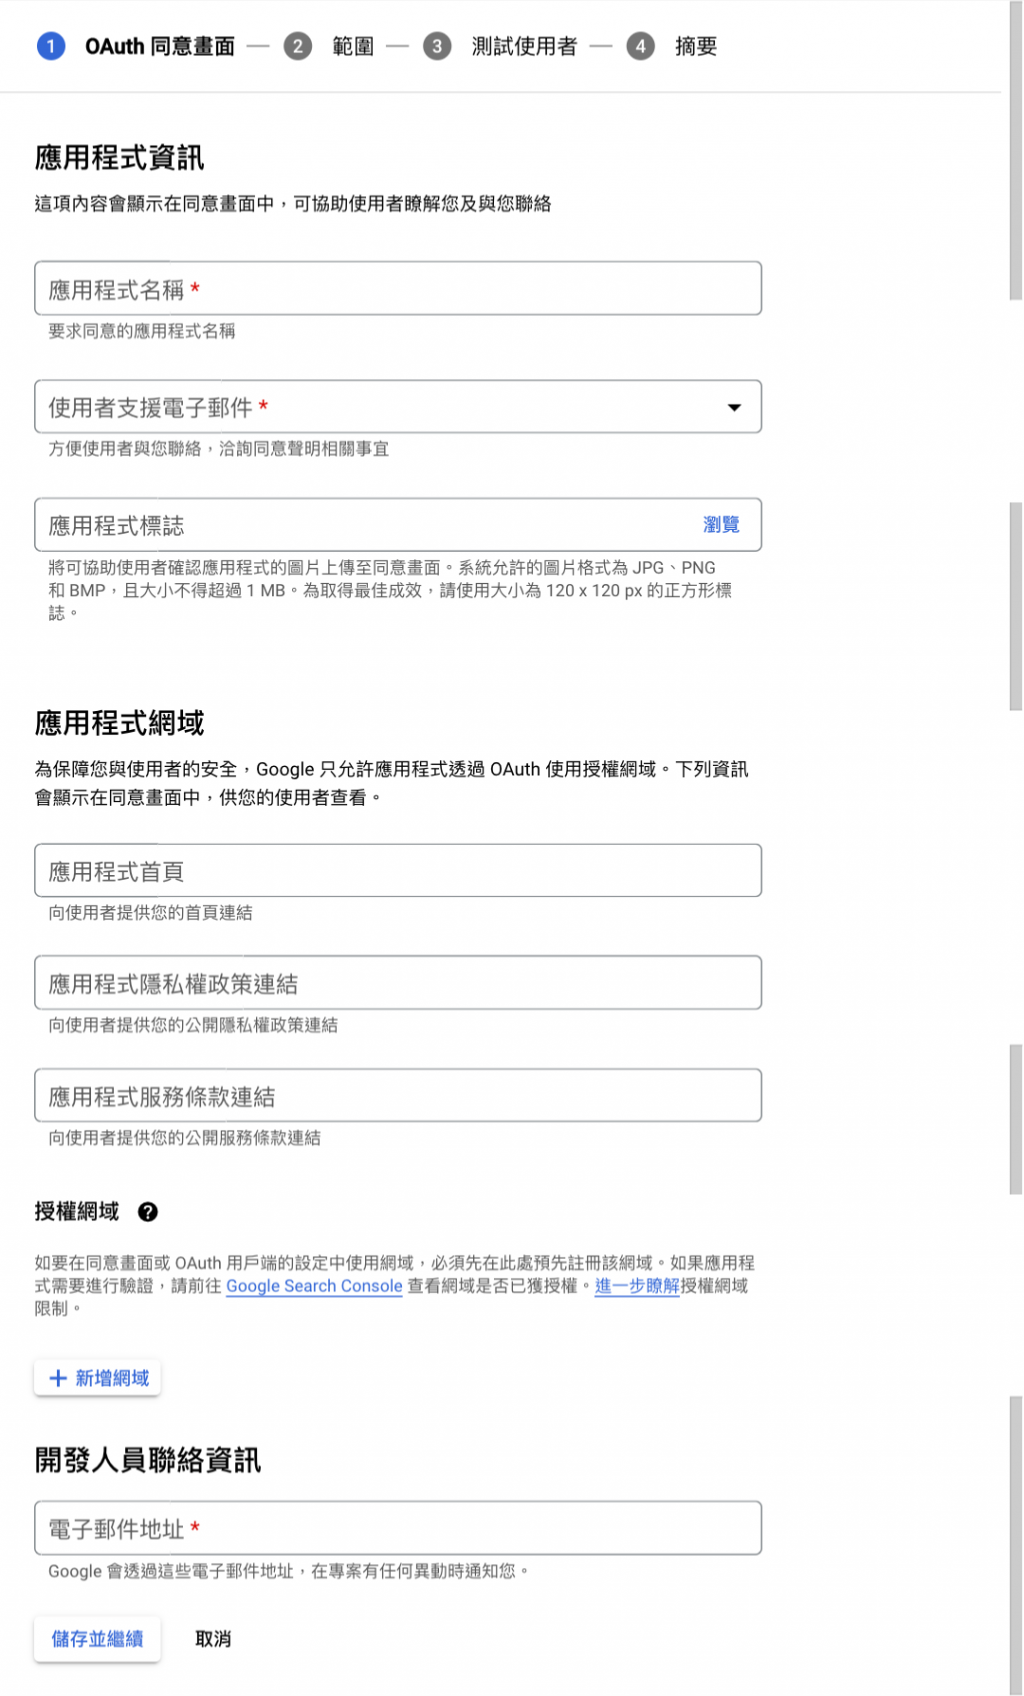
接下來要編輯應用程式資訊。填寫「應用程式名稱」、「使用者支援電子郵件」,以及下方的「開發人員聯絡資訊」。
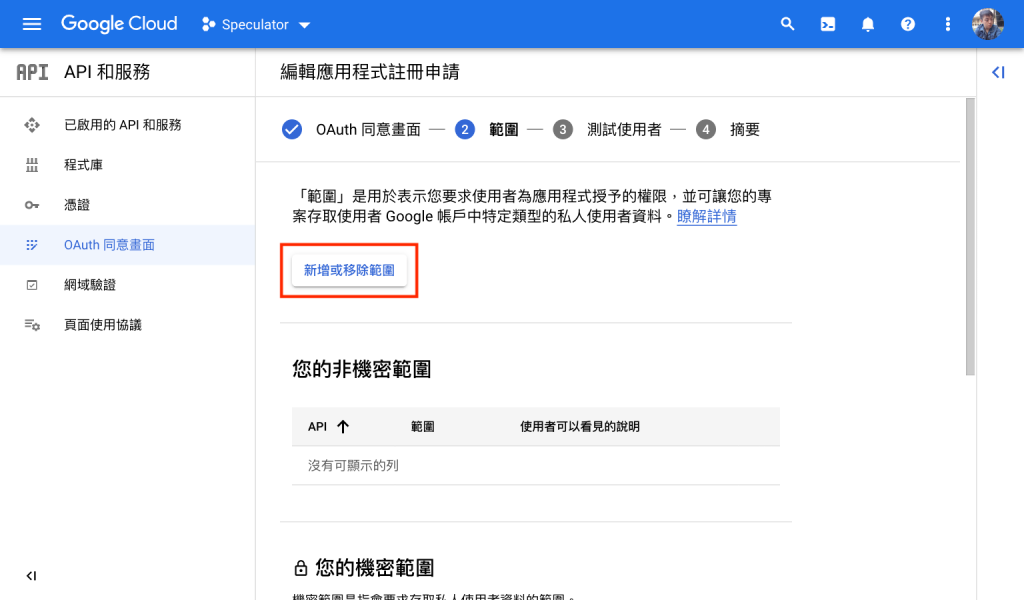
下一步是選擇範圍 (Scope)。請點選「新增或移除範圍」。
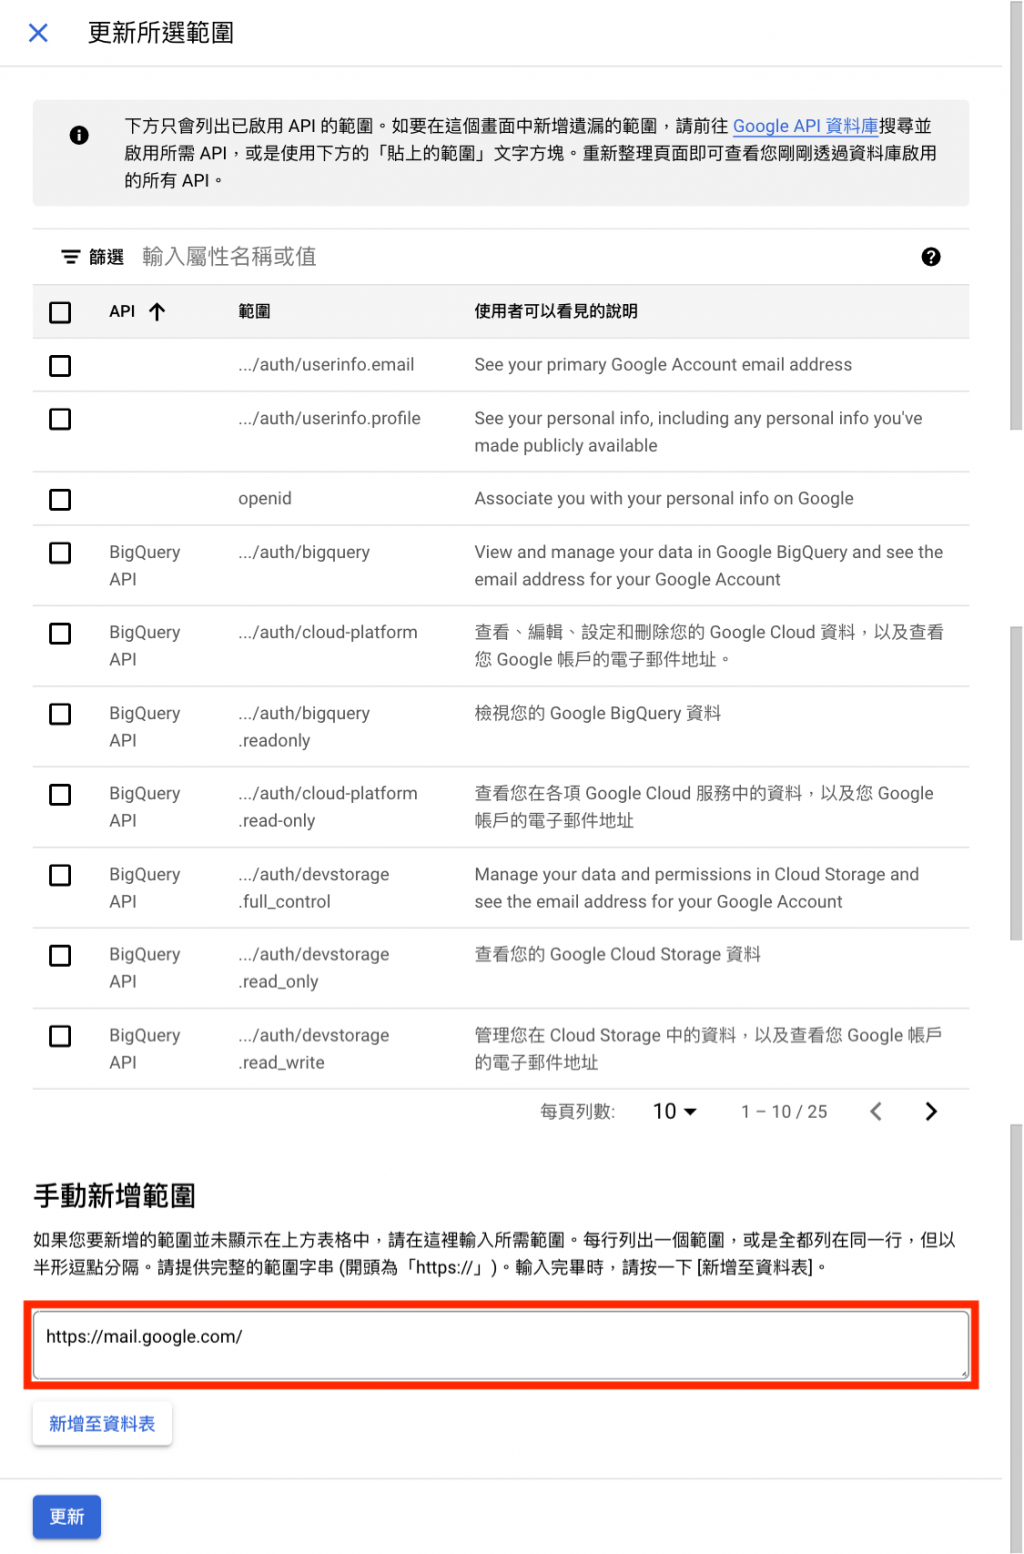
我們選擇「手動新增範圍」,填上 https://mail.google.com/。然後按下「新增資料表」並「更新」。
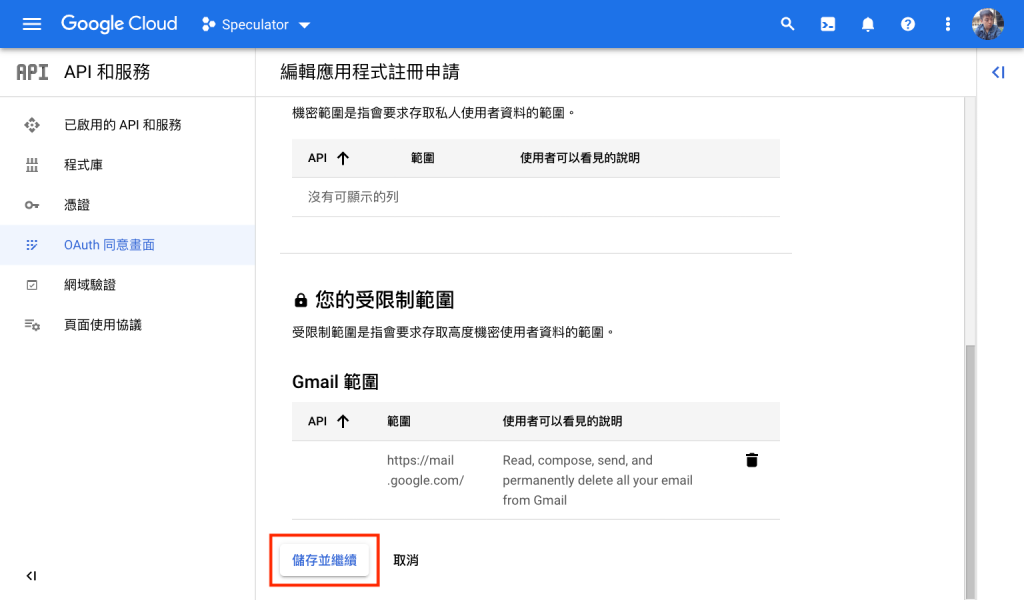
完成更新後,我們可以看到在「您的受限範圍」清單上,已經加入「Gmail 範圍」了。然後按下「儲存並繼續」。
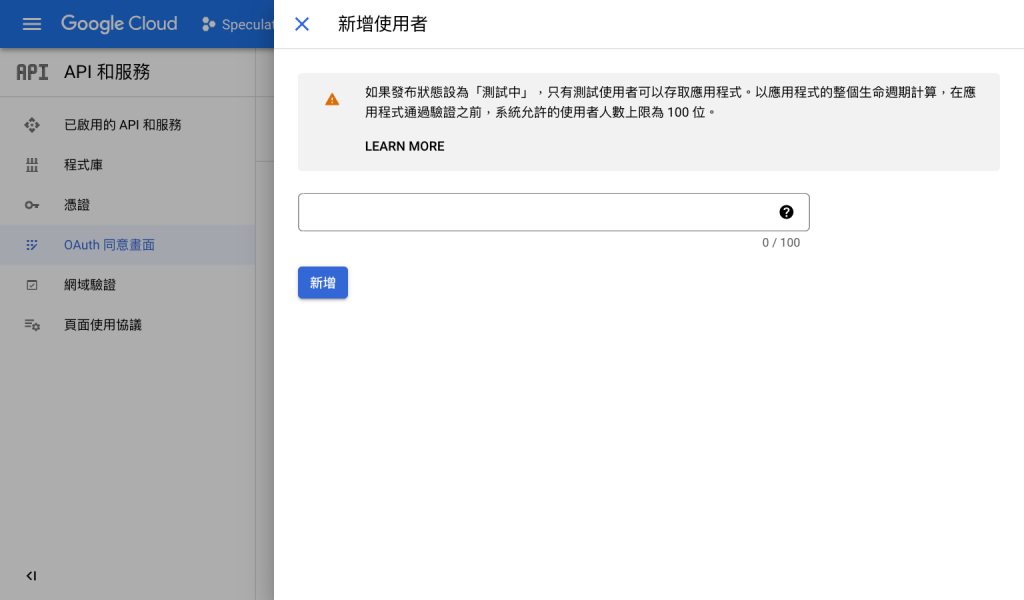
接著我們要新增測試使用者,請點選「ADD USERS」。
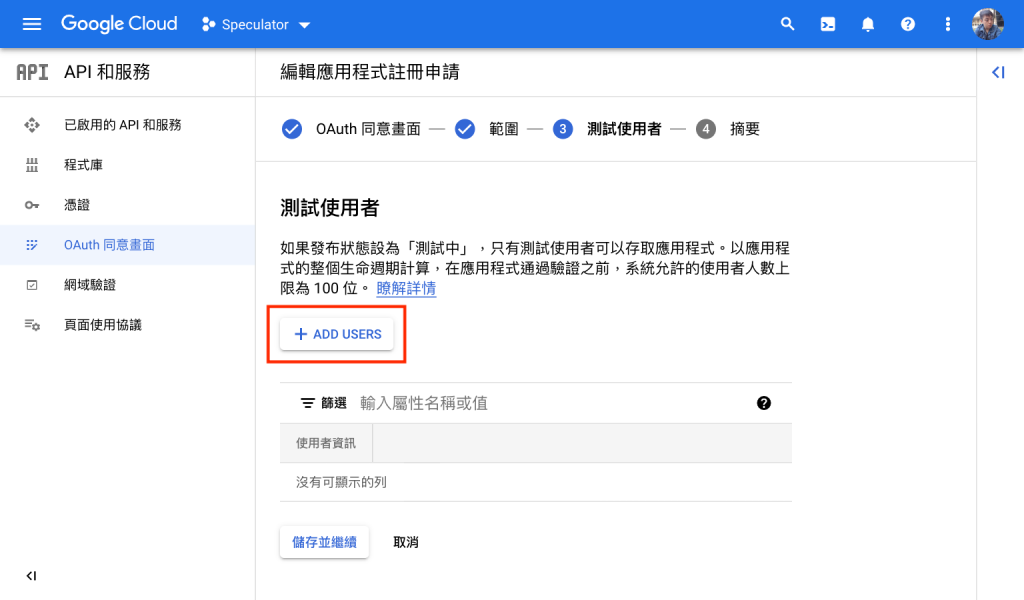
然後是新增使用者,這裡填寫要接收 email 的使用者的 email address。
新增測試使用者後,按下「儲存並繼續」後,可以查看設定後的「摘要」。
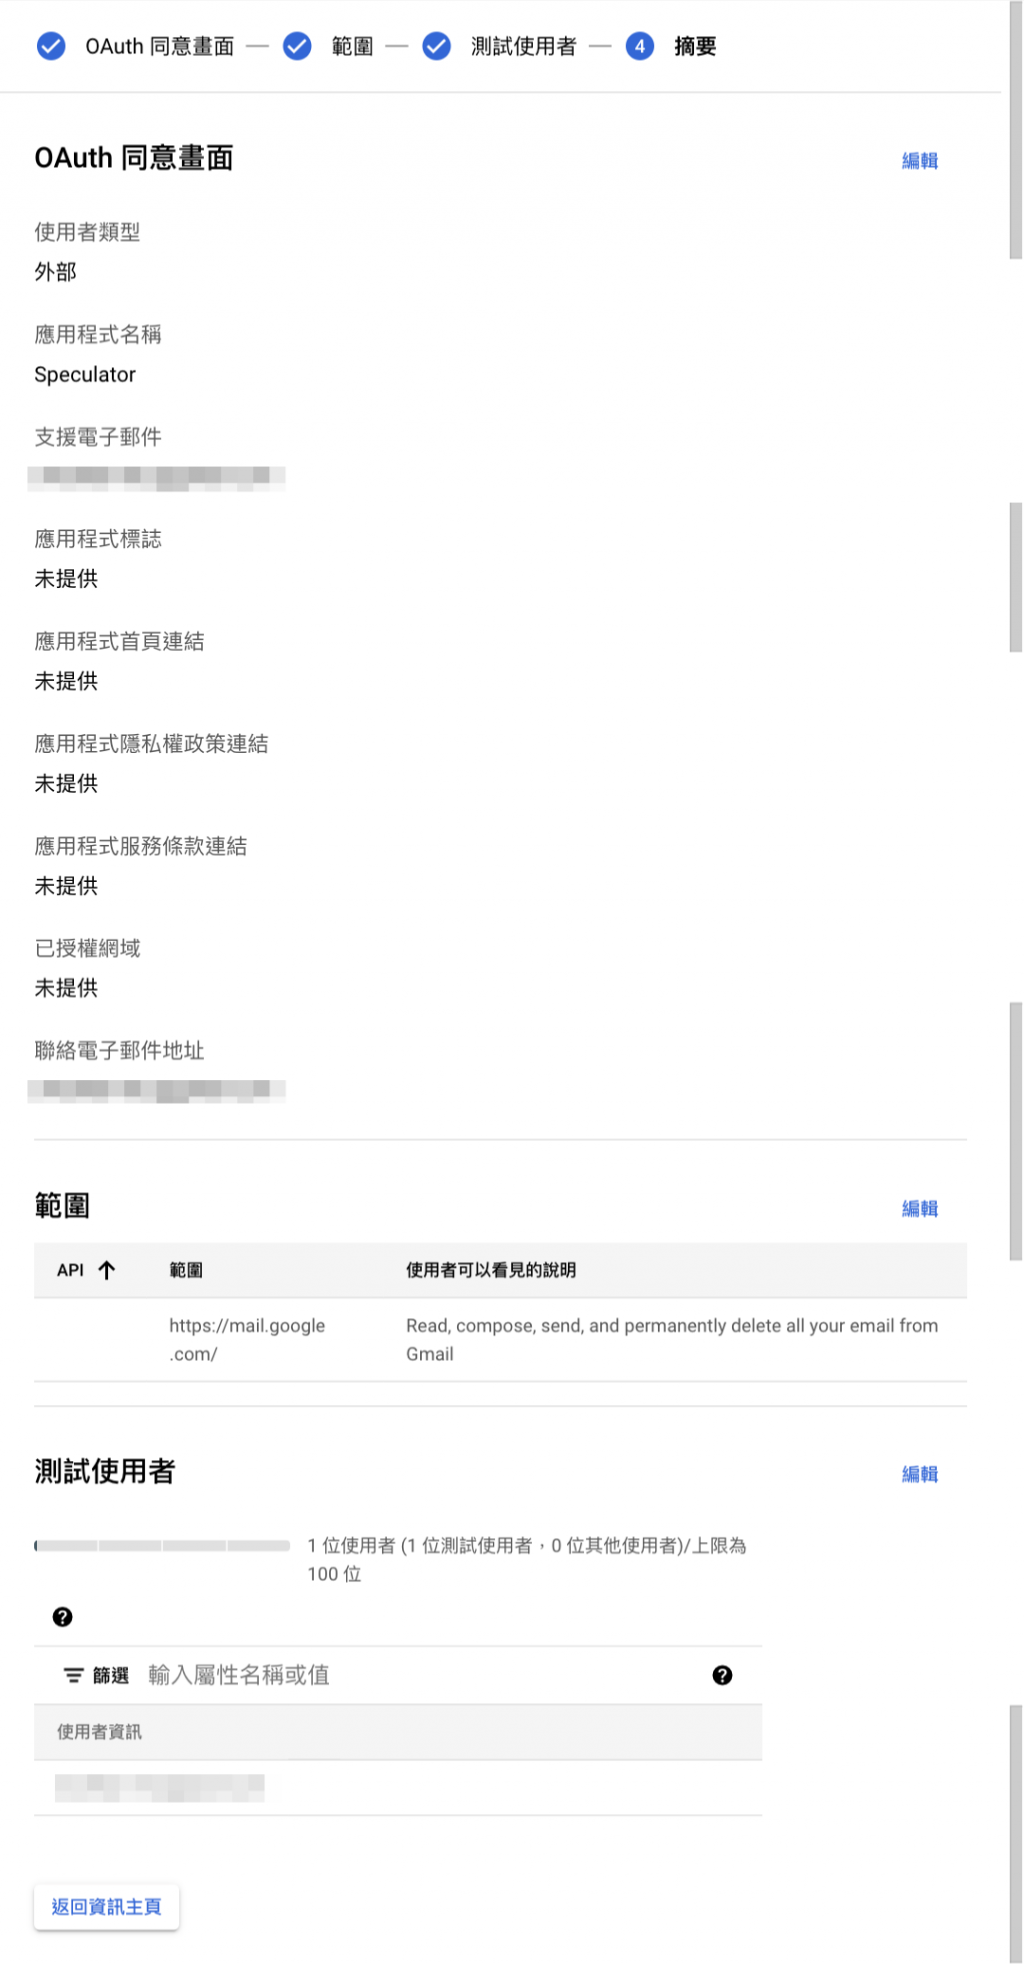
確認無誤後就可以進行一個步驟。
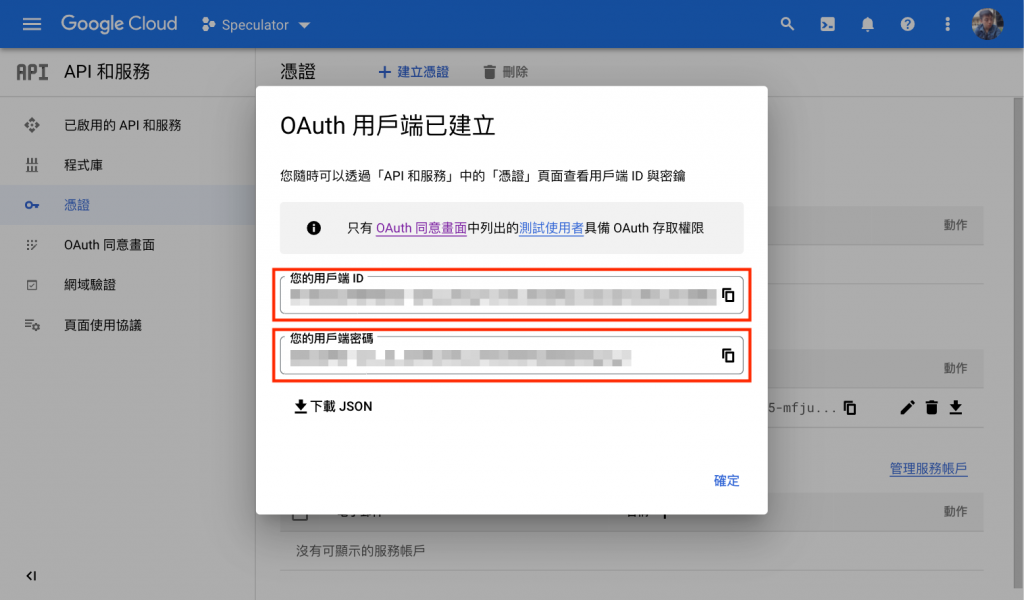
在「API和服務」的選單點選「憑證」。然後在「建立憑證」下選擇「OAuth 用戶端 ID」。

應用程式類型選擇「網頁應用程式」,然後填寫名稱,並且在下方「已授權的重新導向 URI」填入 https://developers.google.com/oauthplayground。
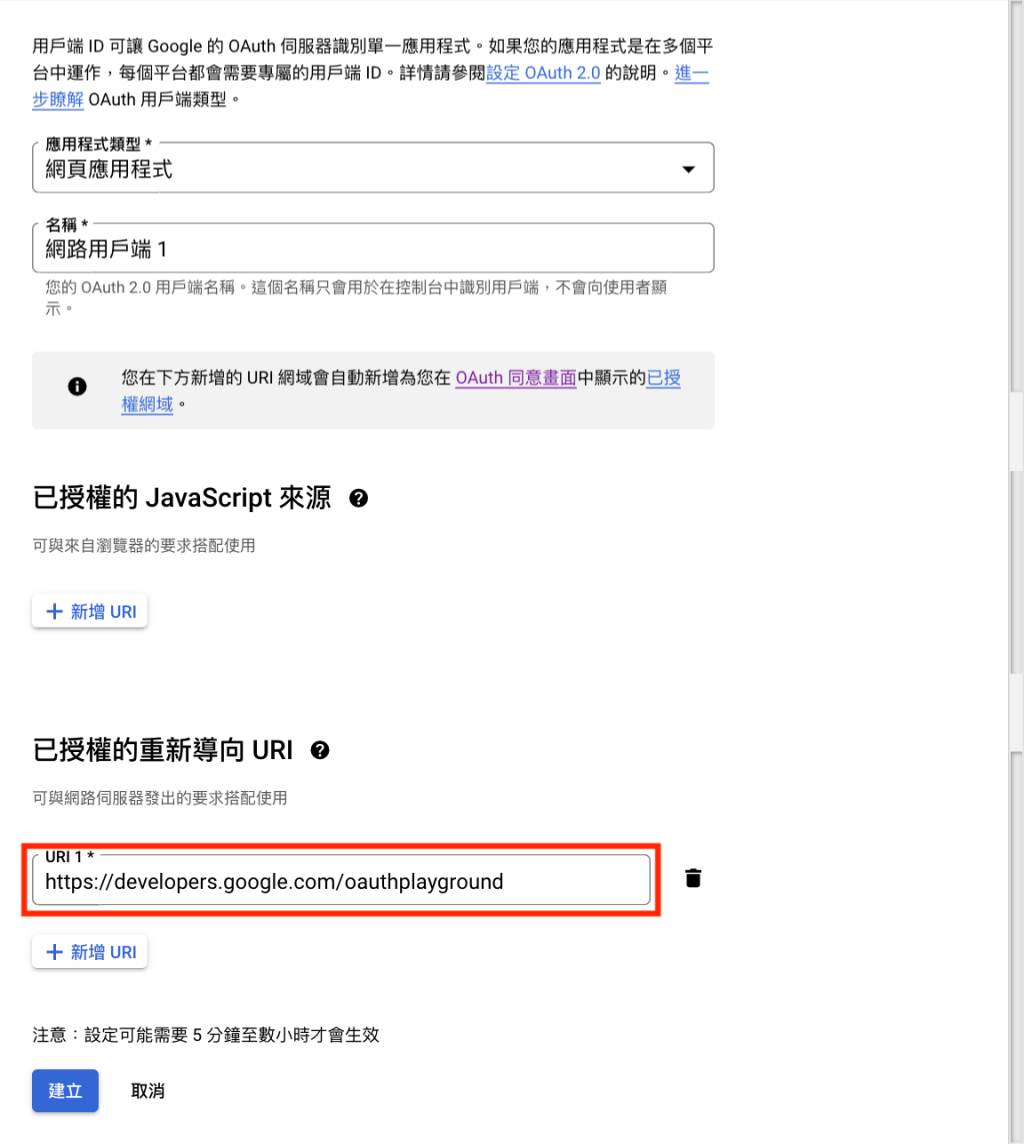
按下「建立」完成後,我們就可以取得 Google OAuth 應用程式的用戶端 ID「Client ID」和用戶端密碼「Client Secret」。
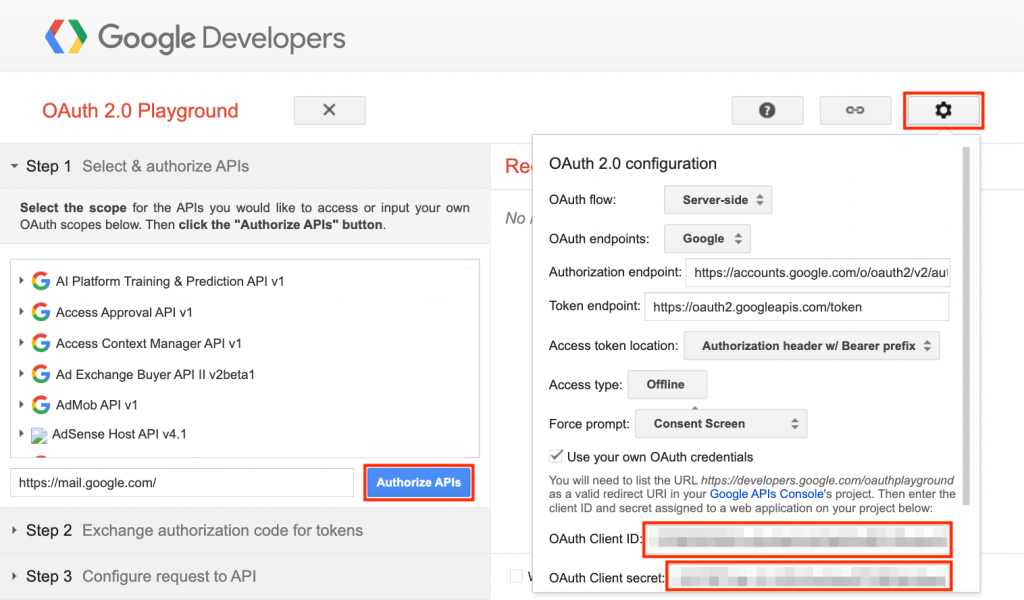
請到 Google Developers OAuth 2.0 Playground 頁面。
按右上方按鈕設定「OAuth 2.0 configuration」。然後勾選「Use your own OAuth credentials」,填入「OAuth Client ID」和「OAuth Client secret」。
請在 scope 加入 https://mail.google.com/ 然後按下 「Authorize APIs」按鈕。
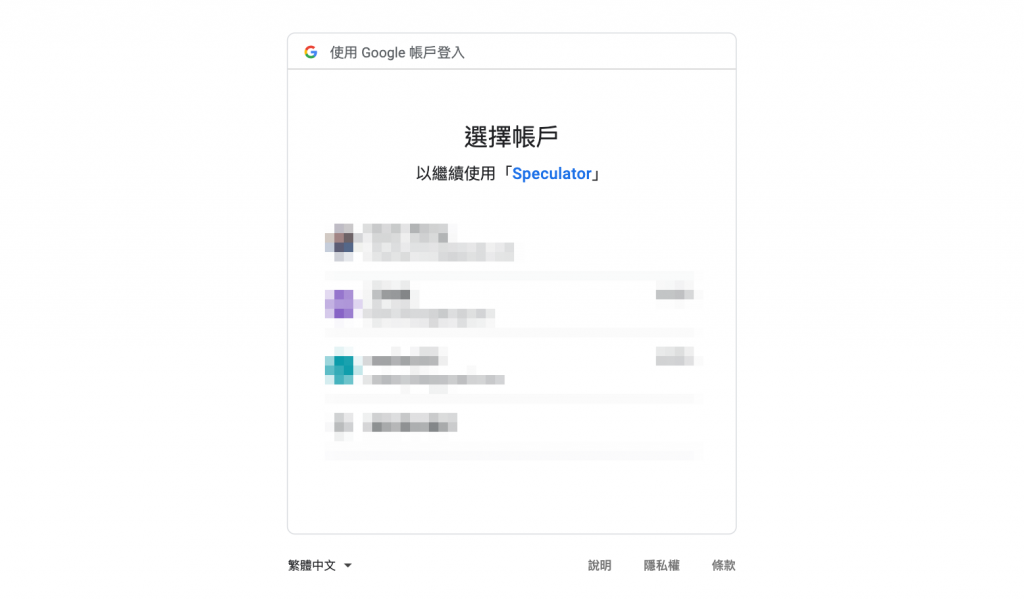
請選擇剛剛已經加入「測試使用者」的帳戶。
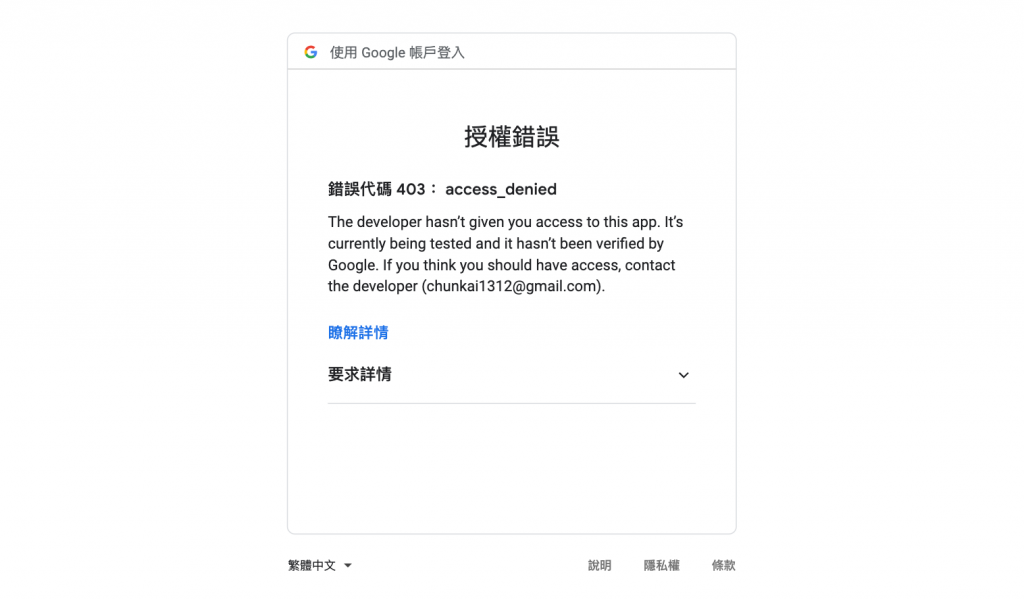
如果該帳戶不在「測試使用者」清單,會出現授權錯誤。
選擇正確的帳戶後,接下來會出現「這個程式未經 Google 驗證」。但這沒關係,因為我們尚未提交驗證,直接點選「繼續」。

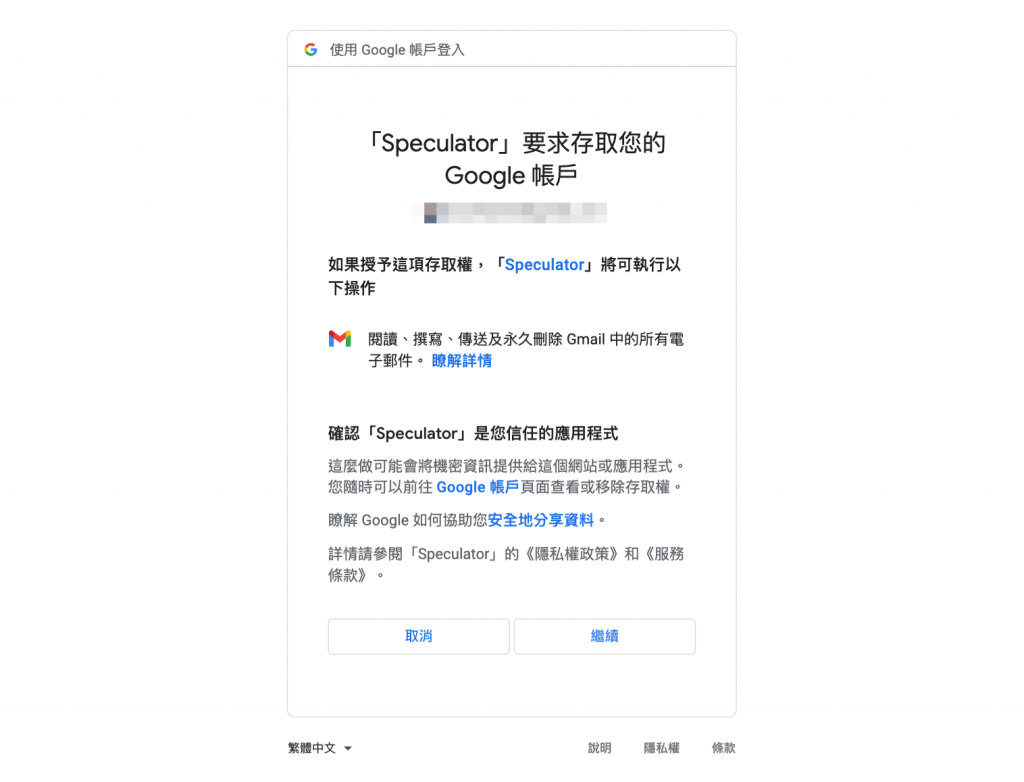
畫面會出現您的 OAuth 應用程式要求存取您的 Gmail 權限。確認後按下「繼續」。
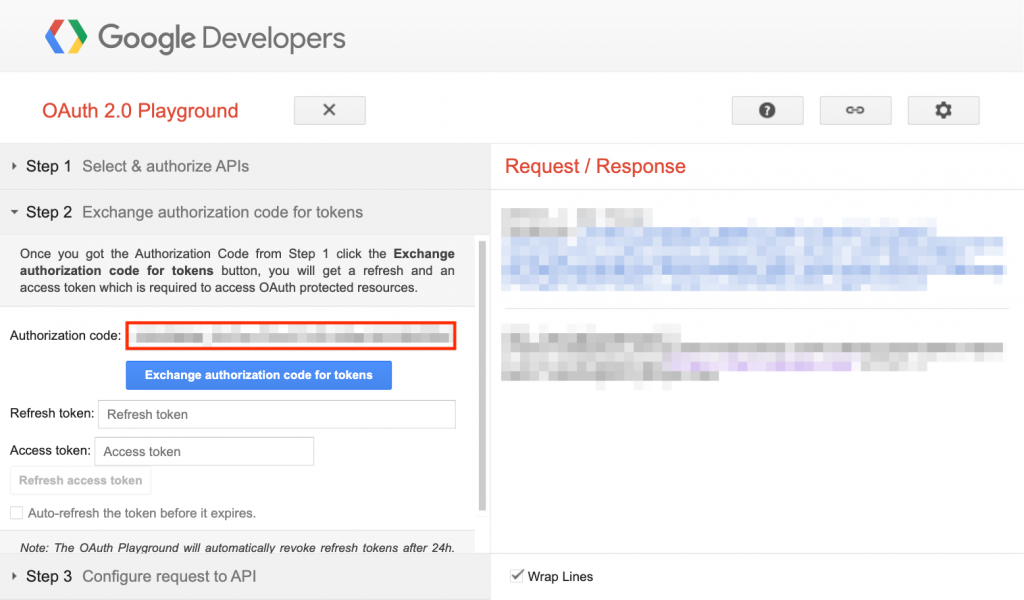
接著會重導向 OAuth 2.0 Playground,並取得「Authorization Code」。根據 OAuth 2.0 流程,我們可以用這組 Authorization Code 換取 Access Token 和 Refresh Token。請按「Exchange authorization code for tokens」。
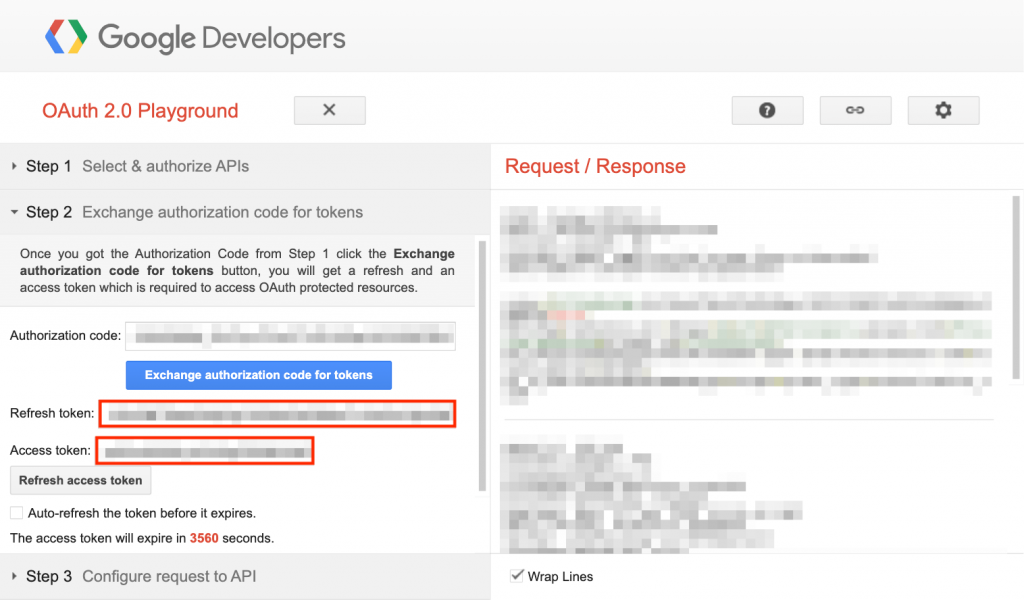
完成後,即取得「Access Token」以及「Refresh Token」。
我們使用 Nodemailer 套件來寄送電子郵件,請安裝以下依賴:
$ npm install --save @nestjs-modules/mailer nodemailer
$ npm install --save-dev @types/nodemailer
安裝完成後,我們先在專案目錄下開啟 .env 檔案,加入以下環境變數:
GOOGLE_USER=
GOOGLE_CLIENT_ID=
GOOGLE_CLIENT_SECRET=
GOOGLE_ACCESS_TOKEN=
GOOGLE_REFRESH_TOKEN=
MAILER_FROM=
MAILER_TO=
這些環境變數代表的意義如下:
GOOGLE_USER:您的 Google 帳號。GOOGLE_CLIENT_ID:在「Google Cloud Platform」建立的 OAuth Client ID。GOOGLE_CLIENT_SECRET:在「Google Cloud Platform」建立的 OAuth Client Secret。GOOGLE_ACCESS_TOKEN:在「OAuth 2.0 Playground」取得的 Access Token。GOOGLE_REFRESH_TOKEN:在「OAuth 2.0 Playground」取得的 Refresh Token。MAILER_FROM:寄件者的電子郵件,填寫您的 Gmail。MAILER_TO:要寄送電的子郵件位址。設定好環境變數後,開啟 src/app.module.ts 檔案,在根模組 AppModule 加入 MailerModule 設定:
import { DateTime } from 'luxon';
import { Module, OnApplicationBootstrap, Logger } from '@nestjs/common';
import { ConfigModule } from '@nestjs/config';
import { ScheduleModule } from '@nestjs/schedule';
import { MongooseModule } from '@nestjs/mongoose';
import { MailerModule } from '@nestjs-modules/mailer';
import { AppController } from './app.controller';
import { AppService } from './app.service';
import { ScraperModule } from './scraper/scraper.module';
import { MarketStatsModule } from './market-stats/market-stats.module';
import { TickerModule } from './ticker/ticker.module';
import { MarketStatsService } from './market-stats/market-stats.service';
import { TickerService } from './ticker/ticker.service';
import { ReportModule } from './report/report.module';

@Module({
  imports: [
    ConfigModule.forRoot(),
    ScheduleModule.forRoot(),
    MongooseModule.forRoot(process.env.MONGODB_URI),
    MailerModule.forRoot({
      transport: {
        host: 'smtp.gmail.com',
        port: 465,
        secure: true,
        auth: {
          type: 'oauth2',
          user: process.env.GOOGLE_USER,
          clientId: process.env.GOOGLE_CLIENT_ID,
          clientSecret: process.env.GOOGLE_CLIENT_SECRET,
          accessToken: process.env.GOOGLE_ACCESS_TOKEN,
          refreshToken: process.env.GOOGLE_REFRESH_TOKEN,
        },
      },
      defaults: {
        from: process.env.MAILER_FROM,
        to: process.env.MAILER_TO,
      },
    }),
    ScraperModule,
    MarketStatsModule,
    TickerModule,
    ReportModule,
  ],
  controllers: [AppController],
  providers: [AppService],
})
export class AppModule implements OnApplicationBootstrap {}
開啟 src/report/report.service.ts 檔案,在 ReportService 實作 sendReport() 方法,並設定排程任務寄出電子郵件:
import * as ExcelJS from 'exceljs';
import * as numeral from 'numeral';
import { DateTime } from 'luxon';
import { Injectable, Logger } from '@nestjs/common';
import { Cron } from '@nestjs/schedule';
import { MailerService } from '@nestjs-modules/mailer';
import { Market, getMarketName, getSectorName } from '@speculator/common';
import { MarketStatsRepository } from '../market-stats/market-stats.repository';
import { TickerRepository } from '../ticker/ticker.repository';
import { getFontColorByNetChange } from './utils';

@Injectable()
export class ReportService {
  constructor(
    private readonly mailerService: MailerService,
    private readonly marketStatsRepository: MarketStatsRepository,
    private readonly tickerRepository: TickerRepository,
  ) {}

  @Cron('0 0 22 * * *')
  async sendReport(options?: { date: string }) {
    const dt = options?.date ? DateTime.fromISO(options.date) : DateTime.local();
    const content = await this.export({ date: dt.toISODate() });
    const date = dt.toFormat('yyyyMMdd');
    const subject = `${date} 盤後報告`;
    const filename = `${date}_盤後報告.xlsx`;
    const attachments = [{ filename, content }];

    await this.mailerService.sendMail({ subject, attachments })
      .then(() => Logger.log(`"${subject}" 已寄出`, ReportService.name))
      .catch((err) => Logger.error(err.message, err.stack, ReportService.name));
  }

  ...
}
在 sendReport() 方法,我們使用 @Cron() 裝飾器聲明排程任務,設定 0 0 22 * * * 表示在每日 22 點 0 時 0 分執行 sendReport() 方法的程式碼。
完成 ReportService 的 sendReport() 方法後,啟動 scraper 應用程式就會在設定的排程時間匯出盤後報告,並將報告以附加檔案的形式寄出電子郵件到指定信箱。
在「我的市場觀察:建立自己的盤後報告」的「上」、「中」、「下」篇,我們示範了如何使用排程任務在指定時間取得大盤籌碼以及指數、個股行情數據,然後自動化產生盤後報告,再將報告在指定時間以電子郵件方式寄出。
透過每日的數據收集,我們也完成了自己的股市資料庫。您可以運用取得的數據,自行設定觀察指標與選股條件,將篩選出的標的加入盤後報告中,並可根據自身需求,客製化屬於自己的市場觀察報告。
本系列文已正式出版為《Node.js 量化投資全攻略:從資料收集到自動化交易系統建構實戰》。本書新增了全新內容和實用範例,為你提供更深入的學習體驗!歡迎參考選購,開始你的量化投資之旅!
天瓏網路書店連結:https://www.tenlong.com.tw/products/9786263336070


 iThome鐵人賽