利用 JSON Server 快速模擬 Restful API,支援開發中最常用的 GET、POST、PUT、PATCH、DELETE、OPTIONS 等方法,
接下來我們就用 POST 模擬新增資料,PUT 模擬修改資料,DELETE 模擬刪除資料,把租戶管理頁面的完整功能做完吧。
src\app\core\services\http.service.tsasync httpPOST(...args: any[]): Promise<object> {
const apiUrl = args[0] || '';
const body = args[1] || {};
try {
const result$ = this.httpClient.post(apiUrl, body).pipe(
tap((resp: IHttpResponse) => {
return resp;
})
);
return await lastValueFrom(result$);
} catch (err) {
return Promise.reject(err);
}
}
src\app\tenant\tenant.component.html為方便使用者新增租戶資料,添加對話框如下,
<!-- Dialog Template -->
<ng-template #dialog let-data let-ref="dialogRef">
    <nb-card class="tenant-dialog">
        <nb-card-header>新增租戶</nb-card-header>
        <nb-card-body>
            <div>
                <label>First Name   </label>
                <input type="text" nbInput [(ngModel)]="addTenant.fname" />
            </div>
            <div>
                <label>Last Name   </label>
                <input type="text" nbInput [(ngModel)]="addTenant.lname" />
            </div>
            <div>
                <label>Phone Number   </label>
                <input type="number" nbInput [(ngModel)]="addTenant.phone" />
            </div>
            <div>
                <label>Address   </label>
                <input type="text" nbInput [(ngModel)]="addTenant.address" />
            </div>
        </nb-card-body>
        <nb-card-footer>
            <button nbButton status="primary" (click)="ref.close('ok')">確定</button>

            <button nbButton (click)="ref.close()">取消</button>
        </nb-card-footer>
    </nb-card>
</ng-template>
src\app\tenant\tenant.component.scss.tenant-dialog {
nb-card-body {
div {
display: flex;
justify-content: space-between;
margin: 1rem 0;
}
}
}
src\app\tenant\tenant.component.tsimport { NbDialogService } from '@nebular/theme';
export class TenantComponent implements OnInit {
constructor(private httpService: HttpService, private nbDialogService: NbDialogService) {}
addTenant = {
fname: '',
lname: '',
phone: '',
address: '',
};
async addItem(dialog: TemplateRef<any>) {
this.nbDialogService
.open(dialog, {
context: {
content: `<div>Hello</div>`,
},
})
.onClose.subscribe(async (dialogResp) => {
if (dialogResp === 'ok') {
const result: any = {
first_name: this.addTenant.fname,
last_name: this.addTenant.lname,
phone: this.addTenant.phone,
address: this.addTenant.address,
};
// 調用新增租戶 API
await this.httpService.httpPOST(this.host + '/myapp-tenant-list', result);
this.queryTenantList.push(result);
// 清空對話框資料
this.addTenant.fname = '';
this.addTenant.lname = '';
this.addTenant.phone = '';
this.addTenant.address = '';
}
});
}
}
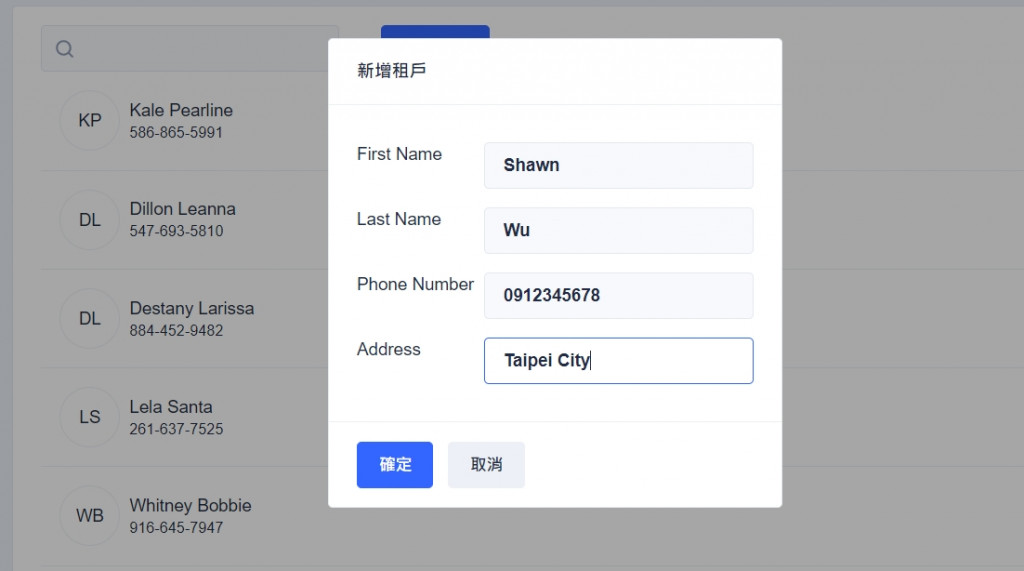
畫面刷新可見新增租戶結果

src\app\core\services\http.service.tsasync httpPUT(...args: any[]): Promise<object> {
const apiUrl = args[0] || '';
const body = args[1] || {};
try {
const result$ = this.httpClient.put(apiUrl, body).pipe(
tap((resp: IHttpResponse) => {
return resp;
})
);
return await lastValueFrom(result$);
} catch (err) {
return Promise.reject(err);
}
}
src\app\tenant\tenant.component.html使用跟新增租戶時同樣的對話框,把被選擇的資料寫入 在
ngFor後面需要加入let i = index
<nb-list-item *ngFor="let tenant of queryTenantList; let i = index" (click)="editItem(dialog, i)">
    <nb-user size="large" [title]="tenant['phone']" name="{{ tenant['first_name'] }} {{ tenant['last_name'] }}">
    </nb-user>
</nb-list-item>
editItem 方法 src\app\tenant\tenant.component.tseditItem(dialog: TemplateRef<any>, idx: number) {
const url = this.host + '/myapp-tenant-list/' + (idx + 1);
const targetObj = this.queryTenantList[idx];
// 被選擇項目資料寫入對話框
this.addTenant.fname = targetObj.first_name;
this.addTenant.lname = targetObj.last_name;
this.addTenant.phone = targetObj.phone;
this.addTenant.address = targetObj.address;
this.nbDialogService.open(dialog).onClose.subscribe(async (dialogResp) => {
if (dialogResp === 'ok') {
const result: any = {
id: idx,
first_name: this.addTenant.fname,
last_name: this.addTenant.lname,
phone: this.addTenant.phone,
address: this.addTenant.address,
};
// 調用修改租戶 API
await this.httpService.httpPUT(url, result);
this.queryTenantList[idx] = result;
}
});
}

src\app\core\services\http.service.tsasync httpDelete(...args: any[]): Promise<object> {
const apiUrl = args[0] || '';
try {
const result$ = this.httpClient.delete(apiUrl);
return await lastValueFrom(result$);
} catch (err) {
return Promise.reject(err);
}
}
src\app\tenant\tenant.component.html直接把刪除按鈕放在剛才的對話框,樣式需要做一些調整。
<nb-card-footer>
    <div>
        <button nbButton status="primary" (click)="ref.close('ok')">確定</button>

        <button nbButton (click)="ref.close()">取消</button>
    </div>
    <div>
        <button nbButton status="danger" *ngIf="data.type === 'edit'" (click)="ref.close('delete')">
            刪除
        </button>
    </div>
</nb-card-footer>
src\app\tenant\tenant.component.scss.tenant-dialog {
nb-card-body {
div {
display: flex;
justify-content: space-between;
margin: 1rem 0;
}
}
nb-card-footer {
display: flex;
justify-content: space-between;
}
}
editItem 添加調用刪除租戶 src\app\tenant\tenant.component.tsthis.nbDialogService
.open(dialog, {
context: {
type: 'edit',
title: '編輯租戶',
},
})
.onClose.subscribe(async (dialogResp) => {
if (dialogResp === 'ok') {
const result: any = {
id: idx,
first_name: this.addTenant.fname,
last_name: this.addTenant.lname,
phone: this.addTenant.phone,
address: this.addTenant.address,
};
// 調用修改租戶 API
await this.httpService.httpPUT(url, result);
this.queryTenantList[idx] = result;
} else if (dialogResp === 'delete') {
// 調用刪除租戶 API
await this.httpService.httpDelete(url);
this.queryTenantList.splice(idx, 1);
}
});

在本篇我們練習了如何利用 JSON Server 模擬 POST 新增資料,PUT 修改資料,DELETE 刪除資料,並使用了 NbDialogService 的對話框服務進行租戶管理,完整的練習了租戶管理頁面的 CRUD 功能。
在填寫租戶資訊的時候都沒有做一些基本的檢查,接下來我們會介紹一下
Angular 的表單驗證,讓資料更符合存入資料庫的需求。
Create A REST API With JSON Server