本次使用的範例是50間新創公司的成本, 地點與盈利
這是一個相當實際的例子, 有機會能讓投資者or引導者下對的決策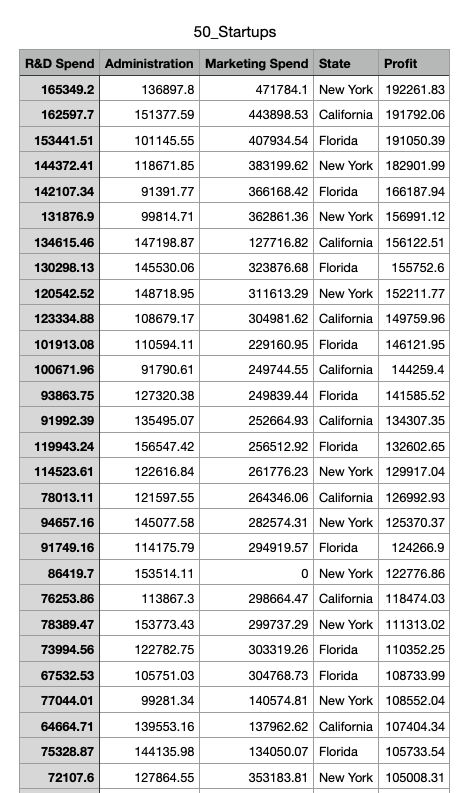
R&D Spend: 研發花費
Administration: 行政費用
Marketing Spend:行銷費用
State:辦公室地點
Profit:盈利
首先我們需要對資料做前處理
import numpy as np
import matplotlib.pyplot as plt
import pandas as pd
from sklearn.model_selection import train_test_split
from sklearn.preprocessing import LabelEncoder
from sklearn.preprocessing import OneHotEncoder
from sklearn.compose import ColumnTransformer

dataset = pd.read_csv('50_Startups.csv')
x = dataset.iloc[:, :-1].values
y = dataset.iloc[:, 4].values
小記:
Spyder(Anaconda內建的編輯器) 上執行完py檔, 可以用Variable explorer 查看變數內容
不過要注意某些資料型態是看不到的內容的
以此為例(課程截圖), x 是object, 因此不能看, 但y 是float 可以看(點擊即可看內容)
不能看的內容可以直接在 console 上敲
再來我們仔細檢視資料內容發現X中的state 有字串
因此我們需要用LabelEncoder 跟 OneHotEncoder 對state做分類
# transfer label to digit
lblenc_x = LabelEncoder()
# init the label encoder and transfer it
# get all the rows with the colmun 3, which is the "state" feild
x[:,3] = lblenc_x.fit_transform(x[:,3])
ct = ColumnTransformer([("Country", OneHotEncoder(), [3])], remainder = 'passthrough')
x = ct.fit_transform(x)
執行後用variable explorer看x內容如下:
此時我們發現x 前三列變成數字0, 1 這就是經過onehotencoder 分類完的state 數據
且前三列相加永遠都為1, 這其實就是前面提到的虛擬變量陷阱
也就是三變數之間存在一種線性關係, 因此我們可以藉由刪除其中一個變數來避開這個陷阱
額外一提, 我們現在要用的class 預設會幫我們處理虛擬變量陷阱
但這邊我們還是自己多做一部移除第0列的步驟
# avoid the Dummy Variable Trap by removing the column 0 in x
x = x[:, 1:]
執行後用variable explorer看x內容如下:
再來~我們現在要用的class 預設一樣會幫我們做特徵縮放, 因此先跳過特徵縮放步驟
接著我們要來資料拆成training set & testing set
# generate training set and testing set
x_train, x_test, y_train, y_test = train_test_split(x,y,test_size=0.2, random_state=0)
接著跟simple linear regression 一樣
首先創建linear regression object 接著我們要利用xtrain, ytrain 來擬合模型
from sklearn.linear_model import LinearRegression
regressor = LinearRegression()
regressor.fit(x_train, y_train)
剩下的回歸部分留到明天再看~


 iThome鐵人賽