能有一面照片牆是非常美好的事情,但若要和不認識的人共用就會覺得很尷尬!因此讓每個租戶擁有自己獨立的照片牆是我們這次的要實現的目標。
本章節我們將要來實作圖片上傳功能,並且在多租戶架構下將每個租戶上傳的圖片進行區隔,讓我們開始吧!
首先我們要在主設定擋 settings.py 進行設定,
調整 context_processors
# main/settings.py

TEMPLATES = [
    {
        'BACKEND': 'django.template.backends.django.DjangoTemplates',
        'DIRS': [],
        'APP_DIRS': True,
        'OPTIONS': {
            'context_processors': [
                # ...
                "django.template.context_processors.media",
                # ...
            ],
        },
    },
]
設定上傳目錄路徑
# main/settings.py

# ...

MEDIA_ROOT = os.path.join(BASE_DIR, 'media')

MEDIA_URL = '/media/'
在 urls.py 新增 media URL
# main/urls.py

from django.conf.urls.static import static

urlpatterns = [
    # ...
] + static(settings.STATIC_URL, document_root=settings.STATIC_ROOT)

# 新增 media
urlpatterns += static(settings.MEDIA_URL, document_root=settings.MEDIA_ROOT)
隨著進行開發,可能會編寫一些能重複使用的程式,例如在 A 與 B 兩個應用程式同時使用到,如果沒有明確定義好共用程式擺放的位置會很難在需要時找到它,或是將這些程式散落在專案根目錄也會顯得非常雜亂,因此我們將建立一個專門放置共用程式的應用程式 —— core
使用 startapp 指令新增 core 應用程式
docker exec --workdir /opt/app/web example_tenant_web \
python3.10 manage.py startapp core
新增 helpers.py 放置輔助函數
docker exec --workdir /opt/app/web/core example_tenant_web \
touch helpers.py
為了讓每個租戶有獨自的照片牆,我們要在上傳圖片時做一些小變化。
在 media 目錄下我們會再有兩個目錄層級,media/租戶目錄名稱_media/模型目錄名稱
例如 example01 的租戶在 ProductCategory 模型上傳了一張 image.png 圖片,則我們的圖片路徑就會是:
/media/example01/productcategory_media/image.png
而最後避免重複檔名會被覆蓋,要再替檔名加上當前時間
/media/example01/productcategory_media/image11664204841.png
我們編寫一個 upload_handle 函數,透過 connection.schema_name 取得當前的 schema 來判斷租戶,根據傳入的 intance 判斷 model 的名稱。
當該層級沒有對應的目錄名稱時就會進行建立,若以建立則會對檔名進行時間加工,最後組合出 url 並返回。
完整程式碼如下:
# core/helpers.py

import os, time

from django.conf import settings
from django.db import connection

def upload_handle(instance, filename):
    schema_dir = settings.MEDIA_ROOT + '/' + connection.schema_name
    if not os.path.exists(schema_dir):
        os.mkdir(schema_dir)
    dir = schema_dir + '/' + instance.__class__.__name__.lower() + '_media'
    if not os.path.exists(dir):
        os.mkdir(dir)
    name = filename.find('.') and '%s' % os.path.basename(filename).split('.', 1)[0] or ''
    ext = filename.find('.') and '.%s' % os.path.basename(filename).split('.', 1)[1] or ''
    return '/'.join([connection.schema_name, instance.__class__.__name__.lower() + '_media', name + str(int(time.time())) + ext])
商品的圖片可能會有不只一張,所以我們需要為商品圖片建立一個模型進行關聯
# products/models.py

class ProductImage(models.Model):
    name = models.CharField('商品圖片說明', max_length=50)
    product = models.ForeignKey('products.Product', on_delete=models.CASCADE, related_name='product_image_set')
    image = models.ImageField("圖片", null=True, blank=True, upload_to=core_helpers.upload_handle)
    order = models.PositiveIntegerField(null=True, blank=True)

    class Meta:
        verbose_name = '商品圖片'
        verbose_name_plural = '商品圖片'
        ordering = ['order']

    def __str__(self):
        return f'{self.name}'
商品類型的圖片只需要一張,我們在 ProductCategory 模型新增一個 ImageField 欄位,upload_to 指定我們寫好的 upload_handle 輔助函數
# products/models.py

class ProductCategory(models.Model):
    # ...
    image = models.ImageField("圖片", null=True, blank=True, upload_to=core_helpers.upload_handle)

    class Meta:
        # ...
對模型進行資料庫遷移
docker exec --workdir /opt/app/web example_tenant_web \
python3.10 manage.py makemigrations

...

ERRORS:
products.ProductCategory.image: (fields.E210) Cannot use ImageField because Pillow is not installed.
        HINT: Get Pillow at https://pypi.org/project/Pillow/ or run command "python -m pip install Pillow".
竟然出現了 ERROR!這是為何呢?因為 ImageField 需要安裝 pillow 這個套件,而我們的 requirements.txt 並沒有設定,因此我們需要新增 pillow 套件與重新打包 Docker
# requirements.txt

django-tenants==3.4.3
django==3.2.5
django-tenants-q==1.0.0
django-elasticsearch-dsl==7.1.1
django_q==1.3.9
django_redis==5.2.0
psycopg2==2.9.3
uwsgi==2.0.20
pillow == 9.2.0
建立 .dockerignore 檔案,避免重新 build 的時候將 data 一起打包,(會出現權限問題)。
cd ~/example_tenant
touch .dockerignore
寫入以下內容
data
使用 docker-compose 重新 build(要在放 docker-compose.yml 的目錄執行)
docker-compose up -d --build
再次生成資料庫遷移檔案
docker exec --workdir /opt/app/web example_tenant_web \
python3.10 manage.py makemigrations

...

Migrations for 'products':
  products/migrations/0002_auto_20220926_1409.py
    - Add field image to productcategory
    - Alter field category on product
    - Create model ProductImage
生成了!進行遷移
docker exec --workdir /opt/app/web example_tenant_web \
python3.10 manage.py migrate
...

=== Starting migration
Operations to perform:
  Apply all migrations: admin, auth, contenttypes, customers, products, sessions, sites
Running migrations:
  Applying products.0002_auto_20220926_1409...
 OK
=== Starting migration
Operations to perform:
  Apply all migrations: admin, auth, contenttypes, customers, products, sessions, sites
Running migrations:
  Applying products.0002_auto_20220926_1409...
 OK
=== Starting migration
Operations to perform:
  Apply all migrations: admin, auth, contenttypes, customers, products, sessions, sites
Running migrations:
  Applying products.0002_auto_20220926_1409...
 OK
這裡我們要使用 inlines 內嵌管理介面。
建立一個商品圖片的內嵌管理介面 ProductImageInline,再將商品圖片的介面加入到商品管理介面 ProductAdmin 中。
而商品分類管理介面 ProductCategoryAdmin 也要加入剛才新增 image 欄位。
# products/admin.py
from django.contrib import admin
from products.models import Product, ProductCategory, ProductImage # 新增 商品圖片模型

class ProductImageInline(admin.TabularInline): # 內嵌管理介面
    model = ProductImage
    fields = ('name', 'image', 'order')
    # ...

class ProductAdmin(admin.ModelAdmin):
    # ...
    inlines = [ProductImageInline, ] # 新增 inlines

class ProductCategoryAdmin(admin.ModelAdmin):
    # ...
    fields = ('name', 'description', 'created', 'modified', 'image') # 新增 image 欄位
    # ...
讓我們來看看新的商品管理介面吧!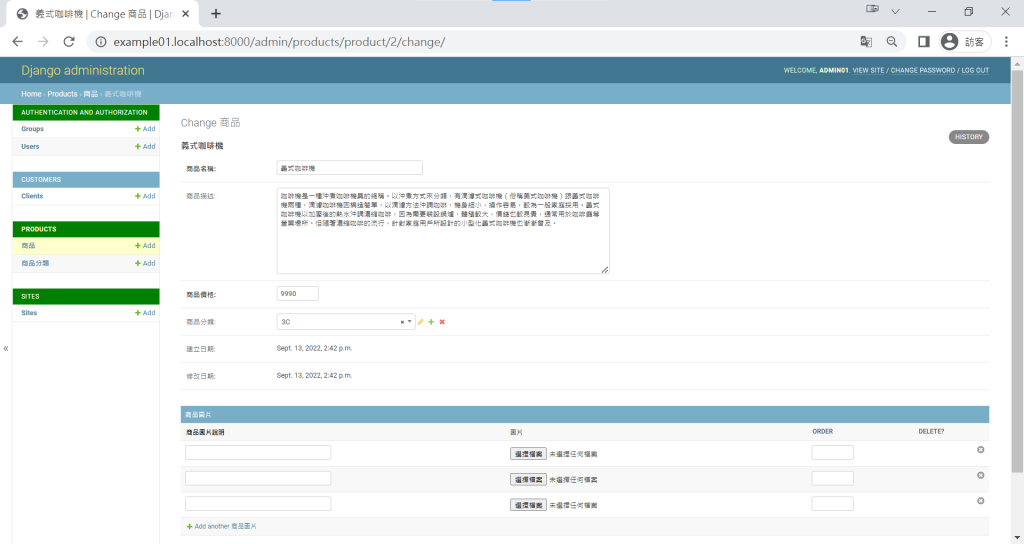
下方出現了內嵌的商品圖片欄位,後來有選擇檔案的按鈕,馬上來上傳3張圖片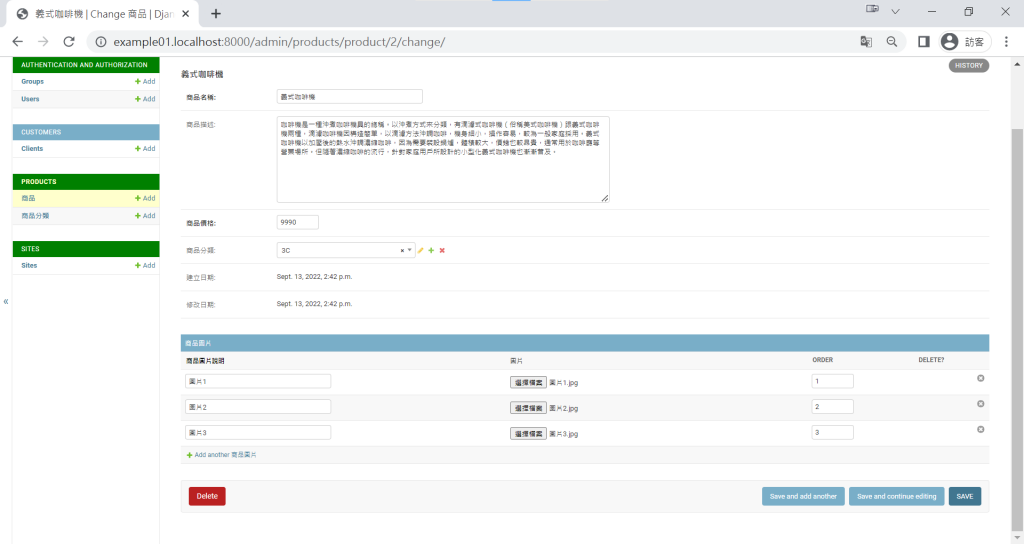
上傳成功!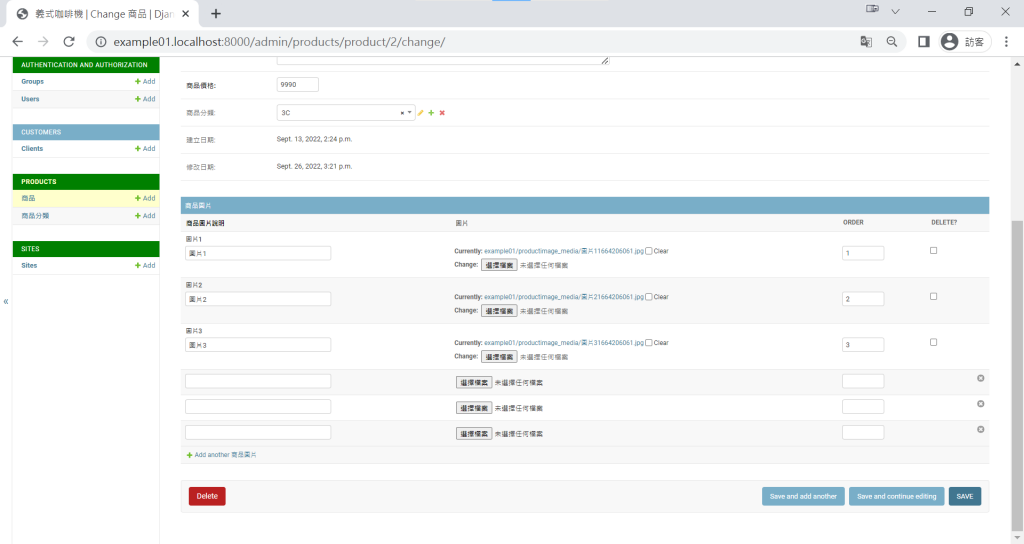
接著是商品分類介面
上傳成功!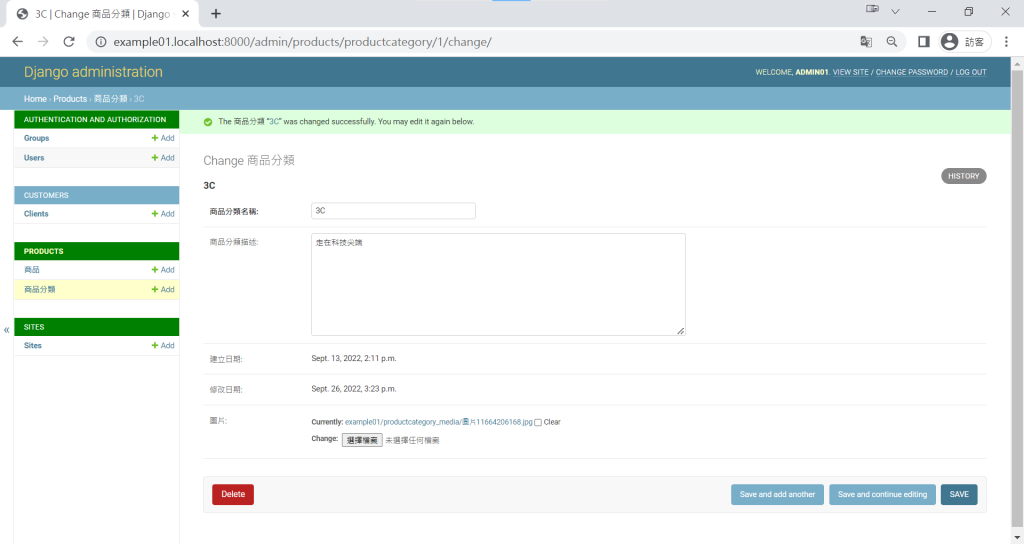
可以清楚的看到 media 目錄底下的租戶目錄與模型目錄兩個層級
.
├── core
│   ├── admin.py
│   ├── apps.py
│   ├── helpers.py
│   ├── __init__.py
│   ├── migrations
│   │   └── __init__.py
│   ├── models.py
│   ├── tests.py
│   └── views.py
├── customers
│   ├── admin.py
│   ├── apps.py
│   ├── __init__.py
│   ├── migrations
│   │   ├── 0001_initial.py
│   │   └── __init__.py
│   ├── models.py
│   ├── tests.py
│   └── views.py
├── main
│   ├── asgi.py
│   ├── __init__.py
│   ├── settings.py
│   ├── urls.py
│   └── wsgi.py
├── manage.py
├── media
│   ├── example01
│   │   ├── productcategory_media
│   │   │   └── 圖片11664206168.jpg
│   │   └── productimage_media
│   │       ├── 圖片11664206061.jpg
│   │       ├── 圖片21664206061.jpg
│   │       └── 圖片31664206061.jpg
│   └── example02
│       └── productcategory_media
│           └── image2-11664206335.jpg
└── products
    ├── admin.py
    ├── apps.py
    ├── __init__.py
    ├── migrations
    │   ├── 0001_initial.py
    │   ├── 0002_auto_20220926_1409.py
    │   └── __init__.py
    ├── models.py
    ├── templates
    │   ├── base.html
    │   └── products
    ├── tests.py
    ├── urls.py
    └── views.py
今天我們上傳完圖片,下一章節我們要來美化我們的首頁 『裝潢大廳,套用 Template 版面』。
在 urls.py 新增 media URL的步驟中,
需要from django.conf import settings
在新增圖片模型與欄位的步驟中,
因為需要handle core_helper
不先import會出現 core_helper not defined
在上傳檔案中的步驟中,
如果不先在 /opt/app/web create media folder,
會報Error
雖然是minor error,不過可以作為少少reminder for其他學生