今天我們將完整拼疊出一個手寫數字辨識系統,這邊會以
三個部分來說明,這一篇的完整程式碼可以看這 → DAY16-MNIST-MLP
模型建立訓練前一定有資料。在資料的部分,我們使用的是 MNIST 資料集,並會對其做一些資料格式的轉換,讓它符合模型輸入輸出需要的形式。
ps. MNIST 資料集的介紹可以看 DAY15 使用 Keras 拼出手寫數字辨識系統的前置作業2-MNIST 資料集
1.圖片(模型輸入)
首先我們會先將資料集的圖片從二維(28*28)轉成一維(784),因為這樣才能與神經網路的輸入層結構匹配。這邊我們借用 Numpy 的 reshape() 與 astype() 功能,將原本 0~255 的 uint8 整數像素資料型態轉成 float32 浮點數,因為在處理圖片做圖片或資料計算時通常都是用浮點數運算。
再來我們會做資料正規化,將所有的數值正規化到 0~1 之間,因為這樣模型的訓練成效會更好,而最簡單的正規化就是除以最大值。
# convert 28x28 image to 784 array, datatype unit8 -> float32
x_train = train_image.reshape(60000, 784).astype('float32') #np.float32
x_test = test_image.reshape(10000, 784).astype('float32')

# normalize the image numbers to 0~1
x_train /= 255   # x_train = x_train / 255
x_test /= 255
2.標籤(模型輸出)
標籤的部分可以不做前處理(不轉換成 one hot 形式),但模型架構 loss function 的部分記得要設定成 loss=’sparse_cross_entropy'。而我們這邊因為使用 loss=’cross_entropy’,所以將模型輸出要比對的資料形式改成 one-hot 編碼。
# convert label numbers to one-hot encoding
from tensorflow.keras.utils import to_categorical

y_train=to_categorical(train_label, 10)
y_test=to_categorical(test_label, 10)

這邊使用神經網路找方法三步驟來說明~
1. 找一個 model / 建立一個 NN structure
# import 建 model 需要的套件
from tensorflow.keras.models import Sequential
from tensorflow.keras.layers import Dense
from tensorflow.keras import optimizers

# 定義此 model 模式為 sequential model
model = Sequential()
model.add(Dense(units=64, input_dim=784, kernel_initializer='normal', activation='relu')) #輸入+隱藏層
model.add(Dense(units=10, kernel_initializer='normal', activation='softmax')) #輸出層
print(model.summary())
後面會再提到什麼是 MLP(multilayer neural network/multilayer perceptron)與Dense意義,這邊先知道神經網路模型會分成輸入層、中間的隱藏層跟最後的輸出層就好。我們看model,這邊 model 呼叫了兩次 add(),但實際上是建立了三層模型,一層輸入層、一層隱藏層跟一層輸出層,因為第一次呼叫的 add 同時建立了輸入層(input_dim=784維)跟隱藏層(units=64個神經元,unit可不寫)。第二次呼叫 add()時不需要指定 input_dim,因為上一層的輸出就是這一層的輸入(64個神經元)。這邊每層的一開始我有初始化權重(kernel_initializer),而 activation 的選擇可看 [DAY8] 讓 NN model 引入非線性-激勵函數(activation function)。
在模型建立這邊有一個容易被問到的問題是,怎麼設定每層的 neuron 個數呢?這個目前沒有標準答案(我是看結果去試64/128/256等二的倍數哈)。不過這邊有討論大家可以參考一下 → 如何決定 NN中 hidden layer 數以及每層的 neurons?
2. 定義 model 的好壞並選最好的
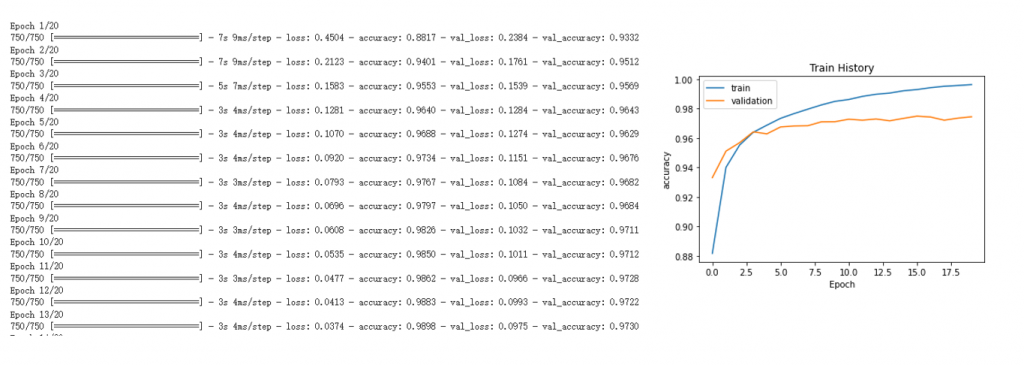
model.compile(loss='categorical_crossentropy', optimizer='adam', metrics=['accuracy'])
train_history =model.fit(x=x_train, y=y_train, epochs=20, batch_size=64, validation_split=0.2)
關於編譯(compile) model 裡的參數,可以看:
[DAY9] 評估 NN model 好壞的指標-損失函數(loss function)
[DAY10] NN model 學習的核心-優化器(optimizer)
[DAY12] 評估結果成效的準則-性能指標(metrics)
而訓練(fit)的部分,傳入訓練集圖片(x_train)及標籤(y_train),epoch、batch_size 跟 validation_split 可以看:
[DAY11] NN model 的訓練設定-訓練週期(epoch) 與 批次(batch)
[DAY13] 資料的劃分-訓練集(training set)、驗證集(validation set) 與 測試集(testing set)
這邊我使用 train_history 這個變數把過程存下來,以便可以比較視覺化的繪圖看結果。
ps.如果想要 Save and load Keras models 所有變數與訓練結果,可以用模型 .h5 檔或 .pb 檔存下來,詳見tensorflow官網
在預測的輸入圖這邊,我使用的是與 DAY4 使用 OCR 來快速實做出手寫數字辨識系統 相同的三張圖,以符合我們實作手寫數字辨識系統的需求。這三張圖片分別是:
三張圖片均有簡單裁切並調正但大小不一。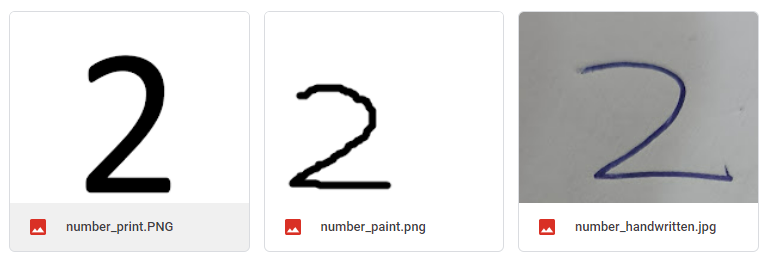
import os
os.chdir('/content/drive/MyDrive/Colab Notebooks')  # Colab 換路徑使用

from PIL import Image
img = Image.open('number_paint.png').convert('L') #灰階圖片
img = img.resize((28,28))

# 轉換格式
im = np.array(img).astype('float32')
im = (255-im)/255
im = im.reshape(784,1)
im = np.expand_dims(im, 0)

# 預測
np.argmax(model.predict(im))
三張圖片只有 number_print 跟number_paint 辨識成功,number_handwritten 可能是因為前處理不夠而無法辨識出。那麼問題來了,要怎麼修改模型或做前處理讓這個手寫辨識系統變的更符合預期呢?以及要怎麼解釋訓練過程中的loss跟accuracy?明天我們會來說明預測結果,跟怎麼根據結果調整我們的程式碼~
嗨~不好意思,我想請問一下,# Colab 換路徑使用,是什麼意思呢?謝謝!
不好意思現在才看到@@ 因為os.chdir(path)這個指令是改變路徑到我想要的資料夾位置,所以才會在後面註解 # Colab 換路徑使用,可以不加,或檔案在不同位置時進行相對應的修改


 iThome鐵人賽