
今天要來做的是備忘錄,可以新增、修改以及刪除,並儲存在local storage中,畫面上錄不到重新整理的按鈕,不過若正確存放到 local storage 中,資料是不會因為重整而遺失的
<textarea>的狀態| 知識點 | 使用說明 |
|---|---|
| overflow-y | 便條的文字超過一定長度時,會出現垂直方向卷軸 |
| 知識點 | 使用說明 |
|---|---|
| createElement( ) | 創建元素 |
| classList.add( )/classList.toggle() | 添加class、切換class |
| appendChild(node) | 在父元素後末尾處新增子節點 |
| remove() | 移除元素,這裡是用來移除便條 |
| 解構賦值 | 擷取物件或陣列片段成為獨立的變數 |
| window.localStorage | 將資料存放在本地 |
| push() | 在陣列尾端新增元素 |
| json.stringify() | 將 JavaScript 值轉換為 JSON 字符串 |
     <!-- 新增按鈕 -->
    <button class="add" id="add">
        <i class="fas fa-plus"></i> Add note
    </button>
    <!-- 便條主體 -->
    <div class="note">
        <div class="tools">
            <!-- 編輯按鈕 -->
            <button class="edit">
                <i class="fas fa-edit"></i>
            </button>
            <!-- 刪除按鈕 -->
            <button class="delete">
                <i class="fas fa-trash-alt"></i>
            </button>
        </div>
     <!-- 文字輸入區塊(下面第一行為文字編輯模式) -->
        <div class="main hidden"></div>
        <textarea></textarea>
    </div>
* {
  box-sizing: border-box;
}

body {
  background-color: #8ba7b8;
  margin: 0;
  padding-top: 3rem;
  display: flex; /*讓內容水平垂直置中*/
  flex-wrap: wrap;
}
新增按鈕
.add {
  position: fixed;
  top: 1rem;
  right: 1rem;
  background-color: #9ec862;
  color: #fff;
  border: none; /*或0**/
  border-radius: 3px;
  padding: 8px 16px;
  cursor: pointer;
}
.add:active {
  transform: scale(0.97);
}
便條主體
.note {
  background-color: #fff;
  box-shadow: 0 0 10px 4px rgba(0, 0, 0, 0.1);
  margin: 30px 20px;
  height: 400px;
  width: 400px;
  overflow-y: scroll;
}
overflow-y 代表便條的文字輸入如果變多時,會自動出現垂直方向的捲軸
編輯工具
.note .tools {
  background-color: #9ec862;
  display: flex;
  justify-content: flex-end;
  padding: 0.5rem;
}
/* 編輯和刪除按鈕 */
.note .tools button {
  background-color: transparent;
  color: #fff;
  border: none;
  cursor: pointer;
  font-size: 16px;
  margin-left: 8px;
}
文字輸入和編輯的區塊
.note textarea {
  outline: none;
  font-size: 20px;
  border: none;
  height: 400px;
  /* height: 100%; */
  width: 100%;
  padding: 20px;
}

/* 以下要透過JS才有效果 */
.main {
  font-size: 25px;
  padding: 15px;
}
.hidden {
  display: none;
}
 <button class="add" id="add">
        <i class="fas fa-plus"></i> Add note
    </button>
新增便條
const addBtn = document.getElementById('add')

addBtn.addEventListener("click", () => addNewNote());
function addNewNote(text = "") {
  // 創建元素
  const note = document.createElement("div");
  note.classList.add("note");
  note.innerHTML = `
  <div class="tools">
  <button class="edit"><i class="fas fa-edit"></i></button>
  <button class="delete"><i class="fas fa-trash-alt"></i></button>
  </div>
  <div class="main hidden"></div>
  <textarea></textarea> `
    document.body.appendChild(note);
}
用 createElement() 創建元素,並添加class="note",元素間的內容用樣板字串把剛剛HTML註解得程式碼貼進來。值得一提的是倒數第二行的class="hidden",必須在編輯模式時才會出現,所以可以加入個判斷,如下:
  <div class="main ${text ? "" : "hidden"}"></div>
  <textarea class="${text ? "hidden" : ""}"></textarea>
這裡使用三元運算子,簡單明瞭
以上設定好,呈現如下
接下來處理編輯和刪除的功能
  const editBtn = note.querySelector(".edit");
  const deleteBtn = note.querySelector(".delete");
  const main = note.querySelector(".main");
  const textArea = note.querySelector("textarea");

  textArea.value = text;
  main.innerHTML = marked(text);

  //編輯
  editBtn.addEventListener("click", () => {
    main.classList.toggle("hidden");
    textArea.classList.toggle("hidden");
  });

  //刪除
  deleteBtn.addEventListener("click", () => {
    note.remove();
  });

  //文本區域
    textArea.addEventListener("input", (e) => {
    //console.log(e);
    const { value } = e.target; // 解構賦值
    main.innerHTML = marked.parse(value);
  });
以上程式碼分成以下兩點稍微進行說明
The input event fires when the value of an
<input>,<select>, or<textarea>element has been changed.
擷取至MDN
當 <input>、<select> 或 <textarea> 元素的值更改時,將觸發 input 事件
The destructuring assignment syntax is a JavaScript expression that makes it possible to unpack values from arrays, or properties from objects, into distinct variables.
擷取至MDN
解構賦值 是一個ES6新增的特性,可以把陣列或物件中的資料解開並擷取成為獨立的變數(一般使用const宣告),讓程式碼在撰寫時更為簡短與提高閱讀性const { value } = e.target 這段e.target是被點擊的對象,他是一個物件,例如:我在便條中輸入123,那麼 console.log({value}) 的結果是 {value: '123'}
好的,那來處理local storage的部分,先做一個簡單的暖身
localStorage.setItem("applePrice", "20");
localStorage.getItem("applePrice");
setItem 和 getItem 是web storage的API, 前者的參數是鍵(key)與值(value)的配對,value 儲存型別僅能是 string ,後者的參數則是放鍵名(key name),結果會返回該鍵所對應的值(value),那這段程式碼的結果如下圖
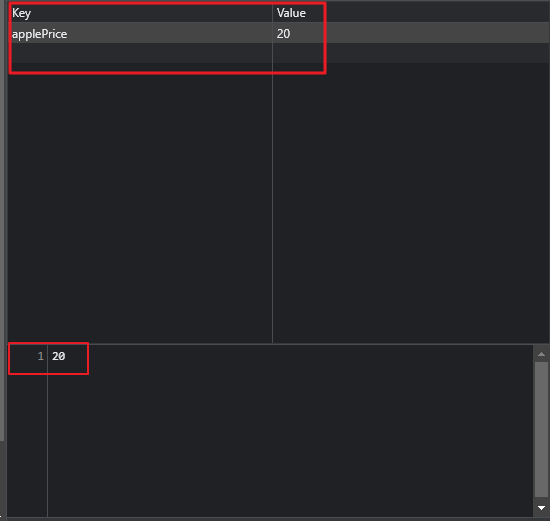
透過 getItem() 取得了applePrice 為 20
local storage
const notes = JSON.parse(localStorage.getItem("notes"));

if (notes) {
  notes.forEach((note) => addNewNote(note));
}

function updateLS() {
  const notesText = document.querySelectorAll("textarea"); //可能有好幾張便條

  const notes = [];

  notesText.forEach((note) => notes.push(note.value));

  localStorage.setItem("notes", JSON.stringify(notes));
}
updateLS() 記得加在刪除按鈕和新增便條的按鈕中,如此重新整理後的便條才會正確存放到local storage中
附上codepen連結 https://codepen.io/hangineer/pen/PoeBrvp?editors=0011
local storage 的部分因篇幅考量沒有介紹太多,想了解更多可以點此,
若有解說不夠詳盡或是錯誤歡迎指教,感激不盡!那明天見囉
50 Projects In 50 Days - HTML, CSS & JavaScript
ES2015(ES6) - 變數
Destructuring Assignment(解構賦值)


 iThome鐵人賽