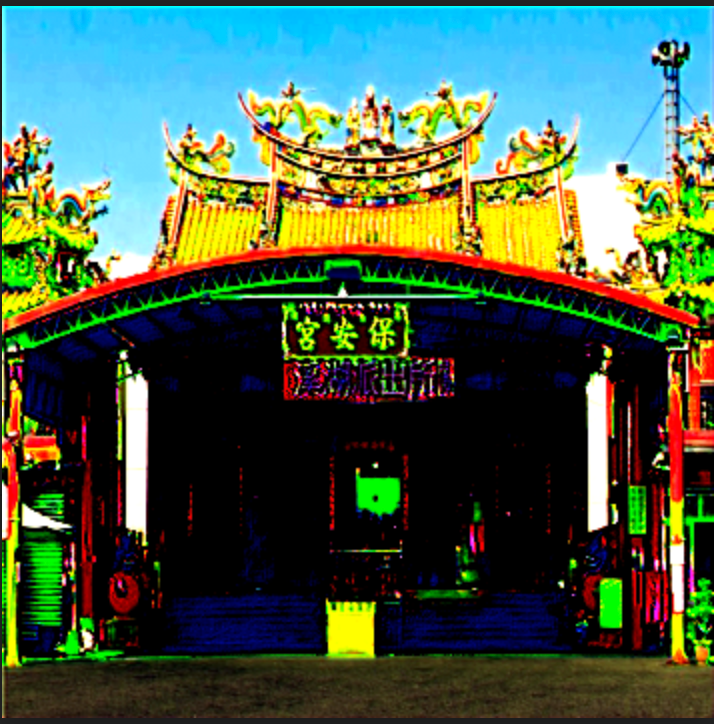
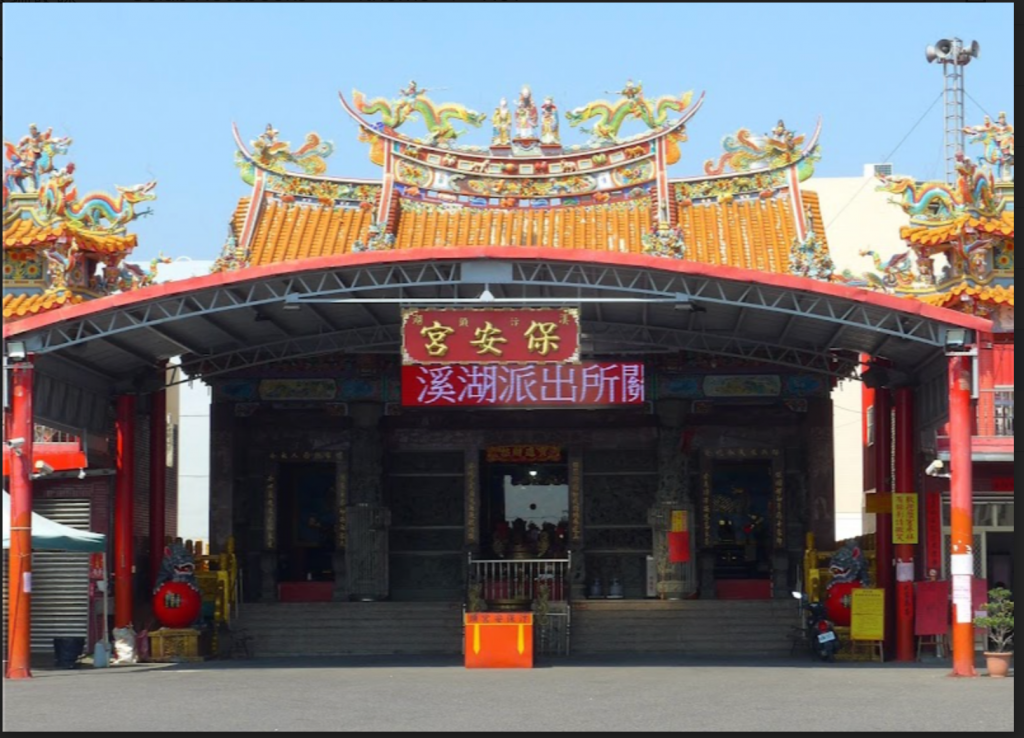
本來想隨便打哈哈就做一個結論就結束了,但是這篇主要作為風格轉換的model ,因為蠻有趣的,所以我把我們 保安宮的指示 也放上來訓練一下。因此我們原始的圖片就是 保安宮的門面
但是這邊還是用我理解的說明一下這章節主要的內容,其實就是利用CNN 進行 Style Transfer,這概念主要是認為畫風的構成是由 顏色 及 紋理 的兩個的不同,就可以讓人覺得是不同的畫風
import torch
import torch.nn as nn
import torch.optim as optim
from PIL import Image
import torchvision.transforms as transforms
import torchvision.models as models
from torchvision.models import vgg19, VGG19_Weights
from torchvision.utils import

from google.colab import drive
drive.mount('/content/drive')
看一下 vgg19 的架構
model = vgg19(aux_logits=False,init_weights=VGG19_Weights.IMAGENET1K_V1).features
print(model)
print的結果如下,因為要做 Style Transfer 不做後面三層的 Desen ,所以要拿掉,然後還要挑選出conv1_1, conv2_1, conv3_1, conv4_1, conv5_1 這幾層需要特別處理, 所以我把print 的結果前面再加上一些符號代表這層要被處理 ,而當我們計算到 conv5_1 後,其餘的 layer 我們就不需要再另外計算,因此我把他標註 - 代表要刪除
Sequential(
  (*0): Conv2d(3, 64, kernel_size=(3, 3), stride=(1, 1), padding=(1, 1))
  (1): ReLU(inplace=True)
  (2): Conv2d(64, 64, kernel_size=(3, 3), stride=(1, 1), padding=(1, 1))
  (3): ReLU(inplace=True)
  (4): MaxPool2d(kernel_size=2, stride=2, padding=0, dilation=1, ceil_mode=False)
  (*5): Conv2d(64, 128, kernel_size=(3, 3), stride=(1, 1), padding=(1, 1))
  (6): ReLU(inplace=True)
  (7): Conv2d(128, 128, kernel_size=(3, 3), stride=(1, 1), padding=(1, 1))
  (8): ReLU(inplace=True)
  (9): MaxPool2d(kernel_size=2, stride=2, padding=0, dilation=1, ceil_mode=False)
  (*10): Conv2d(128, 256, kernel_size=(3, 3), stride=(1, 1), padding=(1, 1))
  (11): ReLU(inplace=True)
  (12): Conv2d(256, 256, kernel_size=(3, 3), stride=(1, 1), padding=(1, 1))
  (13): ReLU(inplace=True)
  (14): Conv2d(256, 256, kernel_size=(3, 3), stride=(1, 1), padding=(1, 1))
  (15): ReLU(inplace=True)
  (16): Conv2d(256, 256, kernel_size=(3, 3), stride=(1, 1), padding=(1, 1))
  (17): ReLU(inplace=True)
  (18): MaxPool2d(kernel_size=2, stride=2, padding=0, dilation=1, ceil_mode=False)
  (*19): Conv2d(256, 512, kernel_size=(3, 3), stride=(1, 1), padding=(1, 1))
  (20): ReLU(inplace=True)
  (21): Conv2d(512, 512, kernel_size=(3, 3), stride=(1, 1), padding=(1, 1))
  (22): ReLU(inplace=True)
  (23): Conv2d(512, 512, kernel_size=(3, 3), stride=(1, 1), padding=(1, 1))
  (24): ReLU(inplace=True)
  (25): Conv2d(512, 512, kernel_size=(3, 3), stride=(1, 1), padding=(1, 1))
  (26): ReLU(inplace=True)
  (27): MaxPool2d(kernel_size=2, stride=2, padding=0, dilation=1, ceil_mode=False)
  (*28): Conv2d(512, 512, kernel_size=(3, 3), stride=(1, 1), padding=(1, 1))
  (-29): ReLU(inplace=True)
  (-30): Conv2d(512, 512, kernel_size=(3, 3), stride=(1, 1), padding=(1, 1))
  (-31): ReLU(inplace=True)
  (-32): Conv2d(512, 512, kernel_size=(3, 3), stride=(1, 1), padding=(1, 1))
  (-33): ReLU(inplace=True)
  (-34): Conv2d(512, 512, kernel_size=(3, 3), stride=(1, 1), padding=(1, 1))
  (-35): ReLU(inplace=True)
  (-36): MaxPool2d(kernel_size=2, stride=2, padding=0, dilation=1, ceil_mode=False)
)
使用 vgg19 的架構,在自己把input 輸入到對應的層數,不過我們有挑選出需要處理的layer,因此要把層數對應的索引值抓出來,所以 ["0", "5", "10", "19", "28"] 的部分則是另外提取裡面的數值來當作 feature 計算後面的 loss value
class VGG(nn.Module):
    def __init__(self):
        super(VGG, self).__init__()
        # The first number x in convx_y gets added by 1 after it has gone
        # through a maxpool, and the second y if we have several conv layers
        # in between a max pool. These strings (0, 5, 10, ..) then correspond
        # to conv1_1, conv2_1, conv3_1, conv4_1, conv5_1 mentioned in NST paper
        self.chosen_features = ["0", "5", "10", "19", "28"]

        # We don't need to run anything further than conv5_1 (the 28th module in vgg)
        # Since remember, we dont actually care about the output of VGG: the only thing
        # that is modified is the generated image (i.e, the input).
        self.model = models.vgg19(pretrained=True).features[:29]

    def forward(self, x):
        # Store relevant features
        features = []

        # Go through each layer in model, if the layer is in the chosen_features,
        # store it in features. At the end we'll just return all the activations
        # for the specific layers we have in chosen_features
        for layer_num, layer in enumerate(self.model):
            x = layer(x)

            if str(layer_num) in self.chosen_features:
                features.append(x)

        return features
再來處理影像的部分,Load image 然後還有設定 image szie,然後在compose 的最後面一項 Normalize 的部分,論文是說要做 normalize ,但是作者說經過他的測試,他覺得沒有 Normalize 的效果比較好,所以我們也把它拿掉注意,vgg 不適合處理太小的影像 imsize< 224 ,然後處理太大的影像計算時間就需要很久
device = torch.device("cuda" if torch.cuda.is_available() else "cpu")
imsize = 356

# Here we may want to use the Normalization constants used in the original
# VGG network (to get similar values net was originally trained on), but
# I found it didn't matter too much so I didn't end of using it. If you
# use it make sure to normalize back so the images don't look weird.

loader = transforms.Compose(
    [
        transforms.Resize((imsize, imsize)),
        transforms.ToTensor(),
        # transforms.Normalize(mean=[0.485, 0.456, 0.406], std=[0.229, 0.224, 0.225]),
    ]
)


def load_image(image_name):
    # 這邊會強制轉RGB,不然沒有加convert(RGB) 的話有可能 channel = 4
    image = Image.open(image_name).convert('RGB')
    image = loader(image).unsqueeze(0)
    return image.to(device)
載入影像,原始圖像為 original_img 而想要套用的特色為 style_img ,generated 原本是要隨機分佈,然後慢慢修正慢慢訓練,但是這需要很多的時間才有辦法,因此我們的邏輯是先複製原圖,然後把原圖的 feature 慢慢調整到具有風格的 featurerequires_grad 這就是代表這個圖片會被backward修正
original_img = load_image("/content/drive/MyDrive/Colab Notebooks/ithome/NST/peaceful_building.png")

style_img = load_image("/content/drive/MyDrive/Colab Notebooks/ithome/NST/style.jpg")
# initialized generated as white noise or clone of original image.
# Clone seemed to work better for me.


# generated = torch.randn(original_img.data.shape, device=device, requires_grad=True)
generated = original_img.clone().requires_grad_(True)
model = VGG().to(device).eval()
Alpha 跟 beta 就是要調整 loss function 用的
Optimizer 這個比較特別,因為他修正的事 generated 這個,不是model 本身,所以這個NST 在訓練的是圖片不是model !!
total_steps = 6000
learning_rate = 0.001
alpha = 1
beta = 0.01
optimizer = optim.Adam([generated], lr=learning_rate)
Train 的部分其實也不算是在做訓練調整參數,不過其實就是一直在修正model的所產生出來的loss,然後我們的loss 又有分成跟原圖的的 loss function跟風格圖的 loss function ,然後最後產生出來的會參考設定的 alpha 和 beta 會產生出兩者的loss 最低的結果
for step in range(total_steps):
    # Obtain the convolution features in specifically chosen layers
    # 執行產生圖片的 feature
    generated_features = model(generated)
    # 原圖的 feature
    original_img_features = model(original_img)
    # 風格的 feature
    style_features = model(style_img)

    # Loss is 0 initially
    style_loss = original_loss = 0

    # iterate through all the features for the chosen layers
    # 總共有五個layer
    for gen_feature, orig_feature, style_feature in zip(
        generated_features, original_img_features, style_features
    ):

        # batch_size will just be 1, channel = 3
        batch_size, channel, height, width = gen_feature.shape
        original_loss += torch.mean((gen_feature - orig_feature) ** 2)
        # Compute Gram Matrix of generated
        G = gen_feature.view(channel, height * width).mm(
            gen_feature.view(channel, height * width).t()
        )
        # Compute Gram Matrix of Style
        A = style_feature.view(channel, height * width).mm(
            style_feature.view(channel, height * width).t()
        )
        style_loss += torch.mean((G - A) ** 2)

    total_loss = alpha * original_loss + beta * style_loss
    optimizer.zero_grad()
    total_loss.backward()
    optimizer.step()

    if step % 200 == 0:
        print(total_loss)
        save_image(generated, "/content/drive/MyDrive/Colab Notebooks/ithome/NST/generated.png")
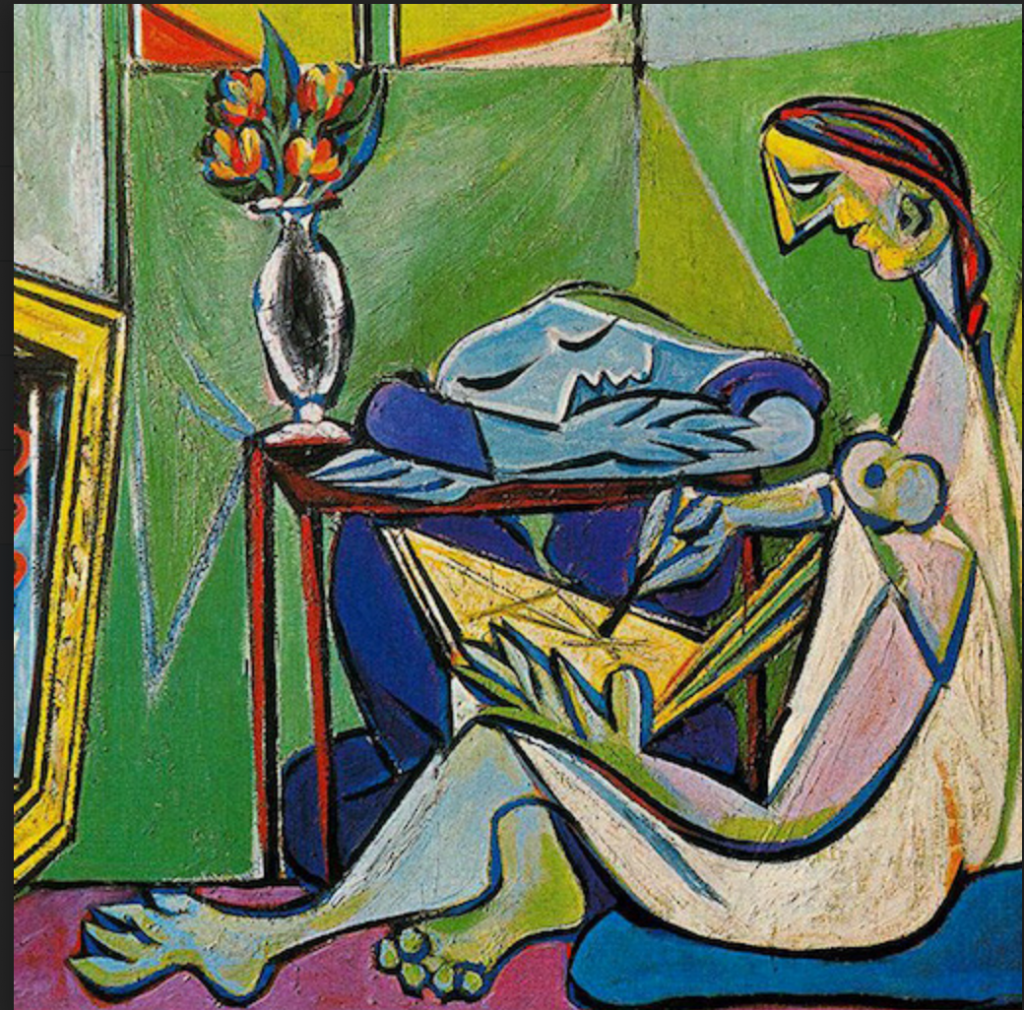
本次咧人賽的保安宮當作最後一天的呈現結果,而範例中利用下方的圖作為style,而我們的原圖就是 溪湖保安宮本人 ,所以把這兩個風格混合再一起
這就是風格上的轉換,雖然怪怪的,但是還蠻有趣的,有興趣的話可以把超參數調一調也許就會跑出意想不到的結果,但是記得原圖的樣子,不要改成beta 過大,反而讓風格圖變成原圖
我們訓練作者提供的8個風格圖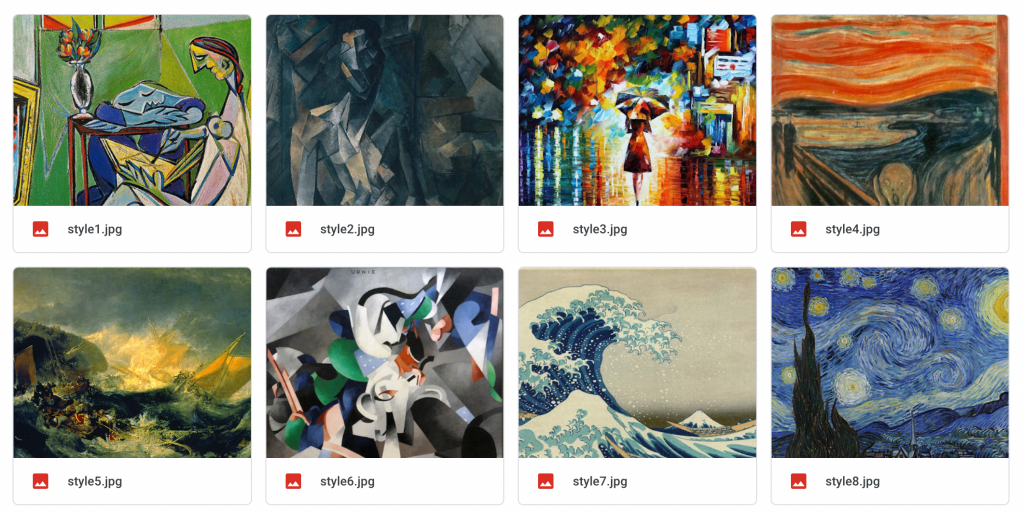
這是最後產生出來的結果,我是覺得效果不是很好,但是我覺得蠻有趣的,可以看得出來至少跟原圖差的蠻多的,風格上雖然比不上十分相似,但是顯然的有被改過,至少下圖中不同風格的保安宮的差異也是蠻大的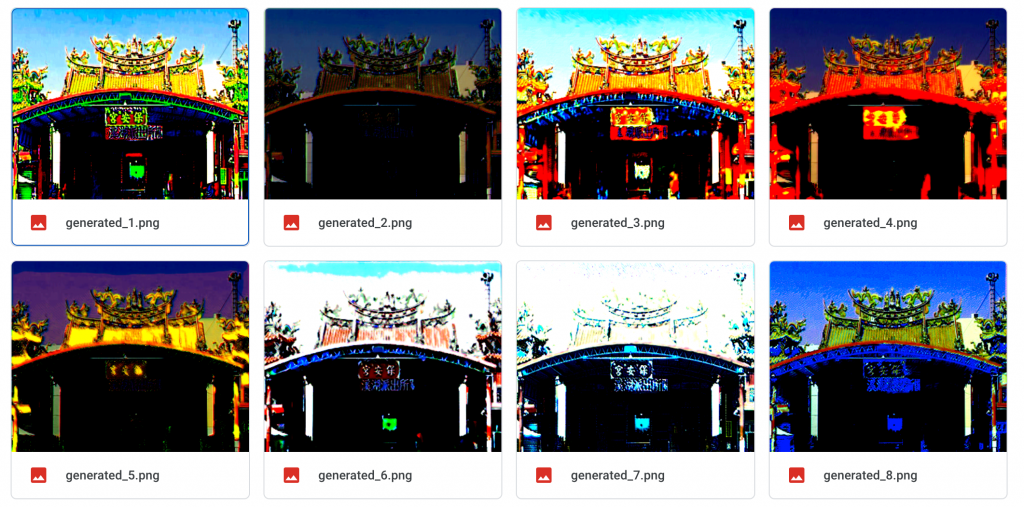
以上完成30天的鐵人賽,希望大家喜歡,保安宮我回溪湖再找你跟你說謝謝


 iThome鐵人賽