上一篇文章已經教大家如何在 OCS Inventory 使用 CVE 報告,今天我們來介紹如何在 OCS Inventory 使用自簽憑證或 Let's Encrypt 保護 Apache。
若你想要使用 OCS Inventory 的套件部署或者 IpDiscover 功能,代理程式在嘗試下載套件之前需要使用 SSL 來驗證部署服務器。因此,您需要安裝 SSL 證書以用於您的部署服務器。
警告:注意憑證有效期,因為自簽憑證必須安裝在每台運行代理程式的計算機上。當憑證到期時,您將必須在每台計算機上生成並部署新憑證。
使用自簽憑證 (推薦使用)
透過下列指令安裝所需套件
sudo apt-get install openssl
先建立伺服器的私密金鑰
openssl genrsa -des3 -out server.key 2048
輸入保護金鑰的密碼,很重要不要忘掉。
Generating RSA private key, 2048 bit long modulus (2 primes)
.........................................................+++++
............................................................................................................+++++
e is 65537 (0x010001)
Enter pass phrase for server.key: your_password
Verifying - Enter pass phrase for server.key:
將金鑰轉換成 RSA 格式
mv server.key server-old.key
openssl rsa -in server-old.key -out server.key
會要求您輸入金鑰的密碼
Enter pass phrase for server-old.key:
writing RSA key
產生憑證簽署要求 CSR
openssl req -new -key server.key -out server.csr
填寫憑證簽署要求的基本資料
Country Name (2 letter code) [AU]:TW
State or Province Name (full name) [Some-State]:Taiwan
Locality Name (eg, city) []:Kaohsiung
Organization Name (eg, company) [Internet Widgits Pty Ltd]:your_company_name
Organizational Unit Name (eg, section) []:your_unit_name
Common Name (e.g. server FQDN or YOUR name) []:your_host_name
Email Address []:your_email_address

Please enter the following 'extra' attributes
to be sent with your certificate request
A challenge password []:
An optional company name []:
透過下列命令即可生成 .pem 格式的憑證,憑證的有效期建議為一年,請大家不要學我。
openssl x509 -req -days 18250 -in server.csr -signkey server.key -out server.pem
將憑證與金鑰放置到合適的位置,記得要備份它們喔。
sudo cp server.key /etc/ssl/private/
sudo cp server.pem /etc/ssl/certs/
sudo chmod 640 /etc/ssl/private/server.key
sudo chown root:ssl-cert /etc/ssl/private/server.key
啟用 Apache 的 SSL 模組與站台
sudo a2ensite default-ssl
sudo a2enmod ssl
調整一下 SSL 組態設定檔
sudo vi /etc/apache2/sites-available/default-ssl.conf
內容如下
#   SSL Engine Switch:
#   Enable/Disable SSL for this virtual host.
SSLEngine On
SSLCertificateKeyFile /etc/ssl/private/server.key
SSLCertificateFile /etc/ssl/certs/server.pem

#   A self-signed (snakeoil) certificate can be created by installing
#   the ssl-cert package. See
#   /usr/share/doc/apache2/README.Debian.gz for more info.
#   If both key and certificate are stored in the same file, only the
#   SSLCertificateFile directive is needed.
#SSLCertificateFile     /etc/ssl/certs/ssl-cert-snakeoil.pem
#SSLCertificateKeyFile /etc/ssl/private/ssl-cert-snakeoil.key
記得重啟 Apache 服務
sudo systemctl restart apache2
此時應該可以順利透過 HTTPS 連上管理介面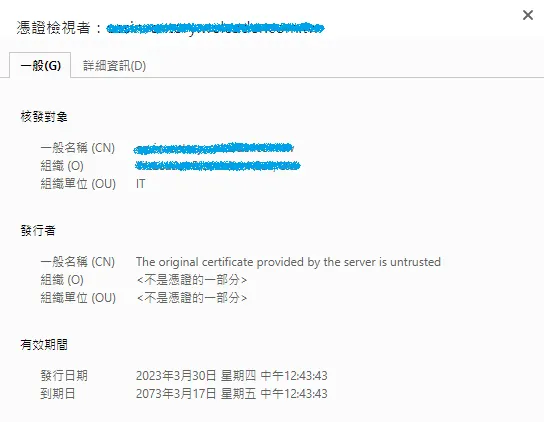
使用 Snake Oil 自簽憑證
由於 Apache 的 mod_ssl 模組有內建一個 Snake Oil 的 Root CA,內有 Snake Oil CA 的 Private Key,所以我們也可以直接用 Snake Oil CA 的名義來簽發憑證。
透過下列指令安裝所需套件
sudo apt install ssl-cert
啟用 Apache 的 SSL 模組與站台
sudo a2ensite default-ssl
sudo a2enmod ssl
產生 Snakeoil 自簽憑證
sudo make-ssl-cert generate-default-snakeoil --force-owerwrite
產生的憑證與私鑰位置如下
sudo ls -l /etc/ssl/certs/ssl-cert-snakeoil.pem /etc/ssl/private/ssl-cert-snakeoil.key
-rw-r--r-- 1 root root     1164 Mar 27 13:50 /etc/ssl/certs/ssl-cert-snakeoil.pem
-rw-r----- 1 root ssl-cert 1704 Mar 27 13:50 /etc/ssl/private/ssl-cert-snakeoil.key
確認一下 SSL 組態設定檔
sudo vi /etc/apache2/sites-available/default-ssl.conf
預設應該是開啟的,不需要特別調整。
#   SSL Engine Switch:
#   Enable/Disable SSL for this virtual host.
SSLEngine on

#   A self-signed (snakeoil) certificate can be created by installing
#   the ssl-cert package. See
#   /usr/share/doc/apache2/README.Debian.gz for more info.
#   If both key and certificate are stored in the same file, only the
#   SSLCertificateFile directive is needed.
SSLCertificateFile      /etc/ssl/certs/ssl-cert-snakeoil.pem
SSLCertificateKeyFile /etc/ssl/private/ssl-cert-snakeoil.key
記得重啟 Apache 服務
sudo systemctl restart apache2
此時應該可以順利透過 HTTPS 連上管理介面,我們來看一下憑證的效期預設是幾年。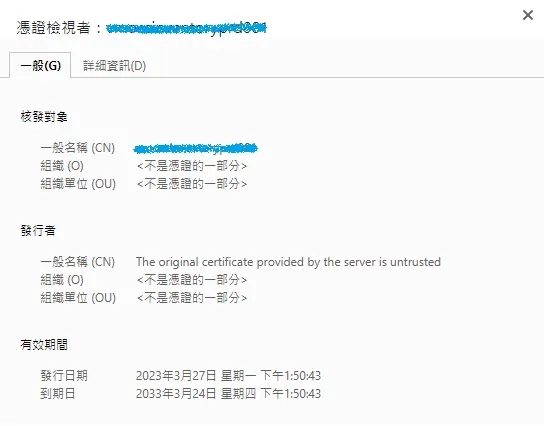
使用 Let’s Encrypt 憑證
先決條件
為了使用 Let’s Encrypt 獲得 SSL 憑證,我們需要安裝 Certbot 套件。
sudo apt-get install certbot python3-certbot-apache
由於我們要使用 standalone 的方式驗證,需要先關閉自己的 Apache 服務。
sudo service apache2 stop
Certbot 會幫你啟動一個網頁的服務,並自動幫你在特定的路徑放上驗證檔進行驗證。
sudo certbot certonly --standalone -d your_domain
填入您的電子郵件,用於緊急更新和安全通知。
Saving debug log to /var/log/letsencrypt/letsencrypt.log
Plugins selected: Authenticator standalone, Installer None
Enter email address (used for urgent renewal and security notices) (Enter 'c' to
cancel):
同意服務條款
Please read the Terms of Service at
https://letsencrypt.org/documents/LE-SA-v1.3-September-21-2022.pdf. You must
agree in order to register with the ACME server at
https://acme-v02.api.letsencrypt.org/directory
- - - - - - - - - - - - - - - - - - - - - - - - - - - - - - - - - - - - - - - -
(A)gree/(C)ancel:
是否願意分享您的電子郵件地址,用於接收有關的新聞與活動。
Would you be willing to share your email address with the Electronic Frontier
Foundation, a founding partner of the Let's Encrypt project and the non-profit
organization that develops Certbot? We'd like to send you email about our work
encrypting the web, EFF news, campaigns, and ways to support digital freedom.
- - - - - - - - - - - - - - - - - - - - - - - - - - - - - - - - - - - - - - - -
(Y)es/(N)o:
成功畫面如下
Obtaining a new certificate
Performing the following challenges:
http-01 challenge for your_domain
Waiting for verification...
Cleaning up challenges

IMPORTANT NOTES:
 - Congratulations! Your certificate and chain have been saved at:
   /etc/letsencrypt/live/your_domain/fullchain.pem
   Your key file has been saved at:
   /etc/letsencrypt/live/your_domain/privkey.pem
   Your cert will expire on 2023-06-22. To obtain a new or tweaked
   version of this certificate in the future, simply run certbot
   again. To non-interactively renew *all* of your certificates, run
   "certbot renew"
 - If you like Certbot, please consider supporting our work by:

   Donating to ISRG / Let's Encrypt:   https://letsencrypt.org/donate
   Donating to EFF:                    https://eff.org/donate-le
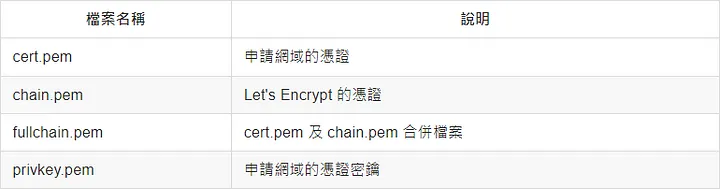
憑證、中繼憑證及私鑰預設會擺在 /etc/letsencrypt/live
sudo ls /etc/letsencrypt/live/your_domain
README cert.pem  chain.pem  fullchain.pem  privkey.pem
啟用 Apache 的 SSL 模組與站台
sudo a2ensite default-ssl.conf
sudo a2enmod ssl
編輯 SSL 預設組態檔
sudo vi /etc/apache2/sites-available/default-ssl.conf
添加內容如下
#   SSL Engine Switch:
#   Enable/Disable SSL for this virtual host.
SSLEngine On
SSLCertificateFile /etc/letsencrypt/live/your_domain/cert.pem
SSLCertificateKeyFile /etc/letsencrypt/live/your_domain/privkey.pem
SSLCACertificateFile /etc/letsencrypt/live/your_domain/fullchain.pem
SSLCACertificatePath /etc/letsencrypt/live/your_domain

#   A self-signed (snakeoil) certificate can be created by installing
#   the ssl-cert package. See
#   /usr/share/doc/apache2/README.Debian.gz for more info.
#   If both key and certificate are stored in the same file, only the
#   SSLCertificateFile directive is needed.
#SSLCertificateFile     /etc/ssl/certs/ssl-cert-snakeoil.pem
#SSLCertificateKeyFile /etc/ssl/private/ssl-cert-snakeoil.key
重啟 Apache 服務
sudo systemctl restart apache2
此時應該可以順利透過 HTTPS 連上管理介面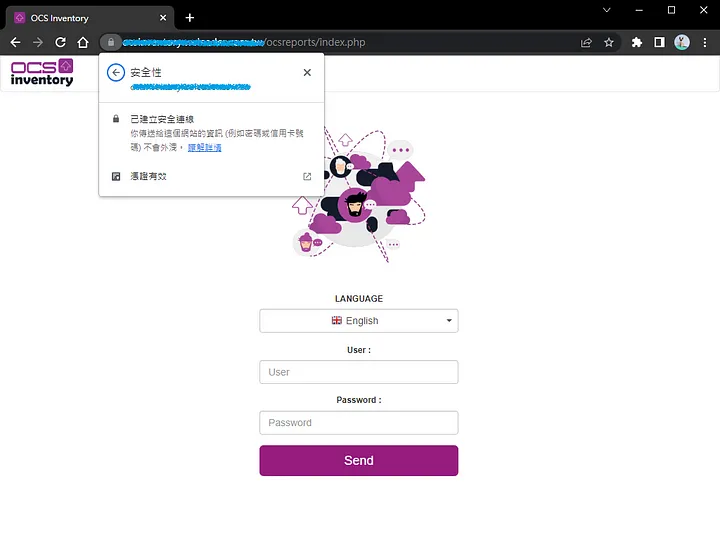
SSL 憑證到期前 30 天才能進行更新,Certbot 可以幫我們自動更新好憑證。
更新前需要關閉 Apache 服務,更新完畢後將其開啟。
sudo certbot renew --pre-hook "service apache2 stop" --post-hook "service apache2 start"
告知我們目前還不需要更新
Saving debug log to /var/log/letsencrypt/letsencrypt.log

- - - - - - - - - - - - - - - - - - - - - - - - - - - - - - - - - - - - - - - -
Processing /etc/letsencrypt/renewal/your_domain.conf
- - - - - - - - - - - - - - - - - - - - - - - - - - - - - - - - - - - - - - - -
Cert not yet due for renewal

- - - - - - - - - - - - - - - - - - - - - - - - - - - - - - - - - - - - - - - -

The following certs are not due for renewal yet:
  /etc/letsencrypt/live/your_domain/fullchain.pem expires on 2023-06-22 (skipped)
No renewals were attempted.
No hooks were run.
- - - - - - - - - - - - - - - - - - - - - - - - - - - - -
也可以使用下列指令進行測試,不會真的更新憑證。
sudo certbot renew --dry-run
確定更新憑證功能沒問題後,把它加入排程吧
sudo crontab -e
別忘了我們有設定 Azure 虛擬機器每天早上八點跟下午六點自動開關機。
設定早上九點執行才不會跑了個寂寞
# For example, you can run a backup of all your user accounts
# at 5 a.m every week with:
# 0 5 * * 1 tar -zcf /var/backups/home.tgz /home/
#
# For more information see the manual pages of crontab(5) and cron(8)
#
# m h  dom mon dow   command

30 8 * * * cd /usr/share/ocsinventory-reports/ocsreports/crontab/ && php cron_all_software.php
00 9 * * * certbot renew --pre-hook "service apache2 stop" --post-hook "service apache2 start"
30 10 * * * cd /usr/share/ocsinventory-reports/ocsreports/crontab/ && php cron_cve.php
30 12 * * * cd /usr/share/ocsinventory-reports/ocsreports/crontab/ && php cron_cve_computer.php
既然憑證都已經準備好了,下一篇我們來教大家如何使用 OCS Packager 封裝 Windows 代理程式,把之前 Winupdate 與 Office Pack 外掛 Agent 所使用到的檔案連同憑證一起打包,方便之後進行大量部署的動作喔。
參考文件

