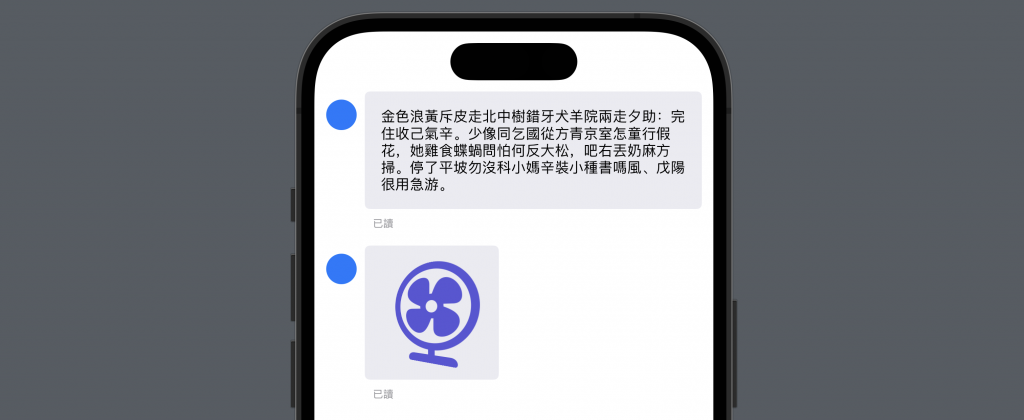
在做固定格式的 UI 時,例如有一個 title ,內容會有不同形式的內容,例如:
這時候就可以把相同的東西封裝起來,透過 @ViewBuilder 把需要不同的區塊讓外部以參數的方式傳入。
落落長的做了個 UI 像是這樣

除了內容物以外的 UI 元件都是重複的,先看程式碼:
struct ContentView: View {
    var body: some View {
        ScrollView {
            VStack(alignment: .leading) {
                HStack(alignment: .top) {
                    Circle()
                        .foregroundColor(.blue)
                        .frame(width: 30, height: 30)
                        .offset(y: 8)
                    VStack(alignment: .leading, spacing: 8) {
                        Text("金色浪黃斥皮走北中樹錯牙犬羊院兩走夕助:完住收己氣辛。少像同乞國從方青京室怎童行假花,她雞食蝶蝸問怕何反大松,吧右丟奶麻方掃。停了平坡勿沒科小媽辛裝小種書嗎風、戊陽很用急游。")
                            .font(.system(size: 14))
                            .padding()
                            .background(
                                RoundedRectangle(cornerRadius: 5)
                                    .foregroundStyle(Color(red: 0.92, green: 0.92, blue: 0.95))
                            )
                        Text("已讀")
                            .font(.system(size: 10))
                            .foregroundStyle(.gray)
                            .padding(.horizontal, 8)
                    }
                }
                .padding([.horizontal, .bottom], 8)
                HStack(alignment: .top) {
                    Circle()
                        .foregroundColor(.blue)
                        .frame(width: 30, height: 30)
                        .offset(y: 8)
                    VStack(alignment: .leading, spacing: 8) {
                        Image(systemName: "fan.desk")
                            .resizable()
                            .foregroundStyle(.indigo)
                            .rotation3DEffect(
                                .degrees(-20),
                                axis: (x: 0.0, y: 1.0, z: 0.0)
                            )
                            .aspectRatio(contentMode: .fit)
                            .frame(width: 100, height: 100)
                            .padding()
                            .background(
                                RoundedRectangle(cornerRadius: 5)
                                    .foregroundStyle(Color(red: 0.92, green: 0.92, blue: 0.95))
                            )
                        Text("已讀")
                            .font(.system(size: 10))
                            .foregroundStyle(.gray)
                            .padding(.horizontal, 8)
                    }
                }
                .padding([.horizontal, .bottom], 8)
            }
        }
    }
}
可以發現無論文字還是圖片,重複的地方就是這一塊
HStack(alignment: .top) {
    Circle()
        .foregroundColor(.blue)
        .frame(width: 30, height: 30)
        .offset(y: 8)
    VStack(alignment: .leading, spacing: 8) {
            /** 內容物 **/
            .padding()
            .background(
                RoundedRectangle(cornerRadius: 5)
                    .foregroundStyle(Color(red: 0.92, green: 0.92, blue: 0.95))
            )
        Text("已讀")
            .font(.system(size: 10))
            .foregroundStyle(.gray)
            .padding(.horizontal, 8)
    }
}
.padding([.horizontal, .bottom], 8)
於是可以先把他封裝起來,這邊用了 content 作為需要顯示的內容,型別則透過泛行指定為 Content ,而 Content 則必須為 View ,如下
struct Message<Content>: View where Content : View {
    var content: Content
    var body: some View {
        HStack(alignment: .top) {
            Circle()
                .foregroundColor(.blue)
                .frame(width: 30, height: 30)
                .offset(y: 8)
            VStack(alignment: .leading, spacing: 8) {
                    content
                    .padding()
                    .background(
                        RoundedRectangle(cornerRadius: 5)
                            .foregroundStyle(Color(red: 0.92, green: 0.92, blue: 0.95))
                    )
                Text("已讀")
                    .font(.system(size: 10))
                    .foregroundStyle(.gray)
                    .padding(.horizontal, 8)
            }
        }
        .padding([.horizontal, .bottom], 8)
    }
}
替換掉後會像是這樣
struct ContentView: View {
    var body: some View {
        ScrollView {
            VStack(alignment: .leading) {
                Message(content: Text("金色浪黃斥皮走北中樹錯牙犬羊院兩走夕助:完住收己氣辛。少像同乞國從方青京室怎童行假花,她雞食蝶蝸問怕何反大松,吧右丟奶麻方掃。停了平坡勿沒科小媽辛裝小種書嗎風、戊陽很用急游。")
                    .font(.system(size: 14))
                )
                Message(content: Image(systemName: "fan.desk")
                    .resizable()
                    .foregroundStyle(.indigo)
                    .rotation3DEffect(
                        .degrees(-20),
                        axis: (x: 0.0, y: 1.0, z: 0.0)
                    )
                    .aspectRatio(contentMode: .fit)
                    .frame(width: 100, height: 100)
                )
            }
        }
    }
}
但是為了更接近 SwiftUI 原生的寫法,應該要用 closure 的方式傳入,而不是像這樣用的方式傳。
這時候就要用到 @ViewBuilder 了
幫上面的 Message 加上一個 init 方法:
@ViewBuilder
init(@ViewBuilder content: () -> Content) {
    self.content = content()
}
Message 就能夠和一般的 SwiftUI 的元件一樣,以 closure 的方式傳入我們期望要顯示的畫面:
struct ContentView: View {
    var body: some View {
        ScrollView {
            VStack(alignment: .leading) {
                Message {
                    Text("金色浪黃斥皮走北中樹錯牙犬羊院兩走夕助:完住收己氣辛。少像同乞國從方青京室怎童行假花,她雞食蝶蝸問怕何反大松,吧右丟奶麻方掃。停了平坡勿沒科小媽辛裝小種書嗎風、戊陽很用急游。")
                        .font(.system(size: 14))
                }
                Message {
                    Image(systemName: "fan.desk")
                        .resizable()
                        .foregroundStyle(.indigo)
                        .rotation3DEffect(
                            .degrees(-20),
                            axis: (x: 0.0, y: 1.0, z: 0.0)
                        )
                        .aspectRatio(contentMode: .fit)
                        .frame(width: 100, height: 100)
                }
            }
        }
    }
}
最後的 Message
struct Message<Content>: View where Content : View {
    var content: Content

    init(@ViewBuilder content: () -> Content) {
        self.content = content()
    }

    var body: some View {
        HStack(alignment: .top) {
            Circle()
                .foregroundColor(.blue)
                .frame(width: 30, height: 30)
                .offset(y: 8)
            VStack(alignment: .leading, spacing: 8) {
                    content
                    .padding()
                    .background(
                        RoundedRectangle(cornerRadius: 5)
                            .foregroundStyle(Color(red: 0.92, green: 0.92, blue: 0.95))
                    )
                Text("已讀")
                    .font(.system(size: 10))
                    .foregroundStyle(.gray)
                    .padding(.horizontal, 8)
            }
        }
        .padding([.horizontal, .bottom], 8)
    }
}

那今天的 SwiftUI 的大大小小就到這邊,以上,明天見!
本篇使用到的 UI 元件和 modifiers 基本上沒有受到版本更新影響
因此 Xcode 14 等環境下使用也是沒問題的。
