今天也是要用Kotlin撰寫來接取API並加入到RecyclerView中顯示連續資料。
這邊我是結合昨天的專案再新增一個Activity來讓主畫面跳轉至API接取的畫面。
現在就開始從引入Dependencies開始吧。
以下是今天需要新增的資料類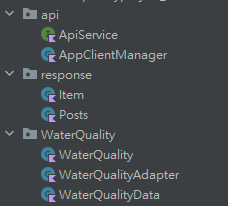
dependencies {
    // retrofit2 & okhttp3
    implementation 'com.squareup.retrofit2:retrofit:2.9.0'
    implementation 'com.squareup.retrofit2:converter-gson:2.9.0'
    implementation 'com.squareup.okhttp3:okhttp:4.11.0'
    // rxjava3
    implementation 'io.reactivex.rxjava3:rxjava:3.1.6'
    implementation 'io.reactivex.rxjava3:rxandroid:3.0.2'
    // retrofit2工具套件
    implementation 'com.squareup.retrofit2:adapter-rxjava3:2.9.0'
}
class AppClientManager private constructor() {
    private val retrofit: Retrofit
    private val okHttpClient: OkHttpClient

    // 初始化的時候創建了 OkHttpClient 和 Retrofit 實例。
    init {
        okHttpClient = OkHttpClient.Builder()
            .build()
        retrofit = Retrofit.Builder()
            .baseUrl("https://api.water.gov.taipei")
            .addConverterFactory(GsonConverterFactory.create())
            .addCallAdapterFactory( RxJava3CallAdapterFactory.create())
            .build()
    }
    // 伴生物件
    // 通過伴生物件創建了 AppClientManager 的單例實例 manager,
    // 並提供了一個 client 屬性,用於訪問 Retrofit 實例。
    // 這意味著您可以通過 AppClientManager.client 來獲取全局共享的 Retrofit 實例,
    // 而不需要每次創建一個新的實例。
    companion object {
        private val manager = AppClientManager()
        val client: Retrofit
            get() = manager.retrofit
    }
}
interface ApiService {

    // 建立接取API的方法,這邊只接取一個水質檢測API,
    // 並且不需要傳入參數獲取資料。
    @POST("/prod/WaterQualityData")
    fun getPosts(): Observable<Response<Posts>>
}
class Posts {
    @SerializedName("httpCode")
    lateinit var httpCode: String
    @SerializedName("httpMessage")
    lateinit var httpMessage: String
    @SerializedName("count")
    var count: Int = 0
    @SerializedName("item")
    var item: List<Item> = listOf()
}
class Item {
    @SerializedName("update_date")
    lateinit var update_date: String
    @SerializedName("update_time")
    lateinit var update_time: String
    @SerializedName("qua_id")
    lateinit var qua_id: String
    @SerializedName("code_name")
    lateinit var code_name: String
    @SerializedName("longitude")
    lateinit var longitude: String
    @SerializedName("latitude")
    lateinit var latitude: String
    @SerializedName("qua_cntu")
    lateinit var qua_cntu: String
    @SerializedName("qua_cl")
    lateinit var qua_cl: String
    @SerializedName("qua_ph")
    lateinit var qua_ph: String
}
以上是建立接取API的必要步驟,這邊完成之後就是開始畫面與API的互動接取步驟了,這邊先從畫面布置的動作開始。
<?xml version="1.0" encoding="utf-8"?>
<androidx.constraintlayout.widget.ConstraintLayout xmlns:android="http://schemas.android.com/apk/res/android"
    xmlns:app="http://schemas.android.com/apk/res-auto"
    xmlns:tools="http://schemas.android.com/tools"
    android:layout_width="match_parent"
    android:layout_height="match_parent"
    tools:context=".WaterQuality.WaterQuality">

    <androidx.appcompat.widget.Toolbar
        android:id="@+id/toolbar2"
        android:layout_width="match_parent"
        android:layout_height="wrap_content"
        android:background="?attr/colorPrimary"
        android:minHeight="?attr/actionBarSize"
        android:textAlignment="center"
        android:theme="?attr/actionBarTheme"
        app:layout_constraintEnd_toEndOf="parent"
        app:layout_constraintStart_toStartOf="parent"
        app:layout_constraintTop_toTopOf="parent" />

    <ImageView
        android:id="@+id/backToHome"
        android:layout_width="40dp"
        android:layout_height="40dp"
        app:layout_constraintBottom_toBottomOf="@+id/toolbar2"
        app:layout_constraintStart_toStartOf="@+id/toolbar2"
        app:layout_constraintTop_toTopOf="@+id/toolbar2"
        app:srcCompat="?attr/homeAsUpIndicator" />

    <TextView
        android:layout_width="wrap_content"
        android:layout_height="wrap_content"
        android:text="台北水質檢測API"
        android:textColor="@color/white"
        android:textSize="32dp"
        app:layout_constraintBottom_toBottomOf="@+id/toolbar2"
        app:layout_constraintEnd_toEndOf="@+id/toolbar2"
        app:layout_constraintStart_toStartOf="@+id/toolbar2"
        app:layout_constraintTop_toTopOf="@id/toolbar2" />

    <androidx.recyclerview.widget.RecyclerView
        android:id="@+id/waterQualityRecyclerView"
        android:layout_width="0dp"
        android:layout_height="0dp"
        app:layout_constraintBottom_toBottomOf="parent"
        app:layout_constraintEnd_toEndOf="parent"
        app:layout_constraintStart_toStartOf="parent"
        app:layout_constraintTop_toBottomOf="@+id/toolbar2" />
</androidx.constraintlayout.widget.ConstraintLayout>
xml布置文件預覽圖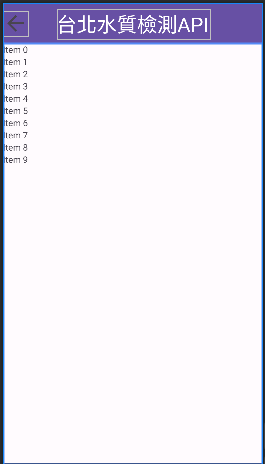
RecyclerView_item
<?xml version="1.0" encoding="utf-8"?>
<androidx.constraintlayout.widget.ConstraintLayout xmlns:android="http://schemas.android.com/apk/res/android"
    xmlns:tools="http://schemas.android.com/tools"
    android:layout_width="match_parent"
    android:layout_height="wrap_content"
    xmlns:app="http://schemas.android.com/apk/res-auto">

    <LinearLayout
        android:id="@+id/DataLinearLayout"
        android:layout_width="match_parent"
        android:layout_height="wrap_content"
        android:orientation="vertical">

        <LinearLayout
            android:layout_width="match_parent"
            android:layout_height="match_parent"
            android:orientation="horizontal">
            <LinearLayout
                android:layout_width="wrap_content"
                android:layout_height="match_parent"
                android:layout_marginBottom="5dp"
                android:layout_weight="0"
                android:orientation="vertical">

                <TextView
                    android:layout_width="match_parent"
                    android:layout_height="wrap_content"
                    android:text="Date:" />

                <TextView
                    android:layout_width="match_parent"
                    android:layout_height="wrap_content"
                    android:text="Time:" />

                <TextView
                    android:layout_width="match_parent"
                    android:layout_height="wrap_content"
                    android:text="Name:" />
            </LinearLayout>
            <LinearLayout
                android:layout_width="wrap_content"
                android:layout_height="match_parent"
                android:layout_marginBottom="5dp"
                android:layout_weight="1"
                android:orientation="vertical">

                <TextView
                    android:id="@+id/updateDate"
                    android:layout_width="match_parent"
                    android:layout_height="wrap_content"
                    android:text="2023-09-22" />

                <TextView
                    android:id="@+id/updateTime"
                    android:layout_width="match_parent"
                    android:layout_height="wrap_content"
                    android:text="11:45:00" />

                <TextView
                    android:id="@+id/codeName"
                    android:layout_width="match_parent"
                    android:layout_height="wrap_content"
                    android:maxLength="6"
                    android:ellipsize="none"
                    android:text="捷運忠孝復興站" />
            </LinearLayout>
            <LinearLayout
                android:layout_width="wrap_content"
                android:layout_height="match_parent"
                android:layout_marginBottom="5dp"
                android:layout_weight="0"
                android:orientation="vertical">
                <TextView
                    android:layout_width="match_parent"
                    android:layout_height="wrap_content"
                    android:text="Long:" />

                <TextView
                    android:layout_width="match_parent"
                    android:layout_height="wrap_content"
                    android:text="Lat:" />

                <TextView
                    android:layout_width="match_parent"
                    android:layout_height="wrap_content"
                    android:text="ID:" />
            </LinearLayout>
            <LinearLayout
                android:layout_width="wrap_content"
                android:layout_height="match_parent"
                android:layout_marginBottom="5dp"
                android:layout_weight="1"
                android:orientation="vertical">
                <TextView
                    android:id="@+id/longitude"
                    android:layout_width="match_parent"
                    android:layout_height="wrap_content"
                    android:text="121.569433" />

                <TextView
                    android:id="@+id/latitude"
                    android:layout_width="match_parent"
                    android:layout_height="wrap_content"
                    android:text="25.114194" />

                <TextView
                    android:id="@+id/qua_id"
                    android:layout_width="match_parent"
                    android:layout_height="wrap_content"
                    android:text="CS00" />
            </LinearLayout>
            <LinearLayout
                android:layout_width="wrap_content"
                android:layout_height="match_parent"
                android:layout_marginBottom="5dp"
                android:layout_weight="0"
                android:orientation="vertical">
                <TextView
                    android:layout_width="match_parent"
                    android:layout_height="wrap_content"
                    android:text="濁度:" />

                <TextView
                    android:layout_width="match_parent"
                    android:layout_height="wrap_content"
                    android:text="餘氯(mg/L):" />

                <TextView
                    android:layout_width="match_parent"
                    android:layout_height="wrap_content"
                    android:text="酸度(pH):" />
            </LinearLayout>
            <LinearLayout
                android:layout_width="wrap_content"
                android:layout_height="match_parent"
                android:layout_marginBottom="5dp"
                android:layout_weight="1"
                android:orientation="vertical">
                <TextView
                    android:id="@+id/qua_cntu"
                    android:layout_width="match_parent"
                    android:layout_height="wrap_content"
                    android:text="0.02" />

                <TextView
                    android:id="@+id/qua_cl"
                    android:layout_width="match_parent"
                    android:layout_height="wrap_content"
                    android:text="0.53" />

                <TextView
                    android:id="@+id/qua_ph"
                    android:layout_width="match_parent"
                    android:layout_height="wrap_content"
                    android:text="7" />
            </LinearLayout>
        </LinearLayout>
    </LinearLayout>
    <View
        android:layout_width="match_parent"
        android:layout_height="1dp"
        android:background="#000000"
        app:layout_constraintTop_toBottomOf="@+id/DataLinearLayout"
        tools:ignore="MissingConstraints" />

</androidx.constraintlayout.widget.ConstraintLayout>
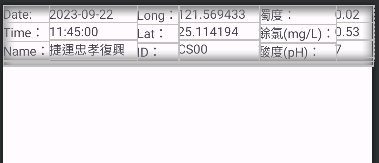
data類別的 WaterQualityData 去建立傳入資料格式。onCreateViewHolder的view變數需要更改成自己設置的 "item_layout" 的名稱。waterQualityList是傳入後的資料轉成List型態的WaterQualityData資料類別。onBindViewHolder中將ViewHolder中所定義的元件設置參數資料 = 設定在waterQualityList中的對應位置的API資料class WaterQualityAdapter (private val waterQualityList: List<WaterQualityData>): RecyclerView.Adapter<WaterQualityAdapter.ViewHolder>(){
class ViewHolder(itemView: View) : RecyclerView.ViewHolder(itemView) {
val updateDate: TextView = itemView.findViewById(R.id.updateDate)
val updateTime: TextView = itemView.findViewById(R.id.updateTime)
val codeName: TextView = itemView.findViewById(R.id.codeName)
val longitude: TextView = itemView.findViewById(R.id.longitude)
val latitude: TextView = itemView.findViewById(R.id.latitude)
val quaId: TextView = itemView.findViewById(R.id.qua_id)
val quaCntu: TextView = itemView.findViewById(R.id.qua_cntu)
val quaCl: TextView = itemView.findViewById(R.id.qua_cl)
val quaPh: TextView = itemView.findViewById(R.id.qua_ph)
}
override fun onCreateViewHolder(parent: ViewGroup, viewType: Int): ViewHolder {
val view = LayoutInflater.from(parent.context).inflate(R.layout.waterqualityitem, parent, false)
return ViewHolder(view)
}
override fun onBindViewHolder(holder: ViewHolder, position: Int) {
val data = waterQualityList[position]
holder.updateDate.text = data.update_date
holder.updateTime.text = data.update_time
holder.codeName.text = data.code_name
holder.longitude.text = data.longitude
holder.latitude.text = data.latitude
holder.quaId.text = data.qua_id
holder.quaCntu.text = data.qua_cntu
holder.quaCl.text = data.qua_cl
holder.quaPh.text = data.qua_ph
}
override fun getItemCount(): Int {
return waterQualityList.size
}
}
data class WaterQualityData(
    val update_date: String,
    val update_time: String,
    val code_name: String,
    val longitude: String,
    val latitude: String,
    val qua_id: String,
    val qua_cntu: String,
    val qua_cl: String,
    val qua_ph: String
)
class WaterQuality : AppCompatActivity() {
    private val TAG = "WaterQuality"

    // 建立初始化物件 & 延遲初始化物件建立
    private lateinit var recyclerView: RecyclerView
    private lateinit var adapter: WaterQualityAdapter
    private val service  = AppClientManager.client.create(ApiService::class.java)
    private lateinit var imageView: ImageView

    override fun onCreate(savedInstanceState: Bundle?) {
        // 建立時所產生的
        super.onCreate(savedInstanceState)
        setContentView(R.layout.activity_water_quality)

        // 這邊開始接收API
        service.getPosts()
            .subscribeOn(Schedulers.io())
            .observeOn(AndroidSchedulers.mainThread())
            .subscribe(
                {response ->
                    // 定義posts為回覆所接收API的資料
                    val posts = response.body()
                    adapter = WaterQualityAdapter(listOf())

                    // 判斷是否有資料
                    if (posts != null) {
                        // 在這邊處理從API接取的數據
                        val items = response.body()?.item // 獲取item列表
                        if (items != null) {
                            // 建立List來儲存接取的Data參數資料
                            val waterQualityList = mutableListOf<WaterQualityData>()
                            for (item in items) {
                                val updateDate = item.update_date
                                val updateTime = item.update_time
                                val codeName = item.code_name
                                val longitude = item.longitude
                                val latitude = item.latitude
                                val quaId = item.qua_id
                                val quaCntu = item.qua_cntu
                                val quaCl = item.qua_cl
                                val quaPh = item.qua_ph

                                // 把數據加入WaterQualityData列表中
                                waterQualityList.add(WaterQualityData(updateDate, updateTime, codeName, longitude, latitude, quaId, quaCntu, quaCl, quaPh))
                            }

                            // 全部接取完成後將Adapter建立並傳入資料
                            adapter = WaterQualityAdapter(waterQualityList)

                            // 設置Adapter並通知資料設置變換
                            recyclerView.adapter = adapter
                            adapter.notifyDataSetChanged()
                        }
                        // 獲取接取狀態的資料後Toast出來顯示。
                        val status = posts.httpMessage
                        Toast.makeText(this, "Status: $status", Toast.LENGTH_SHORT).show()
                    } else {
                        // 這邊處理若接取的資料為空狀態時的事件。
                    }
                },
                { error ->
                    println(error)
                }
            )
        // 這邊是圖像,功能為返回主頁面
        imageView = findViewById(R.id.backToHome)
        imageView.setOnClickListener {
            val intent = Intent(this, MainActivity::class.java)
            startActivity(intent)
        }
        // 這邊是初始化RecyclerView並定義元件
        recyclerView = findViewById(R.id.waterQualityRecyclerView)
        recyclerView.layoutManager = LinearLayoutManager(this)
    }
}
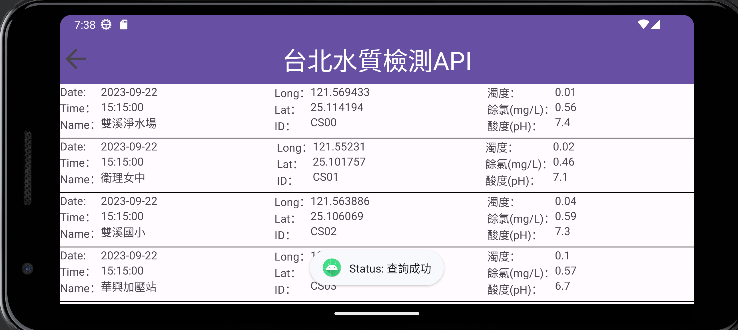
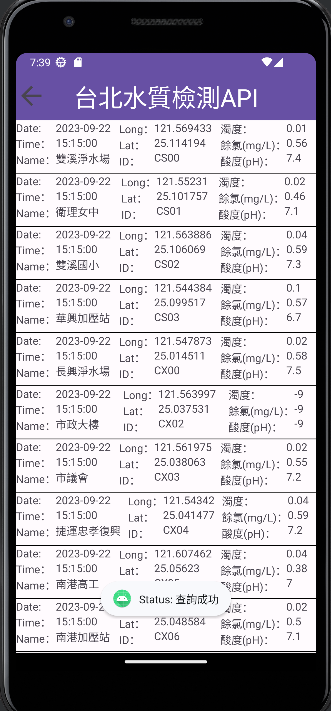
以上是今天使用Kotlin撰寫的接取API資料小專案,有關於如何接取API的retrofit、RxJava等套件我在去年的文章中皆有詳細說明與操作,不熟悉的新朋友可以去看一看我之前寫的鐵人文章,感謝。![]()
