在【Day - 25】中,我們完成歷史對話的儲存,並且已預先建立了一個聊天室功能的資料表。現在,我們將使用這個資料表,來實現一個與ChatGPT左側聊天室選單相似的功能。過去幾天,我們已經介紹了Ionic的Sheet Modal和Navigation,這兩個元件為APP增添了許多豐富且獨特的互動體驗。而今天,我們將結合Menu和Alert這兩個元件,再次為APP注入更多新鮮元素!
首先,打開【Day - 25】中所建立的sqlitedb.service.ts。在這個檔案裡,我們加入了三個新的操作方法:「新增」、「刪除」及「選取」聊天室的資料。需要注意的是,當我們選擇刪除某個聊天室時,相關的歷史對話也應該同時被刪除,以確保資料的一致性和完整性:
public async addChatRoom() {
  try {
    //更新所有聊天室的選擇狀態為未選擇
    await this.db.query('UPDATE chatroomdb SET selecting = 0');

    //新增新的聊天室,並將其設置為已選擇
    const query = 'INSERT INTO chatroomdb (name, selecting) VALUES (?, ?)';

    //先固定聊天室名稱,未來可以再自行修改成使用者自定義
    const values = ['英文口說聊天室', 1];
    const result = await this.db.query(query, values);

    //重新讀取聊天室清單和歷史對話資料
    await this.loadChatRoomData();
    await this.loadChatHistoryData();
    return result;
  } catch (error) {
    console.error("Error adding chat room:", error);
    return;
  }
}

public async selectChatRoom(id: number) {
  try {
    //更新所有聊天室的選擇狀態為未選擇
    await this.db.query('UPDATE chatroomdb SET selecting = 0');

    //根據chatRoomId將特定聊天室的選擇狀態設置為已選擇
    await this.db.query('UPDATE chatroomdb SET selecting = 1 WHERE chatroomid = ?', [id]);

    //重新讀取聊天室清單和歷史對話資料
    await this.loadChatRoomData();
    await this.loadChatHistoryData();
  } catch (error) {
    console.error("Error selecting chat room:", error);
  }
}

public async deleteChatRoom(id: number) {
  try {
    //刪除與聊天室相關的歷史對話資料
    const deleteChatHistoryQuery = 'DELETE FROM chathistorydb WHERE chatroomid = ?';
    await this.db.query(deleteChatHistoryQuery, [id]);

    //刪除聊天室
    const deleteChatRoomQuery = 'DELETE FROM chatroomdb WHERE chatroomid = ?';
    await this.db.query(deleteChatRoomQuery, [id]);

    //重新讀取聊天室清單和歷史對話資料
    await this.loadChatRoomData();
    await this.loadChatHistoryData();
  } catch (error) {
    console.error(`Error deleting chat room with chatroomid: ${id}`, error);
  }
}
接著,建立ChatMenu元件。在chatmenu.component.ts檔案裡,注入MenuController和SQLite Service兩個服務。當進行「新增」、「刪除」及「選取」聊天室的操作時,我們將會調用SQLite Service中對應的方法來執行這些操作:
constructor(private menuCtrl: MenuController,
  private sqlitedbService: SqlitedbService) { }

get chat$() {
  return this.sqlitedbService.chat$;
}

onChatRoomClick(id: number) {
  this.sqlitedbService.selectChatRoom(id);
  this.menuCtrl.close();
}

onChatRoomDeleteClick(id: number) {
	this.sqlitedbService.deleteChatRoom(id);
}

onAddChatRoomClick() {
  this.sqlitedbService.addChatRoom();
}
在chatmenu.component.html模板加入IonMenu元件並設定以下三個屬性性:
<ion-menu #menu menuId="chat-menu" contentId="main-content" maxEdgeStart="0">
  <ion-header>
    <ion-toolbar>
      <div class="border-b border-gray-300">
        <div
          class="mx-2 my-4 p-2 border-2 border-gray-400 rounded-lg bg-white flex flew-row items-center justify-center text-gray-500"
          (click)="onAddChatRoomClick()">
          <ion-icon class="text-xl" name="add-circle-outline"></ion-icon>
          <span>新增聊天室</span>
        </div>
      </div>
    </ion-toolbar>
  </ion-header>

  <ion-content class="ion-padding">
    <ng-container *ngFor="let item of (chat$ | async); let i = index">
      <div class="flex flex-col">
        <div
          [class]="'ion-activatable relative overflow-hidden flex flex-row items-center m-2 p-2 rounded-lg ' + (item.selecting ? 'bg-gradient-to-br from-purple-500 to-blue-400 border-2 border-gray-300 text-white' : '')">
          <div class="flex-1 flex flex-row items-center" (click)="onChatRoomClick(item.chatroomid)">
            <ion-icon class="flex-none text-xl" name="chatbubbles-outline"></ion-icon>
            <span class="flex-1 mx-2">{{ item.name }}</span>
          </div>
          <div class="flex-none flex items-center p-2" (click)="onChatRoomDeleteClick(item.chatroomid)">
            <ion-icon *ngIf="!item.selecting" class="flex-none text-xl text-rose-400" name="trash-outline"></ion-icon>
          </div>
          <ion-ripple-effect></ion-ripple-effect>
        </div>
      </div>
    </ng-container>
  </ion-content>
</ion-menu>
接著,我們需要建立一個ChatMenuButton元件,作為觸發選單的按鈕。這個按鈕在許多應用中都能見到,也被稱為漢堡式選單(Hamburger Menu):
<div class="m-2 flex items-center">
  <div class="ion-activatable relative overflow-hidden bg-gradient-to-br from-purple-500 to-blue-400 border-2 border-gray-300 rounded-lg w-10 h-10 flex items-center justify-center"
    (click)="onOpenCloseMenuClick()">
    <ion-icon class="text-3xl text-white font-bold" name="menu-outline"></ion-icon>
    <ion-ripple-effect></ion-ripple-effect>
  </div>
</div>
於chatmenubutton.component.ts檔案中,注入了MenuController服務。當該按鈕被按下時,它將調用open()方法,並傳入之前在Menu元件中設定的menuId,以打開對應的選單:
constructor(private menuCtrl: MenuController) { }

onOpenCloseMenuClick() {
  this.menuCtrl.open('chat-menu');
}
最後在Home主頁中,加入ChatMenu元件,並將ChatMenuButton元件按鈕放置在ion-header和ion-toolbar之內,可以確保按鈕與工具欄對齊:
<ion-header>
  <ion-toolbar>
    <!-- 聊天室選單按鈕 -->
    <app-chatmenubutton></app-chatmenubutton>
  </ion-toolbar>
</ion-header>

<!-- 聊天室選單 -->
<app-chatmenu></app-chatmenu>

<div class="w-full h-full bg-white" id="main-content">
  <div class="flex flex-col w-full h-full">
    <div class="flex-none flex justify-center items-center">
      <!-- 文法提示 -->
      <app-grammermistake></app-grammermistake>
    </div>
    <div class="relative flex flex-col w-full h-full">
      <!-- 3D機器人動畫 -->
      <app-robot3d class="flex-grow flex-shrink w-full pb-10"></app-robot3d>
    </div>
    <div class="flex-none flex flex-row justify-between items-center pb-10 relative">
      <div class="flex-grow">
        <!-- 重播按鈕 -->
        <app-replayaudio></app-replayaudio>
      </div>
      <div class="flex-grow">
        <!-- 錄音按鈕 -->
        <app-voicerecording (getRecordingBase64Text)="OnGetRecordingBase64Text($event)"></app-voicerecording>
      </div>
      <div class="flex-grow">
        <!-- 歷史對話 -->
        <app-chathistorybutton></app-chathistorybutton>
      </div>
    </div>
  </div>
</div>
進行測試時會發現,當使用ion-header結合ion-toolbar時,頂部會出現一個較為深色的工具列。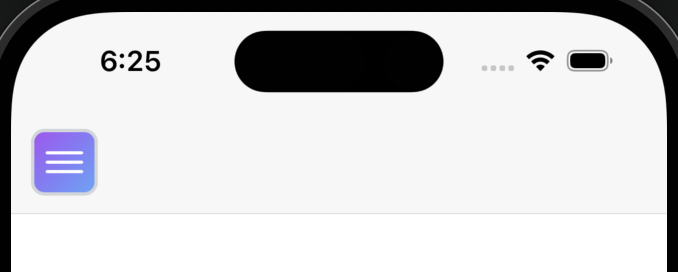
若不使用這些元件,在iOS平台上,APP的內容會涵蓋「StatusBar」,因此需要自行計算StatusBar高度的問題(包括劉海和動態島的區塊)。
為了使header樣式和白色底背景一致,我使用Ionic所提供的CSS變數,對ion-toolbar進行顏色調整並消除其外框:
ion-toolbar {
  --background: white;
  --border-width: 0 !important;
}
而在Android平台上,header預設帶有陰影效果。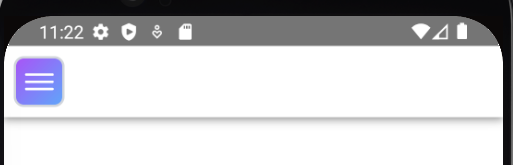
我們可以藉由覆寫.header-md來移除該陰影效果:
.header-md {
  box-shadow: none !important;
}
最終,我們成功的達到當切換不同的聊天室時,相應的歷史對話也會隨著改變的效果。
當使用者按下刪除按鈕時,直接移除聊天室可能會有一個糟糕的的使用者體驗。為了確認使用者的意圖,我們可以使用Ionic的Alert元件來添加一個原生風格的提示視窗,詢問使用者是否確定要刪除。
透過注入AlertController服務,我們可以方便快速使用Ionic的Alert功能:
constructor(private menuCtrl: MenuController,
  private sqlitedbService: SqlitedbService,
  private alertCtrl: AlertController) { }
使用alertCtrl.create()方法時,我們可以利用AlertOptions物件來定制Alert的外觀和功能。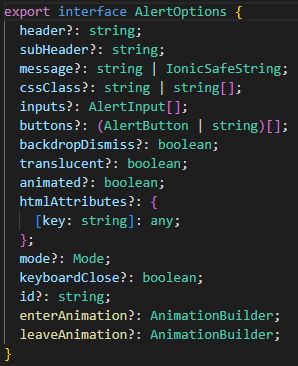
在buttons陣列中,為使用者提供了按鈕選項,包含「取消」和「刪除」兩個選擇。當使用者選擇「刪除」時,將會觸發SQLite的刪除方法。而為了突顯「刪除」按鈕的重要性,我們使用了cssClass來賦予它紅色的外觀
async onChatRoomDeleteClick(id: number) {
  const alert = await this.alertCtrl.create({
    message: '確定要刪除聊天室?',
    buttons: [{
      text: '取消',
      role: 'cancel'
    },
    {
      text: '刪除',
      role: 'confirm',
      cssClass: 'delete-color',
      handler: () => {
        this.sqlitedbService.deleteChatRoom(id);
      },
    },],
  });
  await alert.present();
}
新增的delete-color必須是global範圍的,因此我們將它添加在src\theme\variables.scss檔案中:
.delete-color {
  color: rgb(251 113 133) !important;
}
最後,讓我們看一下實際操作的成果吧!
今天,我們運用Ionic的Menu和Alert元件,成功打造出聊天室的選單功能,讓使用者可以輕鬆的開始新的對話。這不僅呈現了Ionic元件的多樣性和便利性,也讓我們更深入了解它的強大之處。時間過得真快,不知不覺,鐵人挑戰已進入尾聲。在【Day - 1】所設定的目標和功能都已逐一達成。在剩下幾天的鐵人賽中,我們還會更新APP的圖示、啟動畫面及調整狀態欄設定,為這次的鐵人賽畫下完美的句點哦!
Github專案程式碼:Ionic結合ChatGPT - Day27