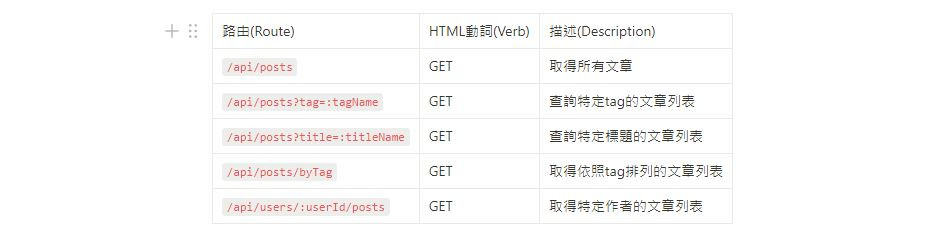
今天我們要來把剩下查詢相關的API開發完成,今天要開發的API如下:
我們可以把tag和title都當作查詢的參數去設計這個API。
這樣的好處是可以更靈活地增加查詢條件,當有新的查詢條件時不需要再去新增一個路由。
因為我們之前已經建立過posts-controller.js,就直接在裡面新增這次的API邏輯。
//post-controller.js

const HttpError = require('../models/http-error');
const Post = require('../models/Post');

...(略)

//取得所有文章
exports.getAllPost =  async (req,res,next) =>{
    try {
        const { tag, title } = req.query;

        let queryObj = {};

        //若有tag參數
        if (tag) {
           queryObj.tags = { $regex: new RegExp(tag, 'i') }; // 使用正規表達式進行模糊搜尋
        }

        //若有title參數
        if (title) {
            queryObj.title = new RegExp(title, 'i'); // 使用正規表達式進行模糊搜尋
        }

        const posts = await Post.find(queryObj);

        res.json(posts);

    } catch (err) {
        next(new HttpError('Server error', 500));
    }
}
接著到posts-routes.js新增取得所有文章API的路徑,並記得加上昨天開發的auth middleware
//posts-routes.js
const express = require("express");
const router = express.Router();
const postControllers = require("../../controllers/posts-controller");
const auth = require("../../middleware/auth");

...(略)

//@router GET api/posts
//@desc 取得所有文章
//@access Public
router.get("/", auth, postControllers.getAllPost);

module.exports = router;
雖然可以透過上一支API來取得文章列表後再到前端透過tag來進行分組,但這裡想嘗試看看在後端進行處理後再回傳。
我們希望可以得到的回傳格式如下
[
    {
       "tag": "frontend",
       "posts" : [
           {
               "title":"文章1",
               "content":"內容1",
               "tags": ['frontend','fullstack'],
               "createdDate": "2023-09-24T09:31:47.123Z",
               "authorId":"65142d3f92e81e096e3d7752"
           },
            {
               "title":"文章2",
               "content":"內容2",
               "tags": ['frontend'],
               "createdDate": "2023-09-22T10:21:55.123Z",
               "authorId":"691f3d3f92e81e096e3d7752"
           },
            {
               "title":"文章3",
               "content":"內容3",
               "tags": ['frontend','node'],
               "createdDate": "2023-09-22T02:41:10.123Z",
               "authorId":"761f3d3f92e81e096e3d7752"
           }
       ]
    },
    {
       "tag": "fullstack",
       "posts" : [
           {
               "title":"文章1",
               "content":"內容1",
               "tags": ['frontend','fullstack'],
               "createdDate": "2023-09-24T09:31:47.123Z",
               "authorId":"961f3d3f92e81e096e3d7752"
           }
       ]
    },
]
一樣在post-controller.js新增API handle function
//post-controller.js

const HttpError = require('../models/http-error');
const Post = require('../models/Post');

...(略)

//取得所有文章(依照標籤分類)
exports.getPostsByTag =  async (req,res,next) =>{
     try {
        // 找出所有的標籤
        const distinctTags = await Post.distinct('tags');

        // 對於每個標籤,找出含有該標籤的文章
        const results = [];

        for (let tag of distinctTags) {
            const postsWithTag = await Post.find({ tags: tag }).sort({ createdDate: -1 }).select('title content tags createdDate');
            results.push({
                tag,
                posts: postsWithTag
            });
        }

        res.json(results);

    } catch (err) {
        next(new HttpError('Server error', 500));
    }
}
以上做法看似很直觀沒有任何錯誤,但這樣其實隱含著效能問題,每當我們迴圈一次就要查詢一次資料庫,若有10個不一樣的tag,就要查詢10次。
此時就可以使用MongoDB中的Aggregation Pipeline來優化這樣的情境。
它允許開發者在MongoDB伺服器上對資料集進行一系列的操作和轉換。
基本概念:
常見的聚合階段:
這裡只簡單介紹,詳細資料請見官網
//取得所有文章(依照標籤分類)
exports.getPostsByTag =  async (req,res,next) =>{
 try {
      const results = await Post.aggregate([
            // 使用 $unwind 來擴展 tags這個陣列
            {
                $unwind: "$tags"
            },
            //根據tag來組合回傳的資料
            {
                $group: {
                    _id: "$tags", // 使用 tag 作為群組的 ID
                    posts: {
                        $push: {
                            title: "$title",
                            content: "$content",
                            tags: "$tags",
                            authorId: "$authorId",
                            createdDate: "$createdDate",
                        }
                    }
                }
            },
            //根據文章建立時間排序
            {
                $sort: { "posts.createdDate": -1 }
            },
            // 調整回傳資料
            {
                $project: {
                    tag: "$_id",
                    posts: 1, //保留posts。數字1代表該欄位被包含在回傳資料中。
                    _id: 0  // 將_id從回傳內容中排除。因為每個MongoDB文件都會有一個自動生成的_id,但在這裡我們不希望它出現在回傳的資料中
                }
            }
        ]);

        res.json(results);

    } catch (err) {
        next(new HttpError('Server error', 500));
    }
}
調整後只需要呼叫一次資料庫,大幅優化效能。
接著到posts-routes.js新增API的路徑
//posts-routes.js
const express = require("express");
const router = express.Router();
const postControllers = require("../../controllers/posts-controller");
const auth = require("../../middleware/auth");

...(略)

//@router GET api/posts/byTag
//@desc 取得所有文章(依照標籤分類)
//@access Public
router.get("/byTag", auth, postControllers.getPostsByTag);

module.exports = router;
在users-controller.js新增API handle function
//users-controller.js

const HttpError = require('../models/http-error');
const User = require('../models/User');
const Post = require('../models/Post');  //記得要引入post model

//取得該使用者發布的文章
exports.getUserPosts = async (req, res) => {
    try {
        //先判斷該User是否存在
        const userId = req.params.userId;
        const user = await User.findById(userId);
        if (!user) {
            return next(new HttpError('找不到該使用者', 404));
        }

        const posts = await Post.find({ authorId: userId });

        res.json(posts);

    } catch (err) {
        next(new HttpError('Server error', 500));
    }
};
到users-routes.js新增route,並記得加上auth middleware
//users-routes.js

const express = require('express');
const router = express.Router();
const userControllers = require('../../controllers/users-controller');
const auth = require("../../middleware/auth");


//@router GET api/users/:userId/posts
//@desc 取得使用者發佈的文章
//@access Public
router.get('/:userId/posts',auth,userControllers.getUserPosts);