這篇終於進入到 Strawberry 跟 Django 整合的部分,在這邊我會在部落格應用程式模組內建立一個新的模組,用來放跟 GraphQL 相關的程式碼。
首先是建立模組,一樣回到專案根目錄,執行:
$ mkdir -p server/app/blog/graph
$ touch server/app/blog/graph/__init__.py
上面的步驟完成後,就完成建立 graph 的模組。
接下來將部落格應用的 Django 模型轉換成 GraphQL 的型態,在 graph 的模組中加入types.py檔案:
$ touch server/app/blog/graph/types.py
後續跟部落格應用有關的 GraphQL 型態都放到這個 Python 檔案中。
接著就編輯types.py,幫我們的部落格的模型加進 GraphQL 型態:
import strawberry_django

from server.app.blog import models as blog_models

__all__ = (
    "Post",
    "Comment",
    "Tag",
    "Category",
)

@strawberry_django.type(blog_models.Post, fields="__all__")
class Post:
    pass

@strawberry_django.type(blog_models.Comment, fields="__all__")
class Comment:
    pass

@strawberry_django.type(blog_models.Tag, fields=["name"])
class Tag:
    pass

@strawberry_django.type(
    blog_models.Category,
    exclude=["created_at", "motified_at"],
)
class Category:
    pass
在匯入部落格的模型的地方,將models另外使用別名成blog_models,方便辨識是哪個應用程式的模型,__all__的用途是標記當前哪些東西是可以給其他地方可以匯入使用。
後面使用strawberry_django.type方法,建立 GraphQL 型態,strawberry_django.type的第一個要帶入的引數是 Django 模型,後面的參數fields是傳入一個欄位名稱字串的列表,或是"__all__"來代表全部模型欄位都要轉成 GraphQL 型態的欄位,另外還有提供exclude參數的方式讓我們用傳入要忽略哪些模型欄位的列表,需要注意的是fields與exclude同時使用的話,exclude是會被忽略的。
再接下來我們使用剛剛建立好的 GraphQL 型態,來建立 GraphQL 查詢,先在 graph 模組中新增一個 Python 檔queries.py,
$ touch server/app/blog/graph/queries.py
接著編輯queries.py:
import typing
import strawberry
import strawberry_django

from server.app.blog.graph import types as blog_types

__all__ = (
    "Query",
)

@strawberry.type
class Query:
    posts: typing.List[blog_types.Post] = strawberry_django.field()
    tags: typing.List[blog_types.Tag] = strawberry_django.field()
    categories: typing.List[blog_types.Category] = strawberry_django.field()
    comments: typing.List[blog_types.Comment] = strawberry_django.field()
上面建立查詢的方法基本上跟前面單純使用 strawberry 的時候很類似,只差在定義欄位的地方,欄位的是使用strawberry_django.field,它預設的resolver會幫我們呼叫 Django ORM 的查詢功能,並回傳為 GraphQL 型態。
完成 GraphQL 查詢後,就要將查詢設定到 Schema 中。
這邊一樣建立一個放 Schema 相關程式碼的檔案:
$ touch server/schema.py
接者編輯schema.py:
import strawberry
import strawberry.tools

from server.app.blog.graph import queries as blog_queries

__all__ = ("schema",)

query = strawberry.tools.merge_types(
    "Query",
    (blog_queries.Query,),
)

schema = strawberry.Schema(query=query)
這邊我們使用strawberry.tools.merge_types,它可以多個 strawberry 的 GraphQL 型態合併成一個,這裡是將多個查詢型態合併成一個,再設定到 Schema 中,這樣的方式可以讓各自的應用程式裡面維護自己的 GraphQL 查詢。
使用 Django 建立 Strawberry GraphQL API 還有一個步驟,就是設定路由。
編輯server/urls.py:
from django.contrib import admin
from django.urls import path
+from strawberry.django.views import GraphQLView

+from server.schema import schema

urlpatterns = [
    path("admin/", admin.site.urls),
+   path("graphql/", GraphQLView.as_view(schema=schema)),
]
到這邊就可以啟動 Django 開發用伺服器了。
$ python manage.py runserver
Watching for file changes with StatReloader
Performing system checks...

System check identified no issues (0 silenced).
Django version 4.2.5, using settings 'server.settings'
Starting development server at http://127.0.0.1:8000/
Quit the server with CONTROL-C.
接者打開瀏覽器,連上http://127.0.0.1:8000/graphql/,就可以看到 GraphiQL 頁面。
這裡我們做一個簡單的查詢:
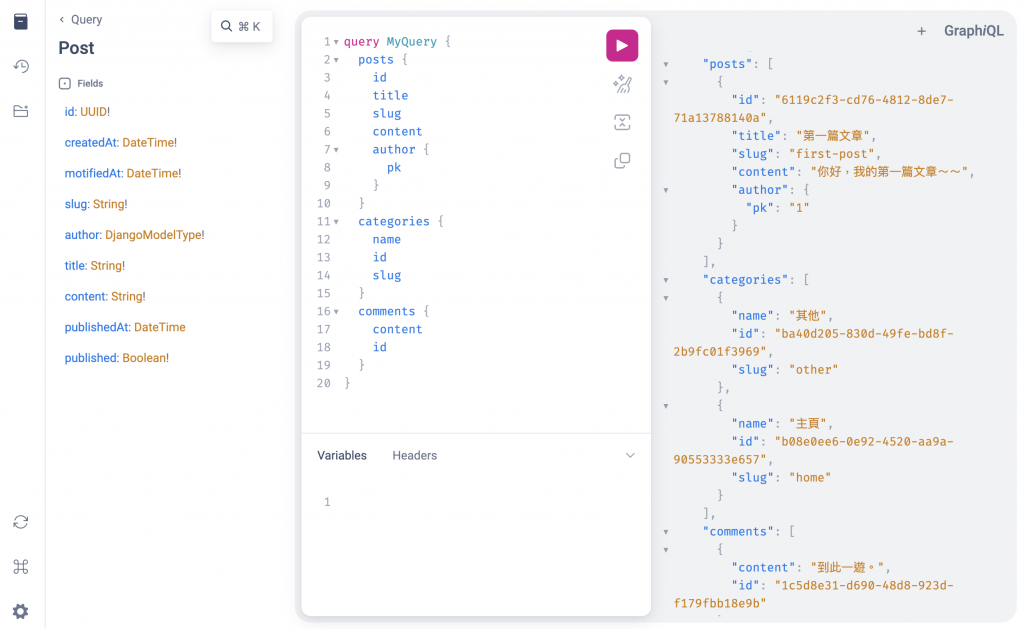
query MyQuery {
  posts {
    id
    title
    slug
    content
    author {
      pk
    }
  }
  categories {
    name
    id
    slug
  }
  comments {
    content
    id
  }
}
到這邊就建立完成一個最簡單 Django GraphQL 查詢 API。
這次修改內容可以參考 Git commit https://github.com/JiaWeiXie/django-graphql-tutorial/commit/5afd45439bbfa175f27f6395478677b5630fc112