前言
PopupWindow是Android中的一個彈出式窗口(彈窗)組件,用於在屏幕上方或下方顯示臨時性的內容或操作選項。它通常用於創建一種浮動的用戶界面,以提供額外的信息、功能或操作。以下是PopupWindow的一些關鍵特點和概述:
彈窗效果: PopupWindow通常以彈窗的形式顯示在屏幕上,覆蓋部分或全部的底層內容。這使得開發者可以實現一種輕量級的對話框效果,而無需創建一個全新的Activity。
自定義內容: 開發者可以自定義PopupWindow的內容,可以是文本、按鈕、圖像、列表、甚至自定義的佈局。這意味著你可以在PopupWindow中顯示幾乎任何類型的內容。
位置控制: 你可以控制PopupWindow顯示的位置,通常可以選擇在某個視圖的上方或下方顯示,也可以設置偏移量。這使得PopupWindow能夠根據需要顯示在屏幕的不同位置。
焦點和觸摸: 可以設置PopupWindow是否具有焦點(可接收用戶輸入)以及是否可以觸摸。這允許你決定是否要讓用戶與底層內容進行交互。
關閉和銷毀: PopupWindow通常具有關閉或銷毀的方法,使你能夠在合適的時候關閉彈窗。這可以通過按鈕點擊、屏幕外點擊、返回鍵按下等方式觸發。
動畫效果: 你可以為PopupWindow設置進入和退出時的動畫效果,以增強用戶體驗。
適用場景: PopupWindow在許多應用場景中都很有用,例如在列表項上顯示操作菜單、在表單中顯示幫助信息、在地圖應用中顯示信息窗口等。
總之,PopupWindow是一個強大的工具,可用於改善Android應用程序的用戶界面和交互性。通過合理使用PopupWindow,你可以為用戶提供更多的信息和功能,同時保持界面簡潔和易於使用。
功能
這裡我會試範PopupWindow怎麼使用的簡單小範本,在這裡我會試範怎麼把RecycleView放入PopupWindow裡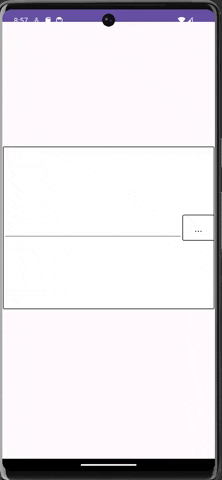
注意(Notice):要先在drawable放入border.xml的程式碼,它的功能是邊框設計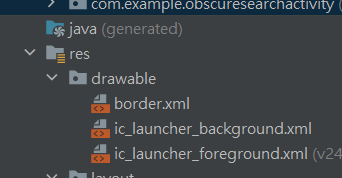
border.xml
<?xml version="1.0" encoding="utf-8"?>
<shape xmlns:android="http://schemas.android.com/apk/res/android">
    <corners android:radius="2dp"/>
    <solid android:color="#FFFFFF"/>
    <stroke android:width="1dp"
        android:color="#000000"/>

</shape>
main_activity
<?xml version="1.0" encoding="utf-8"?>
<androidx.constraintlayout.widget.ConstraintLayout xmlns:android="http://schemas.android.com/apk/res/android"
    xmlns:app="http://schemas.android.com/apk/res-auto"
    xmlns:tools="http://schemas.android.com/tools"
    android:layout_width="match_parent"
    android:layout_height="match_parent"
    tools:context=".MainActivity">

    <LinearLayout
        android:layout_width="409dp"
        android:layout_height="314dp"
        android:gravity="center"
        android:orientation="horizontal"
        android:background="@drawable/border"
        app:layout_constraintBottom_toBottomOf="parent"
        app:layout_constraintEnd_toEndOf="parent"
        app:layout_constraintStart_toStartOf="parent"
        app:layout_constraintTop_toTopOf="parent"
        app:layout_constraintVertical_bias="0.436">

        <EditText
            android:id="@+id/editTextText"
            android:layout_width="0dp"
            android:layout_height="50dp"
            android:layout_weight="8.5"
            android:ems="10"
            android:inputType="text" />

        <TextView
            android:id="@+id/openDialogTextView"
            android:layout_width="0dp"
            android:layout_height="50dp"
            android:layout_weight="1.5"
            android:background="@drawable/border"
            android:gravity="center"
            android:text="..."
            android:textColor="@color/black"
            android:textSize="20sp" />
    </LinearLayout>

</androidx.constraintlayout.widget.ConstraintLayout>
popupwindow_layout.xml
我的Popupwindow部局的部分
<?xml version="1.0" encoding="utf-8"?>
<LinearLayout xmlns:android="http://schemas.android.com/apk/res/android"
    android:layout_width="200dp"
    android:layout_height="400dp"
    android:orientation="vertical">

    <androidx.recyclerview.widget.RecyclerView
        android:id="@+id/recyclerView"
        android:layout_width="match_parent"
        android:layout_height="0dp"
        android:layout_weight="1" />
</LinearLayout>
search_item_layout.xml
在RecycleView裡的子畫面布局的部分
<?xml version="1.0" encoding="utf-8"?>
<LinearLayout xmlns:android="http://schemas.android.com/apk/res/android"
    android:layout_width="match_parent"
    android:layout_height="wrap_content">

    <TextView
        android:id="@+id/textView4"
        android:layout_width="match_parent"
        android:layout_height="wrap_content"
        android:layout_weight="1"
        android:background="@color/black"
        android:textColor="@color/white"
        android:text="TextView" />
</LinearLayout>
layout看到的總結果
會看到3個部局
MainActivity
package com.example.obscuresearchactivity;

import androidx.appcompat.app.AppCompatActivity;
import androidx.recyclerview.widget.LinearLayoutManager;
import androidx.recyclerview.widget.RecyclerView;


import android.os.Bundle;
import android.util.Log;
import android.view.Gravity;
import android.view.View;
import android.view.ViewGroup;
import android.widget.PopupWindow;
import android.widget.TextView;

import java.util.ArrayList;
import java.util.List;

public class MainActivity extends AppCompatActivity {
    private TextView openPopupTextView;
    private PopupWindow popupWindow;
    private RecyclerView recyclerView;

    @Override
    protected void onCreate(Bundle savedInstanceState) {
        super.onCreate(savedInstanceState);
        setContentView(R.layout.activity_main);

        ById();//綁定主畫面元件
        callPopupWindow();//設Dialog 對話框設定
    }
    //綁定主畫面元件
    public void ById(){
        openPopupTextView  = findViewById(R.id.openDialogTextView);
    }

    //當TextView被按下就跳出PopupWindow對話框
    public void callPopupWindow(){
        openPopupTextView.setOnClickListener(new View.OnClickListener() {
            @Override
            public void onClick(View view) {
                showPopupWindow(view);
            }
        });
    }

    //設定並顯示PopupWindow
    public void showPopupWindow(View anchorView){

        View popupView = getLayoutInflater().inflate(R.layout.popupwindow_layout, null);
        recyclerView = popupView.findViewById(R.id.recyclerView);//綁定RecycleView的畫面
        setRecyclerView();//設定RecycleView

        // 設定 PopupWindow 的寬度和高度
        int width = ViewGroup.LayoutParams.WRAP_CONTENT;
        int height = ViewGroup.LayoutParams.WRAP_CONTENT;

        popupWindow = new PopupWindow(popupView, width, height, true);
        popupWindow.setOutsideTouchable(true);//的外部點擊是否可觸發關閉

        // 取得 TextView 的位置座標
        int[] location = new int[2];
        anchorView.getLocationOnScreen(location);
        int x = location[0] + anchorView.getWidth(); // 在右側

        // 在指定位置彈出 PopupWindow
        popupWindow.showAtLocation(anchorView, Gravity.NO_GRAVITY, x, location[1]);

    }
    //設定我的RecycleView
    public void setRecyclerView(){
        List<String> dataList = new ArrayList<>();
        generateFalseData(dataList);//建立假資料
        // 將數據添加到 dataList 中
        MyAdapter adapter = new MyAdapter(this, dataList);
        recyclerView.setAdapter(adapter);

        // 設置線性佈局管理器
        RecyclerView.LayoutManager layoutManager = new LinearLayoutManager(this);
        recyclerView.setLayoutManager(layoutManager);
    }
    //建立假資料
    public void generateFalseData(List<String> dataList){
        // 生成假資料
        for (int i = 1; i <= 20; i++) {
            dataList.add("Item " + i);
        }
    }
}
MyAdapter Class
因為有用到RecycleView所以有用到Adapter,目的是為了方便管理,在RecycleView有教過寫法了,這裡直接帶過
package com.example.obscuresearchactivity;

import android.content.Context;
import android.util.Log;
import android.view.LayoutInflater;
import android.view.View;
import android.view.ViewGroup;
import android.widget.TextView;
import androidx.annotation.NonNull;
import androidx.recyclerview.widget.RecyclerView;
import java.util.List;

public class MyAdapter extends RecyclerView.Adapter<MyAdapter.ViewHolder> {

    private List<String> dataList;
    private Context context;

    public MyAdapter(Context context, List<String> dataList) {
        this.context = context;
        this.dataList = dataList;
        Log.d("dataListSize",Integer.toString(dataList.size()));
    }

    @NonNull
    @Override
    public ViewHolder onCreateViewHolder(@NonNull ViewGroup parent, int viewType) {
        View view = LayoutInflater.from(parent.getContext()).inflate(R.layout.search_item_layout, parent, false);
        return new ViewHolder(view);
    }

    @Override
    public void onBindViewHolder(@NonNull ViewHolder holder, int position) {
        String itemData = dataList.get(position);
        Log.d("itemData:",itemData);
        holder.data_textView.setText(itemData);
    }

    @Override
    public int getItemCount() {
        return dataList.size();
    }

    public class ViewHolder extends RecyclerView.ViewHolder {
        TextView data_textView;
        public ViewHolder(View itemView) {
            super(itemView);
            data_textView = itemView.findViewById(R.id.textView4);
        }
    }
}
程式碼解說
    public void callPopupWindow(){
        openPopupTextView.setOnClickListener(new View.OnClickListener() {
            @Override
            public void onClick(View view) {
                showPopupWindow(view);
            }
        });
    }
    public void showPopupWindow(View anchorView){

        View popupView = getLayoutInflater().inflate(R.layout.popupwindow_layout, null);
        recyclerView = popupView.findViewById(R.id.recyclerView);//綁定RecycleView的畫面
        setRecyclerView();//設定RecycleView

        // 設定 PopupWindow 的寬度和高度
        int width = ViewGroup.LayoutParams.WRAP_CONTENT;
        int height = ViewGroup.LayoutParams.WRAP_CONTENT;

        popupWindow = new PopupWindow(popupView, width, height, true);
        popupWindow.setOutsideTouchable(true);//的外部點擊是否可觸發關閉

        // 取得 TextView 的位置座標
        int[] location = new int[2];
        anchorView.getLocationOnScreen(location);
        int x = location[0] + anchorView.getWidth(); // 在右側

        // 在指定位置彈出 PopupWindow
        popupWindow.showAtLocation(anchorView, Gravity.NO_GRAVITY, x, location[1]);

    }
3.setRecyclerView():
    //設定我的RecycleView
    public void setRecyclerView(){
        List<String> dataList = new ArrayList<>();
        generateFalseData(dataList);//建立假資料
        // 將數據添加到 dataList 中
        MyAdapter adapter = new MyAdapter(this, dataList);
        recyclerView.setAdapter(adapter);

        // 設置線性佈局管理器
        RecyclerView.LayoutManager layoutManager = new LinearLayoutManager(this);
        recyclerView.setLayoutManager(layoutManager);
    }
在RecycleView的章節中有特別說明做了,這裡直接帶過
--總結--
PopupWindow的優點處:
1.在部置位置方便,可以在指定的按鈕旁邊彈出,
2.靈活性高,我們可以客制化它內部的layout。
PopupWindow的缺點處:
1.因為靈活性高所以需要使用的方法較多
Dialog 和 PopupWindow 都是用於在 Android 應用程式中建立彈出式使用者界面的元件,但它們有不同的用途和特性,以下是它們之間的比較:
用途:
Dialog:通常用於顯示模式對話方塊,阻止使用者與背後的內容進行互動,直到對話方塊被關閉。它常用於警告、確 認、輸入資料等需要使用者干預的情況。
PopupWindow:通常用於在螢幕上方或下方顯示臨時性的內容或操作選項,通常不會阻止使用者與底層內容進行互 動。它常用於上下文選單、資訊提示、選擇項等。
互動性:
Dialog:通常是模式的,意味著使用者必須在對話方塊上完成某種操作,然後才能繼續與應用程式的其他部分互動。
PopupWindow:通常不是模式的,使用者可以同時與彈窗和底層內容進行互動。使用者可以點擊彈窗外部或按返回按 鈕來關閉 PopupWindow。
定位:
Dialog:通常居中顯示在螢幕上,雖然可以自訂位置,但通常不用於相對於特定視圖的位置顯示。
PopupWindow:可以相對於特定視圖的位置進行定位,通常用於根據觸發點在不同位置顯示。
外觀和自訂:
Dialog:通常提供了一些內建樣式,但自訂外觀和佈局相對較為複雜。通常需要使用自訂佈局檔案來實現。
PopupWindow:更加靈活,可以自訂外觀和內容,通常通過將佈局檔案填充到 PopupWindow 中來實現。
用法場景:
Dialog:適用於需要使用者明確互動的情況,如確認對話方塊、輸入對話方塊、警告框等。
PopupWindow:適用於顯示上下文選單、資訊提示、選擇項、快速操作等非模式需求。
總之,選擇使用 Dialog 還是 PopupWindow 取決於你的具體需求。如果需要創建一個模式對話方塊,通常使用 Dialog 更合適。如果需要在螢幕上方或下方顯示臨時性內容或操作選項,並且不需要阻止使用者與底層內容進行互動,那麼使用 PopupWindow 更合適。根據具體情況選擇合適的元件,以提供最佳的使用者體驗。


 iThome鐵人賽