前言
當你開發Android應用程式時,經常需要在不同的活動(Activity)之間進行轉跳,以實現應用程式中不同功能和畫面之間的切換。這個過程通常涉及使用Android的Intent,它是一種用於在不同組件之間進行通信的機制。本篇文章將介紹在Android應用程式中如何使用Intent實現以下功能:
轉跳功能:將應用程式從一個活動轉移到另一個活動。這是實現不同功能和畫面之間切換的基本操作。
返回功能:如何從一個活動返回到前一個活動,以實現流程控制和用戶導航。
資料傳遞到另一個畫面:如何使用Intent將數據(例如文字、圖像或其他資訊)從一個活動傳遞到另一個活動,以實現資訊共享和處理。
在這篇文章中,我們將探討這些主題的基本原則和實際示例,以幫助你更好地理解和應用Intent在Android應用程式中的使用。
功能
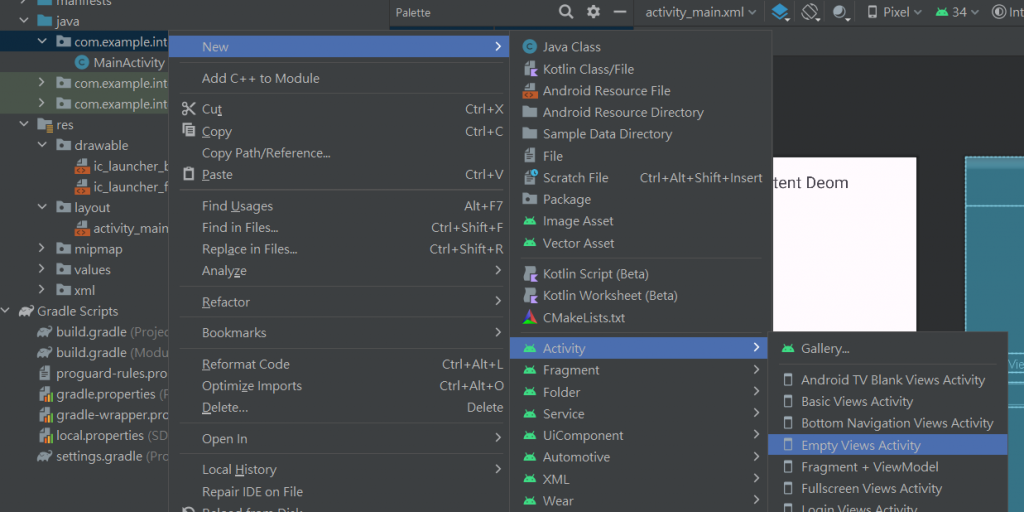
建立空的Activity
名稱的部分自行輸入想要的名子就好了,我這裡是用result_activtiy.xml。
設計main_activity.xml與result_activtiy.xml的畫面
<?xml version="1.0" encoding="utf-8"?>
<LinearLayout xmlns:android="http://schemas.android.com/apk/res/android"
    xmlns:app="http://schemas.android.com/apk/res-auto"
    xmlns:tools="http://schemas.android.com/tools"
    android:layout_width="match_parent"
    android:layout_height="match_parent"
    android:orientation="vertical"
    tools:context=".MainActivity">

    <LinearLayout
        android:layout_width="409dp"
        android:layout_height="729dp"
        android:orientation="vertical"
        tools:layout_editor_absoluteX="1dp"
        tools:layout_editor_absoluteY="1dp">

        <TextView
            android:id="@+id/textView2"
            android:layout_width="match_parent"
            android:layout_height="0sp"
            android:layout_weight="1"
            android:gravity="center"
            android:text="Intent Deom"
            android:textSize="30sp" />

        <View
            android:id="@+id/view"
            android:layout_width="match_parent"
            android:layout_height="0dp"
            android:layout_weight="3" />

        <LinearLayout
            android:layout_width="match_parent"
            android:layout_height="0sp"
            android:layout_weight="0.4"
            android:orientation="horizontal">

            <TextView
                android:id="@+id/textView3"
                android:layout_width="0dp"
                android:layout_height="match_parent"
                android:layout_weight="4"
                android:gravity="fill_vertical"
                android:text="input Text"
                android:textSize="25sp" />

            <EditText
                android:id="@+id/editTextText"
                android:layout_width="0sp"
                android:layout_height="match_parent"
                android:layout_weight="6"
                android:ems="10"
                android:inputType="text" />

        </LinearLayout>

        <Space
            android:layout_width="match_parent"
            android:layout_height="0sp"
            android:layout_weight="0.2" />

        <Button
            android:id="@+id/button"
            android:layout_width="match_parent"
            android:layout_height="0dp"
            android:layout_weight="0.5"
            android:text="送出" />

        <View
            android:id="@+id/view2"
            android:layout_width="match_parent"
            android:layout_height="0sp"
            android:layout_weight="3" />

    </LinearLayout>
</LinearLayout>
<?xml version="1.0" encoding="utf-8"?>
<LinearLayout xmlns:android="http://schemas.android.com/apk/res/android"
    xmlns:app="http://schemas.android.com/apk/res-auto"
    xmlns:tools="http://schemas.android.com/tools"
    android:layout_width="match_parent"
    android:layout_height="match_parent"
    android:orientation="vertical"
    tools:context=".ResultActivity">

    <LinearLayout
        android:layout_width="match_parent"
        android:layout_height="match_parent"
        android:orientation="vertical">

        <LinearLayout
            android:layout_width="match_parent"
            android:layout_height="0dp"
            android:layout_weight="1"
            android:orientation="horizontal">

            <Button
                android:id="@+id/button3"
                android:layout_width="0dp"
                android:layout_height="match_parent"
                android:layout_weight="3"
                android:text="return"
                android:textSize="20sp" />

            <TextView
                android:id="@+id/textView6"
                android:layout_width="0sp"
                android:layout_height="match_parent"
                android:layout_weight="7"
                android:gravity="center"
                android:text="Result Demo"
                android:textSize="30sp" />

        </LinearLayout>

        <TextView
            android:id="@+id/textView8"
            android:layout_width="match_parent"
            android:layout_height="0sp"
            android:layout_weight="1"
            android:textSize="50sp"
            android:text="Context:" />

        <TextView
            android:id="@+id/textView7"
            android:layout_width="match_parent"
            android:layout_height="0dp"
            android:layout_weight="8"
            android:text=""
            android:textSize="30sp" />

    </LinearLayout>
</LinearLayout>
轉跳畫面並把資料傳送到ResultActivity
package com.example.intentdeom;

import androidx.appcompat.app.AppCompatActivity;

import android.content.Intent;
import android.os.Bundle;
import android.util.Log;
import android.view.View;
import android.widget.Button;
import android.widget.EditText;


public class MainActivity extends AppCompatActivity {
    private EditText input_editText;
    private Button sentData_button;
    @Override
    protected void onCreate(Bundle savedInstanceState) {
        super.onCreate(savedInstanceState);
        setContentView(R.layout.activity_main);
        Initialize();//初始化設定
        Intent();//轉跳畫面並把資料發到另一個畫面
    }
    private void Initialize(){
        ById();//綁定元件
    }
    private void ById(){
        input_editText = findViewById(R.id.editTextText);
        sentData_button = findViewById(R.id.button);
    }
    private void Intent(){
        sentData_button.setOnClickListener(new View.OnClickListener() {
            @Override
            public void onClick(View view) {
                // 在第一個頁面
                String dataToPass = String.valueOf(input_editText.getText());
                Intent intent = new Intent(MainActivity.this, ResultActivity.class); //設定轉跳的起點和終點
                intent.putExtra("key_data", dataToPass); //(key,value)放入關鍵字和值
                Log.d("dataToPass",dataToPass);
                startActivity(intent);//開始轉跳的部分
            }
        });
    }
}
顯示結果畫面並接受來自MainActivity的資料
package com.example.intentdeom;

import androidx.appcompat.app.AppCompatActivity;

import android.os.Bundle;
import android.view.View;
import android.widget.Button;
import android.widget.TextView;

public class ResultActivity extends AppCompatActivity {
    private Button return_button;
    private TextView context_textView;
    @Override
    protected void onCreate(Bundle savedInstanceState) {
        super.onCreate(savedInstanceState);
        setContentView(R.layout.activity_result);
        initialize();//初始化設定
        ReturnActivity();//返回上一頁
    }
    private void initialize(){
        ById();//綁定元件
        // 在第二個頁面的onCreate方法中
        Bundle extras = getIntent().getExtras();
        String receivedData = "";
        if (extras != null) {
            receivedData = extras.getString("key_data");
        }
        context_textView.setText(receivedData);//更新TextView
    }
    //綁定元件
    private void ById(){
        return_button = findViewById(R.id.button3);
        context_textView = findViewById(R.id.textView7);
    }
    private void ReturnActivity(){
        return_button.setOnClickListener(new View.OnClickListener() {
            @Override
            public void onClick(View view) {
                ResultActivity.this.finish();//結束這個ResultActivity Class
            }
        });
    }
}
轉跳功能、準備資料傳遞到第二個畫面
在第一個畫面,寫上Intent的方法來轉跳畫面
            // 在第一個頁面
            String dataToPass = "這是要傳遞的資料";
            Intent intent = new Intent(MainActivity.this, ResultActivity.class); //設定轉跳的起點和終點
            intent.putExtra("key_data", dataToPass); //(key,value)放入關鍵字和值
            startActivity(intent);//開始轉跳的部分
第二個畫面接受第一個畫面資料、返回功能
第二個畫面接受第一個畫面資料
        // 在第二個頁面的onCreate方法中
        Bundle extras = getIntent().getExtras();
        String receivedData = "";
        if (extras != null) {
            receivedData = extras.getString("key_data");
        }
返回功能
ResultActivity.this.finish();//結束這個ResultActivity Class
總結
這次好像沒什麼好總結的,都如同上方說明
