昨天的進度是安裝 RabbitMQ,並準備 Spring Boot 專案與之連接。而本文會以最小的規模實作「傳送資料到 MQ」與「從 MQ 拿取資料做處理」的過程。今天要介紹的設計模式,是相對單純的「Simple」與「Worker」模式。
此篇亦轉載到個人部落格。
透過 MQ,可以將服務給串起來。為了方便稱呼,我們通常稱傳送資料到 MQ 的 server 為生產者(producer);拿取 MQ 中資料進行處理的 server 為消費者(consumer);而資料為「訊息」(message)。
從架構上來看,透過 MQ 串起 producer 與 consumer 的做法,會有幾種設計模式。接下來的文章,就讓我們逐一去了解並實作。
最單純的模式是「Simple」。在架構中,就只是一個 producer、一個 MQ,跟一個 consumer 而已。如下圖。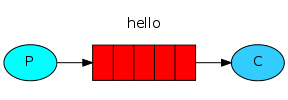
在程式實作中,會有 4 個東西要準備,分別是:queue、訊息 model、producer 與 consumer。本節會透過 Simple 模式,讓讀者在完成程式後,體驗 producer 與 consumer 之間傳接資料。
昨天的文章已經示範過如何配置 queue,在此不贅述。
import org.springframework.amqp.core.Queue;

@Configuration
public class RabbitConfig {

    @Bean
    public Queue commentNotificationQueue() {
        return new Queue("Comment Notification Queue");
    }
}
根據上一篇舉例的「留言通知」情境,下面簡單設計了一個叫做「CommentMsg」的類別,做為要傳送到 MQ 的訊息。
public class CommentMsg implements Serializable {
    private int postId; // 文章 id
    private int creatorId; // 留言建立者 id
    private String content; // 留言內容

    // getter, setter ...
}
RabbitMQ 只能傳送
String、byte[]與Serializable型態的資料,故此處實作Serializable介面。
接著實作 producer,它會是一個元件。其職責是在業務邏輯完成後被呼叫,將訊息傳送至 MQ。
@Component
public class MessageProducer {
    private static final Logger LOGGER = LoggerFactory.getLogger(MessageProducer.class);

    @Autowired
    private RabbitTemplate rabbitTemplate;

    public void sendNewCommentNotification(CommentMsg comment) {
        rabbitTemplate.convertAndSend("Comment Notification Queue", comment);
        LOGGER.info("{} sends message successfully.", getClass().getSimpleName());
    }
}
此處呼叫了 RabbitTemplate 的 convertAndSend 方法,將 CommentMsg 訊息傳送到名為「Comment Notification Queue」的 queue 裡面。
最後實作 consumer 元件。其職責是接收 producer 送來的訊息,進行需要的處理。
@Component
public class NotificationConsumer {
    private static final Logger LOGGER = LoggerFactory.getLogger(NotificationConsumer.class);

    @RabbitListener(queues = "Comment Notification Queue")
    public void processMsg(@Payload CommentMsg comment) {
        LOGGER.info("{} receives message successfully.", getClass().getSimpleName());

        // 模擬從 DB 取得文章標題和留言者名字
        String userName = getUserName(comment.getCreatorId());
        String postTitle = getPostTitle(comment.getPostId());

        // 模擬發送通知
        LOGGER.info("站內通知:{}在文章「{}」上留言", userName, postTitle);
        LOGGER.info("信件主旨:文章「{}」有新留言", postTitle);
        LOGGER.info("信件內容:{}在「{}」上留言:{}", userName, postTitle, comment.getContent());
    }

    // 以 Map 代替真實 DB
    private final Map<Integer, String> userNameMap = Map.of(1, "Vincent", 2, "Dora");
    private final Map<Integer, String> postNameMap = Map.of(1, "2023 週年慶", 2, "iPhone 15 週邊上架");

    private String getUserName(int userId) {
        return userNameMap.get(userId);
    }

    private String getPostTitle(int itemId) {
        return postNameMap.get(itemId);
    }
}
此處宣告了名為 processMsg 的處理方法,並冠上 @RabbitListener 標記,指定 queue 的名稱。且方法參數用 @Payload 標記接收訊息(這點與在 controller 接收 request body 很像)。
筆者認為,應該是在其他臺 server 跑自己的 Spring Boot,並執行 consumer 的程式才比較合理。而 RabbitMQ 也在獨立的 server 上運行。此處為了方便練習,刻意都在同一個程式專案中實作。
實作完 producer 與 consumer 後,讓我們實際測試能否正常傳接訊息。由於 producer 需要有人呼叫,因此這裡建立一個 controller 去執行它。接下來的幾篇文章也都可以用這套做法來測試。
@RestController
public class MessageController {

    @Autowired
    private MessageProducer producer;

    @PostMapping("/comment")
    public void notifyNewComment(@RequestBody CommentMsg comment) {
        producer.sendNewCommentNotification(comment);
    }
}
讀者可自行用 Postman 或 curl 等工具,發送請求到該 API。
POST http://localhost:8080/comment
{
    "postId": 1,
    "creatorId": 2,
    "content": "把錢錢變成喜歡的樣子!"
}
隨後可看見印出的 log。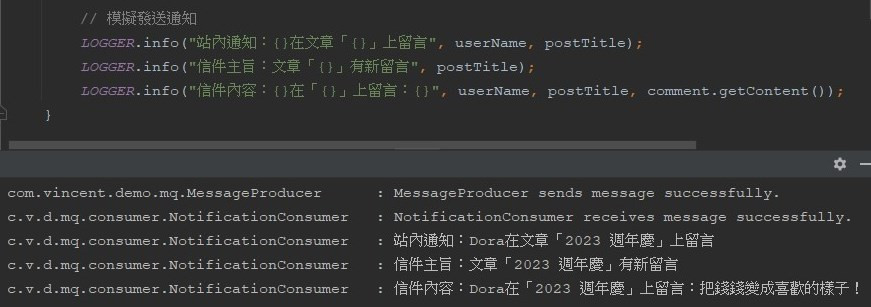
多發送幾次請求的話,在 RabbitMQ 的管理介面,也能看見有流量通過。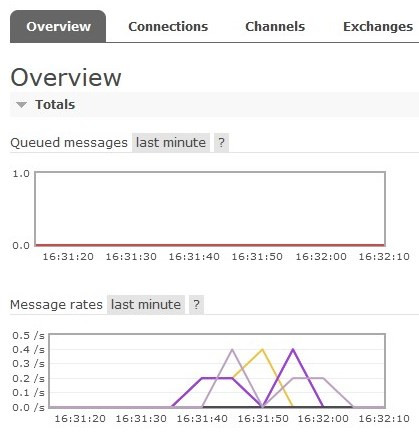
認識 Simple 模式後,要理解 Worker 模式就容易多了。
背景是這樣的,採取 Simple 模式後,若請求真的很多,MQ 將會累積大量排隊中的訊息資料。雖說昨天文章的例子,提到可以接受「通知晚一點到」、「關鍵字晚一點生效」,但如果這些訊息消化不完,「晚一點」會變成不知道等到什麼時候!
Worker 模式的目的,是藉由增設一至多個 consumer,來加快消化訊息的速度。官方的架構示意圖如下。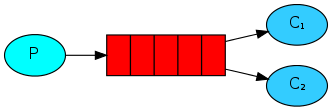
這些增設的 consumer,原則上也會是在新的 server 上運行。由於 consumer 要執行的程式邏輯都相同,且它們都是接收來自相同 IP 地址的 MQ 訊息,所以我們說 MQ 要做「水平擴展」是容易的。
Worker 模式是透過增設 consumer 來加速消化訊息。本文示範上為了方便,就直接在同一個程式專案中,複製第二節寫好的 consumer。
@Component
public class NotificationWorkerConsumer1 {
    private static final Logger LOGGER = LoggerFactory.getLogger(NotificationWorkerConsumer1.class);

    @RabbitListener(queues = "Comment Notification Queue")
    public void processMsg(@Payload CommentMsg comment) {
        LOGGER.info("{} receives message successfully.", getClass().getSimpleName());
    }
}

@Component
public class NotificationWorkerConsumer2 {
    private static final Logger LOGGER = LoggerFactory.getLogger(NotificationWorkerConsumer2.class);

    @RabbitListener(queues = "Comment Notification Queue")
    public void processMsg(@Payload CommentMsg comment) {
        LOGGER.info("{} receives message successfully.", getClass().getSimpleName());
    }
}
測試的方式與本文第三節相同。呼叫 POST http://localhost:8080/comment 的 API 後,看到印出的 log 如下。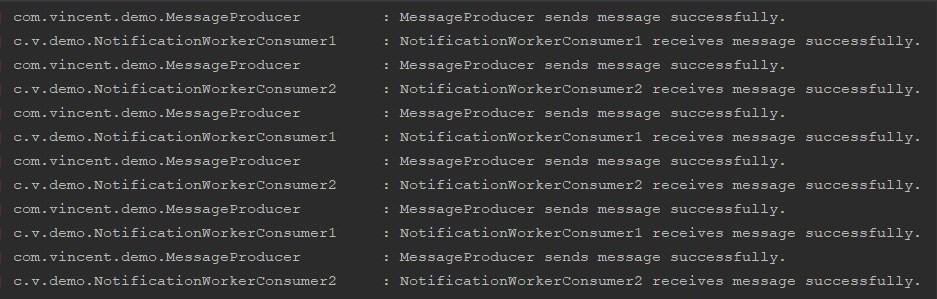
可以注意到,consumer 會輪流接收訊息並處理。
Ref:SpringBoot - 第二十六章 | RabbitMQ的集成和使用
本文介紹了簡單的 Simple 與 Worker 模式,明天將繼續解說其他複雜一點的模式。
本文的完成專案:
https://github.com/ntub46010/SpringBootUsingRabbitMQ/tree/simple-and-worker-pattern
今日文章到此結束!
最後推廣一下自己的部落格,我是「新手工程師的程式教室」的作者,請多指教