
前面介紹了很多元件,要讓一個應用程式跑起來可能會需要 Deployment、Service、configMap、Service Account、Role、RoleBinding ……
這些 yaml 檔分開寫可能會有很多個檔案而且要執行的時候要指定順序很麻煩。如果全部寫在同一個檔案中,內容可能好幾百行、上千行。要做版本控制、更新設定檔、部署不是一件容易的事。
Helm 其中一個功能就是能讓我們用較方便的方式來管理這些 yaml 檔,以及快速地部署程式到 Kubernetes Cluster 中。
參考官網,有很多種安裝方式。這邊我利用官方提供的 script 安裝
# choose a place download the script
curl -fsSL -o get_helm.sh https://raw.githubusercontent.com/helm/helm/main/scripts/get-helm-3

chmod 700 get_helm.sh
./get_helm.sh
接下來做一些名詞解釋 -
Chart
.tgz 格式,就能上傳到 Repo 中供其他使用者使用Repo
Release
Helm 3 的架構大概是這樣,之前 Helm 2 還有個 Tiller,但 Tiller 對於 Cluster 有 admin access,考慮安全性在 Helm 3 時把 Tiller 拿掉了。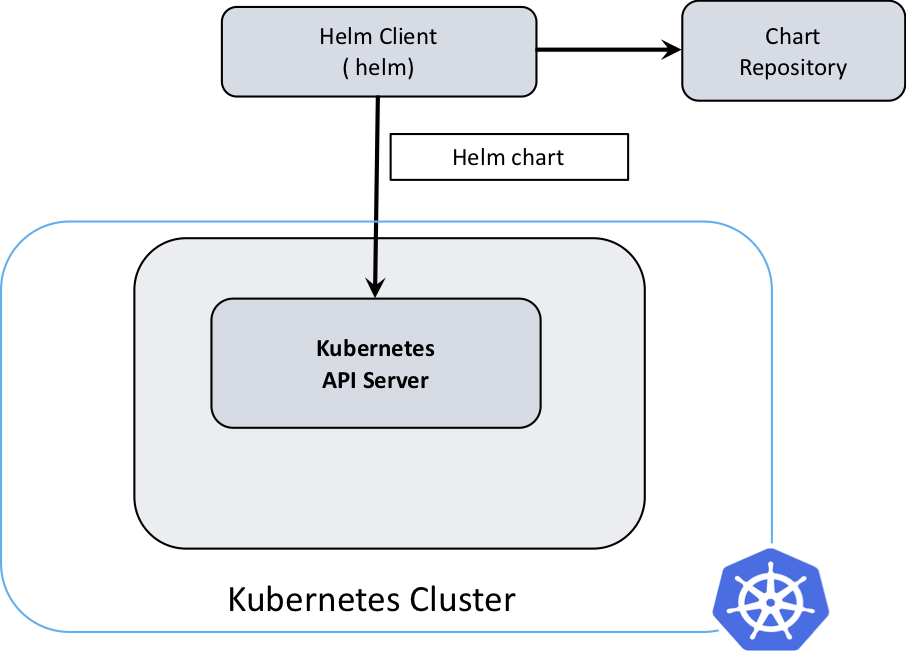
Source: https://developer.ibm.com/blogs/kubernetes-helm-3/
Chart & Release 的關係可以看以下的圖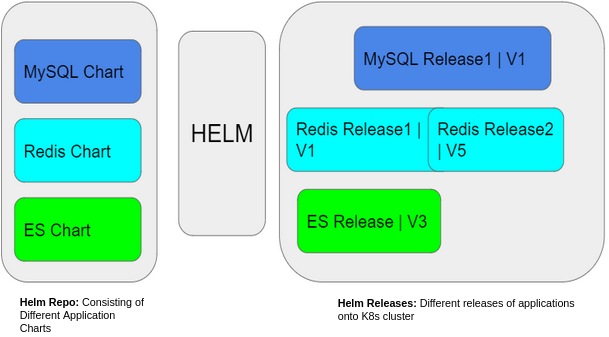
Source: https://blog.opstree.com/2021/02/09/helm-hands-on-get-started-with-helm-part-02/
另一個概念圖也不錯不過避免在文章中塞太多圖這裡就只放網址: https://cloudacademy.com/course/introduction-to-helm-1034/helm-terminology/
加 Repo & 搜尋 Charts
# Add a repository from the internet:
helm repo add <repo-name> <url>

# List added chart repositories
helm repo list

# Update information of available charts locally from chart repositories
helm repo update

# Search repositories for a keyword in charts, with the latest version
# Will obtain the chart version, app version, description of the chart
helm search repo <keyword>
helm search repo prometheus-community/prometheus
# list all versions
helm search repo prometheus-community/prometheus -l
安裝
# Install the chart in a specific namespace
helm install <name> <chart> --namespace <namespace>

# Install the chart with your specified values
helm install <name> <chart> --values <yaml-file/url>
helm install <name> <chart> -f <yaml-file/url>

# Displays the contents of the values.yaml file
helm show values <chart>
# Save the contents of the values.yaml file into local file
helm show values <added repo>/<chart name> > custom-values.yaml

# Run a test installation to validate chart (p)
helm install <name> <chart> --dry-run --debug

# Uninstall a release
helm uninstall <name> -n <namespace>
安裝後 - 檢視 & 升級
# show installed release in all namespace
helm list -A

# specify a version constraint for the chart version to use
helm upgrade <release> <chart> --version <version_number>
更多指令可以看 cheatsheet - https://helm.sh/docs/intro/cheatsheet/
前面在講 StatefulSet 的時候拿了 MySQL cluster 來舉例,如果需要 1 primary & 2 secondary DB,它們彼此要能知道怎麼辨識。不過我們很單純的設置 Replica,並沒有處理 instances 之間溝通的問題。但官方或是社群已經幫我們把設定檔都寫好並且包成 Helm chart,可以非常簡便的安裝。不過還是要了解有哪些設定,再依照自己的需求去做更改。
Artifact Hub 上有各式的 Charts 可使用,任何人都能上傳 Helm Charts。搜尋 MySQL 會找到很多版本,如果沒有官方釋出的 Charts,可以找 Bitnami 出的。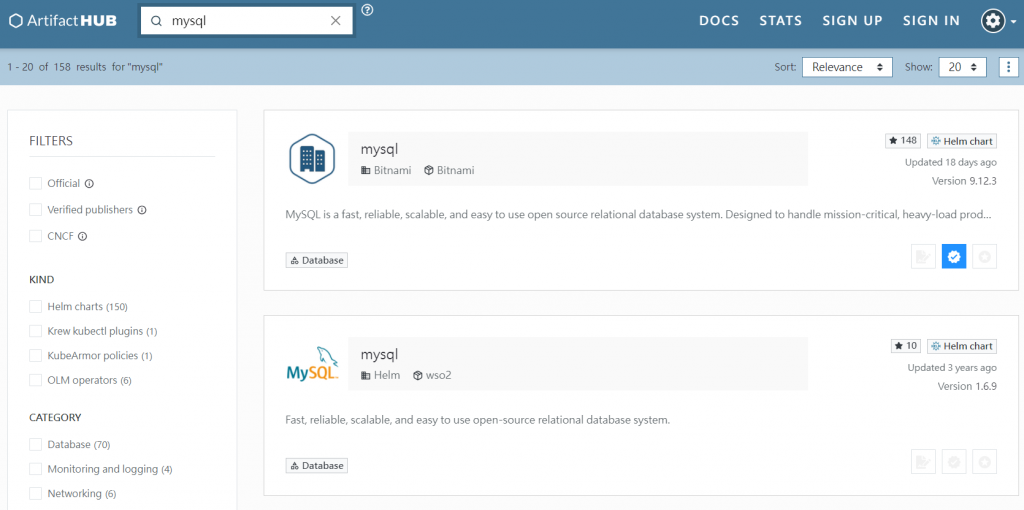
Bitnami 又是什麼呢?跟主題沒什麼關係但在使用 Charts 時很常用到,所以稍微了解一下。
Bitnami 是一個開源專案,2019 被 VMware 收購。Bitnami 提供各種軟體的 package,包含 docker image、Helm chart、或 VM 的安裝套件。一開始看到時覺得有點難理解,不過可以想成 Bitnami 釋出的 Package or Software Stacks 讓部署程式變得更便利,包括雲端上的部署或是在 Kubernetes Cluster 中部署。例如使用 WordPress 架站,不用從主機開始一個一個安裝 WordPress、MySQL、Apache、PHP …,Bitnami 幫忙包好了需要的應用程式,並做好了各種 Server 的設置來簡化架站的步驟。
回到 MySQL Installation,可以用以下兩種方式安裝 -
helm repo add bitnami https://charts.bitnami.com/bitnami
helm search repo bitnami/mysql

helm repo update # Make sure we get the latest list of charts
helm install bitnami/mysql --generate-name
helm search 的功能,在 repo 中找 Charthelm install 的部分即是安裝 bitnami 這個 repo 中的 mysql chart,如果沒有給 release name 那就請它幫忙生一個 ( --generate-name )Artifact Hub 上面的安裝方式是 -
helm install my-release oci://registry-1.docker.io/bitnamicharts/mysql
這行指令則是使用 OCI image 安裝 MySQL,Release Name = ‘my-release’。
好多專有名詞,OCI 是什麼?全名是 Open Container Initiative,這邊就不介紹了因為我也還沒理解完所有專有名詞 QQ。上述的指令我先理解成拿符合 OCI 規範的 Image 來裝 MySQL。
放上一些 OCI 相關的參考資料 -
https://helm.sh/docs/topics/registries/
https://opencontainers.org/
https://blog.tienyulin.com/open-container-initiative-oci/
安裝之前先下載一下 Values.yaml 來看看
helm show values bitnami/mysql > mysql-values.yaml
下載後會得到個 1000 多行的 yaml 檔,裡面有預設的參數。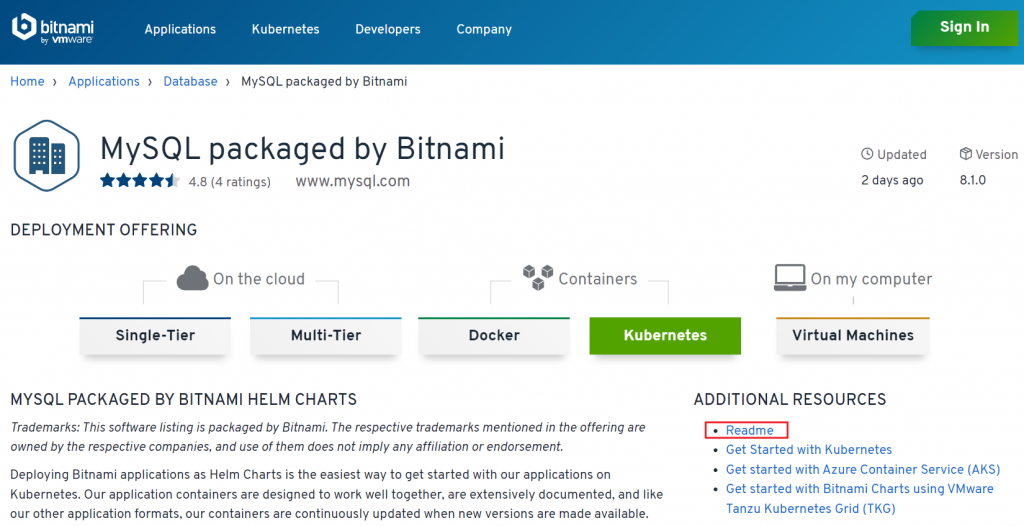
Bitnami MySQL stack
點進上圖的 Readme,會連到這個 chart 的 GitHub,可看各參數的意思。
這邊我只列出一些 -
# custom-mysql-values.yaml

# @param global.storageClass Global StorageClass for Persistent Volume(s)
global:
  storageClass: ""

# @param architecture MySQL architecture (`standalone` or `replication`)
architecture: replication

auth:
  rootPassword: "test1234"
  createDatabase: true
  database: "ironman"

  # @param auth.username Name for a custom user to create
  username: ""
  # @param auth.password Password for the new user. Ignored if existing secret is provided
  password: ""

  # @param auth.replicationUser MySQL replication user
  replicationUser: replicator
  # @param auth.replicationPassword MySQL replication user password. Ignored if existing secret is provided
  replicationPassword: "replicationtest"

primary:
  name: primary
  persistence:
    enabled: true
    # @param primary.persistence.storageClass MySQL primary persistent volume storage Class
    # If defined, storageClassName: <storageClass>
    # If set to "-", storageClassName: "", which disables dynamic provisioning
    # If undefined (the default) or set to null, no storageClassName spec is set, choosing the default provisioner.  (gp2 on AWS, standard on GKE, AWS & OpenStack)
    storageClass: ""

secondary:
  name: secondary
  replicaCount: 2
  persistence:
    enabled: true
    # @param secondary.persistence.storageClass MySQL secondary persistent volume storage Class
    # If defined, storageClassName: <storageClass>
    # If set to "-", storageClassName: "", which disables dynamic provisioning
    # If undefined (the default) or set to null, no storageClassName spec is set, choosing the default provisioner.  (gp2 on AWS, standard on GKE, AWS & OpenStack)
    storageClass: ""
architecture - 如果只裝一個 MySQL,選擇 standalone;這邊我們要建 mysql cluster,所以選 replicationsecondary.replicaCount - 設定 secondary db 要幾個auth - 設 root password,以及要不要先建好 database、root 以外的 user。這邊偷懶沒設 custom user。如果要設 replication,必須設定 replicationUser &replicationPassword 。或是如果有已經建好的 secret,那就不用在 values.yaml 中設定,而是要寫明 existingSecret: <secret name>
persistence - 有點讓人困惑的部分,但看指示應該是讓 storageClassName: "" 會使用 cluster 中預設的 provisioner,設置 storageClassName: "-" 才是不用動態配置。所以這裡我就不改預設的設定,預期它應該會使用我 k3d cluster 中已經先設好的 storage class改好我們自己的設定檔後就可下指令安裝 - 將 mysql release 到 db 這個 namespace,然後用剛才改的 custom-mysql-values.yaml 蓋掉預設的 values.yaml
helm install mysql bitnami/mysql -f day24/custom-mysql-values.yaml -n db --create-namespace
安裝好後的畫面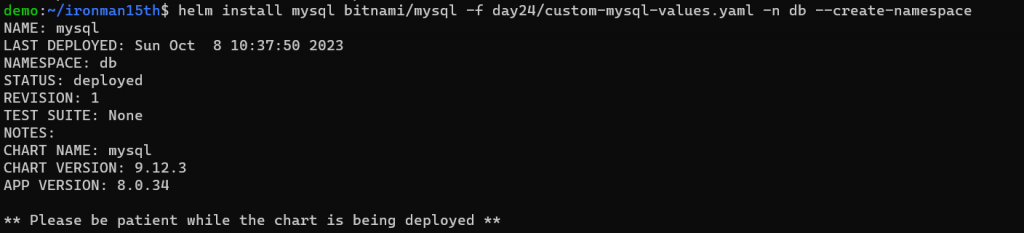
底下還有一些 Tips -
Tip:

  Watch the deployment status using the command: kubectl get pods -w --namespace db

Services:

  echo Primary: mysql-primary.db.svc.cluster.local:3306
  echo Secondary: mysql-secondary.db.svc.cluster.local:3306

Execute the following to get the administrator credentials:

  echo Username: root
  MYSQL_ROOT_PASSWORD=$(kubectl get secret --namespace db mysql -o jsonpath="{.data.mysql-root-password}" | base64 -d)

To connect to your database:

  1. Run a pod that you can use as a client:

      kubectl run mysql-client --rm --tty -i --restart='Never' --image  docker.io/bitnami/mysql:8.0.34-debian-11-r56 --namespace db --env MYSQL_ROOT_PASSWORD=$MYSQL_ROOT_PASSWORD --command -- bash

  2. To connect to primary service (read/write):

      mysql -h mysql-primary.db.svc.cluster.local -uroot -p"$MYSQL_ROOT_PASSWORD"

  3. To connect to secondary service (read-only):

      mysql -h mysql-secondary.db.svc.cluster.local -uroot -p"$MYSQL_ROOT_PASSWORD"
可以用 helm list -A 來看現在有哪些 release
App Version 是這個應用程式的版本,但使用 --version 是指定 Chart Version,所以要注意這兩個的對應。
來看看 Cluster 中裝了什麼東西 -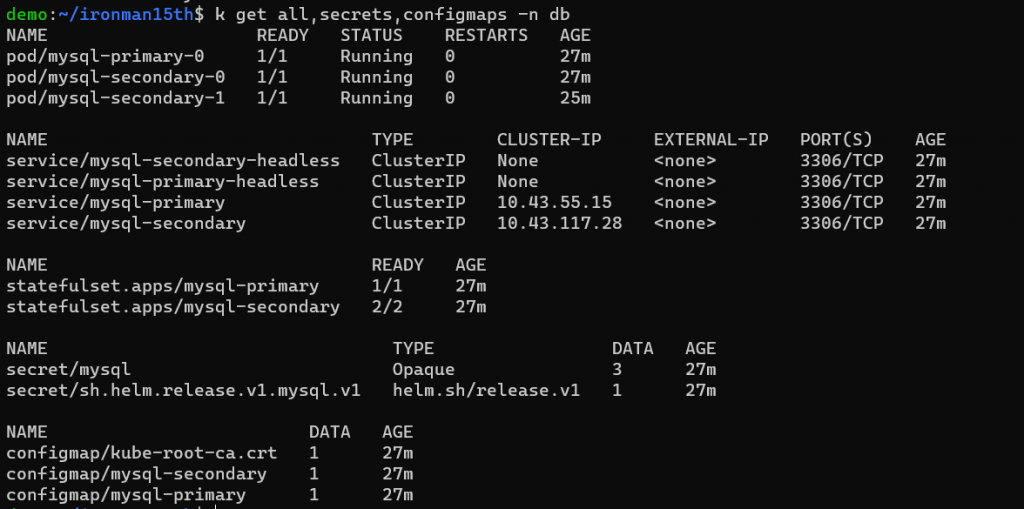
透過 Helm,一鍵啟了 statefulset、service、secret、configmap …..
這些 yaml 可以下載到本地但我這邊就先略過。也可在 Artifact Hub 上點 Templates 來看
https://artifacthub.io/packages/helm/bitnami/mysql?modal=template&template=extra-list.yaml
再來觀察一下 Persistence 的部分,是不是正確的動態配置了 PV 給 3 個 DB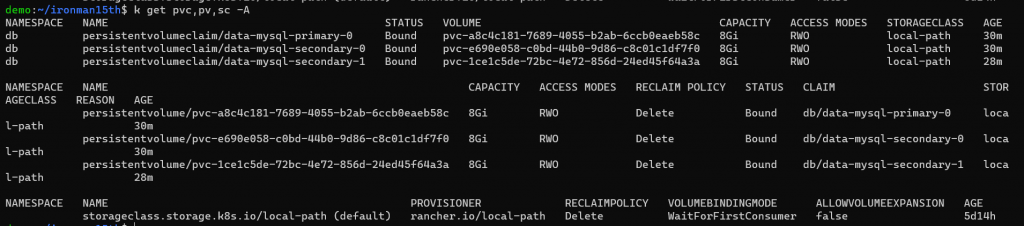
內容太長跑版,PV & Storage Class 是沒有 Namespace 的。可以看到 PV 自動建好並跟 PVC 綁定了。
接下來來測試能不能連接到這個 DB cluster,跟隨 Tips 建一個暫時的 client pod
kubectl run mysql-client --rm --tty -i --restart='Never' --image bitnami/mysql --namespace db --env ALLOW_EMPTY_PASSWORD=yes --command -- bash
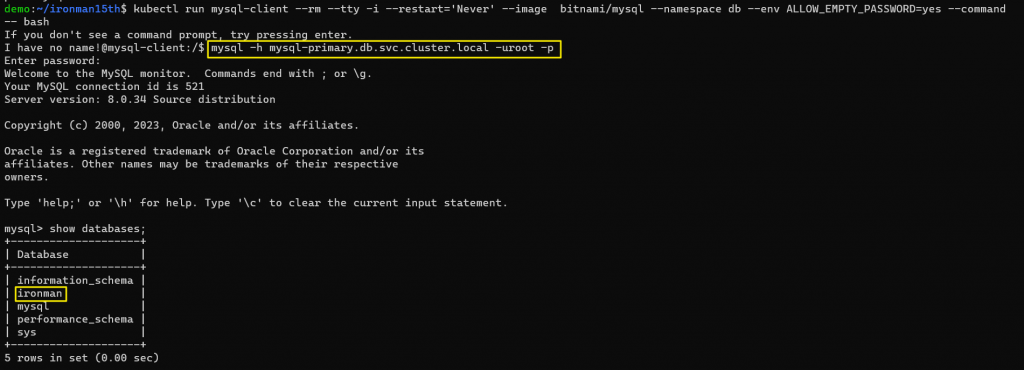
這邊密碼就打上面設置的 rootPassword: "test1234" 密碼,進去 MySQL 中果然看到已經有 ironman 這個 Database。
下一步,使用這個 Database,並且建立 Table,插入一些資料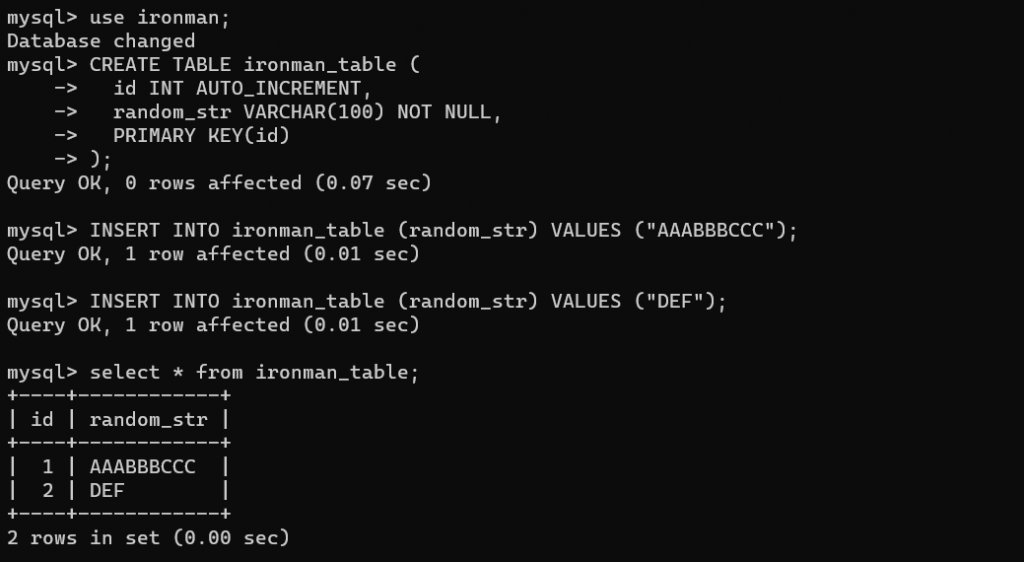
離開 primary DB 的連線,改連 secondary DB,可以讀到剛才插入的資料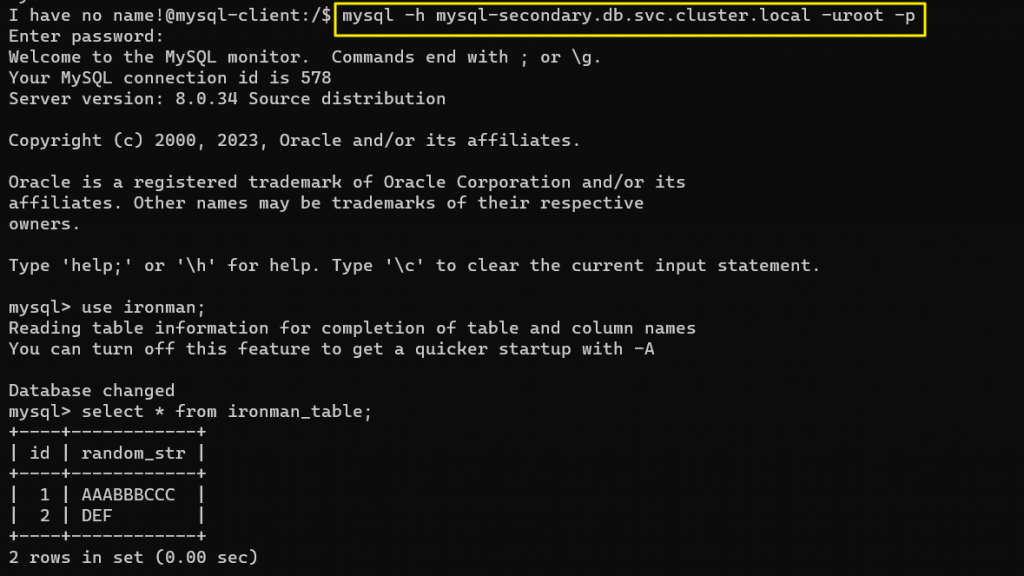
OK 收工!
噢不其實還有個問題,我以為 secondary DB 不能寫入,但其實可以!
未來有機會再研究怎麼做這部分的設置。
順帶一提那個 I have no name! ,因為這邊用的 bitnami image 會跑 non-root container,這跟當初建 Image 的設定有關。如果操作不需要 root access,那也不需要用 root 去跑。
名詞好多!
來不及看 Charts 怎麼建還有把參數抽出來的寫法,之後再說。現在只能先讓程式動起來🫠🫠🫠🫠
Reference
https://helm.sh/docs/
https://www.cnblogs.com/evescn/p/16249207.html
https://godleon.github.io/blog/DevOps/learn-Helm/
https://artifacthub.io/packages/helm/bitnami/mysql
https://bitnami.com/stack/mysql
https://chineselife.us/what-is-bitnami
https://www.cnblogs.com/szx666/p/14662630.html
https://github.com/bitnami/charts/issues/2428
https://stackoverflow.com/questions/72897454/bitnami-kubectl-container-unable-to-create-files-permission-denied
