
目前為止我們的帳號頁面提供了編輯個人的姓名、信箱與自我介紹的功能。還記得我們昨天定義的 UserModel 嗎?讓我們複習一下:
class UserModel {
  final String name;         // 使用者名字
  final String email;        // 使用者信箱
  final String avatar;       // 使用者頭貼
  final String description;  // 使用者介紹
}
我們還提供了加入使用者頭像圖片網址的欄位,因此今天我們的內容會教大家如何上傳本機的檔案至 firebase 上。
昨天有請大家在下載 firestore 套件時也一併下載了此套件。此套件提供於 iOS 與 Android 平台從本機圖片瀏覽庫中挑選圖片或拍照並選擇該相片的功能。
在使用該套件之前我們需要進行些設定。
請開啟 ios/Runner/Info.plist 檔案,並加入以下設置
<dict>
    <!-- 可能有一大堆 key 或 array 等,加在最下面就好了 -->
    <key>NSPhotoLibraryUsageDescription</key>
	<string>向使用者說明為什麼此應用程式需要使用相片瀏覽器的權限</string>
	<key>NSCameraUsageDescription</key>
	<string>向使用者說明為什麼此應用程式需要使用相機權限</string>
	<key>NSMicrophoneUsageDescription</key>
	<string>向使用者說明為什麼此應用程式需要使用麥克風權限</string>
</dict>
很棒都不需要額外設定 🎉
Firebase storage 是基於 Google Cloud 基礎架構上,使用於儲存影像、音訊、影片的儲存服務,並為其建立下載 URL。
為什麼我們需要額外使用這項服務?簡單來說現在的相片動轍就 2~3MB 以上,但是我們將用於儲存使用者頭像的欄位 avatar 為 string 型態,最多僅能容納 1MB 資料。即便經過壓縮後也難以達成此目標。因此我們可以借助 firebase storage 服務來存放使用者所選擇上傳的相片,並產將自動產生的圖片網址儲存於使用者的 avatar 欄位中。
請開啟 Firebase 主控台,並於左側「產品類別」底下的「建構」列表中找到 「Storage」 的項目,成功進入後,請點選「開始使用」來開始建立流程。
步驟1. 首先請選擇,「以測試模式啟動」。
步驟2. 設定 Cloud Storage 位置,因為前面 firestore 我們已經設定好的位置,因此這邊也直接套用了相同的位置設定。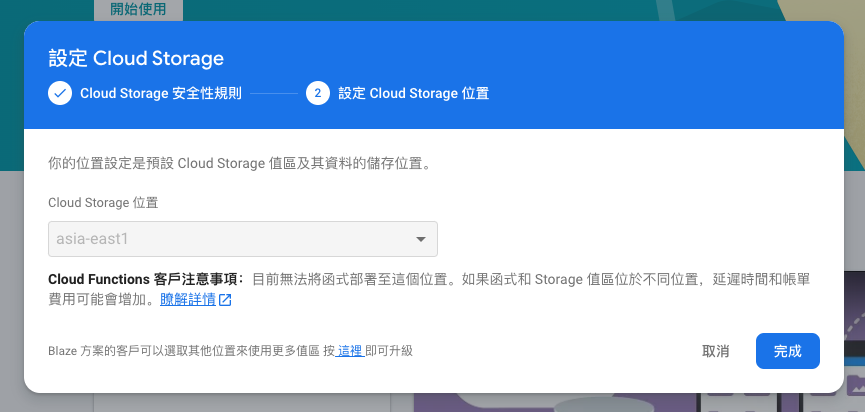
這麼一來就完成拉XDD 設定就是這麼簡單~
在上傳圖片之前,請先製作一個按鈕來觸發系統跳出選擇圖片的視窗,並參考以下程式碼:
// state 需要多一個變數
Uint8List? image;

Future<Uint8List?> pickImage(ImageSource source) async {
  // ImagePicker() 為挑選圖片的套件提供的方法
    XFile? image = await ImagePicker().pickImage(source: source);
    if (image != null) {
      // 將選擇的圖片內容轉為 Bytes 並回傳
      return await image.readAsBytes();
    }
    // 未挑選圖片則回傳 null
    return null;
  }

void selectImage() async {
  // 指定從相片瀏覽器進行挑選照片
  Uint8List? selected = await pickImage(ImageSource.gallery);
  // 若有挑選圖片
  if (selected != null) {
    setState(() {
      // 將挑選圖片的 bytes 存入 image 中
      image = selected;
      _isChanged = true;
    });
  }
}

// 觸發跳出選擇圖片視窗
onPressed: () {
  selectImage();
}
透過此便可以成功的將圖片資訊存入 image 變數中。此時,若你進行測試時在第一次點擊挑選圖片時,系統會跳出是否允許取用照片權限的通知,請點擊允許,才能成功的取用相片喔!
既然挑選完圖片了,現在就只差最後一步將使用者的相片上傳拉。請先開啟 UserRepository ,並參考下方程式碼:
class UserRepository {
  final FirebaseFirestore _db = FirebaseFirestore.instance;
  final FirebaseStorage _storage = FirebaseStorage.instance;

  // getUser, createUser, updateUser 省略,請加入下方函式
  // 此函式用於將圖片上傳至 storage,並將產生的圖片網址回傳
  Future<String> uploadImageToStorage(String child, Uint8List file) async {
    Reference ref = _storage.ref().child(child);
    UploadTask uploadTask = ref.putData(file);
    TaskSnapshot snapshot = await uploadTask;
    return await snapshot.ref.getDownloadURL();
  }
}
最後僅需在更新使用者資訊之前,先將檔案上傳並得到圖片網址,再一併將新的使用者資訊與該圖片網址存入更新至 firestore 即可。
// 儲存按鈕,看讀者想放在哪都可以,重要的是流程
CupertinoButton(
  child: const Text('儲存'),
  onPressed: () async {
      try {
        UserModel u = await _user;
        String avatar = u.avatar;
        // 若有選擇圖片才進行上傳檔案的操作
        if (image != null) {
          // 將上傳的檔案名稱命名為使用者 id,如此當使用者上傳新檔案時就會將原檔案蓋過,節省空間
          avatar = await UserRepository().uploadImageToStorage(FirebaseAuth.instance.currentUser!.uid, image!);
        }
        // 更新使用者資訊
        UserRepository().updateUser(
          userId: FirebaseAuth.instance.currentUser!.uid,
          name: _nameTextController.text,   // 名字文字輸入框輸入的值
          description: _descriptionTextController.text, // 介紹文字輸入框輸入的值
          avatar: avatar, // 若有上傳檔案使用新圖片網址,否則使用原本的
        );
      } catch (e) {
        print('發生錯誤: $e')
      }
  }
)
目前為止我們的結果如下圖:
您也可以隨時至 firestore 的資料頁面檢視您的帳號資料是否有被更新。
接著請開啟 profile_card.dart 的檔案,並將其「使用者名稱」與「自我介紹」的文字顯示部分改為顯示使用者的資訊。這邊就交由各位讀者自行練習~
既然是一個可登入的應用程式,一定也要提供登出的功能!請開啟個人檔案頁面,並於一般設定的 CupertinoListSection.insetGrouped 加入以下程式碼:
CupertinoListSection.insetGrouped(children: [
  // 略過每日一報及夜間模式
  CupertinoListTile.notched(
    title: const Text('登出'),
    leading: DecoratedBox(
        decoration: BoxDecoration(
            borderRadius: BorderRadius.circular(6),
            color: CupertinoColors.systemGrey),
        child: const Padding(
          padding: EdgeInsets.all(4),
          child: Icon(CupertinoIcons.arrow_right_to_line,
              color: CupertinoColors.white, size: 20),
        )),
    onTap: () {
      FirebaseAuth.instance.signOut();
    }),
])
最終結果如下圖,當點擊了登出按鈕後,由於我們先前在 main.dart 中實現了一旦使用者有登入情況導向新聞頁面;未登入導向登入頁面的流程,因此便會直接跳至登入頁面。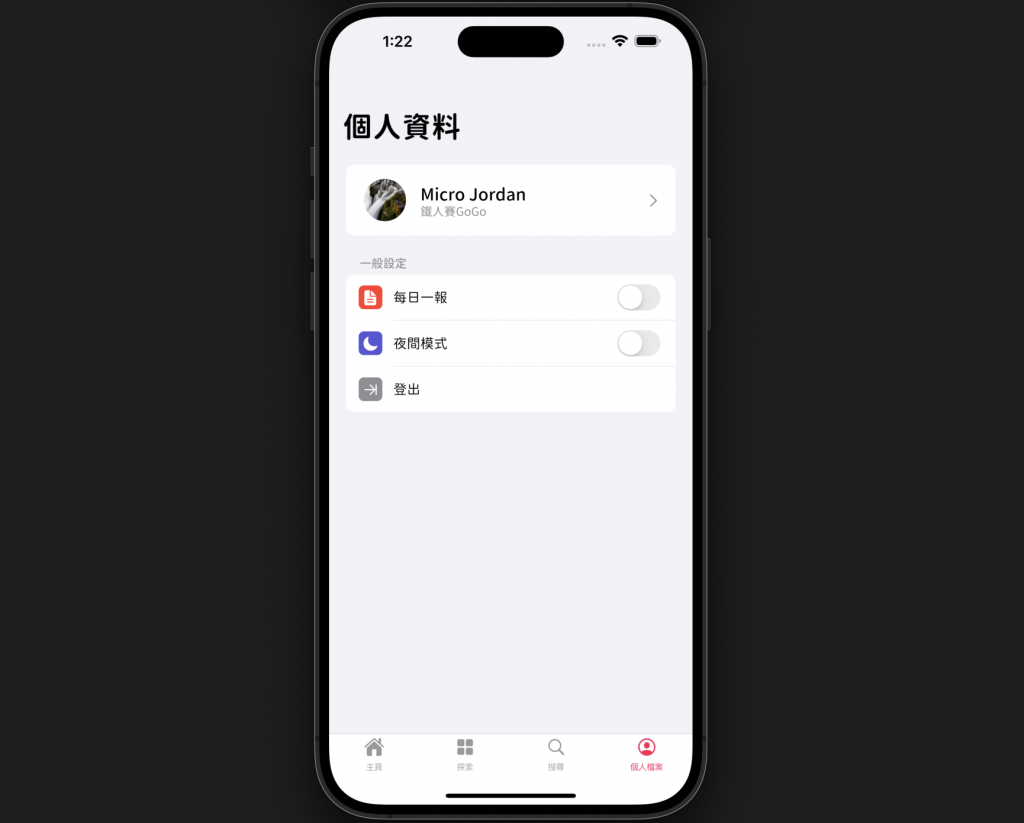
往後在開發應用時可能會使用 firebase storage 或其他的檔案系統服務來存儲圖片、影片、音訊甚至是大型檔案等,其實基本上流程無異,都會走類似的流程將檔案上傳至雲端,並產生特定的網址以供下載取用。
在今天的內容中,我們教大家如何將本地圖片上傳至 firebase storage 產生圖片網址,並且將產生的網址連同使用者資訊一同更新到 firestore 中。又得益於 firebase 的整合,使得這兩者之間的串接變得無比容易。
寫到這裡,恭喜各位!我們已經一起將應用程式的所有主要功能皆開發完畢拉!真的是非常不容易 QQ 剩下的篇章,我打算用來添加一些讓應用程式更豐富的功能!
所以終於明天的文章開頭不是「實戰 APP」拉XDD
今天的參考程式碼:https://github.com/ChungHanLin/micro_news_tutorial/tree/day25/micro_news_app

 iThome鐵人賽