由於我們使用thymeleaf,所以前端部分的網頁內容,要新增在src/main/resources/templates底下。
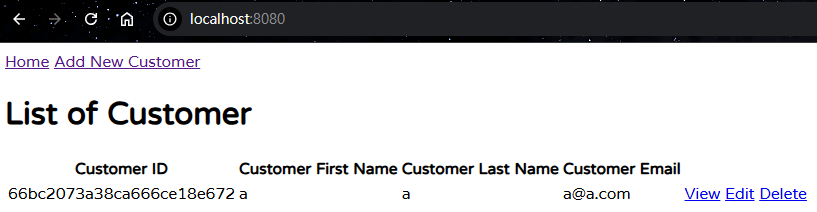
新增index.html,用來把後端接收到的所有客戶資訊顯示在網頁上。
為了使用thymeleaf,必須添加xmlns:th="http://www.thymeleaf.org"
<!DOCTYPE html>
<html lang="en" xmlns:th="http://www.thymeleaf.org">
<head>
    <meta charset="UTF-8">
    <title>Customer Management System</title>
</head>
<body>
<div>
    <div>
th開頭表示是thymeleaf的功能,href是前往指定的相對網址,@{}用來存放網址
@{/}表示前往http://localhost:8080/
<a th:href="@{/}">Home</a>
@{/new}表示前往http://localhost:8080/new
<a th:href="@{/new}">Add New Customer</a>
    </div>
    <div>
        <h1>List of Customer</h1>
    </div>
    <table>
        <thead>
        <tr>
            <th>Customer ID</th>
            <th>Customer First Name</th>
            <th>Customer Last Name</th>
            <th>Customer Email</th>
        </tr>
        </thead>
        <tbody>
th:each讓我們把後端接收到的list中的customer一個一個取出來,放到customer中,像是java中的foreach
<tr th:each="customer : ${customers}">
th:text負責將資料顯示在網頁上,${}用來讀取我們從後端得到的資料,例如:${customer.id}用來讀取用客戶的id,${customer.firstName}則是讀取客戶的名字。
@{'/view/' + ${customer.id}},會根據客戶id,前往不同的網址,假設是3ab531a5-4328-4272-a39e-b8eacebc5b15,那就會前往/view/3ab531a5-4328-4272-a39e-b8eacebc5b15。
edit、delete的部分也是相同的概念。
<td th:text="${customer.id}"></td>
            <td th:text="${customer.firstName}"></td>
            <td th:text="${customer.lastName}"></td>
            <td th:text="${customer.email}"></td>
            <td>
                <div>
                    <a th:href="@{'/view/' + ${customer.id}}">View</a>
                    <a th:href="@{'/edit/' + ${customer.id}}">Edit</a>
                    <a th:href="@{'/delete/' + ${customer.id}}">Delete</a>
                </div>
            </td>
        </tr>
        </tbody>
    </table>
</div>
</body>
</html>
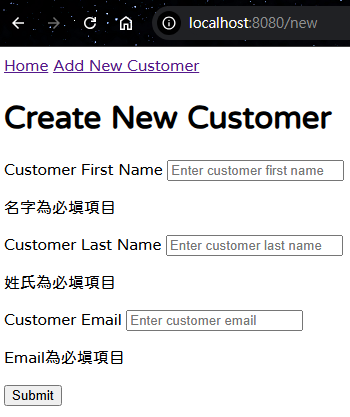
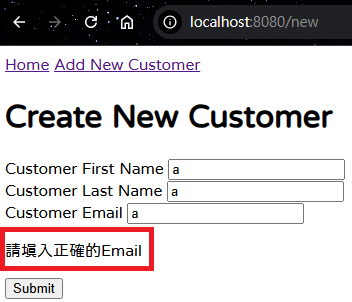
新增new_customer.html用來新增客戶,接收客戶的資料後交由後端處理。
<!DOCTYPE html>
<html lang="en" xmlns:th="http://www.thymeleaf.org">
<head>
  <meta charset="UTF-8">
  <title>Customer Management System</title>
</head>
<body>
<div>
  <div>
    <a th:href="@{/}">Home</a>
    <a th:href="@{/new}">Add New Customer</a>
  </div>
  <div>
    <h1>Create New Customer</h1>
  </div>

  <div>
當按下Submit按鈕時,th:object中的資料會傳送到th:action的網址
th:action的作用和HTML的action相同,只是變成資料用thymeleaf傳到後端
th:object和表單綁定,接收後端的內容,也可以在按下Submit時把內容提供給後端
<form method="post" role="form" th:action="@{/new}" th:object="${customer}">
      <div>
        <label>Customer First Name</label>
th:field的*{firstName}表示這個欄位中的資料對應到customer的firstName
<input placeholder="Enter customer first name" type="text" th:field="*{firstName}" />
th:if="${#fields.hasErrors('firstName')}"的意思是,當格式有誤而且是firstName的問題時,會顯示錯誤訊息
th:if當裡面的條件是true時,才會顯示這段內容。
        <p th:if="${#fields.hasErrors('firstName')}" th:errors="*{firstName}"></p>
      </div>

      <div>
        <label>Customer Last Name</label>
        <input placeholder="Enter customer last name" type="text" th:field="*{lastName}" />
        <p th:if="${#fields.hasErrors('lastName')}" th:errors="*{lastName}"></p>
      </div>

      <div>
        <label>Customer Email</label>
        <input placeholder="Enter customer email" type="text" th:field="*{email}" />
        <p th:if="${#fields.hasErrors('email')}" th:errors="*{email}"></p>
      </div>

      <button type="submit">Submit</button>
    </form>
  </div>

</div>
</body>
</html>
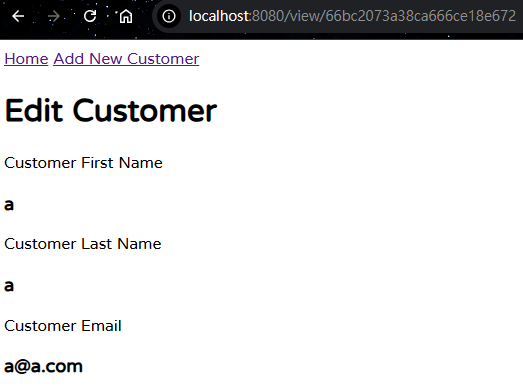
edit_customer.html可以修改客戶的資料,只接受和傳送資料,實際對資料庫的操作用後端負責。
//edit_customer.html

<!DOCTYPE html>
<html lang="en" xmlns:th="http://www.thymeleaf.org">
<head>
    <meta charset="UTF-8">
    <title>Customer Management System</title>
</head>
<body>
<div>
    <div>
        <a th:href="@{/}">Home</a>
        <a th:href="@{/new}">Add New Customer</a>
    </div>
    <div>
        <h1>Edit Customer</h1>
    </div>

    <div>
        <form method="post" role="form" th:action="@{'/edit/' + ${customer.id}}" th:object="${customer}">
            <div>
                <label>Customer First Name</label>
                <input placeholder="Enter customer first name" type="text" th:field="*{firstName}" />
                <p th:if="${#fields.hasErrors('firstName')}" th:errors="*{firstName}"></p>
            </div>

            <div>
                <label>Customer Last Name</label>
                <input placeholder="Enter customer last name" type="text" th:field="*{lastName}" />
                <p th:if="${#fields.hasErrors('lastName')}" th:errors="*{lastName}"></p>
            </div>

            <div>
                <label>Customer Email</label>
                <input placeholder="Enter customer email" type="text" th:field="*{email}" />
                <p th:if="${#fields.hasErrors('email')}" th:errors="*{email}"></p>
            </div>

            <button type="submit">Submit</button>
        </form>
    </div>

</div>
</body>
</html>
view_customer.html查看單一客戶的資訊
//view_customer.html

<!DOCTYPE html>
<html lang="en" xmlns:th="http://www.thymeleaf.org">
<head>
    <meta charset="UTF-8">
    <title>Customer Management System</title>
</head>
<body>
<div>
    <div>
        <a th:href="@{/}">Home</a>
        <a th:href="@{/new}">Add New Customer</a>
    </div>
  <div>
    <h1>Edit Customer</h1>
  </div>

  <div th:object="${customer}">
      <div>
        <label>Customer First Name</label>
        <h3 th:text="${customer.firstName}"></h3>
      </div>

      <div>
        <label>Customer Last Name</label>
        <h3 th:text="${customer.lastName}"></h3>
      </div>

      <div>
        <label>Customer Email</label>
        <h3 th:text="${customer.email}"></h3>
      </div>
  </div>

</div>
</body>
</html>
這部分可能有點複雜,可以切成四個區塊
然後觀察controller和html對應的內容,就能大致理解它們的作用了。
https://mega.nz/file/8Md00Lha#NfOVyWcFucLBDzjmKIC2CObA9DeWNhp0Uy17UgOZMlI
前往http://localhost:8080/,可以看到目前沒有任何customer。
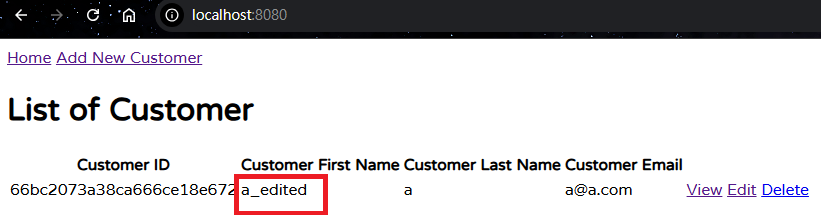
我們成功新增客戶後,就能在網頁上看到新增的客戶資訊。
接下來,測試View、Edit、Delete
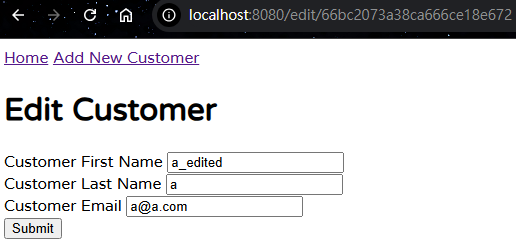
就能看到內容發生變化。


 iThome鐵人賽