之前的多模態我自己的電腦跑不動,所以接著我想把 API 移到 colab 上跑。
參考 ngrok 文件,有提供在 colab 上運行的說明。
https://ngrok.com/docs/using-ngrok-with/googleColab/
https://pyngrok.readthedocs.io/en/latest/integrations.html#google-colaboratory
先把 pyngrok 裝起來。
pip install pyngrok
接著一樣要輸入 ngrok 的 token。
from pyngrok import conf
conf.get_default().auth_token = "your ngrok token"
接著使用文件的範例跑跑看(我只改了一點點)。
import os
import threading

from flask import Flask
from pyngrok import ngrok

app = Flask(__name__)
port = "5000"

# Open a ngrok tunnel to the HTTP server
public_url = ngrok.connect(port).public_url
print( f" * ngrok tunnel   {public_url} -> http://127.0.0.1:{port}")

# Update any base URLs to use the public ngrok URL
app.config["BASE_URL"] = public_url

# ... Update inbound traffic via APIs to use the public-facing ngrok URL

# Define Flask routes
@app.route("/")
def index():
    return "Hello from Colab!"

# Start the Flask server in a new thread
threading.Thread(target=app.run, kwargs={"use_reloader": False}).start()
會看到輸出長這樣,這個 https://xxx.app 就是我們要的 url 了。
- ngrok tunnel https://xxx.app -> http://127.0.0.1:5000
- Serving Flask app 'main'
- Debug mode: off
INFO:werkzeug:WARNING: This is a development server. Do not use it in a production >deployment. Use a production WSGI server instead.- Running on http://127.0.0.1:5000
INFO:werkzeug:Press CTRL+C to quit
連上看看,第一次連線會看到提示,按下 Visit Site 就好。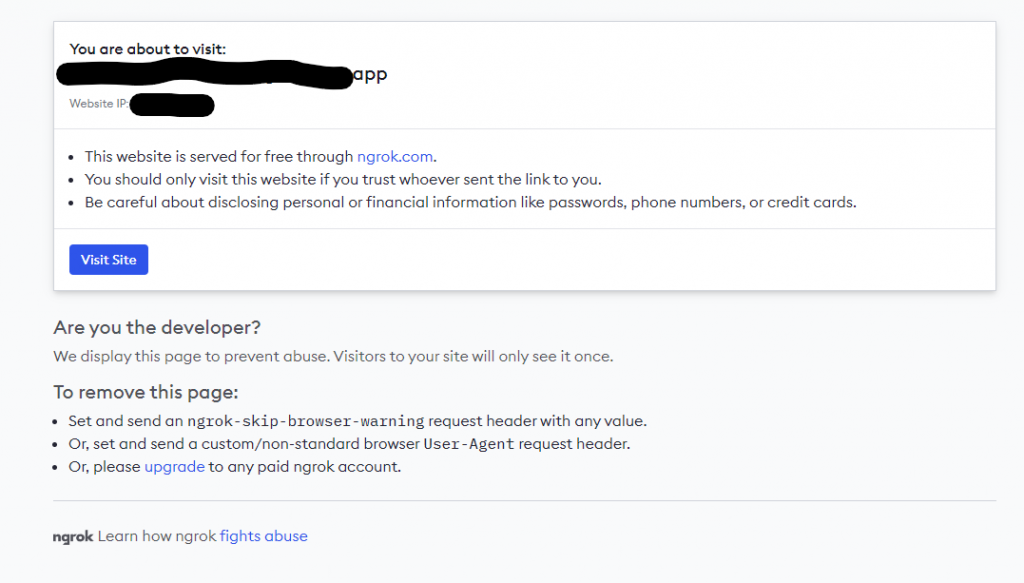

接下來先把它關掉,因為是用 Thread 開的,有點麻煩,我直接重啟工作階段比較快。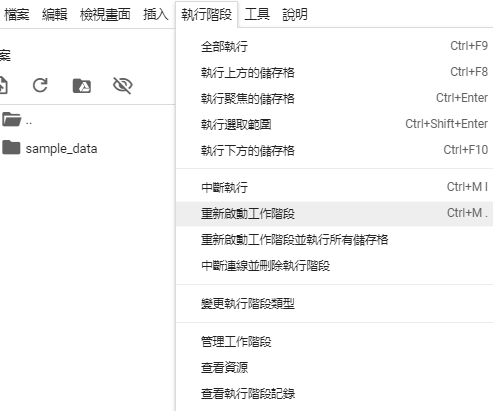
來跟 line bot 結合試試。
先把 SDK 裝起來。
pip install line-bot-sdk
調整一下 ECHO 範例,運行看看。
這邊我把範例給的 threading.Thread 的寫法換掉,畢竟要除錯重開都很麻煩
跑完記的去 Line Developers 裡更新 Messaging API,每次 ngrok 都會給新的 url。
import threading
from pyngrok import conf, ngrok
conf.get_default().auth_token = "your ngrok token"

from flask import Flask, request, abort

from linebot.v3 import (
    WebhookHandler
)
from linebot.v3.exceptions import (
    InvalidSignatureError
)
from linebot.v3.messaging import (
    Configuration,
    ApiClient,
    MessagingApi,
    ReplyMessageRequest,
    TextMessage
)
from linebot.v3.webhooks import (
    MessageEvent,
    TextMessageContent
)

app = Flask(__name__)

configuration = Configuration(access_token='YOUR_CHANNEL_ACCESS_TOKEN')
handler = WebhookHandler('YOUR_CHANNEL_SECRET')


@app.route("/callback", methods=['POST'])
def callback():
    # get X-Line-Signature header value
    signature = request.headers['X-Line-Signature']

    # get request body as text
    body = request.get_data(as_text=True)
    app.logger.info("Request body: " + body)

    # handle webhook body
    try:
        handler.handle(body, signature)
    except InvalidSignatureError:
        app.logger.info("Invalid signature. Please check your channel access token/channel secret.")
        abort(400)

    return 'OK'

@handler.add(MessageEvent, message=TextMessageContent)
def handle_message(event):
    with ApiClient(configuration) as api_client:
        line_bot_api = MessagingApi(api_client)
        line_bot_api.reply_message_with_http_info(
            ReplyMessageRequest(
                reply_token=event.reply_token,
                messages=[TextMessage(text=event.message.text)]
            )
        )

port = "5000"
public_url = ngrok.connect(port).public_url
print( f" * ngrok tunnel   {public_url} -> http://127.0.0.1:{port}")

#threading.Thread(target=app.run, kwargs={"use_reloader": False}).start()
if __name__ == "__main__":
    app.run(debug=False,host='localhost',port=port)
接著是我昨天漏寫了接收使用者傳影像時的處理方式,主要就是要多 import MessagingApiBlob、ImageMessageContent,參考下方程式
from linebot.v3.messaging import (
    Configuration,
    ApiClient,
    MessagingApi,
    MessagingApiBlob,
    ReplyMessageRequest,
    StickerMessage,
    TextMessage
)
from linebot.v3.webhooks import (
    MessageEvent,
    TextMessageContent,
    ImageMessageContent
)
然後再多加一個 handler,用來接收影像訊息。
這部分的程式當收到影像時,會把影像存下來,然後回個貼圖。
@handler.add(MessageEvent, message=ImageMessageContent)
def handle_message_img(event):
    with ApiClient(configuration) as api_client:
        line_bot_blob_api = MessagingApiBlob(api_client)
        message_content = line_bot_blob_api.get_message_content(message_id=event.message.id)
        with open(f'{event.message.id}.jpg', 'wb') as fd:
            fd.write(message_content)

        line_bot_api = MessagingApi(api_client)
        line_bot_api.reply_message_with_http_info(
            ReplyMessageRequest(
                reply_token=event.reply_token,
                messages=[StickerMessage(
                    package_id='1',
                    sticker_id='1')
                ]
            )
        )
接下來串串看多模態模型。
參照 Day 2 把 VisualGLM-6B 的環境建起來。
串起來試試。
from pyngrok import conf
conf.get_default().auth_token = "your ngrok token"
from transformers import AutoTokenizer, AutoModel
tokenizer = AutoTokenizer.from_pretrained("THUDM/visualglm-6b", trust_remote_code=True)
model = AutoModel.from_pretrained("THUDM/visualglm-6b", trust_remote_code=True).half().cuda()
from pyngrok import ngrok
import json
from flask import Flask, request, abort
from linebot.v3 import (
WebhookHandler
)
from linebot.v3.exceptions import (
InvalidSignatureError
)
from linebot.v3.messaging import (
Configuration,
ApiClient,
MessagingApi,
MessagingApiBlob,
ReplyMessageRequest,
TextMessage
)
from linebot.v3.webhooks import (
MessageEvent,
ImageMessageContent
)
app = Flask(__name__)
configuration = Configuration(access_token='YOUR_CHANNEL_ACCESS_TOKEN')
handler = WebhookHandler('YOUR_CHANNEL_SECRET')
history = []
@app.route("/callback", methods=['POST'])
def callback():
# get X-Line-Signature header value
signature = request.headers['X-Line-Signature']
# get request body as text
body = request.get_data(as_text=True)
app.logger.info("Request body: " + body)
# handle webhook body
try:
handler.handle(body, signature)
except InvalidSignatureError:
app.logger.info("Invalid signature. Please check your channel access token/channel secret.")
abort(400)
return 'OK'
@handler.add(MessageEvent, message=ImageMessageContent)
def handle_message_img(event):
global history
with ApiClient(configuration) as api_client:
line_bot_blob_api = MessagingApiBlob(api_client)
message_content = line_bot_blob_api.get_message_content(message_id=event.message.id)
with open(f'{event.message.id}.jpg', 'wb') as fd:
fd.write(message_content)
image_path = f'{event.message.id}.jpg'
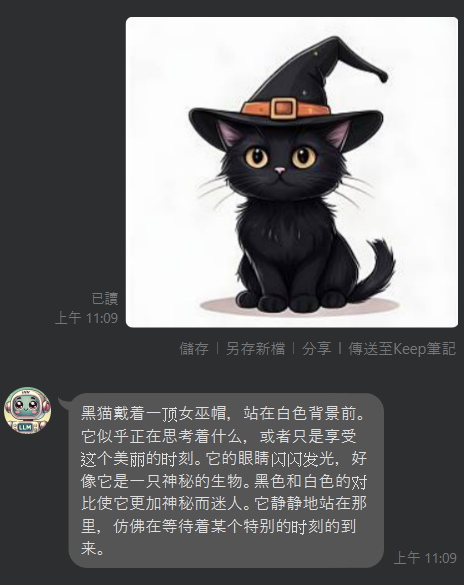
response, history = model.chat(tokenizer, image_path, "描述這張圖片", history)
line_bot_api = MessagingApi(api_client)
line_bot_api.reply_message_with_http_info(
ReplyMessageRequest(
reply_token=event.reply_token,
messages=[TextMessage(text=response)]
)
)
port = "5000"
public_url = ngrok.connect(port).public_url
print( f" * ngrok tunnel {public_url} -> http://127.0.0.1:{port}")
if __name__ == "__main__":
app.run(debug=False,host='localhost',port=port)
不過這樣沒有辦法沒有圖對話,不太好用,乾脆順便換個方式。
環境都不變,多一點步驟而已,先重啟工作階段。
把原始碼 clone 下來。
!git clone https://github.com/THUDM/VisualGLM-6B.git
進到資料夾中。
cd VisualGLM-6B
把模型載下來。
import argparse
from transformers import AutoTokenizer
tokenizer = AutoTokenizer.from_pretrained("THUDM/chatglm-6b", trust_remote_code=True)
from model import chat, VisualGLMModel
model, model_args = VisualGLMModel.from_pretrained('visualglm-6b', args=argparse.Namespace(fp16=True, skip_init=True))
from sat.model.mixins import CachedAutoregressiveMixin
model.add_mixin('auto-regressive', CachedAutoregressiveMixin())
使用模型的方式有一點點不同,另外現在有兩個 handler,分別處理文字跟影像訊息。
from pyngrok import conf
conf.get_default().auth_token = "your ngrok token"

from pyngrok import ngrok
import json

from flask import Flask, request, abort

from linebot.v3 import (
    WebhookHandler
)
from linebot.v3.exceptions import (
    InvalidSignatureError
)
from linebot.v3.messaging import (
    Configuration,
    ApiClient,
    MessagingApi,
    MessagingApiBlob,
    ReplyMessageRequest,
    TextMessage
)
from linebot.v3.webhooks import (
    MessageEvent,
    TextMessageContent,
    ImageMessageContent
)

app = Flask(__name__)

configuration = Configuration(access_token='YOUR_CHANNEL_ACCESS_TOKEN')
handler = WebhookHandler('YOUR_CHANNEL_SECRET')

history = []
cache_image = None

@app.route("/callback", methods=['POST'])
def callback():
    # get X-Line-Signature header value
    signature = request.headers['X-Line-Signature']

    # get request body as text
    body = request.get_data(as_text=True)

    app.logger.info("Request body: " + body)

    # handle webhook body
    try:
        handler.handle(body, signature)
    except InvalidSignatureError:
        app.logger.info("Invalid signature. Please check your channel access token/channel secret.")
        abort(400)

    return 'OK'

@handler.add(MessageEvent, message=TextMessageContent)
def handle_message(event):
    global history, cache_image
    with ApiClient(configuration) as api_client:
        line_bot_api = MessagingApi(api_client)

        response, history, cache_image = chat(None, model, tokenizer, event.message.text, history=history, image=cache_image)
        print(response)

        line_bot_api.reply_message_with_http_info(
            ReplyMessageRequest(
                reply_token=event.reply_token,
                messages=[TextMessage(text=response)]
            )
        )

@handler.add(MessageEvent, message=ImageMessageContent)
def handle_message_img(event):
    global history, cache_image
    with ApiClient(configuration) as api_client:
        line_bot_blob_api = MessagingApiBlob(api_client)
        message_content = line_bot_blob_api.get_message_content(message_id=event.message.id)
        with open(f'{event.message.id}.jpg', 'wb') as fd:
            fd.write(message_content)

        image_path = f'{event.message.id}.jpg'
        response, history, cache_image = chat(image_path, model, tokenizer, "描述這張圖片", history=history)

        line_bot_api = MessagingApi(api_client)
        line_bot_api.reply_message_with_http_info(
            ReplyMessageRequest(
                reply_token=event.reply_token,
                messages=[TextMessage(text=response)]
            )
        )


port = "5000"
public_url = ngrok.connect(port).public_url
print( f" * ngrok tunnel   {public_url} -> http://127.0.0.1:{port}")

#threading.Thread(target=app.run, kwargs={"use_reloader": False}).start()
if __name__ == "__main__":
    app.run(debug=False,host='localhost',port=5000)
跑完一樣記的去 Line Developers 更新 url。
最後試用看看。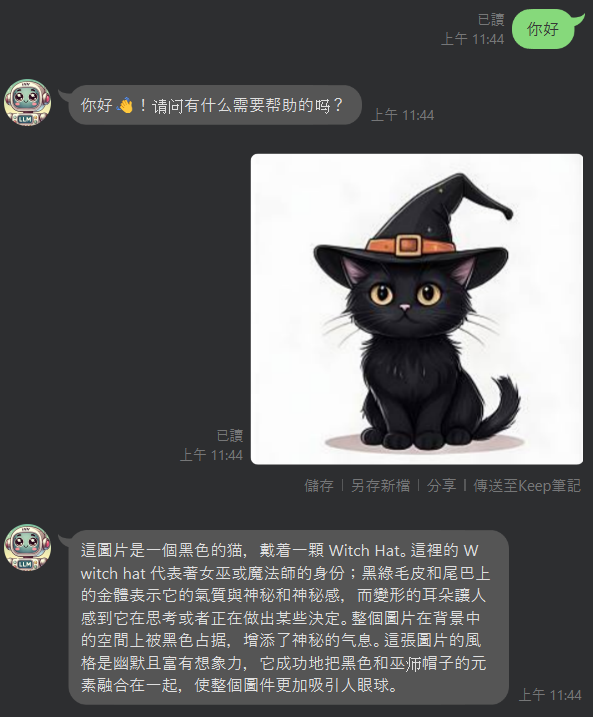
不過這有點吃資源,吃了快 15G 的 GPU RAM。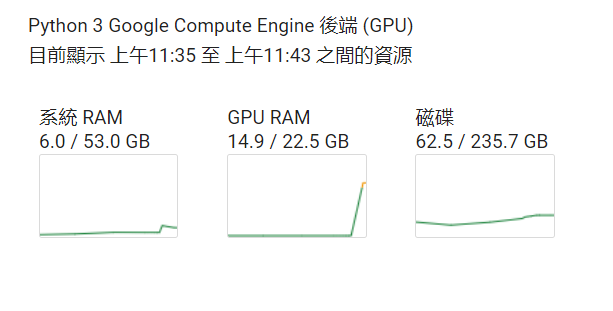

 iThome鐵人賽