接下來讓我們進行 e2e 測試吧!( •̀ ω •́ )✧
e2e 測試和單元測試差在哪?e2e 測試會著重於在接近真實環境下進行測試,透過 Playwright,我們會在實際的網頁上進行測試,而非單元測試的模擬環境。
接下來我們會針對 docs\components\btn-naughty\index.md 網頁的內容進行測試。
現在讓 Playwright 登場吧!(/≧▽≦)/
第一步讓我們進行 playwright 初始化,執行命令:
npm init playwright@latest
初始化精靈會連續提問幾個問題,設定如下:
┌  Welcome to VitePress!
│
◇  Need to install the following packages:
│    create-playwright@1.17.133
│    Ok to proceed? (y)
│  y
│
◇  Where to put your end-to-end tests?
│  e2e
│
◇  Add a GitHub Actions workflow? (y/N)
│  false
│
◇  Install Playwright browsers (can be done manually via 'npx playwright install')? (Y/n)
│  true
└
初始化結束後,會發現跑出以下檔案。
.
├─ playwright.config.ts     // 設定 e2e 運行細節
├─ e2e
│  └─ example.spec.ts       // 簡單的測試範例
└─ tests-examples
   └─ demo-todo-app.spec.ts // 完整 TodoList 功能網頁的測試範例
最後新增腳本。
package.json
{
  ...
  "scripts": {
    ...
    "test:e2e": "playwright test",        // 在終端機運行測試
    "test:e2e-ui": "playwright test --ui" // 開啟 playwright 提供的介面進行測試
  },
  ...
}
現在讓我們新增測試檔案。
e2e\components\btn-naughty.spec.ts
import { test, expect } from '@playwright/test';
test.beforeEach(async ({ page }) => {
await page.goto('http://localhost:5173/components/btn-naughty/');
});
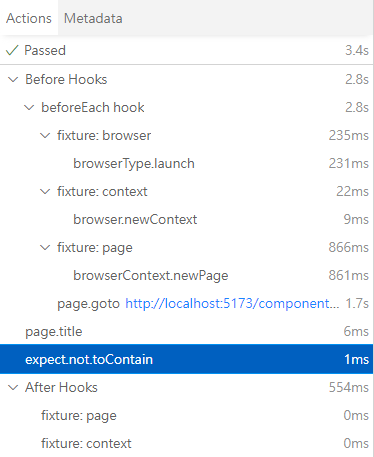
test('頁面必須存在(title 不可出現 404)', async ({ page }) => {
const title = await page.title();
expect(title).not.toContain('404');
});
VitePress 如果頁面為 404,會在 title 加入 404,所以我們利用這點來判斷頁面是否存在。
接下來運行腳本,開啟測試介面吧。
npm run test:e2e-ui
沒有意外的話應該會出現以下畫面,仔細看會發現左側欄已經列出了我們剛剛寫的測試案例。
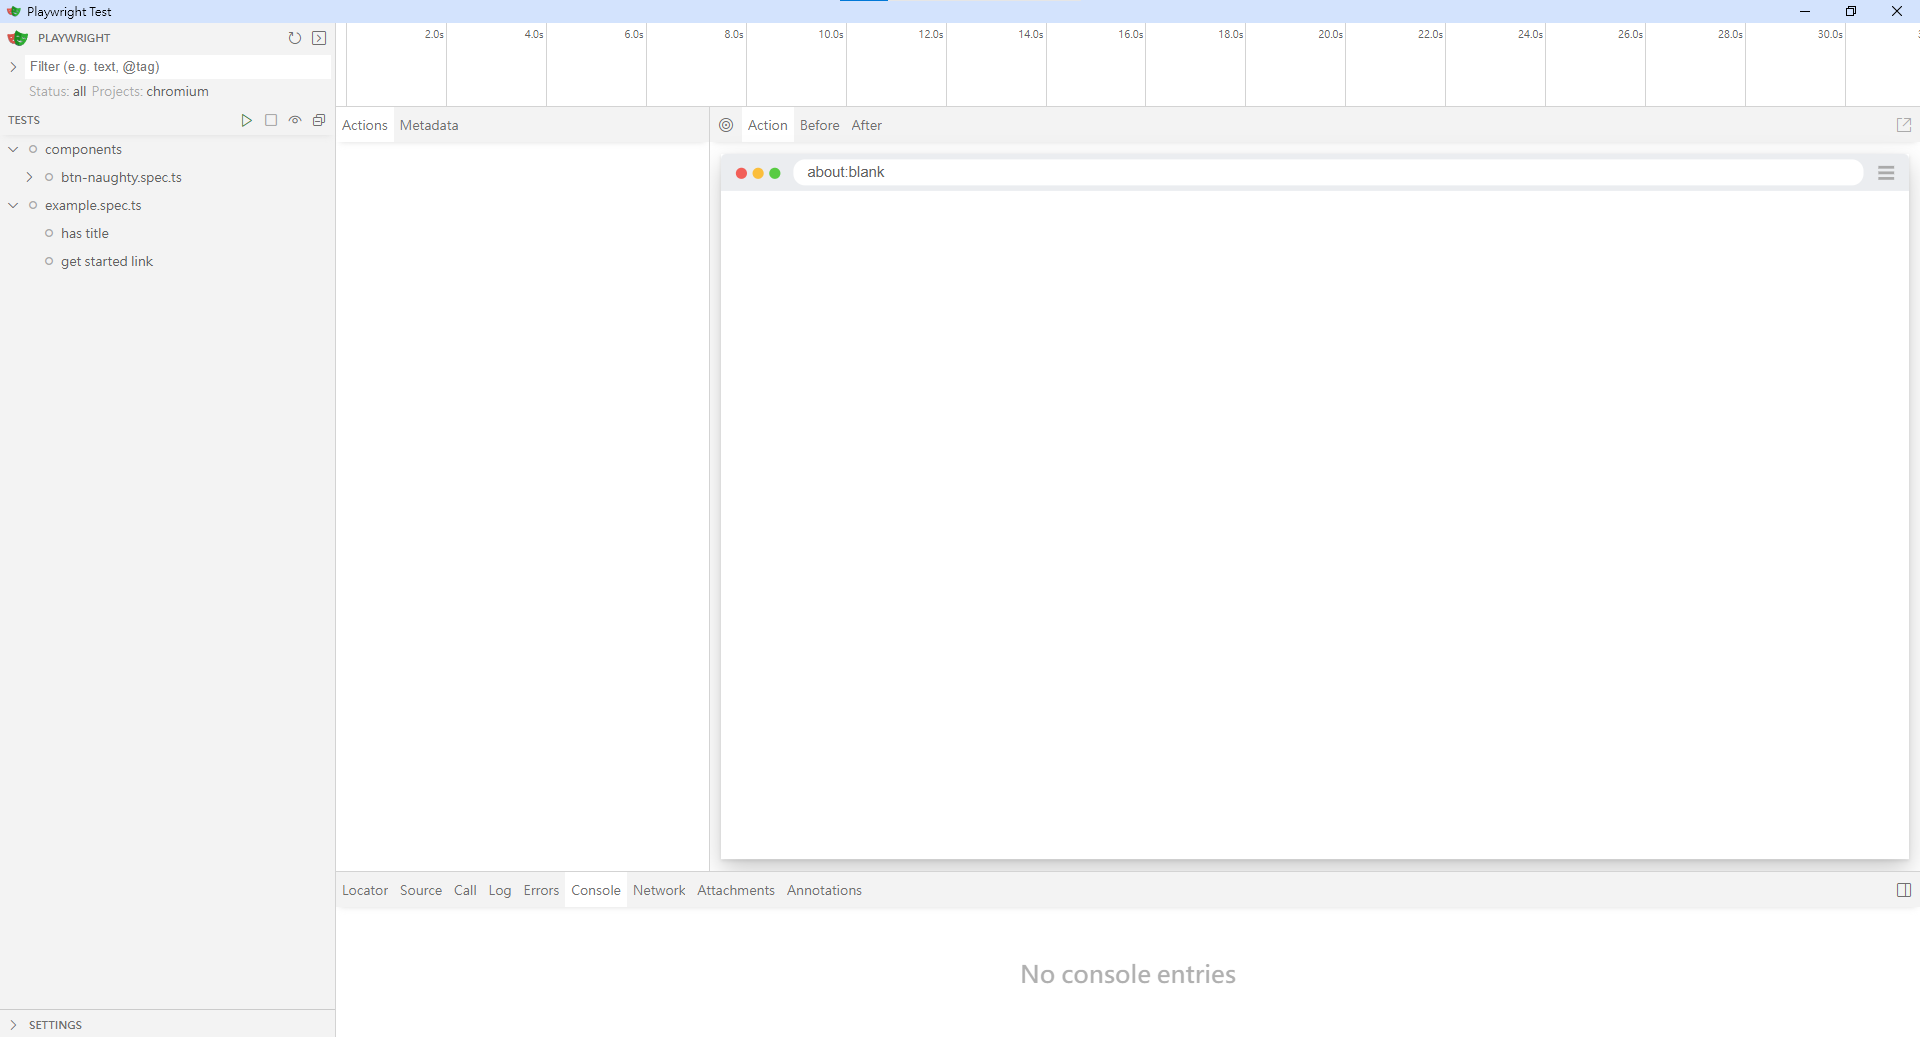
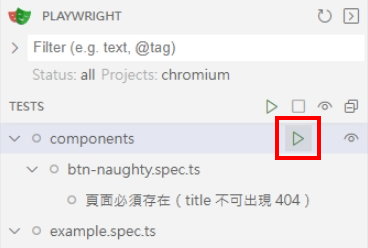
現在讓我們按下左邊目錄裡 components 旁邊的播放鍵,開始進行測試。
中間的 Actions 分頁可以看到測試的完整過程。
右邊看起來瀏覽器畫面的東東,還真的就是瀏覽器沒錯。( •̀ ω •́ )✧
可以顯示此次測試的網頁快照,不過因為這個測試案例只有測試 title,所以沒有畫面。
現在讓我們開始增加更多測試案例吧!◝( •ω• )◟
問題來了,所以要如何取得畫面目前內容?答案就是各種選擇器!(/≧▽≦)/
(其實也可以自動錄製,不過初學嘛,讓我們從基本開始。(´,,•ω•,,))
沒錯!就是那個熟悉 jQuery 或 CSS 的讀者們一定都很熟悉的選擇器!ヽ(●`∀´●)ノ
為了方便抓取內容,先讓我們在每個範例元件新增屬性。
docs\components\btn-naughty\index.md
...

<basic-usage title="basic-usage"/>

...

<moving-distance title="moving-distance"/>

...

<custom-button title="custom-button"/>

...

<custom-rubbing title="custom-rubbing"/>

...
讓我們新增一個「判斷 h3 標題是否為指定文字」的測試。
e2e\components\btn-naughty.spec.ts
...

test.describe('基本用法', () => {
  test('必須有文字為「基本用法」的 h3', async ({ page }) => {
    const h3Els = page.locator('h3');
    const target = h3Els.getByText('基本用法');
    await expect(target).toBeVisible();
  });
})
儲存檔案後,一樣在介面中執行此測試。
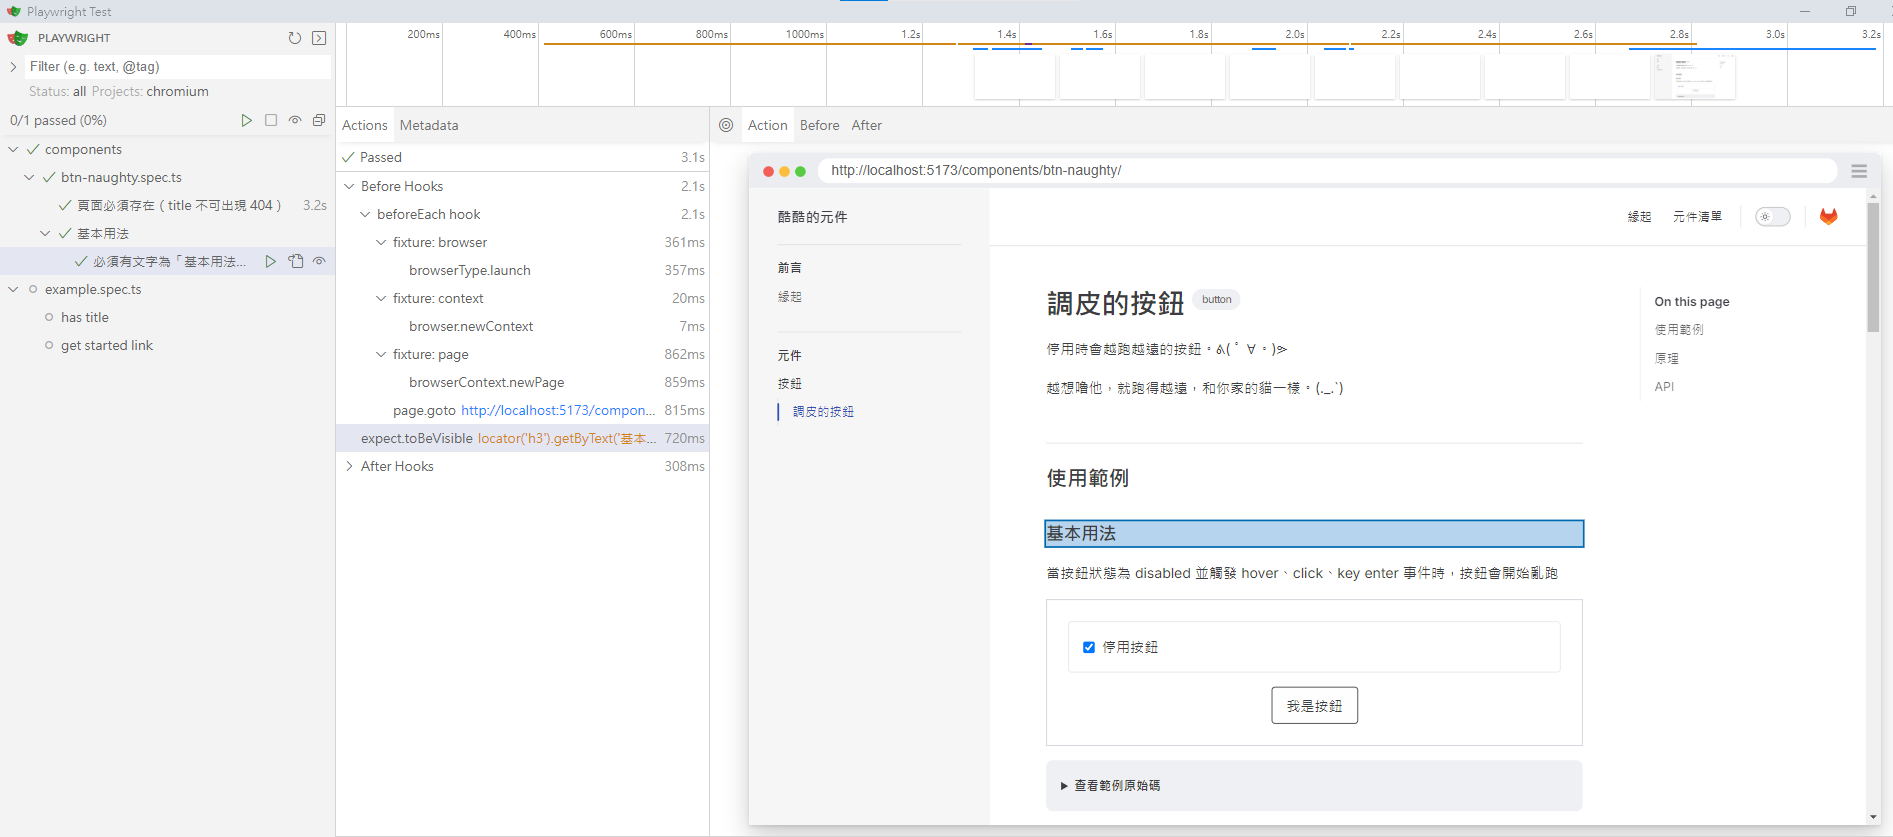
可以看到這次右邊的視窗有畫面了,還明確的指出抓取到的元素,是不是很酷啊!(/≧▽≦)/
接著來追加更多測試。
e2e\components\btn-naughty.spec.ts
...

test.describe('基本用法', () => {
  ...

  test('必須包含一個按鈕', async ({ page }) => {
    const section = page.getByTitle('basic-usage');
    await expect(section).toBeVisible();

    const button = section.getByRole('button');
    await expect(button).toBeVisible();
  });

  test('停用時,按鈕被 hover 會移動', async ({ page }) => {
    const section = page.getByTitle('basic-usage');
    await expect(section).toBeVisible();

    const button = section.getByRole('button');
    // boundingBox 用於取得元素的位置與大小
    const beforeBoundingBox = await button.boundingBox();

    await button.hover();
    await page.waitForTimeout(800);

    const afterBoundingBox = await button.boundingBox();

    if (!beforeBoundingBox || !afterBoundingBox) {
      throw new Error('boundingBox is null');
    }

    expect(beforeBoundingBox.x).not.toBe(afterBoundingBox.x);
    expect(beforeBoundingBox.y).not.toBe(afterBoundingBox.y);

    expect(beforeBoundingBox.width).toBeCloseTo(afterBoundingBox.width);
    expect(beforeBoundingBox.height).toBeCloseTo(afterBoundingBox.height);
  });

  test('停用時,按鈕被 click 會移動', async ({ page }) => {
    const section = page.getByTitle('basic-usage');
    await expect(section).toBeVisible();

    const button = section.getByRole('button');
    const beforeBoundingBox = await button.boundingBox();

    await button.click();
    await page.waitForTimeout(800);

    const afterBoundingBox = await button.boundingBox();

    if (!beforeBoundingBox || !afterBoundingBox) {
      throw new Error('boundingBox is null');
    }

    expect(beforeBoundingBox.x).not.toBe(afterBoundingBox.x);
    expect(beforeBoundingBox.y).not.toBe(afterBoundingBox.y);

    expect(beforeBoundingBox.width).toBeCloseTo(afterBoundingBox.width);
    expect(beforeBoundingBox.height).toBeCloseTo(afterBoundingBox.height);
  });

  test('沒有停用時,按鈕被 hover 不會移動', async ({ page }) => {
    const section = page.getByTitle('basic-usage');
    await expect(section).toBeVisible();

    // 取消停用
    const checkbox = section.getByRole('checkbox');
    checkbox.uncheck();

    const button = section.getByRole('button');
    const beforeBoundingBox = await button.boundingBox();

    await button.hover();
    await page.waitForTimeout(800);

    const afterBoundingBox = await button.boundingBox();

    if (!beforeBoundingBox || !afterBoundingBox) {
      throw new Error('boundingBox is null');
    }

    expect(beforeBoundingBox.x).toBeCloseTo(afterBoundingBox.x);
    expect(beforeBoundingBox.y).toBeCloseTo(afterBoundingBox.y);

    expect(beforeBoundingBox.width).toBeCloseTo(afterBoundingBox.width);
    expect(beforeBoundingBox.height).toBeCloseTo(afterBoundingBox.height);
  });

  test('沒有停用時,按鈕被 click 不會移動', async ({ page }) => {
    const section = page.getByTitle('basic-usage');
    await expect(section).toBeVisible();

    // 取消停用
    const checkbox = section.getByRole('checkbox');
    checkbox.uncheck();

    const button = section.getByRole('button');
    const beforeBoundingBox = await button.boundingBox();

    await button.click();
    await page.waitForTimeout(800);

    const afterBoundingBox = await button.boundingBox();

    if (!beforeBoundingBox || !afterBoundingBox) {
      throw new Error('boundingBox is null');
    }

    expect(beforeBoundingBox.x).toBeCloseTo(afterBoundingBox.x);
    expect(beforeBoundingBox.y).toBeCloseTo(afterBoundingBox.y);

    expect(beforeBoundingBox.width).toBeCloseTo(afterBoundingBox.width);
    expect(beforeBoundingBox.height).toBeCloseTo(afterBoundingBox.height);
  });
})
playwright 的 API 相當直覺好懂,若測試案例寫得夠好,除了保證系統品質,也可以透過測試案例讓維護者掌握系統內容。
實際執行後會發現,有 2 個案例發生錯誤了。( ・ิω・ิ)
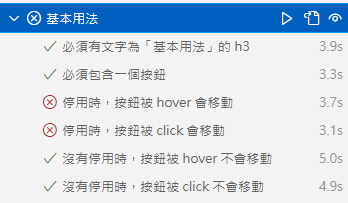
這是因為元件觸發移動的事件設計的不夠全面,讓我們追加個 mouseenter。
src\components\btn-naughty\btn-naughty.vue
<template>
  <!-- 容器 -->
  <div class="relative">
    ...

    <!-- 按鈕容器 -->
    <div
      ...
      @mouseenter="handleTrigger"
    >
      ...
    </div>
  </div>
</template>

...
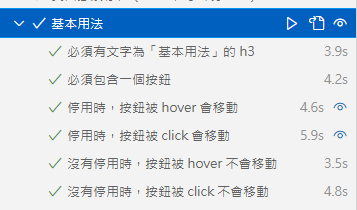
世界恢復和平!(´,,•ω•,,)
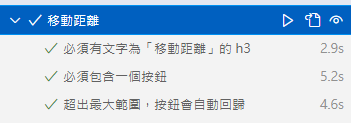
讓我們實測看看移動距離參數是否有效。
e2e\components\btn-naughty.spec.ts
...

test.describe('移動距離', () => {
  test('必須有文字為「移動距離」的 h3', async ({ page }) => {
    const h3Els = page.locator('h3');
    const target = h3Els.getByText('移動距離');
    await expect(target).toBeVisible();
  });

  test('必須包含一個按鈕', async ({ page }) => {
    const section = page.getByTitle('moving-distance');
    await expect(section).toBeVisible();

    const button = section.getByRole('button');
    await expect(button).toBeVisible();
  });

  test('超出最大範圍,按鈕會自動回歸', async ({ page }) => {
    const section = page.getByTitle('moving-distance');

    // 滾動到按鈕位置,以免 scroll 導致 boundingBox 偏移
    const button = section.getByRole('button');
    await button.scrollIntoViewIfNeeded();

    const beforeBoundingBox = await button.boundingBox();

    // 先觸發一次移動(click 會自動 scroll,改用 dispatchEvent )
    await button.dispatchEvent('click');

    // 設定最大範圍為 0
    const input = section.locator('input');
    await input.fill('0');

    // 由於最大範圍為 0,按鈕會回歸原位
    await button.dispatchEvent('click');
    await page.waitForTimeout(800);

    const afterBoundingBox = await button.boundingBox();

    if (!beforeBoundingBox || !afterBoundingBox) {
      throw new Error('boundingBox is null');
    }

    expect(afterBoundingBox.x).toBeCloseTo(beforeBoundingBox.x);
    expect(afterBoundingBox.y).toBeCloseTo(beforeBoundingBox.y);
  });
})
測試通過。
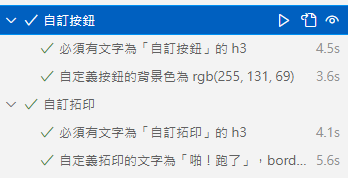
最後兩個範例的概念相同。
e2e\components\btn-naughty.spec.ts
...

test.describe('自訂按鈕', () => {
  test('必須有文字為「自訂按鈕」的 h3', async ({ page }) => {
    const h3Els = page.locator('h3');
    const target = h3Els.getByText('自訂按鈕');
    await expect(target).toBeVisible();
  });

  test('自定義按鈕的背景色為 rgb(255, 131, 69)', async ({ page }) => {
    const section = page.getByTitle('custom-button');

    const target = section.getByText('自定義按鈕');

    expect(target).toBeVisible();
    // 取出按鈕的實際樣式
    const style = await target.evaluate((el) => window.getComputedStyle(el));
    expect(style.backgroundColor).toBe('rgb(255, 131, 69)');
  });
})

test.describe('自訂拓印', () => {
  test('必須有文字為「自訂拓印」的 h3', async ({ page }) => {
    const h3Els = page.locator('h3');
    const target = h3Els.getByText('自訂拓印');
    await expect(target).toBeVisible();
  });

  test('自定義拓印的文字為「啪!跑了」,border 為 dashed', async ({ page }) => {
    const section = page.getByTitle('custom-rubbing');

    const target = section.getByText('啪!跑了');

    expect(target).toBeVisible();
    // 取出按鈕的實際樣式
    const style = await target.evaluate((el) => window.getComputedStyle(el));
    expect(style.borderStyle).toBe('dashed');
  });
})
測試通過。✧*。٩(ˊᗜˋ*)و✧*。
恭喜大家完成 e2e 測試,以上只是簡單範例,大家可以想想還有甚麼更細緻的案例,歡迎大家自由發揮!( ´ ▽ ` )ノ
以上程式碼已同步至 GitLab,大家可以前往下載:


 iThome鐵人賽