大家還記得我們介紹的 VFS 和 proc 檔案系統是為了什麼嗎?
int main() {
    int fd = open("/proc/123/ns/net", O_RDONLY | O_CLOEXEC);  // 打開Process 123 的 network namespace 檔案
    setns(fd, CLONE_NEWNET);  // 切換當前進程的 network namespace 為Process 123 的 namespace
    /* 執行其他操作 */
    return 0;
}
是為了要了解上面這個例子是怎麼做到的。open 一個 process 的 network namespace 檔案,然後使用 setns 就能夠切換當前 process 的 network namespace 。
首先,我們要先知道切換 network namespace 這件事情本身是怎麼實現的。
// include/linux/sched.h
struct task_struct {
    ...
    struct nsproxy			*nsproxy;
    ...
}

struct nsproxy {
	refcount_t count;
	struct uts_namespace *uts_ns;
	struct ipc_namespace *ipc_ns;
	struct mnt_namespace *mnt_ns;
	struct pid_namespace *pid_ns_for_children;
	struct net 	     *net_ns;
	struct time_namespace *time_ns;
	struct time_namespace *time_ns_for_children;
	struct cgroup_namespace *cgroup_ns;
};
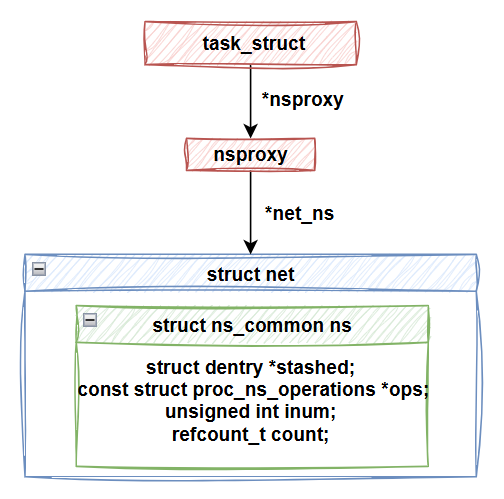
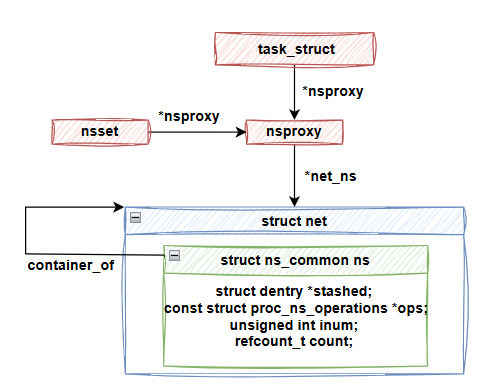
在 process 的 task_struct 結構中,有一個指標指向 nsproxy 結構,負責管理 process 所使用的各種 namespace 指標,指向不同類型 namespace 的結構體實例。因此,所謂的切換 namespace,主要是指修改這些 namespace 的指標。

接著我們要複習 net 結構。
// include/net/net_namespace.h
struct net {
    ...
    struct ns_common	ns;
    ...
}

// include/linux/ns_common.h
struct ns_common {
	atomic_long_t stashed;
	const struct proc_ns_operations *ops;
	unsigned int inum;
	refcount_t count;
};
前面說到,在 net 結構內嵌了 ns_common 結構,而 ns_common 是 Linux namespace 系統中的一個通用結構,不同類型的 namespace 都會使用它。在這個結構中,inum 欄位保存了該 namespace 實例的 ID。
// net/core/net_namespace.c
static __net_init int net_ns_net_init(struct net *net)
{
#ifdef CONFIG_NET_NS
	net->ns.ops = &netns_operations;
#endif
	return ns_alloc_inum(&net->ns);
}

static inline int ns_alloc_inum(struct ns_common *ns)
{
	atomic_long_set(&ns->stashed, 0);
	return proc_alloc_inum(&ns->inum);
}

int proc_alloc_inum(unsigned int *inum)
{
	int i;

	i = ida_simple_get(&proc_inum_ida, 0, UINT_MAX - PROC_DYNAMIC_FIRST + 1,
			   GFP_KERNEL);
	if (i < 0)
		return i;

	*inum = PROC_DYNAMIC_FIRST + (unsigned int)i;
	return 0;
}
在 day 4 我們有提到過,當 net 結構被初始化時,會分配 inum,進一步來看,他是一個隨機分配的數值。同時,net->ns.ops 被設置為 netns_operations,接下來我們會繼續深入了解這個部分。
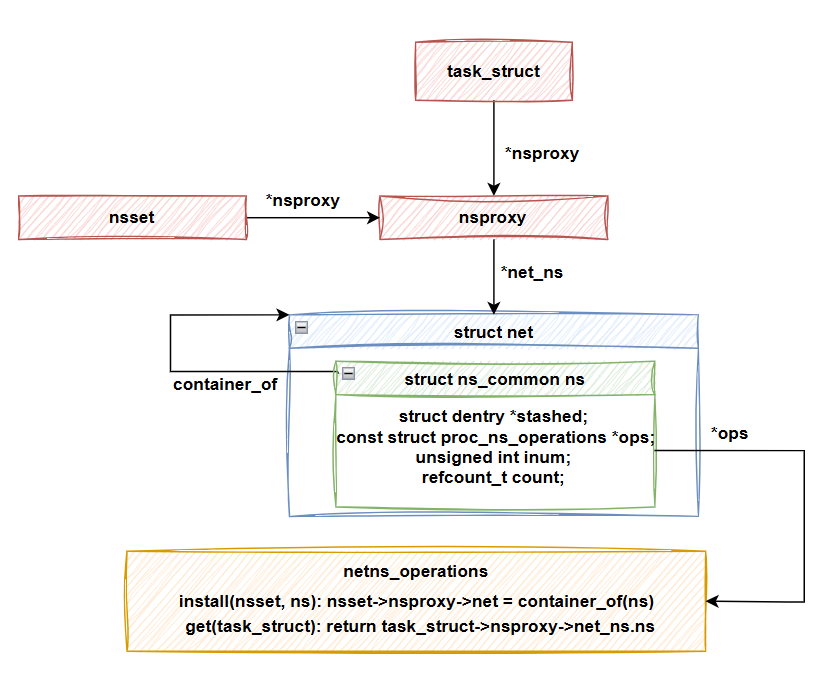
net->ns.ops 是一個 proc_ns_operations 結構 ,它定義了一組各種 namespace 系統應該要支援的介面。
// include/linux/proc_ns.h
struct proc_ns_operations {
	const char *name;
	const char *real_ns_name;
	int type;
	struct ns_common *(*get)(struct task_struct *task);
	void (*put)(struct ns_common *ns);
	int (*install)(struct nsset *nsset, struct ns_common *ns);
	struct user_namespace *(*owner)(struct ns_common *ns);
	struct ns_common *(*get_parent)(struct ns_common *ns);
} __randomize_layout;
在這裡,我們主要關注 name 和兩個 API:get 和 install。
// net/core/net_namespace.c
const struct proc_ns_operations netns_operations = {
	.name		= "net",
	.type		= CLONE_NEWNET,
	.get		= netns_get,
	.put		= netns_put,
	.install	= netns_install,
	.owner		= netns_owner,
};
在 network namespace 的定義 netns_operations 中,name 被設置為 net。
get API 則用於取得一個 task_struct 的 ns_common 指標。
struct ns_common get(struct task_struct *task);
不同 namespace 類型提供的 get 函數則用於拿到特定 namespace 類型結構中的 ns_common 子結構。例如 network namespace 定義的 get 就應該要拿到 net.ns 這個 ns_common 結構。
network namespace 定義的 get 函數是 netns_get。
static struct ns_common *netns_get(struct task_struct *task)
{
	struct net *net = NULL;
	struct nsproxy *nsproxy;

	task_lock(task);
	nsproxy = task->nsproxy;
	if (nsproxy)
		net = get_net(nsproxy->net_ns); // 更新 reference counter
	task_unlock(task);

	return net ? &net->ns : NULL;
}
前面有說明,一個 process 對不同 namespace 的引用都保存在 nsproxy 這個結構中,所以這邊先找到 task_struct->nsproxy->net 拿到 process 引用的 net 結構實例。接著返回 net->ns 拿到 ns_common結構實例。
install API 用來將某個 namespace 安裝到 process 中,實際上就是切換 namespace:
int install(struct nsset *nsset, struct ns_common *ns);


// include/linux/nsproxy.h
struct nsset {
	unsigned flags;
	struct nsproxy *nsproxy;
	struct fs_struct *fs;
	const struct cred *cred;
};
install 的輸入是 nsset 和 ns_common,nsset 是 namespace 切換的上下文,而 nsproxy 則是代表 process 的 namespace 指標。只要我們對 nsproxy 完成修改,引用這個 nsproxy 的 process 就完成了 namespace 的切換。

雖然 install 函數是由各個 namespace 類型實現的,但這個函數的輸入是 ns_common 指標。而當我們需要切換 namespace 時,需要獲取 net 結構體實例,那該怎麼辦呢?這時候就要用到我們在第 2 天介紹的 container_of 了。container_of 可以用來獲取一個欄位所屬的外層結構。由於我們知道 ns_common 是 net 結構的一個欄位,因此可以利用 container_of 來獲取 net 外層結構。
// net/core/net_namespace.c
static int netns_install(struct nsset *nsset, struct ns_common *ns)
{
	struct nsproxy *nsproxy = nsset->nsproxy;
	struct net *net = to_net_ns(ns); // 使用 container_of 取得 net
	...
	nsproxy->net_ns = get_net(net);
	return 0;
}

static inline struct net *to_net_ns(struct ns_common *ns)
{
	return container_of(ns, struct net, ns);
}
我們可以看到 network namespace 對 install API 的實作,確實使用 container_of 取得了 net 結構,並將其賦值給 nsset->nsproxy->net_ns,完成 namespace 的切換
另外,對於一個 ns_common 結構體,可以使用 install API 來切換 process 的 namespace。整個過程中甚至不需要知道具體是哪種 namespace。
nsset.nsproxy = ((*task_struct)p)->nsproxy
ns.ops.install(nsset, ns) // 完全不用去拿特定 namespace 類型的 proc_ns_operations
原因是 proc_ns_operations 本身會被保存在 ns_common 結構體內部,因此可以直接使用 ns.ops.install(nsset, ns) 來切換 namespace,而不需要特別去取得特定 namespace 類型的 proc_ns_operations。

setns 的運作機制int main() {
int fd = open("/proc/123/ns/net", O_RDONLY | O_CLOEXEC); // 打開Process 123 的 network namespace 檔案
setns(fd, CLONE_NEWNET); // 切換當前進程的 network namespace 為Process 123 的 namespace
/* 執行其他操作 */
return 0;
}
我們接下來看看 setns 是怎麼實作的,這裡要注意的是,因為打開的檔案是 network namespace,因此在使用 setns 切換時需要指定 CLONE_NEWNET,否則會報錯。
setns 函數接收的 fd 有兩種類型:一種是範例中使用的 proc namespace 檔案,另一種是 pid 檔案(指向 process 的檔案)。這裡我們忽略 pid 檔案的處理邏輯,專注於 proc namespace 檔案。
// kernel/nsproxy.c
SYSCALL_DEFINE2(setns, int, fd, int, flags)
{
	struct fd f = fdget(fd);
	struct ns_common *ns = NULL;
	struct nsset nsset = {};
	int err = 0;

    // 1. 取的目標的 ns_common 結構
    ns = get_proc_ns(file_inode(f.file));
    if (flags && (ns->ops->type != flags))
        err = -EINVAL;
    ...

    // 2. 準備 nsset
	err = prepare_nsset(flags, &nsset);
    ...
    // 3. 切換
    err = validate_ns(&nsset, ns);
	...
}
如同前面所述,切換 namespace 的方式就是取得目標 namespace 實例的 ns_common 結構和建立當前 process 的 nsset,然後呼叫 install API 進行切換。
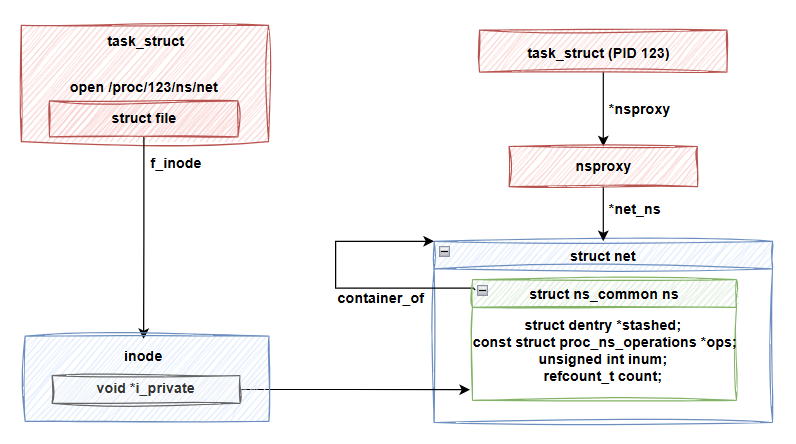
我們的目標是切換到 process 123 的 network namespace,第一步就是取得對應的 ns_common 實例。
struct fd {
	struct file *file;
	unsigned int flags;
};

// include/linux/fs.h
static inline struct inode *file_inode(const struct file *f)
{
	return f->f_inode;
}

// linux/proc_ns.h
#define get_proc_ns(inode) ((struct ns_common *)(inode)->i_private)
透過 fdget 可以取得 fd 對應的 fd 結構,而 file 會保存在這個結構內。接著,get_proc_ns(file_inode(f.file)) 會取得 f.file->f_inode->i_private。根據原始碼,這個欄位正是 ns_common 結構。因此,process 123 的 network namespace 的 ns_common 實例就已經被保存在我們"打開"的 /proc/123/ns/net 對應的 inode->i_private 欄位中。

// kernel/nsproxy.c
static int prepare_nsset(unsigned flags, struct nsset *nsset)
{
	struct task_struct *me = current;
	nsset->nsproxy = create_new_namespaces(0, me, current_user_ns(), me->fs);
    ...
}
接著,我們準備 nsset 上下文。在 kernel 中,可以透過 current 指標取得當前執行的 process 的 task_struct,並將 nsproxy 賦值給 nsset。需要注意的是,這裡使用了 create_new_namespaces 函數,因為 fork 後不同的 process 會共用 nsproxy 實例,但在切換 namespace 時,我們當然不希望影響其他 process,因此會對 nsproxy 結構進行複製。
// kernel/nsproxy.c
static inline int validate_ns(struct nsset *nsset, struct ns_common *ns)
{
	return ns->ops->install(nsset, ns);
}
最後的步驟是 validate_ns。這個函數的名稱或許不太恰當,實際上它應該是 install_ns。正如前面提到的,在完全不知道 ns_common 具體類型的情況下,我們可以呼叫 install API 來完成 namespace 的切換。
到這裡,我們已經了解了 setns 的運作機制。剩下的問題是,我們"打開"的 /proc/123/ns/net 檔案的 inode 是如何擁有 ns_common 結構的資料的?ns_common 結構的 inum 又是哪個檔案系統的 inode number 呢?
雖然我們是打開 proc 檔案系統的檔案,但是這個 inode 並不是來自 proc 檔案系統,而是來自 Linux 特別設計的 nsfs(NameSpace File System),明天我們將繼續介紹這個部分的機制。
