目前市場上有許多知名的虛擬化廠商,企業透過虛擬化技術可以將多個虛擬機器運行在單一的物理伺服器上,從而減少硬體成本和能源消耗。不僅提高了資源的利用率,還加快了應用程式的部署速度,提升了企業的競爭力。
主要的虛擬化廠商如下:
VMware 在全球的虛擬化市場擁有超過 4 成市占率的地位,而在臺灣則有超過 6 成的市占率。今天就來教大家如何透過 Data Collector for vSphere 將 vSphere 的資產相關組態自動整合到 iTop 之中。
Data Collector for vSphere
此外掛程式負責從 vSphere 伺服器自動向 iTop 提供有關整個資料中心的相關資料,例如 Server 、Hypervisor、Farm 與 Virtual Machine。
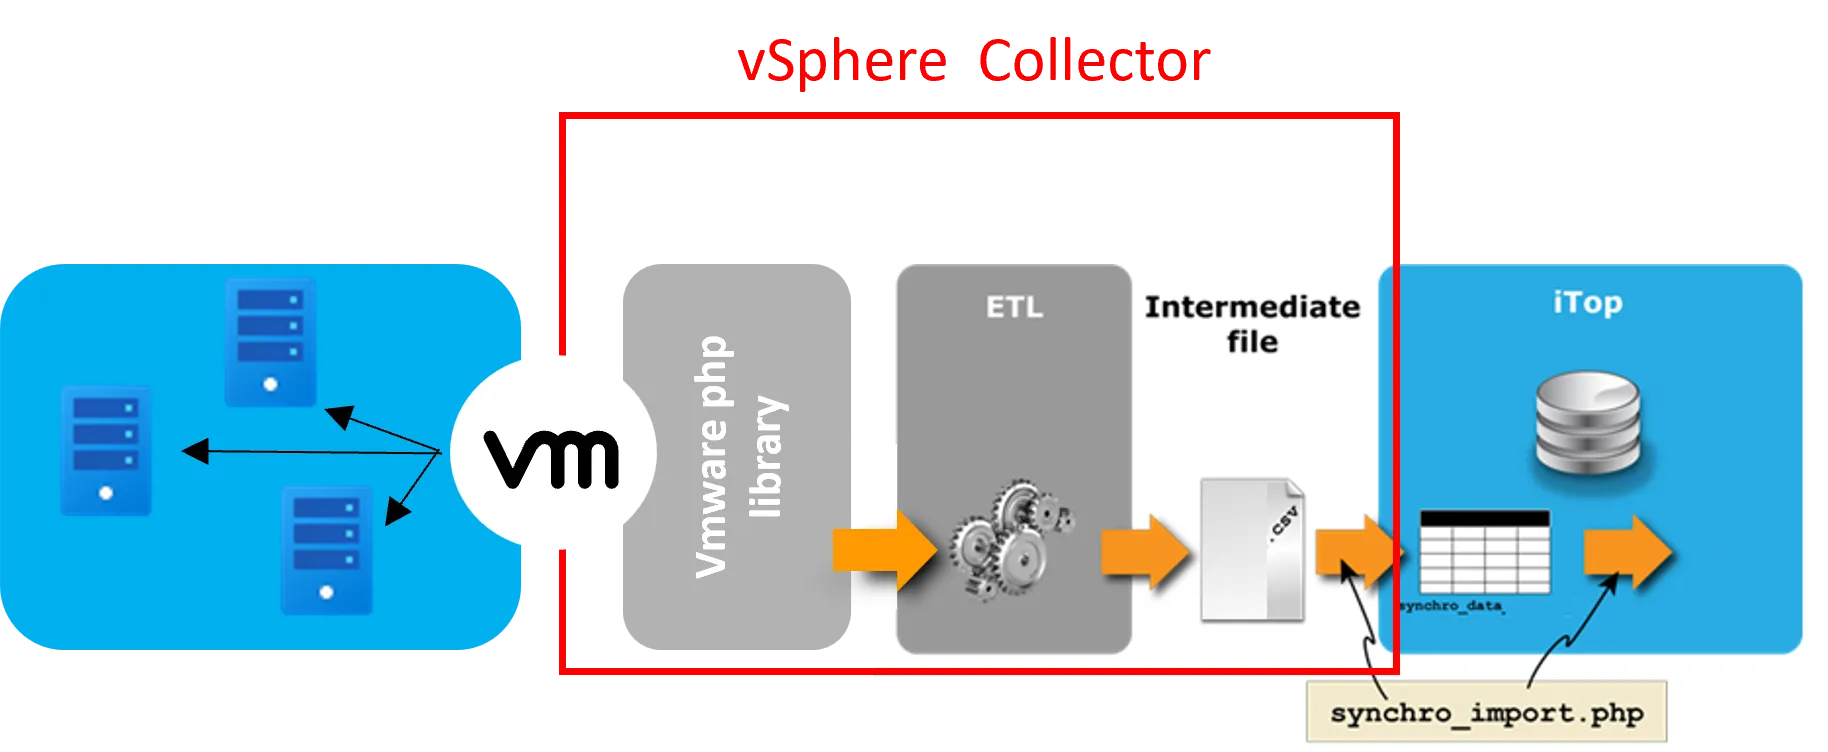
安裝 Data Model for vSphere
您必須在 iTop 上安裝 vSphere 的資料模型,以獲得相容的資料模型。
https://store.itophub.io/en_US/products/combodo-vsphere-datamodel
點選 iTop Store 的 CMDB,找到 Data Model for vSphere 外掛,點選 Free。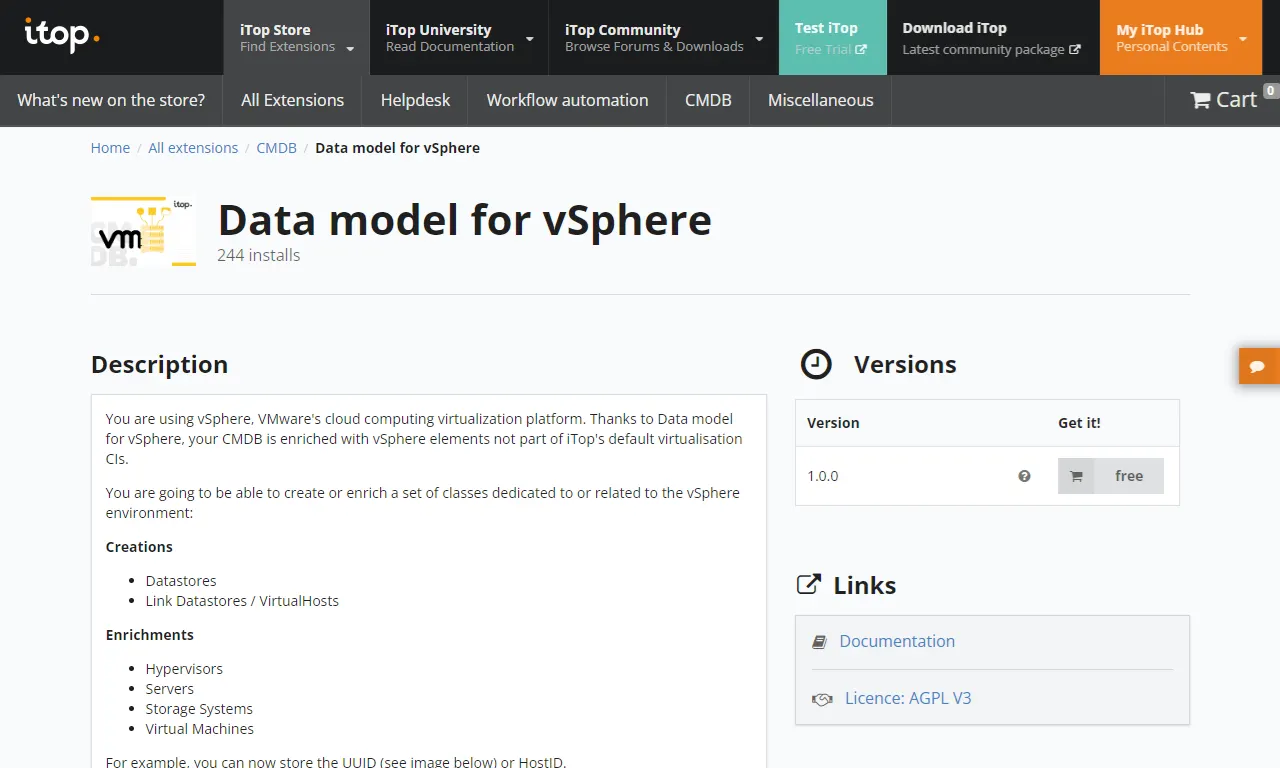
iTop Hub 會自動轉跳到以下畫面,點選 Install。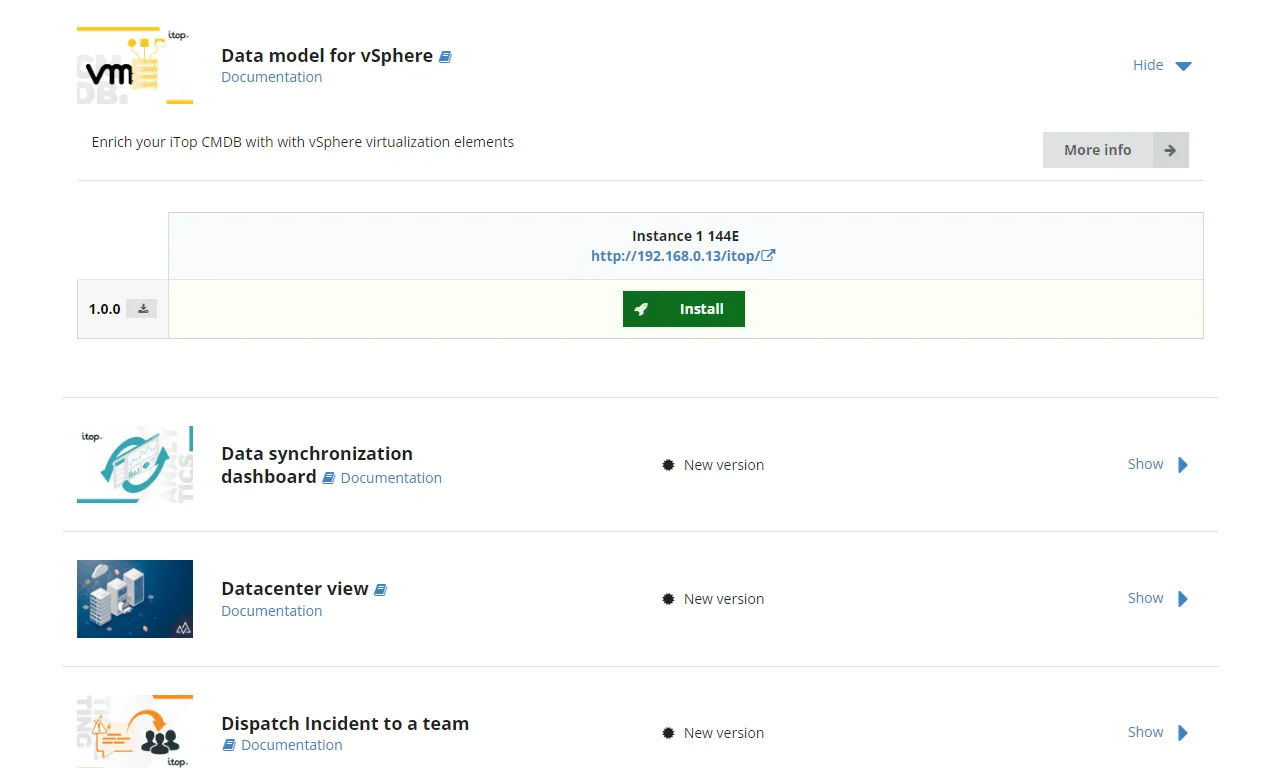
勾選 Instance Backup,點選 Deploy。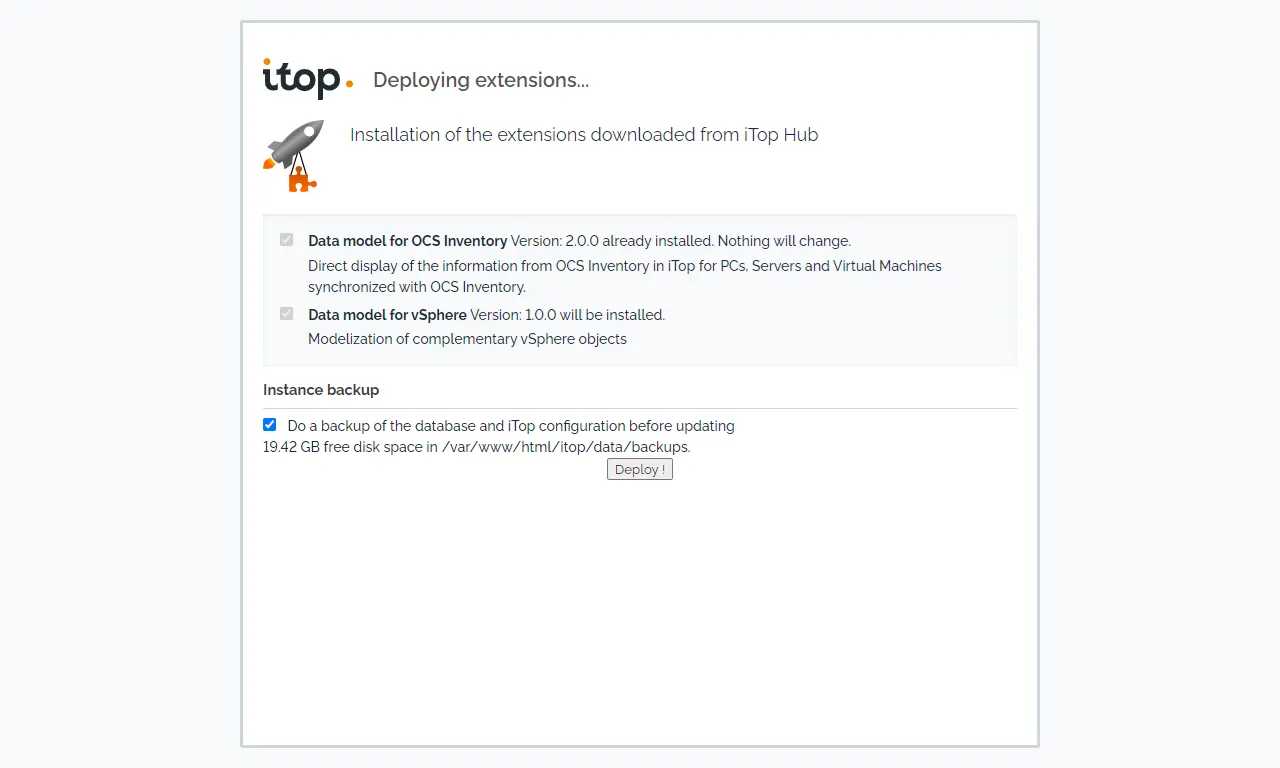
Data Model 安裝成功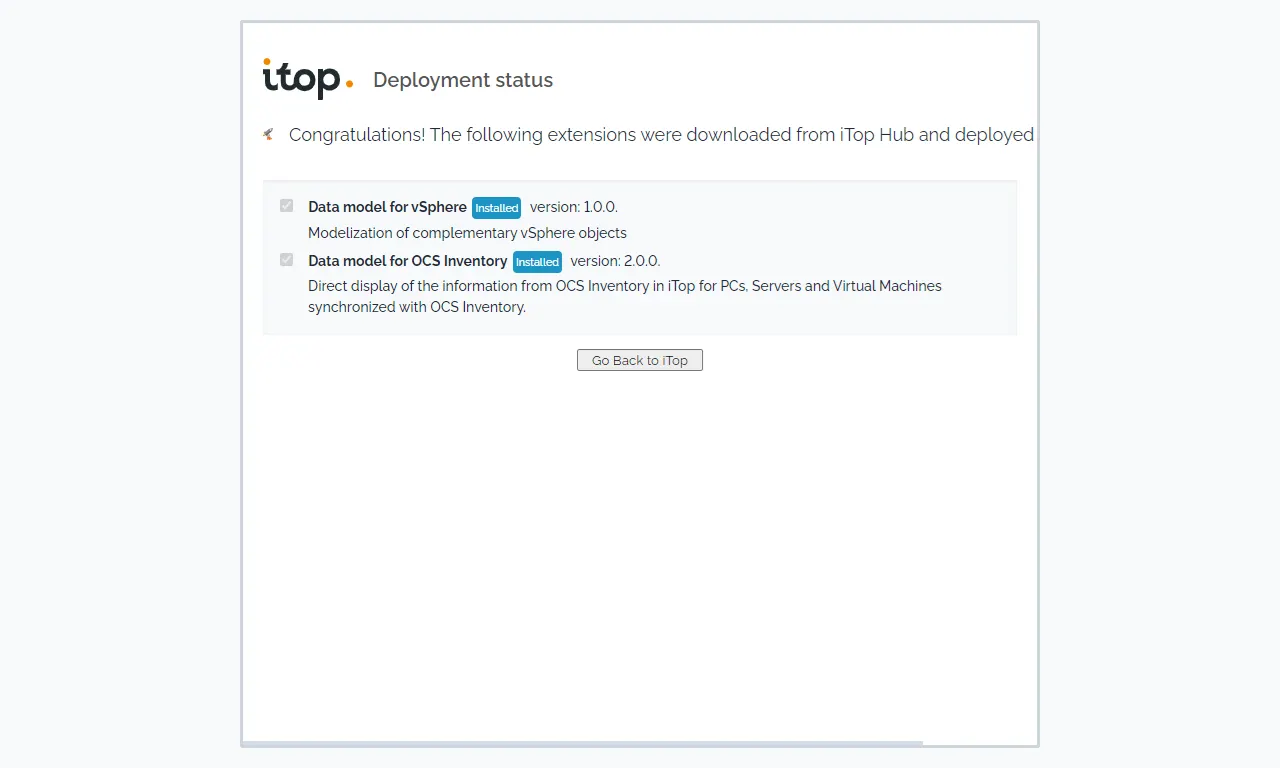
配置 Data Collector for vSphere 連線設定
此外掛程式無法由 iTop Hub 自動安裝,您必須將其手動部署在運行 PHP 的伺服器上。
https://store.itophub.io/en_US/products/combodo-data-collector-for-vsphere
選擇最新的 1.2.0 Version,點選 Download。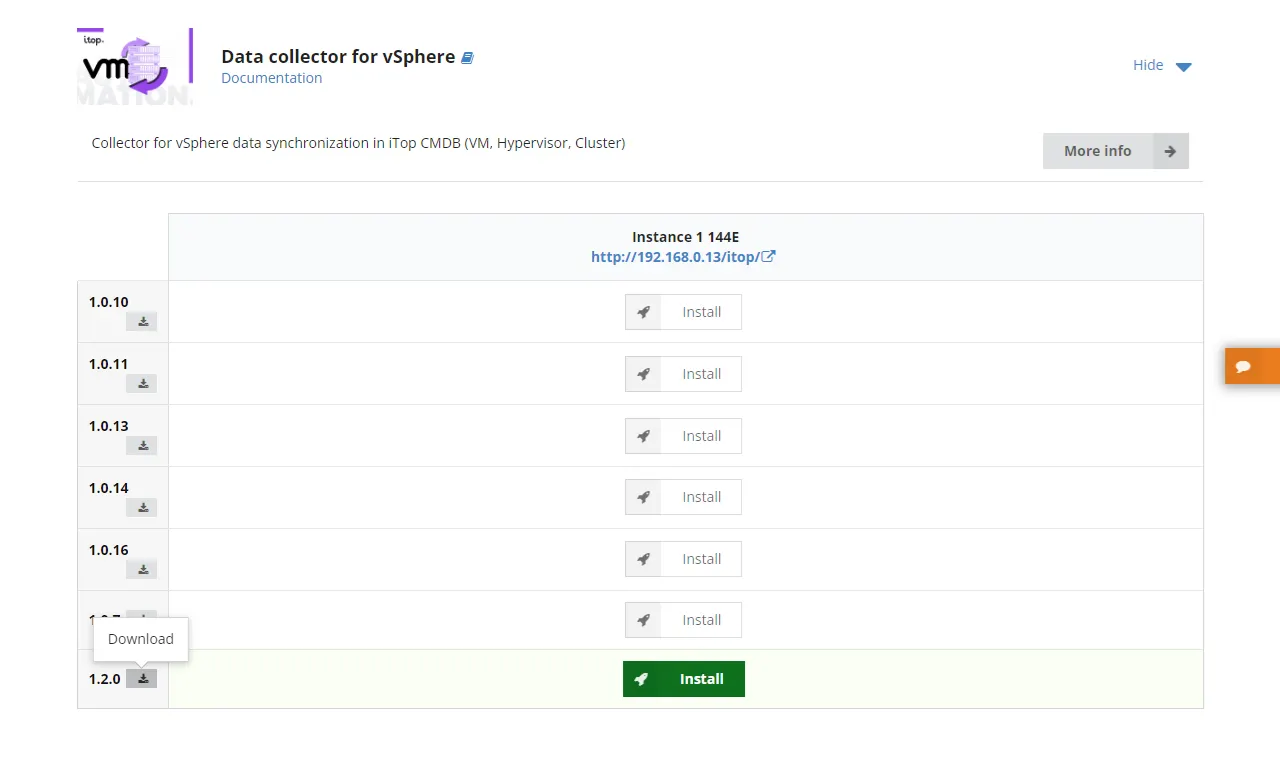
下載完後解壓縮到適當位置
sudo unzip combodo-data-collector-for-vsphere-1_2_0.zip -d /var/www/html/itop/extensions
sudo chown -R www-data:www-data /var/www/html/itop/extensions/combodo-data-collector-for-vsphere
請不要修改 Data Collector 預設的配置檔 params.distrib.xml
如果需要調整配置,請建立名為 params.local.xml 的文件,並將所需的定義複製,使兩個 XML 檔案的結構相同。
不要將 params.local.xml 存放在您的網頁伺服器目錄中,否則您的設定檔中的連線帳密可能外洩。
由於 ESXi 或者 vCenter 通常不只一台以上,建議依照主機名稱的方式將配置檔分開來存放。
sudo cp /var/www/html/itop/extensions/combodo-data-collector-for-vsphere/conf/params.distrib.xml /etc/itop/params.vsphere.your_vsphere_hostname.xml
sudo chown www-data:www-data /etc/itop/params.vsphere.your_vsphere_hostname.xml
編輯新增的組態文件
sudo nano /etc/itop/params.vsphere.your_vsphere_hostname.xml
應包含用於連接到 iTop 伺服器和 vSphere 的參數
<?xml version="1.0" encoding="UTF-8"?>
<!-- Default values for parameters. Do NOT alter this file, use params.local.xml instead -->
<parameters>
  <itop_url>http://your_itop_ip/iTop</itop_url>
  <itop_login>datacollector</itop_login>
  <itop_password>your_datacollector_password</itop_password>
  <itop_token/>
  <itop_login_mode/>

  <vsphere_uri>your_vsphere_ip:443</vsphere_uri>
  <vsphere_login>root</vsphere_login>
  <vsphere_password>your_root_password</vsphere_password>

  <!-- Default values -->
  <default_org_id>My Demo</default_org_id>
  <hypervisor type="hash">
    <!-- Define what attribute to use as cpu attribute within iTop's datamodel.
     numCpuPackages was used before -->
    <cpu_attribute>numCpuCores</cpu_attribute>
  </hypervisor>
  <virtual_machine type="hash">
    <!-- By default, a VM's virtual host points to the farm that the VM's hypervisor belongs to, if any.
        This option forces the VM's virtual host to point to the VM's hypervisor
     Allowed values: hypervisor, farm (default) -->
    <virtual_host>farm</virtual_host>
  </virtual_machine>

  <custom_synchro>
    <vSphereHypervisorCollector>
      <fields>
        <server_id>
          <source>hardware->systemInfo->otherIdentifyingInfo[ServiceTag]</source>
          <json>
            <reconciliation_attcode>serialnumber</reconciliation_attcode>
          </json>
        </server_id>
      </fields>
    </vSphereHypervisorCollector>
    <vSphereServerCollector>
      <fields>
        <serialnumber>
          <source>hardware->systemInfo->otherIdentifyingInfo[ServiceTag]</source>
        </serialnumber>
      </fields>
    </vSphereServerCollector>
  </custom_synchro>

  <vsphere_connection_options>
    <ssl>
      <verify_peer>0</verify_peer>
      <verify_peer_name>0</verify_peer_name>
      <allow_self_signed>1</allow_self_signed>
    </ssl>
  </vsphere_connection_options>

  <!-- console_log_level: level of logging to console (std output)
  -1 : none, nothing will be logged to the console
   0 : System wide emergency errors only (LOG_EMERG)
   1 : Alert errors (LOG_ALERT)
   2 : Critical errors (LOG_CRIT)
   3 : Application level errors (LOG_ERR)
   4 : Warnings
   5 : Notice
   6 : Information
   7 : Debug traces
   -->
  <console_log_level>6</console_log_level>

  <!-- eventissue_log_level: level of creating event issue object on remote itop
  -1 : none, nothing will be logged to the console
   0 : System wide emergency errors only (LOG_EMERG)
   1 : Alert errors (LOG_ALERT)
   2 : Critical errors (LOG_CRIT)
   3 : Application level errors (LOG_ERR)
   4 : Warnings
   5 : Notice
   6 : Information
   7 : Debug traces
   -->
  <eventissue_log_level>-1</eventissue_log_level>

  <!--
    dateformat: logging date format
    Example: [Y-m-d H:i:s] => will produce a log like "[2020-04-29 14:36:16]    [Info]  ......"
  -->
  <console_log_dateformat>[Y-m-d H:i:s]</console_log_dateformat>

  <!-- syslog_log_level: level of logging to Syslog
  -1 : none, nothing will be logged to syslog
   0 : System wide emergency errors (LOG_EMERG)
   1 : Alert errors (LOG_ALERT)
   2 : Critical errors (LOG_CRIT)
   3 : Application level errors (LOG_ERR)
   4 : Warnings
   5 : Notice
   6 : Information
   7 : Debug traces
   -->
  <syslog_log_level>-1</syslog_log_level>

  <!-- data_path: location where to store the temporary data (.raw and .csv files).
  Make sure that you change this value if you run several instances of the collector
  from the same location (with different configuration files).
  You can use the placeholder %APPROOT% to build a path relative to the location of the collector itself
   -->
  <data_path>%APPROOT%/data/your_vsphere_hostname</data_path>

  <!-- Maximum number of elements to process in one iteration (for upload and synchro in iTop) -->
  <max_chunk_size>1000</max_chunk_size>
  <!-- Timeout for waiting for the execution of one data synchro task (in seconds) -->
  <itop_synchro_timeout>600</itop_synchro_timeout>
  <!-- Whether or not to stop when an error occurs during a synchronization -->
  <stop_on_synchro_error>no</stop_on_synchro_error>
  <!-- When using cUrl to connect to the iTop Webservices the cUrl options can be specified below
  The syntax is:
  <NAME_OF_THE_OPTION1>VALUE_OF_THE_OPTION1</NAME_OF_THE_OPTION1>
  <NAME_OF_THE_OPTION2>VALUE_OF_THE_OPTION2</NAME_OF_THE_OPTION2>
  etc...

  Where NAME_OF_THE_OPTIONx and VALUE_OF_THE_OPTIONx are either:
  - The numeric value of the option
  - or the string representation of the corresponding PHP "define" (case sensitive)

  The four examples below are equivalent:
   <CURLOPT_SSLVERSION>CURL_SSLVERSION_TLSv1_2</CURLOPT_SSLVERSION>
  or
   <CURLOPT_SSLVERSION>6</CURLOPT_SSLVERSION>
  or
   <32>CURL_SSLVERSION_TLSv1_2</32>
  or
   <32>6</32>

  Since in PHP we have:
  define ('CURLOPT_SSLVERSION', 32);
  define ('CURL_SSLVERSION_TLSv1_2', 6);

  Note: because the recommandation about which is the best SSL/TLS version
        to use varies over time (as security bugs are found in the procotols)
        it is BETTER NOT TO force any SSL/TLS version at all and let the
        system decide which version to use.

        However if the web server running iTop requires a specific TLS/SSL
        version you can use the configuration to force it anyway...
        but be prepared to revisit this setting regularly.
  -->
  <curl_options>
    <CURLOPT_SSL_VERIFYHOST>0</CURLOPT_SSL_VERIFYHOST>
    <CURLOPT_SSL_VERIFYPEER>1</CURLOPT_SSL_VERIFYPEER>
  </curl_options>

  <!-- The email address of an existing contact in iTop, to be notified in case of error during the synchronization -->
  <contact_to_notify></contact_to_notify>
  <!-- iTop user set as allowed to run synchronization. It is highly recommended to use the same as itop_login -->
  <synchro_user></synchro_user>
  <!-- Synchronization parameters -->
  <json_placeholders type="hash">
    <prefix>your_vsphere_hostname</prefix>
    <full_load_interval>604800</full_load_interval><!-- 7 days (in seconds): 7*24*60*60 -->
    <synchro_status>production</synchro_status>
  </json_placeholders>
</parameters>
預設的收集通用參數
 <!-- Default values -->
  <default_org_id>My Demo</default_org_id>
  <hypervisor type="hash">
    <!-- Define what attribute to use as cpu attribute within iTop's datamodel.
     numCpuPackages was used before -->
    <cpu_attribute>numCpuCores</cpu_attribute>
  </hypervisor>
  <virtual_machine type="hash">
    <!-- By default, a VM's virtual host points to the farm that the VM's hypervisor belongs to, if any.
        This option forces the VM's virtual host to point to the VM's hypervisor
     Allowed values: hypervisor, farm (default) -->
    <virtual_host>farm</virtual_host>
  </virtual_machine>
可以透過在 XML 參數檔案中新增額外的定義來設定 Data Collector。
下列範例配置了伺服器的序號的收集,並且還使用收集到的序號作為 Hypervisors 和實體伺服器之間的對應鍵。
  <custom_synchro>
    <vSphereHypervisorCollector>
      <fields>
        <server_id>
          <source>hardware->systemInfo->otherIdentifyingInfo[ServiceTag]</source>
          <json>
            <reconciliation_attcode>serialnumber</reconciliation_attcode>
          </json>
        </server_id>
      </fields>
    </vSphereHypervisorCollector>
    <vSphereServerCollector>
      <fields>
        <serialnumber>
          <source>hardware->systemInfo->otherIdentifyingInfo[ServiceTag]</source>
        </serialnumber>
      </fields>
    </vSphereServerCollector>
  </custom_synchro>
若您的 vSphere 伺服器使用預設的憑證運行,請在 XML 參數檔案中新增下列配置以繞過 SSL 憑證驗證。
  <vsphere_connection_options>
    <ssl>
      <verify_peer>0</verify_peer>
      <verify_peer_name>0</verify_peer_name>
      <allow_self_signed>1</allow_self_signed>
    </ssl>
  </vsphere_connection_options>
將同步資料依照主機名稱的方式分開來存放,並授予適當權限。
sudo mkdir /var/www/html/itop/extensions/combodo-data-collector-for-vsphere/data/your_vsphere_hostname
sudo chown -R www-data:www-data /var/www/html/itop/extensions/combodo-data-collector-for-vsphere/data/your_vsphere_hostname
我們先手動執行同步作業
sudo -u www-data /usr/bin/php \
/var/www/html/itop/extensions/combodo-data-collector-for-vsphere/exec.php \
--config_file=/etc/itop/params.vsphere.your_vsphere_hostname.xml
回到 Configuration Management 的 Overview,可以發現 Virtualization 的 Hypervisor、Virtual Machine 與 Datastore 都有同步進來了。
由於沒有使用 vCenter 而是使用 ESXi 當作 vSphere 的參數,所以 Farm 的部分沒有同步。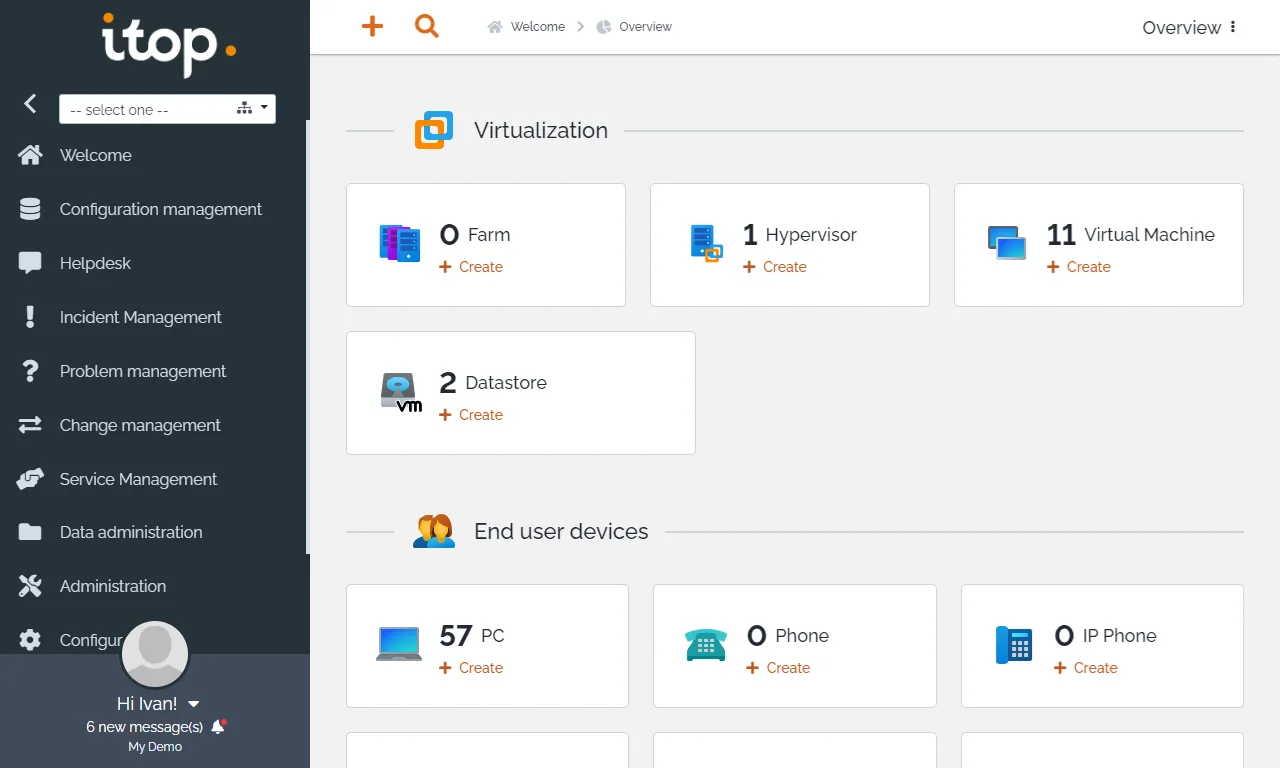
我們點選 Hypervisor 看看,已經把 Virtual Machine 關聯起來了。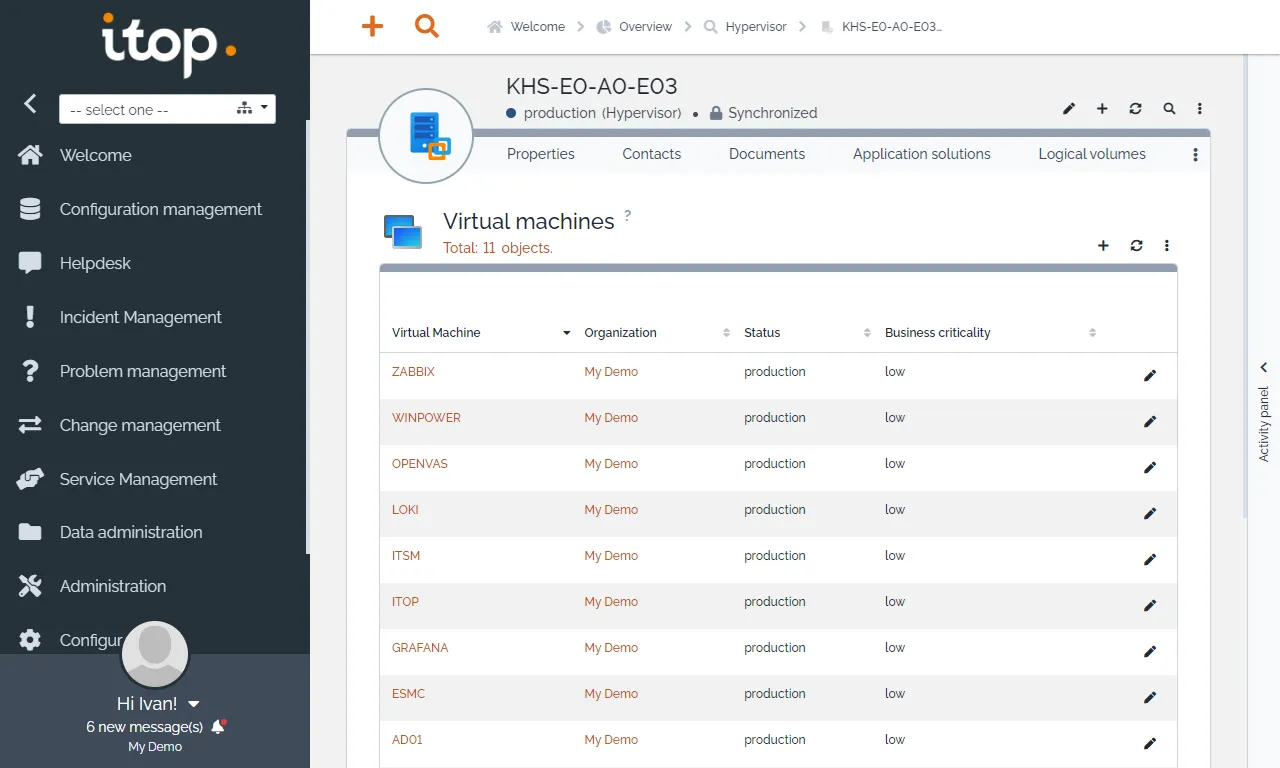
Data Collector 還會自行建立 Server 並與 Hypervisor 進行關聯,我們可以在 Server 查看機器的型號、規格與 OS 的版本。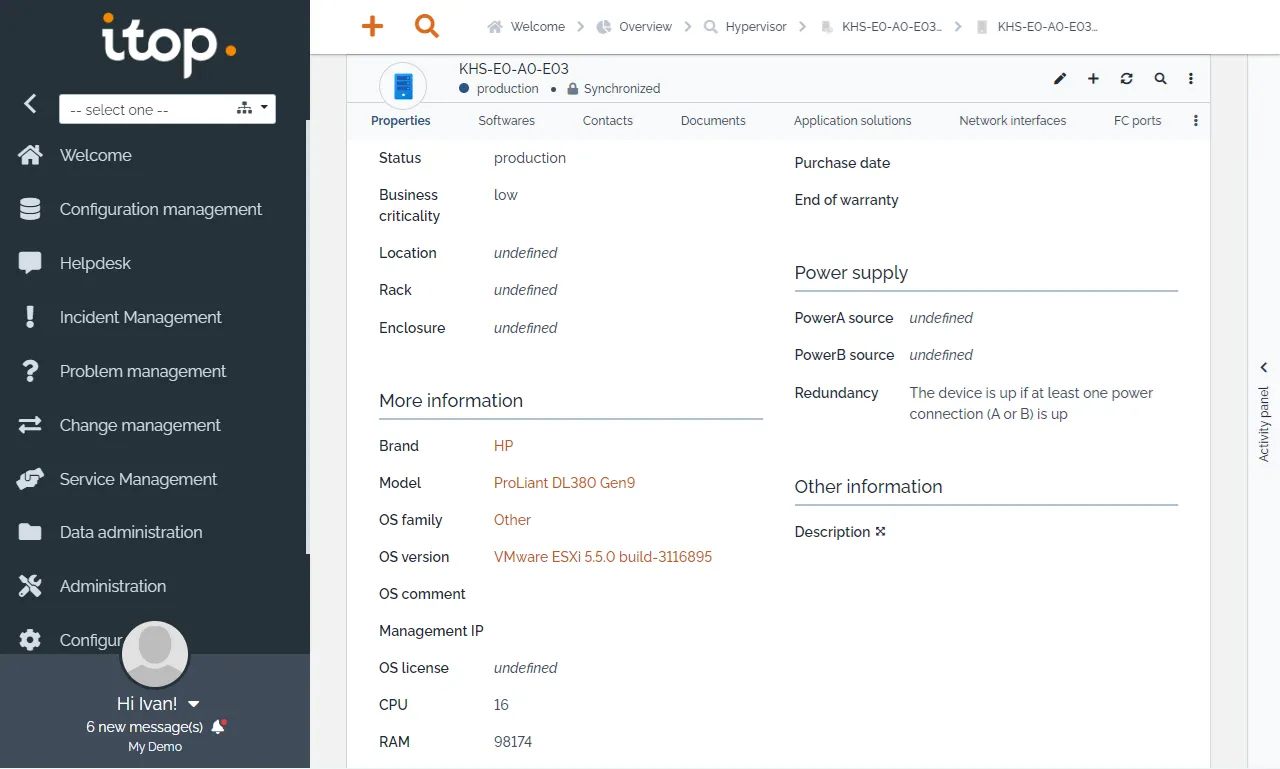
點選 Virtual Machine 則可以看到相關的細節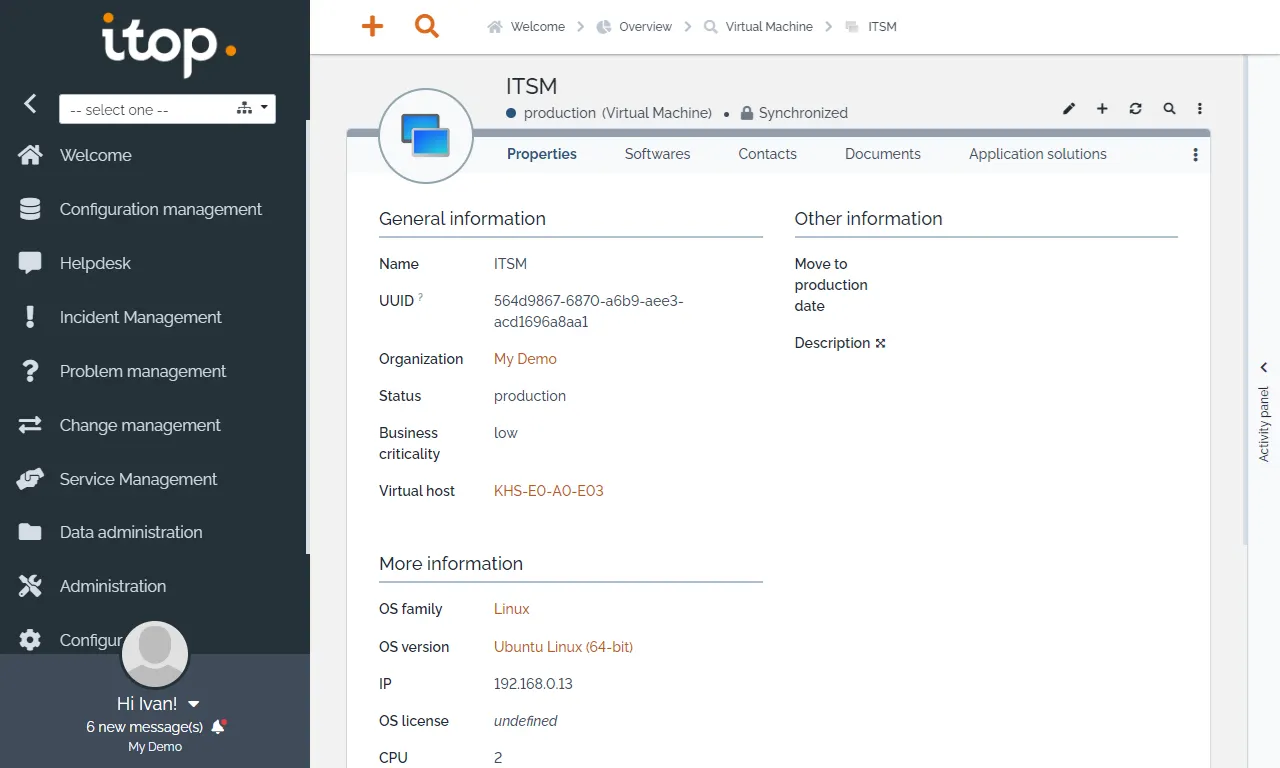
iTop 也有提供 Impacted 與 Depend on 不同視角的拓樸圖,可以輕易地將組態項之間的關係和依賴性畫出並匯出成報告。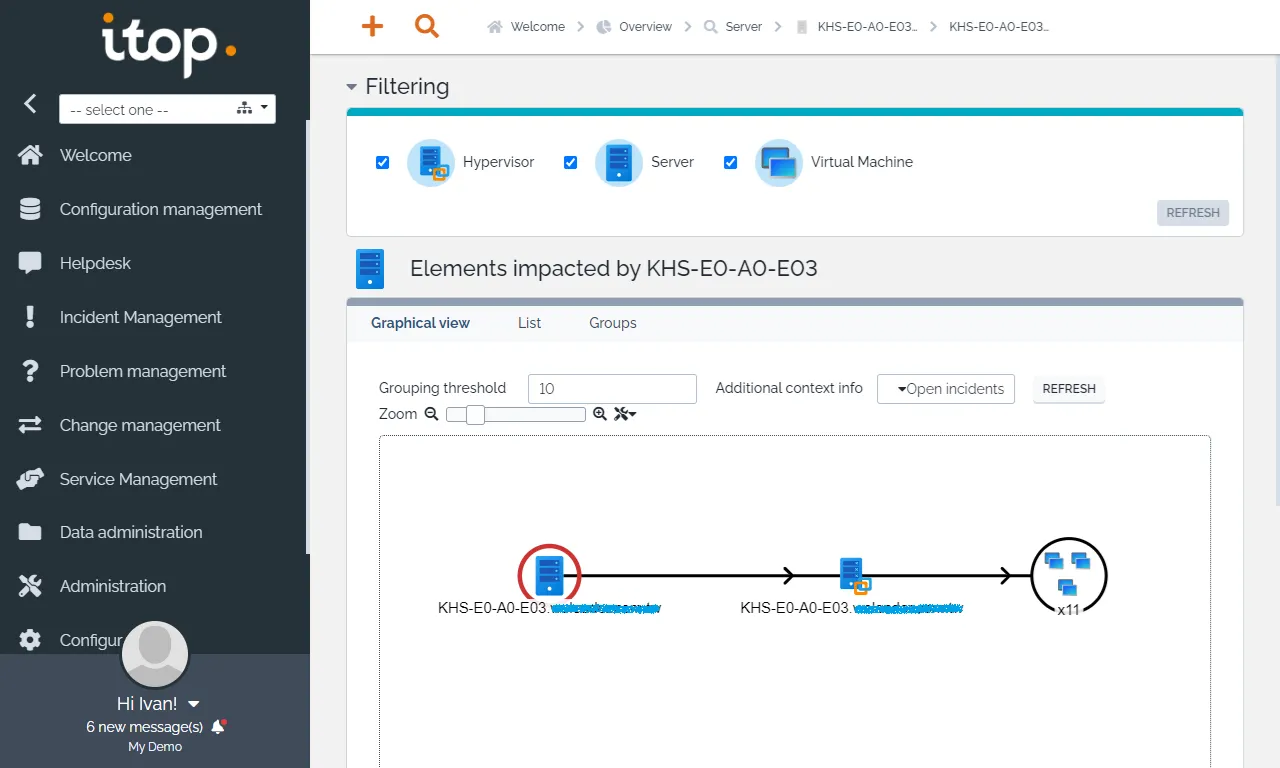
再將 Power Supply 與 Network Device 加入 Server 的組態關聯,就可以得到更完整的拓樸圖。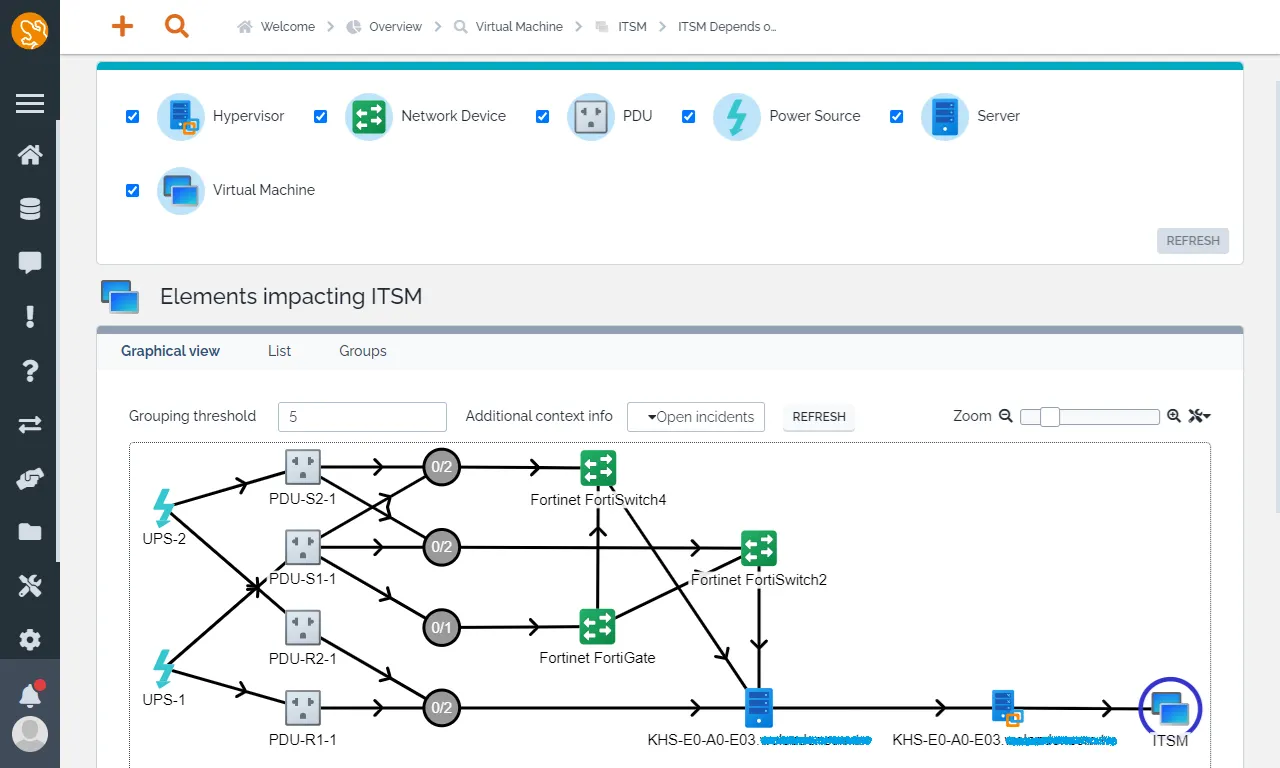
確認同步沒有問題之後,記得將指令放入工作排程。
sudo crontab -u www-data -e
依照自己的環境調整頻率,例如每天上午八點執行。
00 08 * * * /usr/bin/php /var/www/html/itop/extensions/combodo-data-collector-for-vsphere/exec.php --config_file=/etc/itop/params.vsphere.your_vsphere_hostname.xml > /tmp/dc-vsphere-your_vsphere_hostname.log 2>&1
今天的分享就到這邊,感謝收看。
參考文件

版主你好,我有遇到問題
我依照版主的安裝方式安裝好itop,接續設定要抓取VM資料,但出現以下錯誤訊息,能請教該如何解決?
tom@tom-server:/etc/itop$ sudo -u www-data /usr/bin/php /var/www/html/itop/extensions/combodo-data-collector-for-vsphere/exec.php --config_file=/etc/itop/params.vsphere.your_vsphere_hostname_1.xml
[2024-11-29 09:13:42] [Info] ---------- Build collection plan ----------
[2024-11-29 09:13:42] [Info] ---------- Check Virtualization Management Module installation ----------
PHP Warning: Undefined variable $sVirtualizationMgmtMessage in /var/www/html/itop/extensions/combodo-data-collector-for-vsphere/collectors/src/vSphereCollectionPlan.class.inc.php on line 52
[2024-11-29 09:13:42] [Info]
[2024-11-29 09:13:42] [Info] ---------- Check Data model for vSphere installation ----------
[2024-11-29 09:13:42] [Info] ---------- Check TeemIp installation ----------
[2024-11-29 09:13:42] [Info] TeemIp should be considered. Detecting if it is installed on remote iTop server...
[2024-11-29 09:13:42] [Info] ---------- vSphere Collectors to launched ----------
[2024-11-29 09:13:42] [Info] > vSphereBrandCollector will not be launched as Virtualization Management Module is not installed on iTop !
[2024-11-29 09:13:42] [Info] > vSphereModelCollector will not be launched as Virtualization Management Module is not installed on iTop !
[2024-11-29 09:13:42] [Info] > vSphereOSFamilyCollector will not be launched as Virtualization Management Module is not installed on iTop !
[2024-11-29 09:13:42] [Info] vSphereOSVersionCollector will be launched !
[2024-11-29 09:13:42] [Info] > vSphereFarmCollector will not be launched as Virtualization Management Module is not installed on iTop !
[2024-11-29 09:13:42] [Info] vSphereHypervisorCollector uses a custom definition for the field server_id of the Synchro Data Source.
[2024-11-29 09:13:42] [Info] vSphereHypervisorCollector uses a custom collection for the field server_id (hardware->systemInfo->otherIdentifyingInfo[ServiceTag]).
[2024-11-29 09:13:42] [Info] > vSphereHypervisorCollector will not be launched as Virtualization Management Module is not installed on iTop !
[2024-11-29 09:13:42] [Info] vSphereServerCollector uses a custom collection for the field serialnumber (hardware->systemInfo->otherIdentifyingInfo[ServiceTag]).
[2024-11-29 09:13:42] [Info] > vSphereServerCollector will not be launched as Virtualization Management Module is not installed on iTop !
[2024-11-29 09:13:42] [Info] > vSphereVirtualMachineCollector will not be launched as Virtualization Management Module is not installed on iTop !
[2024-11-29 09:13:42] [Info] > vSphereLogicalInterfaceCollector will not be launched as Virtualization Management Module is not installed on iTop !
[2024-11-29 09:13:42] [Info] > vSphereIPv4AddressCollector will not be launched as Virtualization Management Module is not installed on iTop !
[2024-11-29 09:13:42] [Info] > vSphereIPv6AddressCollector will not be launched as Virtualization Management Module is not installed on iTop !
[2024-11-29 09:13:42] [Info] > vSpherelnkIPInterfaceToIPAddressCollector will not be launched as Virtualization Management Module is not installed on iTop !
[2024-11-29 09:13:42] [Info] > vSphereDatastoreCollector will not be launched as Virtualization Management Module is not installed on iTop !
[2024-11-29 09:13:42] [Info] ---------- Collectors have been orchestrated ----------
[2024-11-29 09:13:42] [Error] Exception: rest.php replied:
Virtualization Management Module is not installed on iTop
確認一下您的組態管理類型有沒有安裝到 Virtualization
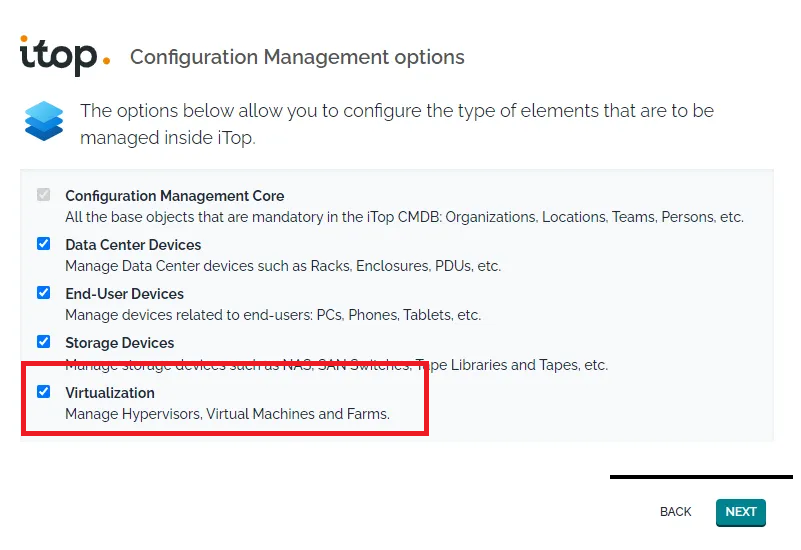
有的,安裝的過程有全選安裝!安裝後也有在管理介面裡看到,也可以手動建立VM主機
如果下列兩個模組都有裝,應該不會有問題才對。
Virtualization Management Module
Data Model for vSphere
您可以先將 itop_login 用 admin 的帳號試試,先排除帳號權限問題。
謝謝,我重新安裝到最新版的itop主程式就可以了