昨天我們了解了 proc 檔案系統、NSFS 與 namespace 機制之間的關係。今天,我們將釐清剩餘的幾個問題:
首先,我們要回憶一下第九天提到的 open 系統呼叫的運作行為。
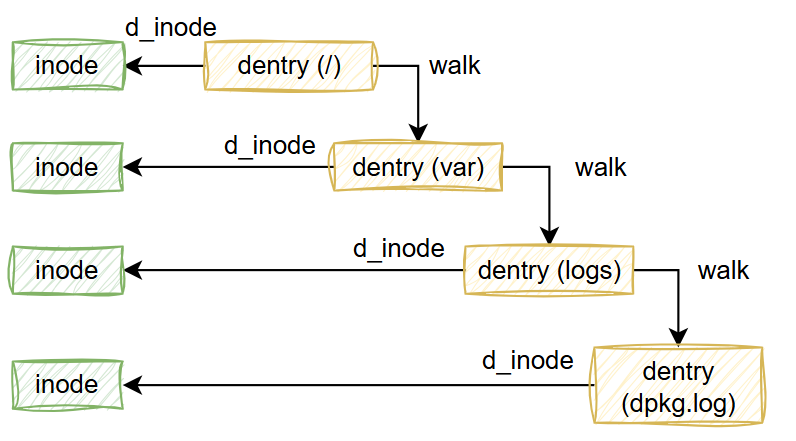
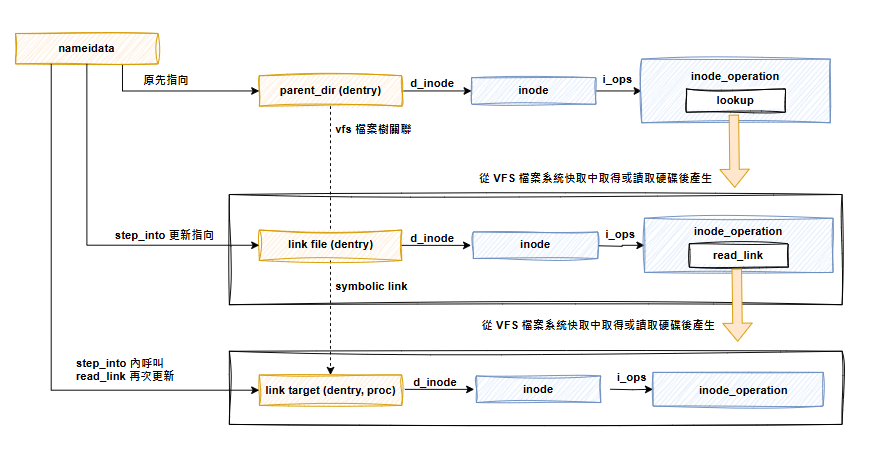
nameidata 實例,用來保存路徑資訊。walk_component 函數,從當前目錄或根目錄出發,根據使用者提供的檔案路徑一層一層移動。移動過程中會呼叫父目錄的 lookup 函數來取得 dentry 跟 inode。移動的方式是透過 step_into 更新 nameidata 上下文結構中表示當前位置的 dentry 及 inode 等資訊。直到最後,nameidata 會指向目標檔案。

file 結構實例,並呼叫 vfs_open 函數。vfs_open 會使用 nameidata 的資料(如 dentry、inode)來填充 file 結構,最後呼叫 file->f_ops->open。static int link_path_walk(const char *name, struct nameidata *nd)
{
...
for(;;) {
...
walk_component(nd, WALK_MORE);
}
...
}
static const char *walk_component(struct nameidata *nd, int flags)
{
struct dentry *dentry;
dentry = lookup_fast(nd);
...
if (unlikely(!dentry)) {
dentry = lookup_slow(&nd->last, nd->path.dentry, nd->flags); // 讀出下一層目錄名稱及當前目錄
}
...
return step_into(nd, flags, dentry); // 更新 nd
}
如上所述,link_path_walk 函數會不斷呼叫 walk_component 來移動並更新 nameidata。walk_component 會透過 lookup_fast 或 lookup_slow 來取得下一層目錄或檔案的 dentry,最後呼叫 step_into 用新的 dentry 更新 nameidata。
// 更新 nd
static const char *step_into(struct nameidata *nd, int flags,
		     struct dentry *dentry)
{
    // 簡化版本
    nd->path->dentry = dentry; // 將新的 dentry 寫回
    struct inode *inode = dentry->d_inode
    nd->inode = inode; // 將新的 inode 寫回
    ...
    return pick_link(nd, &path, inode, flags); // 第九天介紹時省略的內容。
}
對每一層目錄,會先透過 lookup 拿到下一層的 dentry,然後透過 step_into 函數修改 nameidata 上下文。在第九天介紹時,step_into 函數省略了最後呼叫 pick_link 函數的部分。
// fs/namei.c
static const char *pick_link(struct nameidata *nd, struct path *link,
		     struct inode *inode, int flags)
{
	...
    get = inode->i_op->get_link;
	get(link->dentry, inode, &last->done);
	...
}
pick_link 函數的作用是處理路徑上的跳轉,包括在遇到 symbolic link 檔案時,呼叫 inode_operations 的 get_link 函數,將當前的 nameidata 上下文跳轉到 symbolic link 指向的目標檔案。

// include/linux/fs.h
const char get_link(struct dentry *, struct inode *, struct delayed_call *);
get_link 函數接收一個 dentry 和 inode,這兩者指向 symbolic link 檔案,還有一個 callback function。此時你可能會疑惑要更新 nameidata,為什麼沒有傳入 nameidata?這是因為 nameidata 上下文會被保存在 task_struct 內部,可以透過 current->nameidata 存取。
另外,VFS 檔案系統還提供了 nd_jump_link 函數。
int nd_jump_link(const struct path *path)
{
	int error = -ELOOP;
	struct nameidata *nd = current->nameidata; // 取得當前開啟檔案的 context
    ...
	path_put(&nd->path);
	nd->path = *path; // 更新 dentry
	nd->inode = nd->path.dentry->d_inode; // 更新 inode
	nd->state |= ND_JUMPED;
	return 0;

err:
	path_put(path);
	return error;
}

struct path {
	struct vfsmount *mnt;
	struct dentry *dentry;
} __randomize_layout;
檔案系統實作 get_link 函數時,只需要將連結目標檔案的 dentry 放在一個 path 結構中,nd_jump_link 就可以幫你將 dentry 更新到當前的 nameidata 上下文。
現在讓我們回到打開 /proc/123/ns/net 的情境。當 open 系統呼叫走到 /proc/123/ns/net 這一層時,因為 /proc/123/ns/net 是一個 symbolic link 檔案,所以 pick_link 會執行 /proc/123/ns/net 的 inode_operations.get_link。根據 proc 檔案系統的定義,這個函數是 proc_ns_get_link。
fs/proc/namespaces.c
static const char *proc_ns_get_link(struct dentry *dentry,
				    struct inode *inode,
				    struct delayed_call *done)
{
	const struct proc_ns_operations *ns_ops = PROC_I(inode)->ns_ops;
	struct task_struct *task;
	struct path ns_path;
    ...
	task = get_proc_task(inode); // 一樣是從 PROC_I(inode) 取得

	error = ns_get_path(&ns_path, task, ns_ops);

	error = nd_jump_link(&ns_path);
}
這邊可以分成三步驟:
/proc/123/ns/net 的 inode 中拿到 proc_inode,接著從 proc_inode 取得目標 process 123 的 task_struct,以及 network namespace 對應的 proc_ns_operations,也就是 netns_operations。ns_get_path 函數,取得 process 123 的 network namespace 對應的 NSFS 檔案 dentry,並保存在 ns_path 中。nd_jump_link 更新 nameidata。接著來看 ns_get_path。
// fs/nsfs.c
int ns_get_path(struct path *path, struct task_struct *task,
		  const struct proc_ns_operations *ns_ops)
{
	struct ns_get_path_task_args args = {
		.ns_ops	= ns_ops,
		.task	= task,
	};

	return ns_get_path_cb(path, ns_get_path_task, &args);
}

int ns_get_path_cb(struct path *path, ns_get_path_helper_t *ns_get_cb,
		     void *private_data)
{
	int ret;

	do {
		struct ns_common *ns = ns_get_cb(private_data);
		if (!ns)
			return -ENOENT;
		ret = __ns_get_path(path, ns);
	} while (ret == -EAGAIN);

	return ret;
}
這邊將輸入參數包在一個 args 結構內,然後呼叫 ns_get_path_cb。ns_get_path_cb 會先執行傳入的 ns_get_cb 函數,取得目標 namespace 的 ns_common 結構,接著執行 __ns_get_path。。
static struct ns_common *ns_get_path_task(void *private_data)
{
	struct ns_get_path_task_args *args = private_data;

	return args->ns_ops->get(args->task);
}
因為我們傳入的參數中包含了目標的 task_struct 和 proc_ns_operations,因此可以呼叫 proc_ns_operations 的 get 函數來取得 process 123 的 network namespace 的 ns_common 結構。
接著進入 __ns_get_path,產生 dentry 跟 inode。
static int __ns_get_path(struct path *path, struct ns_common *ns)
{
	struct vfsmount *mnt = nsfs_mnt;
	struct dentry *dentry;
	struct inode *inode;
	unsigned long d;

	rcu_read_lock();
	d = atomic_long_read(&ns->stashed); // 產生出來的 dentry 會快取在 ns_common 結構。
	if (!d)
		goto slow; // 找不到,跳到 slow path
	dentry = (struct dentry *)d;
	if (!lockref_get_not_dead(&dentry->d_lockref))
		goto slow;
	rcu_read_unlock();
	ns->ops->put(ns);
got_it:
	path->mnt = mntget(mnt);
	path->dentry = dentry;
	return 0;
slow:
	rcu_read_unlock();
	inode = new_inode_pseudo(mnt->mnt_sb);
	if (!inode) {
		ns->ops->put(ns);
		return -ENOMEM;
	}
	inode->i_ino = ns->inum;
	inode->i_mtime = inode->i_atime = inode_set_ctime_current(inode);
	inode->i_flags |= S_IMMUTABLE;
	inode->i_mode = S_IFREG | S_IRUGO;
	inode->i_fop = &ns_file_operations;
	inode->i_private = ns;

	dentry = d_alloc_anon(mnt->mnt_sb);
	if (!dentry) {
		iput(inode);
		return -ENOMEM;
	}
	d_instantiate(dentry, inode);
	dentry->d_fsdata = (void *)ns->ops;
	d = atomic_long_cmpxchg(&ns->stashed, 0, (unsigned long)dentry);
	if (d) {
		d_delete(dentry);	/* make sure ->d_prune() does nothing */
		dput(dentry);
		cpu_relax();
		return -EAGAIN;
	}
	goto got_it;
}
首先,程式的執行會先進入 fast path。由於 NSFS 檔案系統產生的 dentry 會對應到一個 namespace 實例,NSFS 會直接將這個 dentry 快取保存在 ns_common 結構的 stashed 欄位。因此,程式會先檢查這個快取,如果快取中存在對應的 dentry,則可以直接填充 path 結構並返回結果。
d = atomic_long_read(&ns->stashed); // 產生出來的 dentry 會快取在 ns_common 結構。
dentry = (struct dentry *)d;
path->mnt = mntget(mnt);
path->dentry = dentry;

struct ns_common {
	atomic_long_t stashed;
	const struct proc_ns_operations *ops;
	unsigned int inum;
	refcount_t count;
};
如果在快取中找不到對應的 dentry,程式會跳轉到 slow path,進行正常的檔案建立流程。在這裡,程式會申請一個新的 inode 和 dentry,並透過 d_instantiate 將兩者綁定在一起。
inode = new_inode_pseudo(mnt->mnt_sb);
inode->i_ino = ns->inum;
inode->i_mtime = inode->i_atime = inode_set_ctime_current(inode);
inode->i_flags |= S_IMMUTABLE;
inode->i_mode = S_IFREG | S_IRUGO;
inode->i_fop = &ns_file_operations;
inode->i_private = ns;

dentry = d_alloc_anon(mnt->mnt_sb);
d_instantiate(dentry, inode);
dentry->d_fsdata = (void *)ns->ops;

path->mnt = mntget(mnt);
path->dentry = dentry;
這裡有幾個重要的部分需要注意。
首先,ns_common 結構會被保存到 inode->i_private 欄位,這解答了 setns 函數如何獲取 ns_common 結構的問題。
接著,如昨天所說,NSFS 會使用 ns->inum 作為 inode number。
最後,這裡的 dentry 是透過 d_alloc_anon 函數來建立的。正如我們之前所介紹,NSFS 的檔案都是虛擬的,並不掛載在 VFS 檔案系統樹上。因此,這裡會使用 d_alloc_anon 來建立一個匿名 (anonymous) 的 dentry。
// fs/dcache.c
struct dentry *d_alloc_anon(struct super_block *sb)
{
	return __d_alloc(sb, NULL);
}

struct dentry *d_alloc(struct dentry * parent, const struct qstr *name)
{
	struct dentry *dentry = __d_alloc(parent->d_sb, name);
	if (!dentry)
		return NULL;
	spin_lock(&parent->d_lock);
	/*
	 * don't need child lock because it is not subject
	 * to concurrency here
	 */
	__dget_dlock(parent);
	dentry->d_parent = parent;
	list_add(&dentry->d_child, &parent->d_subdirs);
	spin_unlock(&parent->d_lock);

	return dentry;
}
如上所示,d_alloc_anon 最終仍會呼叫一般的 d_alloc 函數,只不過使用 super_block 作為父 dentry,因此檔案不會被放置在某個目錄下,並且檔名也會被設為空 (NULL)。
到此整個 proc 檔案系統與 NSFS 之間的機制就介紹完成了。
