雖然我們的API都建立好了,但是即使是在路由都做好命名,且視圖中也都寫好註解,如果自己過了一段時間再回頭看,又或是今天多人開發下每個人的命名風格還是有些微的差異,需要能讀懂這些程式碼可能還是一項不小的工程。此外如果API有經過修改或是調整,同時也需要進行API文件的更新,此時也容易導致文件與API本身是不同步的情形,也因此透過自動化的方式建立起符合特定規範的API文件也是相當重要,且不可或缺的一步
今日重點:
Django REST framework(DRF)在先前的版本可以透過安裝coreapi套件來建立API文檔。但是根據官方文檔現在已經不在支援,官方更推薦使用其他第三方庫做使用,例如:drf-spectacular與drf-yasg
# 安裝套件
poetry add coreapi

# settings.py
REST_FRAMEWORK = {
    "DEFAULT_SCHEMA_CLASS": "rest_framework.schemas.coreapi.AutoSchema",
}

# urls.py
from rest_framework.documentation import include_docs_urls
urlpatterns = [
    path("docs/", include_docs_urls(title="DRF Demo API")),
]
我們上面有提到DRF
官方文檔推薦使用drf-spectacular與drf-yasg,前者依循OpenAPI 3 Shema來生成,後者則是 Swagger / OpenAPI 2
相對於Internal API(Private API),通常是企業內部自行使用的API,而Open API則是聚焦於所有API的使用者,也因此訂定一個不需要閱讀程式碼就能理解API如何使用的規範就變得相當重要,這也是OpenAPI規範(OAS)的宗旨:不論使用哪種程式語言的開發人員,都能在不閱讀程式碼的能了解API的使用方式
OpenAPI規範具備以下特點:
在API的生命週期中,OpenAPI規範都能在不同階段幫助到開發人員
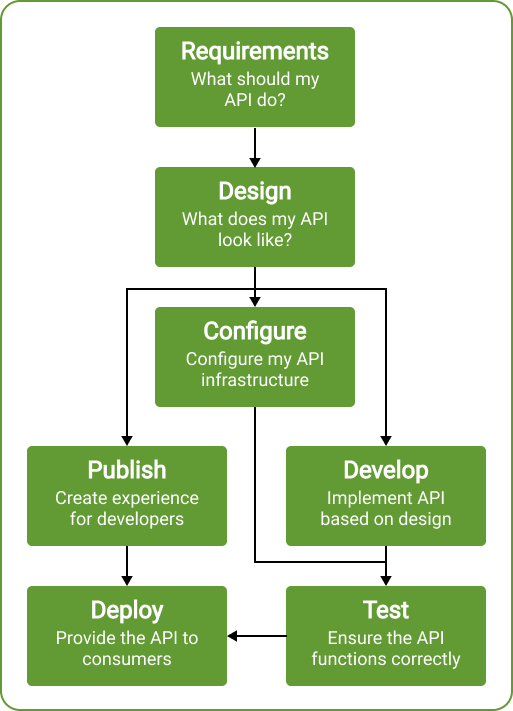
網路上已經有許多資源介紹OpenAPI 2.0與3.0的區別:
而我們則根據這些不同來說明drf-spectacular與drf-yasg之間的區別
callback與links
如果是相對簡單的API,可以考慮使用drf-yasg,相對單純。但是如果是大型專案或是更現代的API設計,還是推薦使用drf-spectacular
我們就使用drf-spectacular來自動建立API文件
程式碼:https://github.com/class83108/drf_demo/tree/api_doc
poetry add drf-spectacular
INSTALLED_APPS = [
		...
    "drf_spectacular",
		...
]

REST_FRAMEWORK = {
    ...
    "DEFAULT_SCHEMA_CLASS": "drf_spectacular.openapi.AutoSchema",
}

SPECTACULAR_SETTINGS = {
    "TITLE": "Note API Documentation",
    "DESCRIPTION": "API documentation for Note app",
    "VERSION": "1.0.0",
    "SERVE_INCLUDE_SCHEMA": False,
    # OTHER SETTINGS
}
有關SPECTACULAR_SETTINGS其他額外配置可以參考官方文檔:
https://drf-spectacular.readthedocs.io/en/latest/settings.html
from drf_spectacular.views import (
    SpectacularAPIView,
    SpectacularRedocView,
    SpectacularSwaggerView,
)

urlpatterns = [
    ...
    path("api/schema/", SpectacularAPIView.as_view(), name="schema"),
    path(
        "api/schema/swagger-ui/",
        SpectacularSwaggerView.as_view(url_name="schema"),
        name="swagger-ui",
    ),
    path(
        "api/schema/redoc/",
        SpectacularRedocView.as_view(url_name="schema"),
        name="redoc",
    ),
]
openapi: 3.0.3
info:
  title: Your Project API
  version: 1.0.0
  description: Your project description
paths:
  /debug/:
    get:
      operationId: debug_retrieve
      tags:
      - debug
      responses:
        '200':
          description: No response body
  /note/documents/:
    get:
      operationId: note_documents_list
      parameters:
      - name: ordering
        required: false
        in: query
        description: Which field to use when ordering the results.
        schema:
          type: string

  ...
ReDoc提供清晰易讀的文檔展示方式,不提供測試API的功能
Swagger則是更著重在互動性上,可以讓用戶直接在介面上測試API功能
這邊展示Swagger UI介面,可以看到我們可以直接測試API,並且看到響應的結果
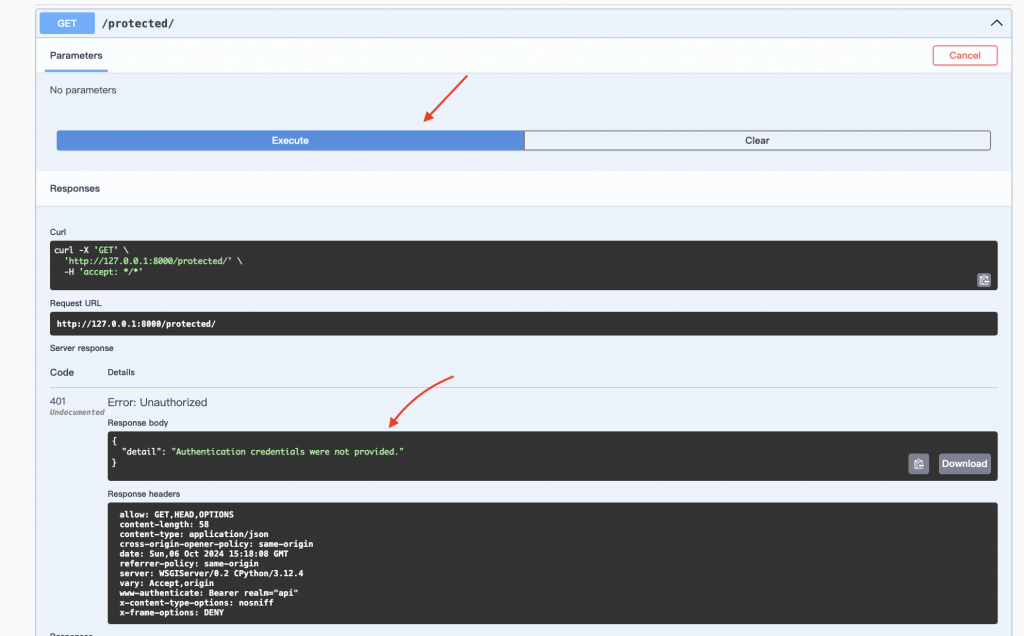
我們來看到我們的otp視圖,在之前Django REST framework: 掌握 JWT、CORS 和 Cookie 處理技巧有提到過是用來建立一次性密碼的視圖
但是如果我如果沒有看到程式碼,根本不知道這個API的作用

當我點擊想要測試時,也沒有提供任何schema以及任何形式的表單讓我們知道該怎麼輸入資料以及怎麼輸入資料來完成POST請求

我們會需要使用到**@extend_schema** 裝飾器來為API自定義Schema,通常會有幾種方式建立出API schema
@extend_schema(
    ...
)
class OTPRequestView(APIView):
    def post(self, request):
        # 實現邏輯保持不變
        ...
class OTPRequestViewInline(APIView):
    @extend_schema(
        ...
    )
    def post(self, request):
        # 實現邏輯保持不變
        ...
def otp_request_schema():
    return extend_schema(
        ...
    )

@otp_request_schema()
class OTPRequestViewFunction(APIView):
    def post(self, request):
這裡因為我的OTP視圖就只有他一個,並且方法也只有一個POST請求,所以使用類別裝飾器
from drf_spectacular.utils import extend_schema, OpenApiResponse, OpenApiExample

@extend_schema(
    tags=["Authentication"],
    description="Request an OTP for user authentication. The OTP will be sent to the user's registered email address.",
    request=OTPRequestSerializer,
    responses={
        status.HTTP_200_OK: OpenApiResponse(
            response=OTPResponseSerializer, description="OTP sent successfully"
        ),
        status.HTTP_400_BAD_REQUEST: OpenApiResponse(
            response=ErrorResponseSerializer, description="Invalid input data"
        ),
        status.HTTP_404_NOT_FOUND: OpenApiResponse(
            response=ErrorResponseSerializer, description="User not found"
        ),
    },
    examples=[
        OpenApiExample(
            "Valid request",
            summary="Request OTP for existing user",
            description='Request an OTP for user "john_doe"',
            value={"username": "john_doe"},
            request_only=True,
        ),
        OpenApiExample(
            "Invalid request",
            summary="Request OTP for non-existing user",
            description="Request an OTP for a user that does not exist",
            value={"username": "non_existing_user"},
            request_only=True,
        ),
        OpenApiExample(
            "Success response",
            summary="OTP sent successfully",
            description="Response when OTP is successfully sent",
            value={"message": "OTP sent successfully."},
            response_only=True,
            status_codes=["200"],
        ),
        OpenApiExample(
            "User not found response",
            summary="User not found error",
            description="Response when the requested user does not exist",
            value={"error": "User not found."},
            response_only=True,
            status_codes=["404"],
        ),
    ],
)
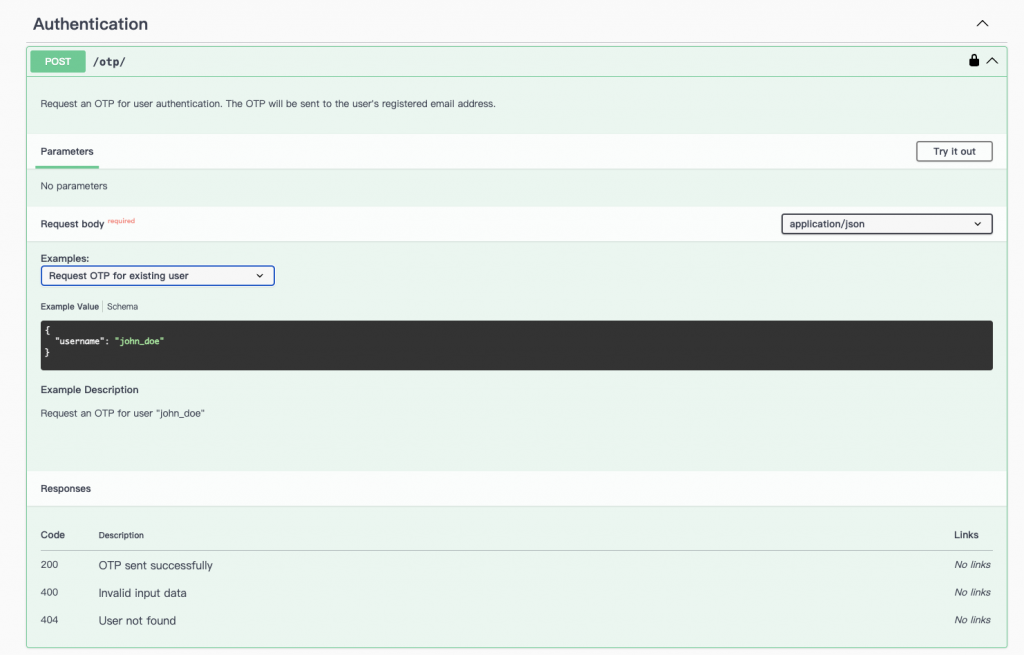
可以看到整個API端點的文檔是不是清晰許多
甚至在response的部分,我們也能透過額外定義序列化器來完善response的schema
class OTPResponseSerializer(serializers.Serializer):
    message = serializers.CharField()

class ErrorResponseSerializer(serializers.Serializer):
    error = serializers.CharField()


@extend_schema(
    tags=["Authentication"],
    description="Request an OTP for user authentication. The OTP will be sent to the user's registered email address.",
    request=OTPRequestSerializer,
    responses={
        status.HTTP_200_OK: OpenApiResponse(
            response=OTPResponseSerializer, description="OTP sent successfully"
        ),
        status.HTTP_400_BAD_REQUEST: OpenApiResponse(
            response=ErrorResponseSerializer, description="Invalid input data"
        ),
        status.HTTP_404_NOT_FOUND: OpenApiResponse(
            response=ErrorResponseSerializer, description="User not found"
        ),
    },
    ....
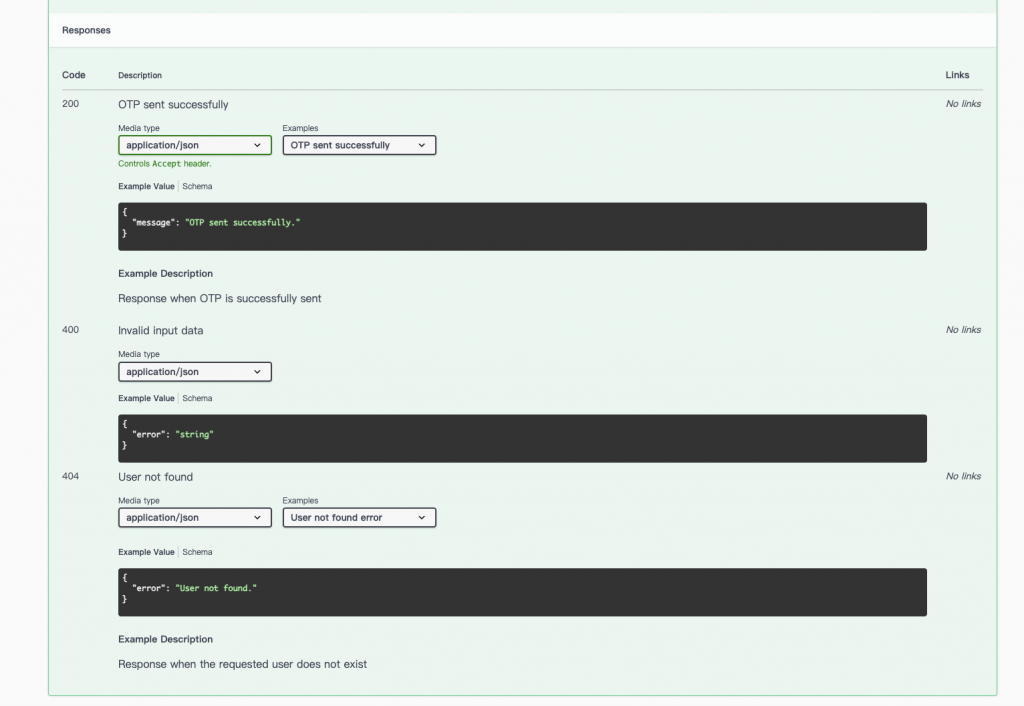
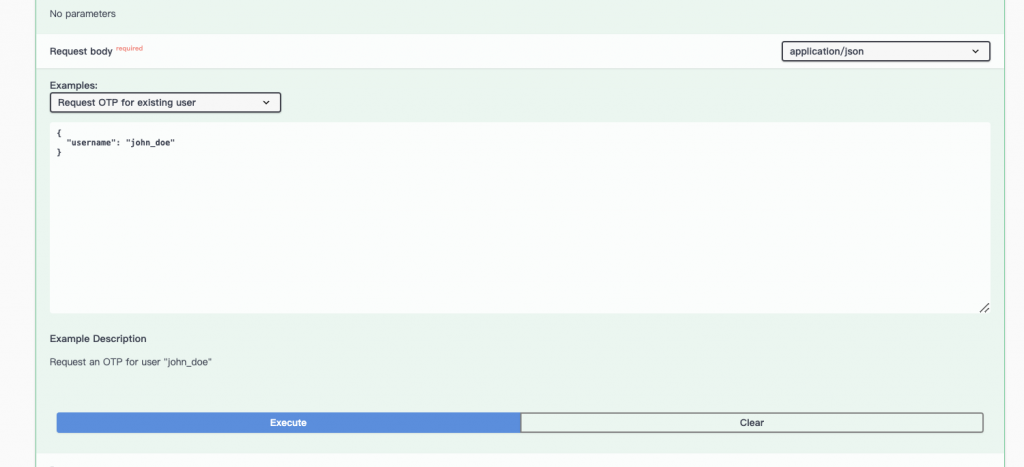
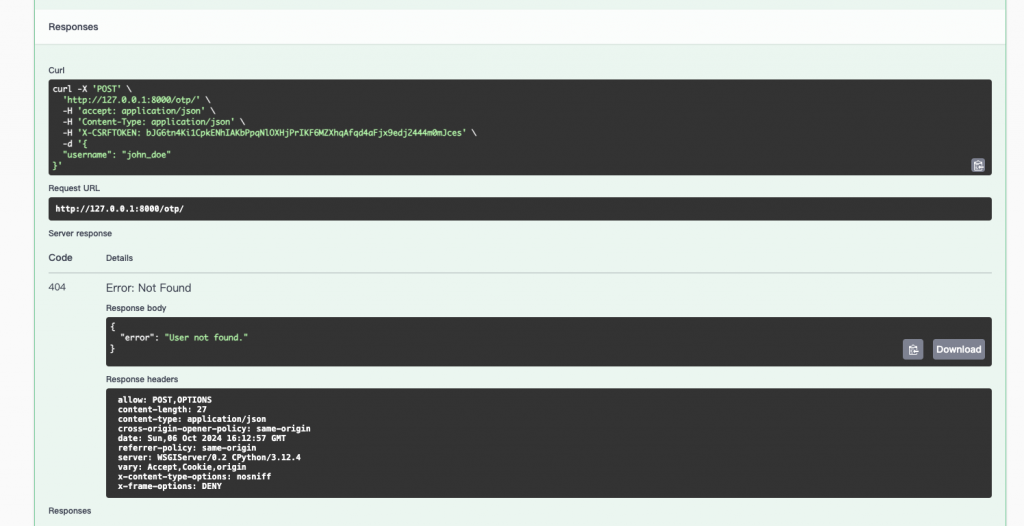
現在我們重新測試API,看到不論是請求的schema,以及響應的格式,我們都能很清晰的判讀
我們此時再次下載YAML檔,可以看到我們新增的描述與schema也一併更新了
  /otp/:
    post:
      operationId: otp_create
      description: Request an OTP for user authentication. The OTP will be sent to
        the user's registered email address.
      tags:
      - Authentication
      requestBody:
        content:
          application/json:
            schema:
              $ref: '#/components/schemas/OTPRequest'
            examples:
              ValidRequest:
                value:
                  username: john_doe
                summary: Request OTP for existing user
                description: Request an OTP for user "john_doe"
          application/x-www-form-urlencoded:
            schema:
              $ref: '#/components/schemas/OTPRequest'
          multipart/form-data:
            schema:
              $ref: '#/components/schemas/OTPRequest'
        required: true
      security:
      - cookieAuth: []
      - {}
      responses:
        '200':
          content:
            application/json:
              schema:
                $ref: '#/components/schemas/OTPResponse'
              examples:
                SuccessResponse:
                  value:
                    message: OTP sent successfully.
                  summary: OTP sent successfully
                  description: Response when OTP is successfully sent
          description: OTP sent successfully
        '400':
          content:
            application/json:
              schema:
                $ref: '#/components/schemas/ErrorResponse'
          description: Invalid input data
        '404':
          content:
            application/json:
              schema:
                $ref: '#/components/schemas/ErrorResponse'
              examples:
                UserNotFoundResponse:
                  value:
                    error: User not found.
                  summary: User not found error
                  description: Response when the requested user does not exist
          description: User not found
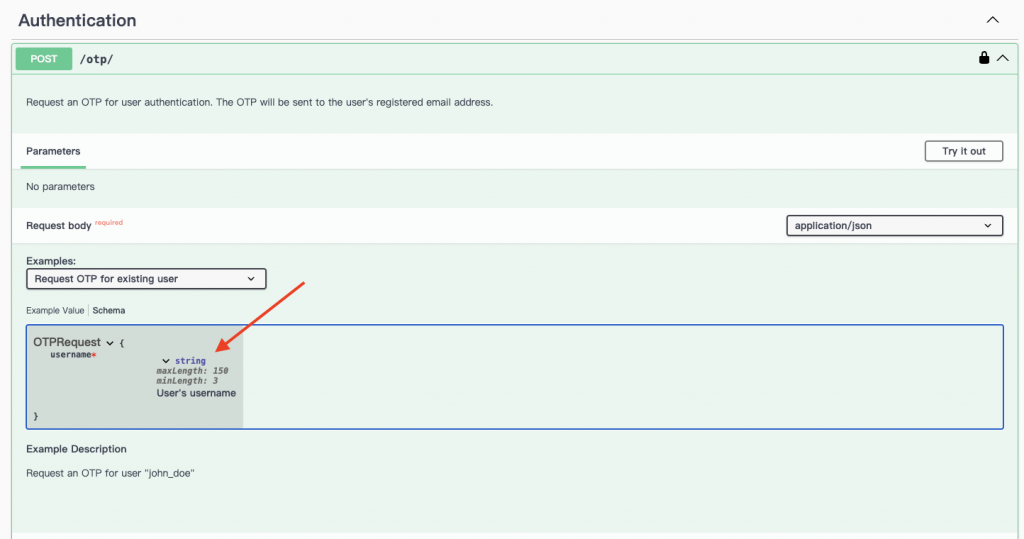
我們如果在序列化器定義更多詳細資訊,也能看到schema顯示更清楚的相關資料
class OTPRequestSerializer(serializers.Serializer):
    username = serializers.CharField(
        help_text="User's username",
        max_length=150,
        min_length=3,
    )
我們在DRF的最後一篇介紹了有關自動生成API文檔的相關知識
@extend_schema,我們能夠針對自動生成時文檔不夠詳細的視圖來修改API文件,使其更完善