
在今天的教學中,我會介紹如何訓練一個只有Decoder部分的模型。我們選用GPT系列中的GPT-2進行訓練,並使用squad_v2這個資料集進行語意理解和問題回答的測試。這個資料集專門用來測試模型在語意理解與問題回答上的能力,答案通常會在文章的某處。但是由於該資料集是以Json格式處理,整理起來可能會有一些難度。詳細的整理方式可以參考我去年的文章:【Day 23】因為站在巨人的肩膀上才能眺望更遠的風景(下)-使用SQuAD做QA問答。或是可以直接從我的GitHub上取得對應的文件。
首先我們先讀取squad_v2資料集的context, question, answer,這三個欄位,context代表的是文章本身,question是對應的文章問題answer則是對應的答案,一個context會有數個question與answer。
import pandas as pd
from sklearn.model_selection import train_test_split
from transformers import AutoTokenizer

tokenizer = AutoTokenizer.from_pretrained("openai-community/gpt2")
# 由於GPT-2沒有PAD token所以使用EOS Token
tokenizer.pad_token_id = tokenizer.eos_token_id

# 讀取CSV檔案並只選取指定的3個欄位
df = pd.read_csv('squad2.0_converted.csv', usecols=['context', 'question', 'answer'])
df = df.fillna('nan')
不過由於在squad_v2的資料集上,會有沒有解答的問題,而我在資料集的處理上將他設定為nan而這將會讓模型的運算出現錯誤,因此我使用了df.fillna('nan')將nan轉換成字串版本的'nan',以讓模型可以正常生成文字,
接下來我們需要把這些文字組合再一起並加入Prompt讓模型能夠更理解每一個斷若的用處,而在這裡的方式很簡單,我們通過加入###與\n讓模型能夠去分割與判別出模型的涵義,不過注意一點,我們要手動的在Ans之後加入EOS token不然模型將會無法學習到結尾的地方。
# 加入Prompt
df['context'] = '### Context:\n' + df['context']
df['question'] = '\n### Question:\n' + df['question']

# 在答案後方加入EOS token表示文本結尾
df['answer'] = '\n### Answer:\n' + df['answer'] + tokenizer.eos_token
而我們也可以通過以下程式碼觀看讀取後的資料結果。
train_df, valid_df = train_test_split(df, train_size=0.8, random_state=46, shuffle=True)
print(train_df['context'][0], end='')
print(train_df['question'][0], end='')
print(train_df['answer'][0])
# ----- 輸出 -----
### Context:
Beyoncé Giselle Knowles-Carter (/biːˈjɒnseɪ/ bee-YON-say) (born September 4, 1981) is an American singer, songwriter, record producer and actress. Born and raised in Houston, Texas, she performed in various singing and dancing competitions as a child, and rose to fame in the late 1990s as lead singer of R&B girl-group Destiny's Child. Managed by her father, Mathew Knowles, the group became one of the world's best-selling girl groups of all time. Their hiatus saw the release of Beyoncé's debut album, Dangerously in Love (2003), which established her as a solo artist worldwide, earned five Grammy Awards and featured the Billboard Hot 100 number-one singles "Crazy in Love" and "Baby Boy".
### Question:
When did Beyonce start becoming popular?
### Answer:
in the late 1990s<|endoftext|>
這次的 collate_fn 難度有點高,原因在於進行文字生成時,我們需要讓 x(1)、x(2)、x(3)...x(t) 去預測 x(t+1)。實際的操作是將 input_ids 與 labels 錯開,以使模型學習這個特徵(這部分模型內部已經幫我們完成,所以不必處理)。不過,我們可以採用更好的遮蔽策略,例如在輸入完成的 input_ids 序列時,我們只需特別計算答案位置的損失,而不是已知輸入(context 與 question)。這樣模型能夠更加關注答案的結果。
不過,input_ids 可以通過 Attention Mask 來進行遮蔽,但 Labels 卻沒有相對應的方法。因此,我們必須手動將 [PAD] 和在 answer 序列之前的 input_ids 通通轉換成 -100。這是因為 Pytorch 的損失函數預設會忽略索引值為 -100 的項目,這樣模型就不會將其計算在損失中。
import torch
from torch.utils.data import Dataset, DataLoader

class SquadDataset(Dataset):
    def __init__(self, dataframe, tokenizer):
        self.dataframe = dataframe
        self.tokenizer = tokenizer

    def __getitem__(self, index):
        item = self.dataframe.iloc[index]
        return item['context'], item['question'], item['answer']

    def __len__(self):
        return len(self.dataframe)

    # 將文本進行分詞
    def tokenize_data(self, texts, max_length=512):
        tokenized_inputs = self.tokenizer(
            list(texts),
            truncation=True,
            padding='longest',
            max_length=max_length,
            return_tensors='pt',
        )

        return tokenized_inputs.input_ids, tokenized_inputs.attention_mask

    # 定義數據加載過程中的數據整理方法
    def collate_fn(self, batch):
        contexts, questions, answers = zip(*batch)

        # 輸入和答案
        question_ids, question_attention_mask = self.tokenize_data(questions)
        answer_ids, answer_attention_mask = self.tokenize_data(answers)
        context_ids, context_attention_mask = self.tokenize_data(contexts, max_length=1024-answer_ids.shape[1]-question_ids.shape[1])


        # 模型的輸入 = context_ids + question_ids + answer_ids
        combined_input_ids = torch.cat((context_ids, question_ids, answer_ids), dim=-1)
        # 模型的MASK = context_attention_mask + question_attention_mask + answer_attention_mask
        combined_attention_mask = torch.cat((context_attention_mask, question_attention_mask, answer_attention_mask), dim=-1)

        # 模型的標籤 = context_ids * [-100] + question_ids * [-100] + answer_ids + [EOS]
        context_ignore_mask = torch.full((context_ids.shape[0], context_ids.shape[-1]), -100) # 產生context_ids * [-100]
        question_ignore_mask = torch.full((question_ids.shape[0], question_ids.shape[-1]), -100) # 產生question_ids * [-100]
        answer_ignore_indices = (answer_attention_mask == 0) # 找出Answer的[PAD] idx
        answer_ids[answer_ignore_indices] = -100 # 將Answer為[PAD]的部分轉換成-100
        combined_answers = torch.cat((context_ignore_mask, question_ignore_mask, answer_ids), dim=-1) #context_ignore_mask + question_ignore_mask + answer_ids

        return {
            'input_ids': combined_input_ids,
            'attention_mask': combined_attention_mask,
            'labels': combined_answers,
        }
不過我們還要注意一點,由於GPT-2的輸入限制為1024個Token,因此我在這裡所使用的策略是減少context的Token數量。這是因為context通常包含多個部分,所以模型其實不需要多次學習這些相關的知識。因此,我們只需要專注於學習question與answer兩個部分即可。
# 建立資料集
trainset = SquadDataset(train_df, tokenizer)
validset = SquadDataset(valid_df, tokenizer)

# 創建 DataLoader
train_loader = DataLoader(trainset, batch_size=4, shuffle=True, collate_fn=trainset.collate_fn)
valid_loader = DataLoader(validset, batch_size=4, shuffle=True, collate_fn=validset.collate_fn)
而在最後的流程則與先前相同,不過要特別注意這次模型很大,因此batch_size需要設置的更小,以免發生OOM。
同樣的我們這次採用Warmup和餘弦退火進行排程優化。但要注意一點,在參數量較大的模型上,我們應該使用較小的學習率進行調整,否則很可能會出現調整錯誤,導致模型梯度爆炸。因此本次的學習率將採用5e-5,這也是大多數人在調整大型語言模型時會選擇的學習率。
import torch.optim as optim
from transformers import get_cosine_with_hard_restarts_schedule_with_warmup
from transformers import AutoModelForCausalLM

# 訓練設置
model = AutoModelForCausalLM.from_pretrained("openai-community/gpt2")

optimizer = optim.AdamW(model.parameters(), lr=5e-5)
scheduler = get_cosine_with_hard_restarts_schedule_with_warmup(
        optimizer,
        num_warmup_steps=len(train_loader) * 0.2,
        num_training_steps=len(train_loader) * 10,
        num_cycles=1,
)
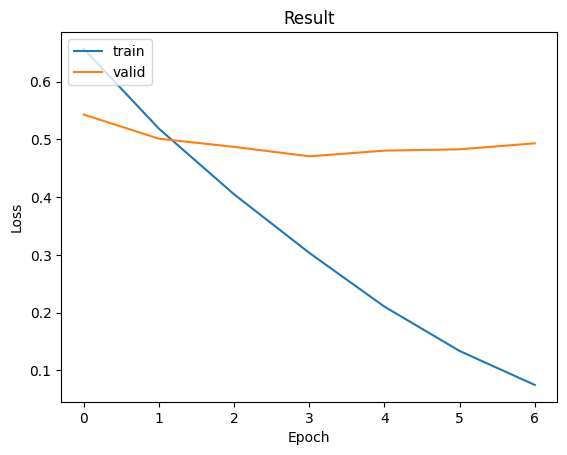
我們同樣使用Trainer進行訓練,最終損失值來到了0.47061。雖然這個結果不太理想,但對於GPT-2這一模型來說已是相當不錯,因為它需要進行推理以找出最合適的Token,而不是像BERT只需進行分類便能找出答案,因此這部分的難度更高。
from trainer import Trainer
trainer = Trainer(
    epochs=10,
    train_loader=train_loader,
    valid_loader=valid_loader,
    model=model,
    optimizer=[optimizer],
    scheduler=[scheduler],
    early_stopping=3,
    device=device
)
trainer.train()
# ----- 輸出 -----
Train Epoch 5: 100%|██████████| 26021/26021 [27:23<00:00, 15.83it/s, loss=0.090]
Valid Epoch 5: 100%|██████████| 6506/6506 [02:28<00:00, 43.72it/s, loss=0.584]
Train Loss: 0.13366| Valid Loss: 0.48269| Best Loss: 0.47061
而我們也可以撰寫一個inference函數,讓模型能夠調用 model.generate 進行生成,同時擷取出答案,完成最終的生成動作。
def inference(model, tokenizer, context, question, device):
    # 準備輸入數據
    inference_data = f"{context}{question}\n### Answer:\n"
    # 進行編碼和截斷
    try:
        inputs = tokenizer(inference_data, max_length=1024, truncation=True, return_tensors='pt').to(device)
        # 禁用梯度計算,進行生成
        with torch.no_grad():
            outputs = model.generate(**inputs, max_new_tokens=1024, do_sample=False)

        # 解碼並提取答案部分
        generated_text = tokenizer.decode(outputs[0], skip_special_tokens=True)
        answer = generated_text.split('\n### Answer:\n')[1].strip()

        return answer
    except:
        return 'Error'

# 載入模型和設定評估模式
model.load_state_dict(torch.load('model.ckpt'))
model.eval()

# 指定要進行推理的索引
idx = 7

# 準備推理資料
context = valid_df['context'].values[idx]
question = valid_df['question'].values[idx]
answer = valid_df['answer'].values[idx]


# 進行推理
model.generation_config.pad_token_id = tokenizer.eos_token_id
model_answer = inference(model, tokenizer, context, question, device)


# 輸出原始上下文、問題、真實答案和模型生成的答案
print(f"{context}")
print(f"{question}")
print(f"{answer.split(tokenizer.eos_token)[0]}")
print("\n### Model Answer:\n" + model_answer)
# ----- 輸出 -----
### Context:
At her Silver Jubilee in 1977, the crowds and celebrations were genuinely enthusiastic, but in the 1980s, public criticism of the royal family increased, as the personal and working lives of Elizabeth's children came under media scrutiny. Elizabeth's popularity sank to a low point in the 1990s. Under pressure from public opinion, she began to pay income tax for the first time, and Buckingham Palace was opened to the public. Discontent with the monarchy reached its peak on the death of Diana, Princess of Wales, though Elizabeth's personal popularity and support for the monarchy rebounded after her live television broadcast to the world five days after Diana's death.

### Question:
What did Elizabeth start paying in the 1990 s?

### Answer:
income tax

### Model Answer:
income tax
而我們最終也能從程式中看到### Model Answer:這一行的答案,該答案就是模型經過推理後取得的結果。當然,不是每次的生成結果都是正確的,但經過我們使用遮蔽策略與Prompt的方式,可以最大程度地引導出模型的推理能力。由於GPT-2的參數量較小,我們無法見到最佳的成效,但這樣的策略仍能有效防止文字生成無限延續,並提升答案的推理能力。
在這次的內容中,我們可以很明顯地看到,GPT-2 的效果不如 BERT 那樣通用和出色。這也對應了我們昨天所討論到的問題:微調後的模型不一定會產生更好的能力。因此GPT-2 在 2019 年的生成能力已經是最佳成果之一。雖然文字生成在過去不被看好,但當時也是不可或缺的技術之一。而這次我所使用的遮蔽策略和方法,是我在參加 AI CUP 時所採用的技巧之一。

 iThome鐵人賽