前篇透過「柱」單一物件的實作驗證,發現了自動化建模的可行性與挑戰。今天再來看看相同流程下,能否在多種不同元素類別下依然穩定運作。
本篇將會結合前面幾篇曾實作的「門」、「柱」物件,再加上「樓梯」元素來進行嘗試。首先,一樣從YOLO的物件辨識標註做起,本次採用「建築製圖應用—電繪項(乙/丙級)技術士技能檢定」的題庫圖像31張,每張同時有「門」、「柱」、「樓梯」的標註,擴增後共有104張圖。
文字辨識部分,因樓梯在圖面上並不會有特別編號標示,因此仍舊使用Day15和Day22所產出的「門/柱編號分群結果.xlsx」進行帶入。以下是實測結果: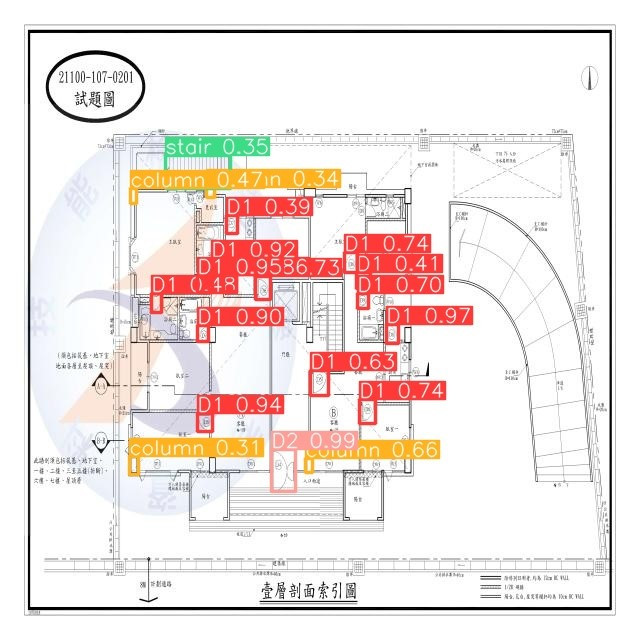
圖23.1 門、柱、樓梯YOLO預測示例圖
前面已有說明門、柱物件轉換為ifcdoor和ifccolumn的對應關係,本次加入了簡化後的樓梯ifcstair部分屬性,僅利用 YOLO 偵測樓梯中心點與長寬,以 IfcProductDefinitionShape 定義為單一 方塊幾何,省略踏步、扶手等複雜細節,為快速驗證自動化建模的流程。
IfcRoot
 └─ IfcObjectDefinition
     └─ IfcObject
         └─ IfcProduct
             ├─ ObjectPlacement → IfcLocalPlacement      // 定位(X, Y, Z)
             ├─ Representation → IfcProductDefinitionShape // 幾何(box外形)
             └─ IfcElement
                 └─ IfcBuildingElement
                     └─ IfcStair
                         └─ [pset, storey, ...]          // (可選:屬性、樓層)
#30 = IFCSTAIR('S1', '樓梯1', $, $, 1000., 3000.);   // IfcStair,方塊樓梯主體,名稱S1
#31 = IFCLOCALPLACEMENT($, ...);                    // 定位(中心點、樓層)
#32 = IFCPRODUCTDEFINITIONSHAPE($, $, (#33));       // 幾何
#33 = IFCSHAPEREPRESENTATION(...);                 // 外形表示(box)
#34 = IFCBUILDINGSTOREY('Level 1', ...);          // 掛載於樓層
在參數設定部分,則是列出所有的標籤分類,並可同步定義尺寸等屬性:
# ===  參數設定 ===
# 類別名稱與尺寸屬性對照表
CLASS_CONFIG = {
    0: {"name": "D1", "type": "door", "label": "單開門",
        "w_cm": 90,  "h_cm": 210, "thick_cm": 5},
    1: {"name": "D2", "type": "door", "label": "雙開門",
        "w_cm": 180, "h_cm": 210, "thick_cm": 5},
    2: {"name": "n/a", "type": "other"},
    3: {"name": "column", "type": "column",
        "size_table": [(40,40), (40,70), (75,40)], "default_h_cm": 300},
    4: {"name": "column-hatch", "type": "column",
        "size_table": [(40,40), (40,70), (75,40)], "default_h_cm": 300},
    5: {"name": "column-hidden", "type": "column",
        "size_table": [(40,40), (40,70), (75,40)], "default_h_cm": 300},
    6: {"name": "column-visible", "type": "column",
        "size_table": [(40,40), (40,70), (75,40)], "default_h_cm": 300},
    7: {"name": "stair", "type": "stair",
        "size_table": [(100,200), (120,250)], "default_h_cm": 300},
}
# 建立 IFC 專案架構
def new_ifc_file(schema="IFC4"):
    ifc = ifcopenshell.api.run("project.create_file", version=schema)
    project  = ifcopenshell.api.run(
    "root.create_entity", ifc, ifc_class="IfcProject",  name="Project")
    site     = ifcopenshell.api.run(
    "root.create_entity", ifc, ifc_class="IfcSite",     name="Site")
    building = ifcopenshell.api.run(
    "root.create_entity", ifc, ifc_class="IfcBuilding", name="Building")
    storey   = ifcopenshell.api.run("root.create_entity", ifc, ifc_class="IfcBuildingStorey", name="Storey")
    ifcopenshell.api.run(
    "aggregate.assign_object", ifc, products=[site], relating_object=project)
    ifcopenshell.api.run(
    "aggregate.assign_object", ifc, products=[building], relating_object=site)
    ifcopenshell.api.run(
    "aggregate.assign_object", ifc, products=[storey], relating_object=building)
    length_unit = ifcopenshell.api.run(
    "unit.add_si_unit", ifc, unit_type="LENGTHUNIT", prefix="CENTI")
    ifcopenshell.api.run("unit.assign_unit", ifc, units=[length_unit])
    context  = ifcopenshell.api.run("context.add_context", ifc, context_type="Model")
    body_ctx = ifcopenshell.api.run(
        "context.add_context", ifc,
        context_type="Model", context_identifier="Body",
        target_view="MODEL_VIEW", parent=context
    )
    return ifc, storey, body_ctx

# 產生簡化的方塊幾何
def manual_box_representation_fixed(ifc, body_ctx, width, depth, height):
    cart0 = ifc.create_entity("IfcCartesianPoint", Coordinates=[0.0, 0.0, 0.0])
    zdir  = ifc.create_entity("IfcDirection", DirectionRatios=[0.0, 0.0, 1.0])
    xdir  = ifc.create_entity("IfcDirection", DirectionRatios=[1.0, 0.0, 0.0])
    prof2d = ifc.create_entity(
        "IfcRectangleProfileDef",
        ProfileType="AREA",
        XDim=float(width), YDim=float(depth),
        Position=ifc.create_entity(
            "IfcAxis2Placement2D",
            Location=ifc.create_entity("IfcCartesianPoint", Coordinates=[0.0, 0.0])
        )
    )
    solid = ifc.create_entity(
        "IfcExtrudedAreaSolid",
        SweptArea=prof2d, Depth=float(height),
        ExtrudedDirection=zdir,
        Position=ifc.create_entity("IfcAxis2Placement3D", Location=cart0, Axis=zdir, RefDirection=xdir)
    )
    body = ifc.create_entity(
        "IfcShapeRepresentation",
        ContextOfItems=body_ctx,
        RepresentationIdentifier="Body",
        RepresentationType="SweptSolid",
        Items=[solid]
    )
    return ifc.create_entity("IfcProductDefinitionShape", Representations=[body])
在 BIM 自動化開發中,建議將每一類建築元素(例如門、柱、樓梯等)分段依序建立於同一個 IFC 檔案物件中,也就是先建骨架,再分批加元素,最後統一寫檔,這樣可避免只會留下最後一個物件的 IFC 檔案,前面的全部被覆蓋的情況。
#//  依序建模門、柱、樓梯(每次都將新元素掛到同一個 ifc 物件)//

# 加門
for ... in door_data:
    ...  # 建 IfcDoor, 加幾何、加屬性、掛 storey

# 加柱
for ... in column_data:
    ...  # 建 IfcColumn, 加幾何、加屬性、掛 storey

# 加樓梯
for ... in stair_data:
    ...  # 建 IfcStair, 加幾何、加屬性、掛 storey

#// 等所有元素都建完,再最後統一寫檔//
ifc.write("all_objects.ifc")
本篇測試了三個物件元素,依照Day19:「專案架構→參數設定→建立元素→加入關聯與屬性→輸出IFC模型檔」的流程,一樣可成功建立了模型如下圖。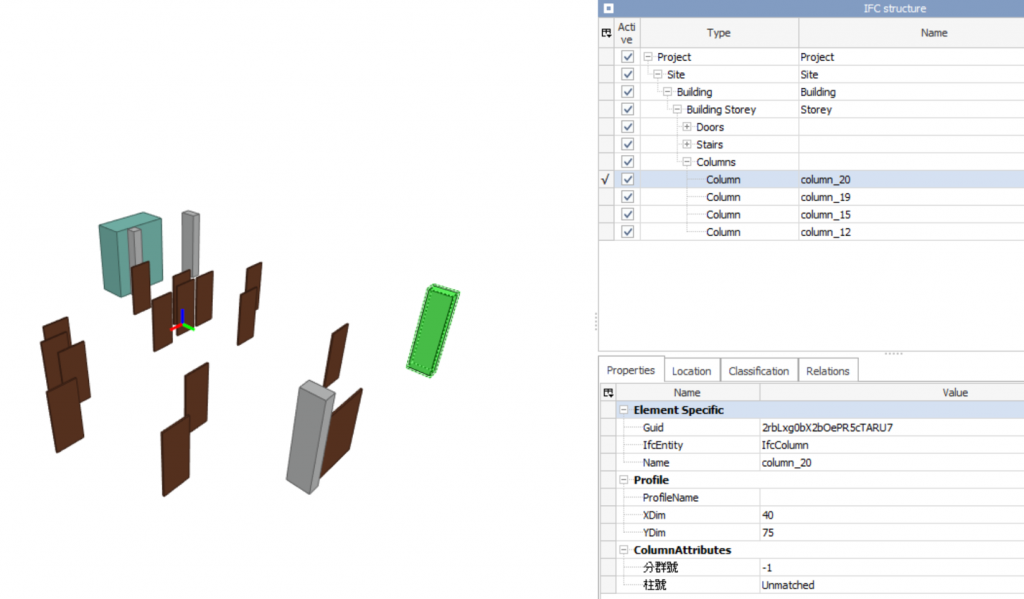
圖23.2 門、柱、樓梯IFC模型示例圖
今天本篇驗證了多元件(門、柱、樓梯)自動化建模的流程與可行性,證明即使面對不同元素類型,只要流程設計得當,仍能以相同的資料驅動模式快速完成建模。
不過,在過程中同樣遇到了昨天在單一元素建置時遇到的挑戰,像是文字辨識資料未檢出、召回率不佳致模型出現漏檢,這些問題當元素數量一多,後續人工校正與維護難度也大幅增加。因此這也提醒我們,自動化流程雖然提升了效率與一致性,但數據品質、流程設計與資料校正依然是成敗關鍵。
從AI辨識結果輸入,再到IFC模型建置輸出的內容就到這邊啦,明天我將實測產出的IFC模型,在各BIM軟體間的使用狀況,以確保自動化產出的結果能順應到產業現有習慣的操作模式中,明天見!


 iThome鐵人賽