iT邦幫忙

2025 iThome 鐵人賽

DAY 17
0
Build on AWS

從一個網站的誕生,看懂 AWS 架構與自動化的全流程!系列 第 17

Day 17 檔案上傳安全:S3 x API x Presigned URL 打造限時上傳連結

  • 分享至 

  • xImage
  •  

https://ithelp.ithome.com.tw/upload/images/20251001/20172743J5DCJ8rppR.png

一、前言

在 Web 或 App 系統中,常見使用者需要上傳檔案(例如:大頭照、報表、附件)。若直接開放 S3 Public Write,會導致嚴重安全風險;若透過後端 Proxy 上傳,則增加伺服器壓力與流量成本。

Presigned URL 提供一種安全、輕量的方式,讓使用者在短時間內直接與 S3 互動,並避免憑證外洩與濫用。
(1) 痛點在於如何允許使用者安全上傳檔案,而不暴露 S3 的寫入權限。
(2) 傳統做法若讓 API Gateway / Lambda 代理檔案上傳,會大幅增加網路流量與成本,且成為瓶頸。
(3) Presigned URL 則允許客戶端在特定時間內直接 PUT 檔案至 S3,結合 IAM 權限控管與條件限制(檔案大小、檔名格式),達到最佳平衡。
在 Serverless 架構中,這個模式通常搭配 Cognito 進行授權,Lambda 產生 Presigned URL,前端再使用該 URL 完成檔案上傳。

二、需要使用到的服務

(1) Amazon S3:存放上傳檔案,設定 Bucket Policy 控制存取權限。
(2) AWS Lambda:產生 Presigned URL,並回傳給前端。
(3) Amazon API Gateway:提供安全的 API 入口,讓前端取得 Presigned URL。
(4) IAM Policy:控制 Lambda 產生的 Presigned URL 僅能用於指定 Bucket 與動作(s3:PutObject)。
(5) Amazon CloudWatch Logs:監控 Lambda 呼叫與上傳行為。
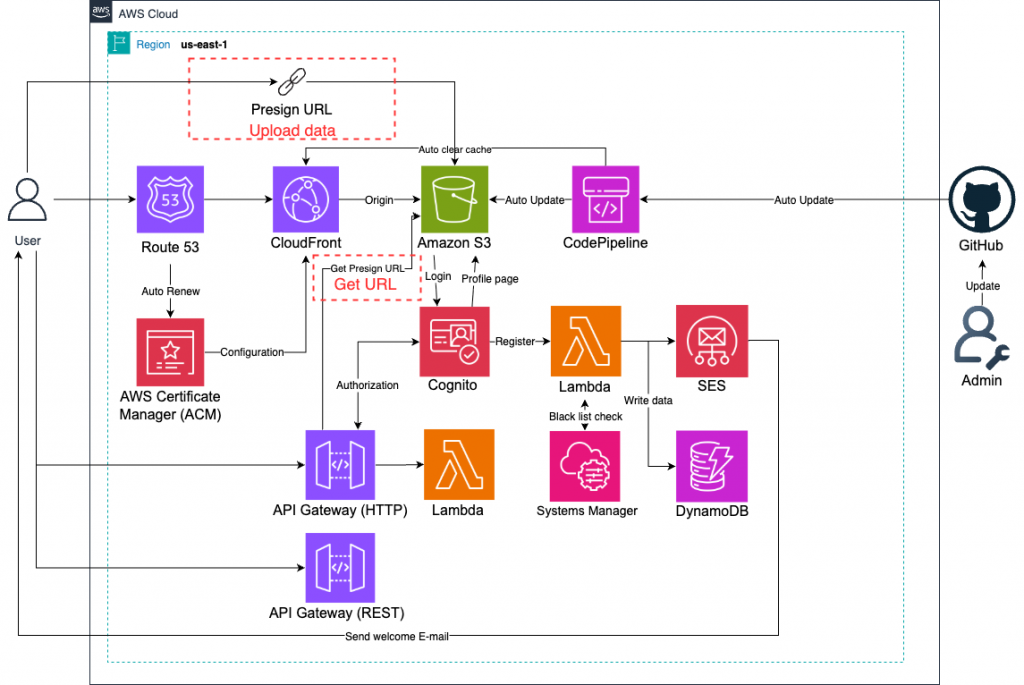
三、架構/概念圖

https://ithelp.ithome.com.tw/upload/images/20251001/20172743Axr5pmfNSH.png

四、技術重點

(1) 限制 Presigned URL 有效時間(通常 5~15 分鐘)。
(2) 搭配 檔案大小限制檔案副檔名檢查,避免惡意檔案上傳。
(3) 若應用需要安全審計,可搭配 S3 Event + Lambda 進行後續處理(如掃毒、壓縮)。
(4) 搭配 Cognito 管控使用者身分,避免所有人都能產生 URL。
(5) S3 Bucket 必須開啟 Block Public Access,避免繞過 Presigned URL。

五、Lab流程

1️⃣ 前置作業

  1. 建立 S3 Bucket:Day6已創建過。

2️⃣ 主要配置

1. 在GitHub上創建一個空資料夾(上傳/下載檔案用)

💡在 GitHub 網站上,你無法直接創建一個空的資料夾。這是因為 Git(GitHub 背後的版本控制系統)的設計理念是只追蹤檔案,不追蹤資料夾

要讓 Git 和 GitHub 追蹤你的資料夾,你必須在裡面放一個**「佔位」檔案**。這個檔案通常是 .gitkeep 或一個簡單的 .gitignore 檔案。

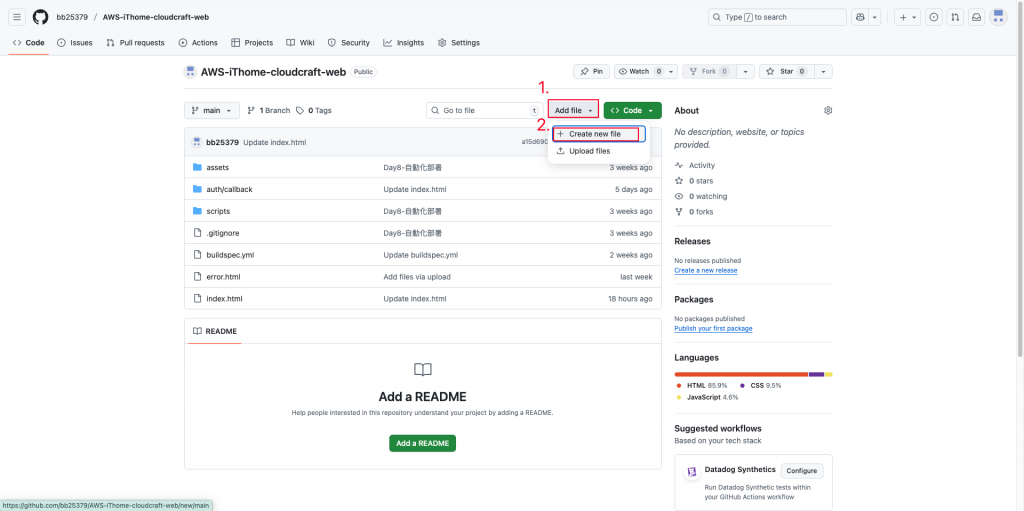
  1. 到自己的GitHub中,並點選創建檔案。
    https://ithelp.ithome.com.tw/upload/images/20251001/20172743rV6PuBv1J9.png

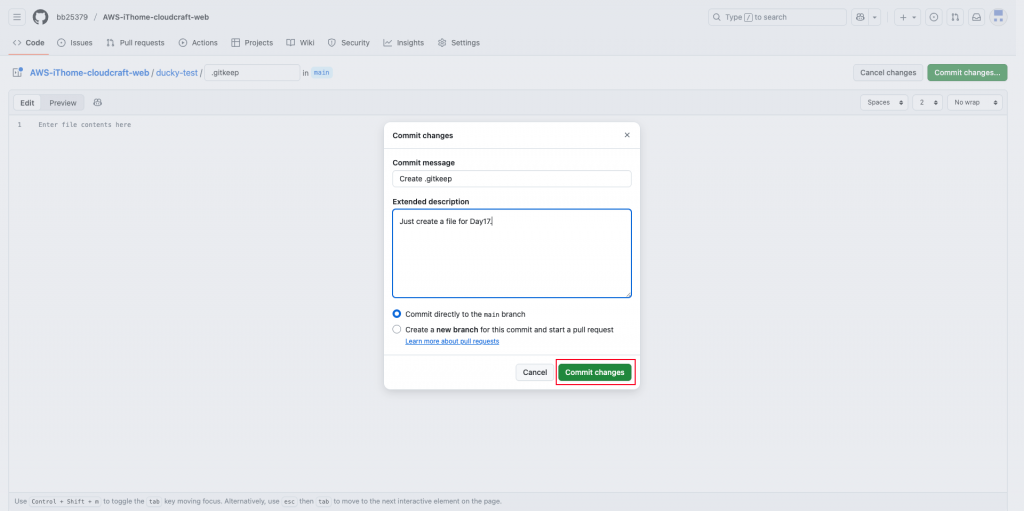
  2. 創建資料夾及佔位檔案「.gitkeep」。
    https://ithelp.ithome.com.tw/upload/images/20251001/20172743NX1qEie547.png

  3. 上傳並推送。
    https://ithelp.ithome.com.tw/upload/images/20251001/20172743nNzhiA8oUh.png

2. 創建Lambda

  1. 進入「Lambda」頁面。
    https://ithelp.ithome.com.tw/upload/images/20251001/201727432QDsEr5ZtV.png

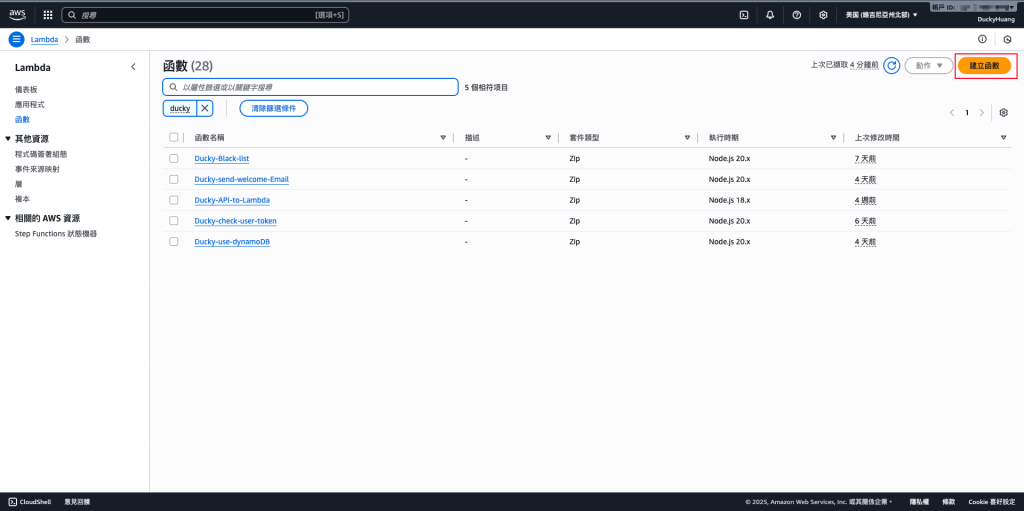
  2. 創建一個新的函數。
    https://ithelp.ithome.com.tw/upload/images/20251001/20172743qsfmkHxsMj.png

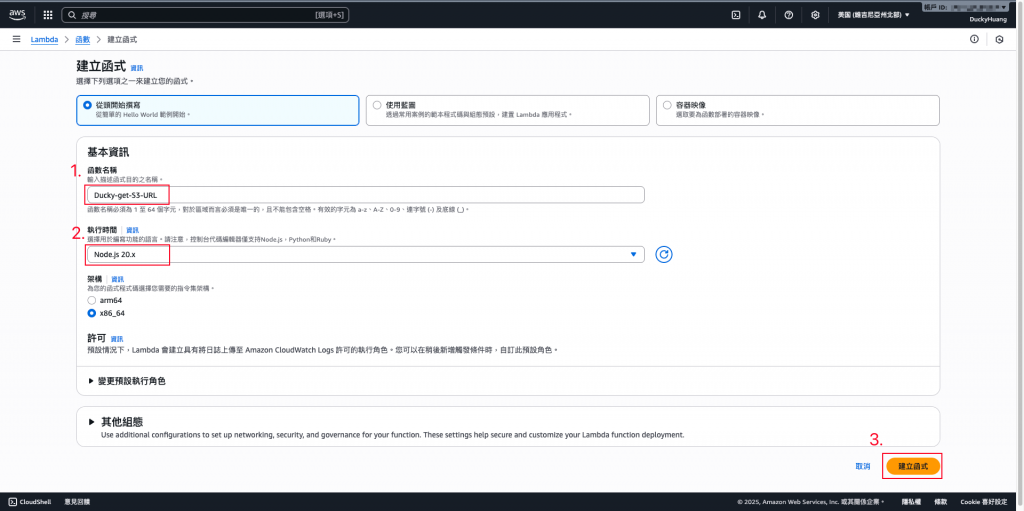
  3. 輸入函數名稱,並選擇編撰語言。
    https://ithelp.ithome.com.tw/upload/images/20251001/20172743d5sdpS19VA.png

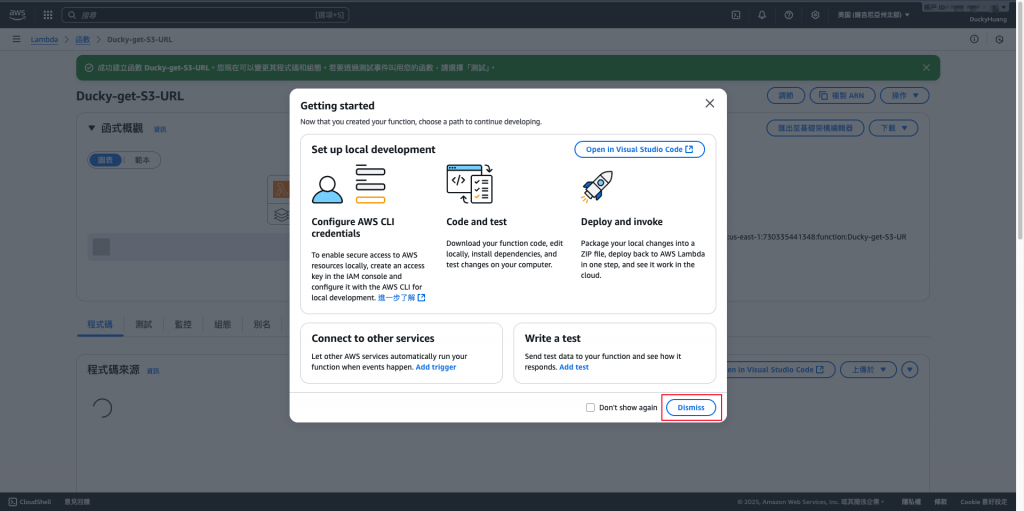
  4. 跳過建議畫面。
    https://ithelp.ithome.com.tw/upload/images/20251001/201727433hcFNbQHnt.png

  5. 寫入程式碼,並部署。

    • 程式碼範例

      import { S3Client, PutObjectCommand } from "@aws-sdk/client-s3";
      import { getSignedUrl } from "@aws-sdk/s3-request-presigner";
      
      const s3Client = new S3Client({ region: process.env.AWS_REGION });
      const BUCKET_NAME = process.env.BUCKET_NAME; // 從環境變數讀取S3 bucket name
      const FOLDER_PATH = process.env.FOLDER_PATH; // 從環境變數讀取資料夾路徑
      const EXPIRES_IN = parseInt(process.env.EXPIRES_IN, 10) || 300; // 從環境變數讀取過期時效
      
      export const handler = async (event, context) => {
        if (!event.queryStringParameters || !event.queryStringParameters.filename) {
          return {
            statusCode: 400,
            body: JSON.stringify("Missing required parameter 'filename'"),
          };
        }
      
        // 修改這裡:將資料夾路徑加到檔名前面
        const key = FOLDER_PATH + event.queryStringParameters.filename;
      
        const command = new PutObjectCommand({
          Bucket: BUCKET_NAME,
          Key: key, // 現在 Key 的值會是 'ducky-test/test.jpg'
        });
      
        try {
          const presignedUrl = await getSignedUrl(s3Client, command, {
            expiresIn: EXPIRES_IN, 
          });
      
          return {
            statusCode: 200,
            body: JSON.stringify(presignedUrl),
          };
        } catch (err) {
          console.error(err);
          return {
            statusCode: 500,
            body: JSON.stringify("Failed to generate presigned URL."),
          };
        }
      };
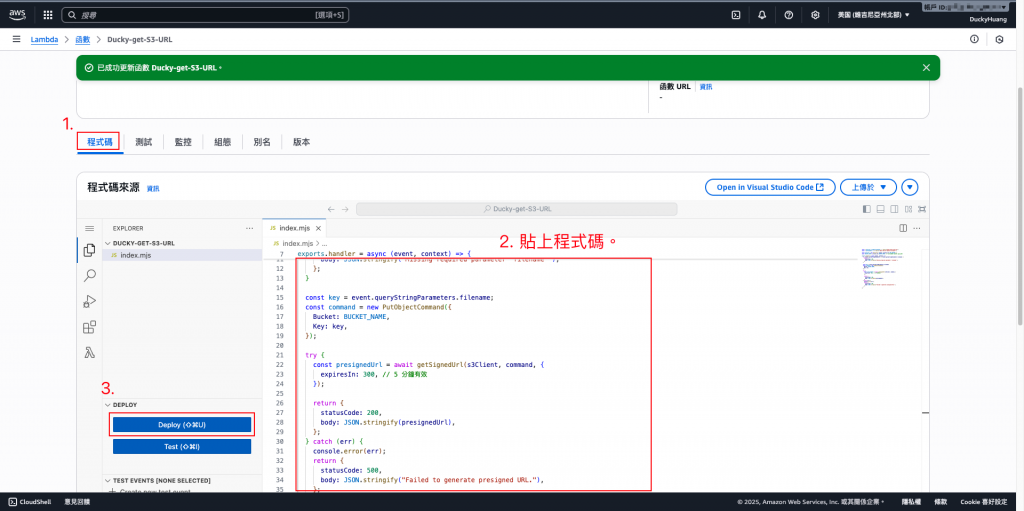
      

    https://ithelp.ithome.com.tw/upload/images/20251001/20172743fdmJY8yAvw.png

3. 在Lambda設定S3 bucket name的環境變數

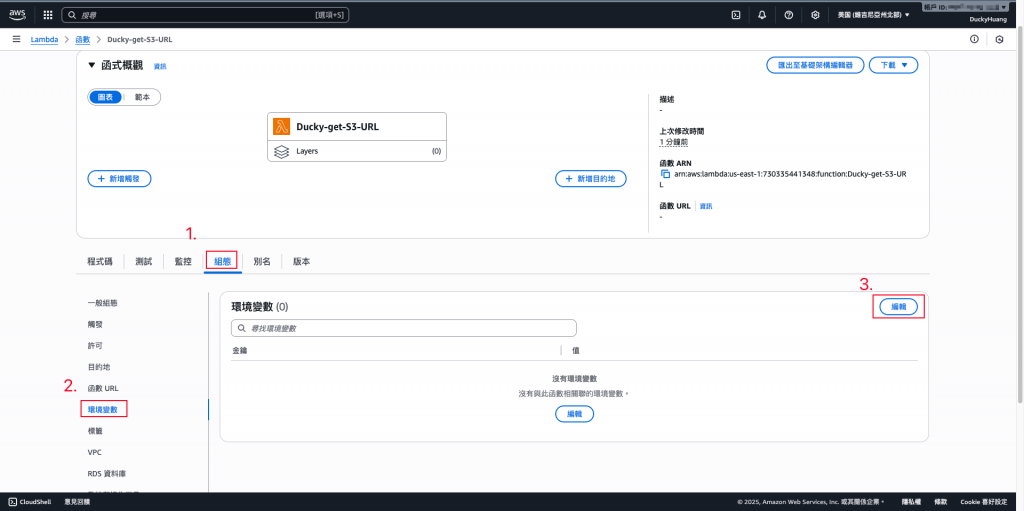
  1. 進入「組態」分頁,設定環境變數。
    https://ithelp.ithome.com.tw/upload/images/20251001/20172743YWddp7S9u9.png

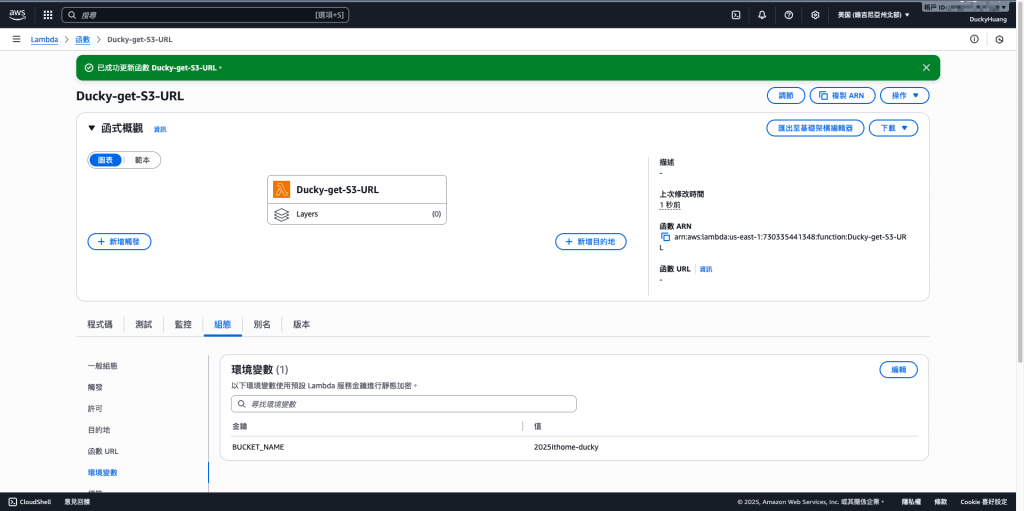
  2. 設定以下的Key及Value。
    BUCKET_NAME:S3 bucket name
    FOLDER_PATH:存檔路徑
    EXPIRES_IN:有效時限(秒)
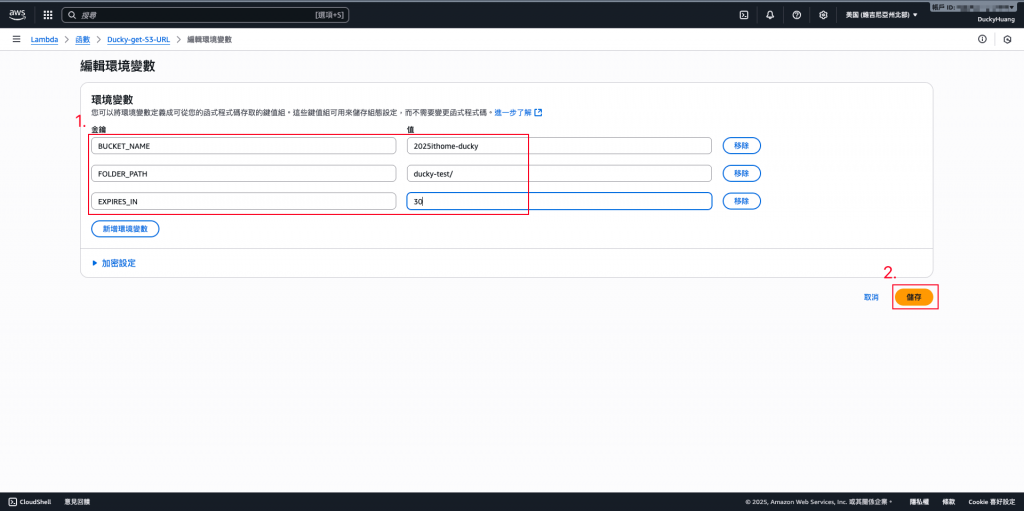
    https://ithelp.ithome.com.tw/upload/images/20251001/20172743czeaLJPq6A.png

  3. 完成畫面。
    https://ithelp.ithome.com.tw/upload/images/20251001/20172743efXIDbbEVc.png

4. 授予 Lambda 的 IAM Role上傳檔案到S3的權限。

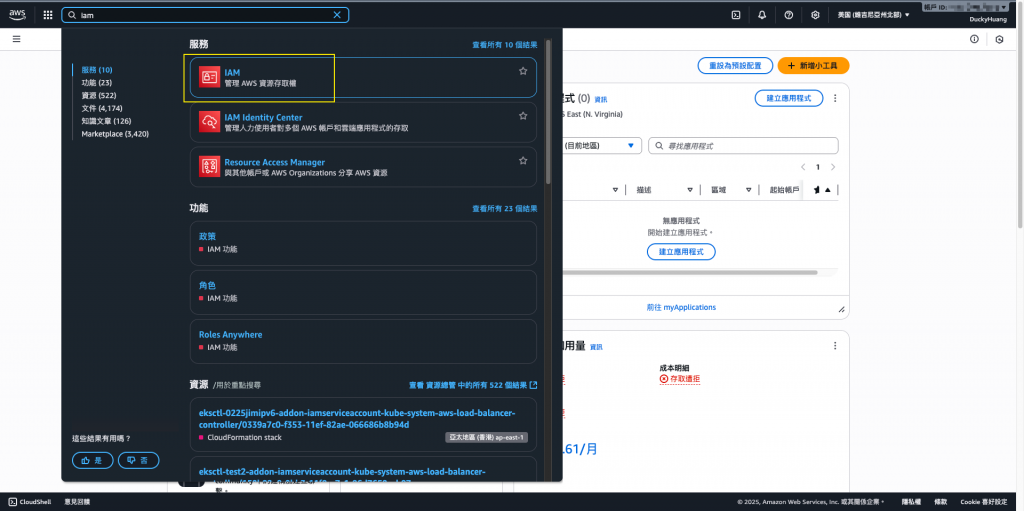
  1. 進入「IAM 」頁面。
    https://ithelp.ithome.com.tw/upload/images/20251001/20172743U9n9ewbe1B.png

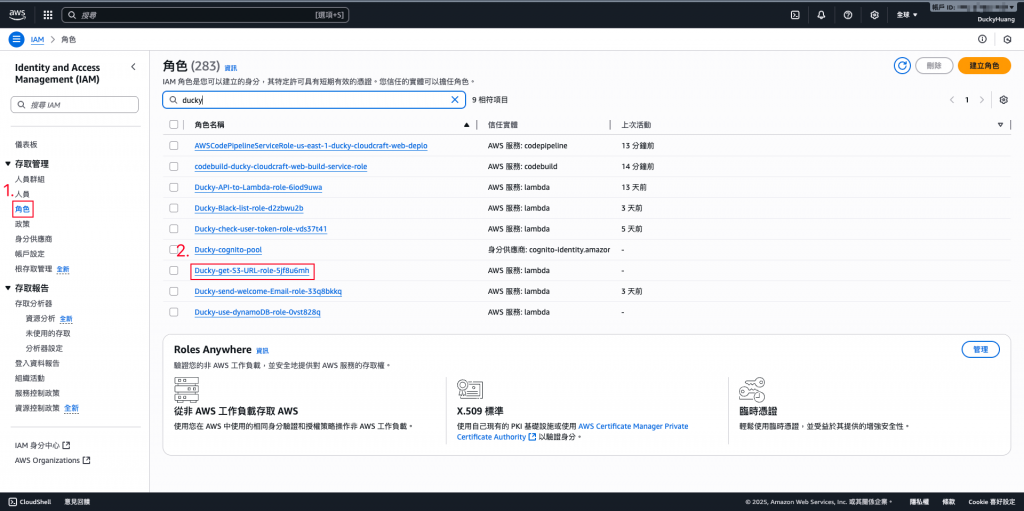
  2. 進入IAM role的頁面,點選該Lambda自動創建的IAM role。
    https://ithelp.ithome.com.tw/upload/images/20251001/20172743GbJU6PbGlI.png

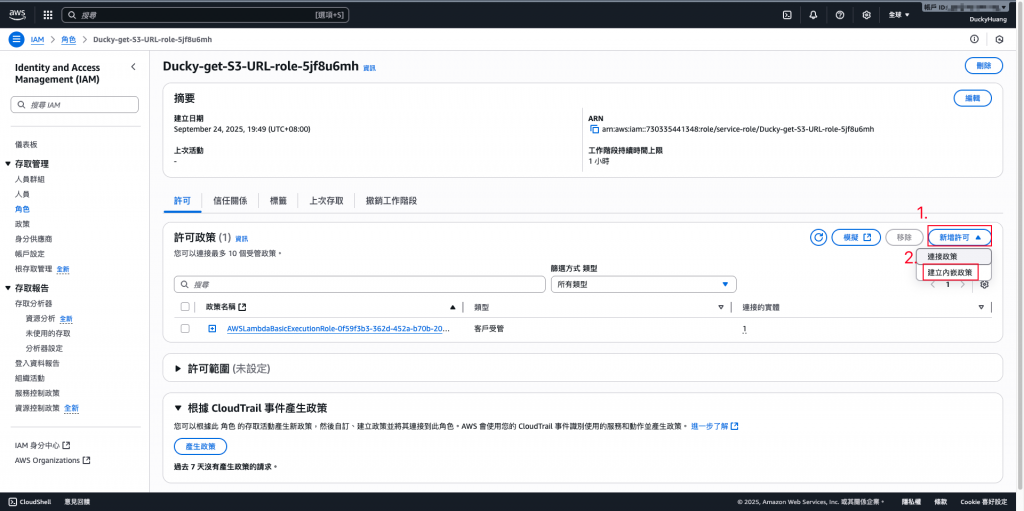
  3. 新增「許可政策」。
    https://ithelp.ithome.com.tw/upload/images/20251001/20172743QOhvsqVwTL.png

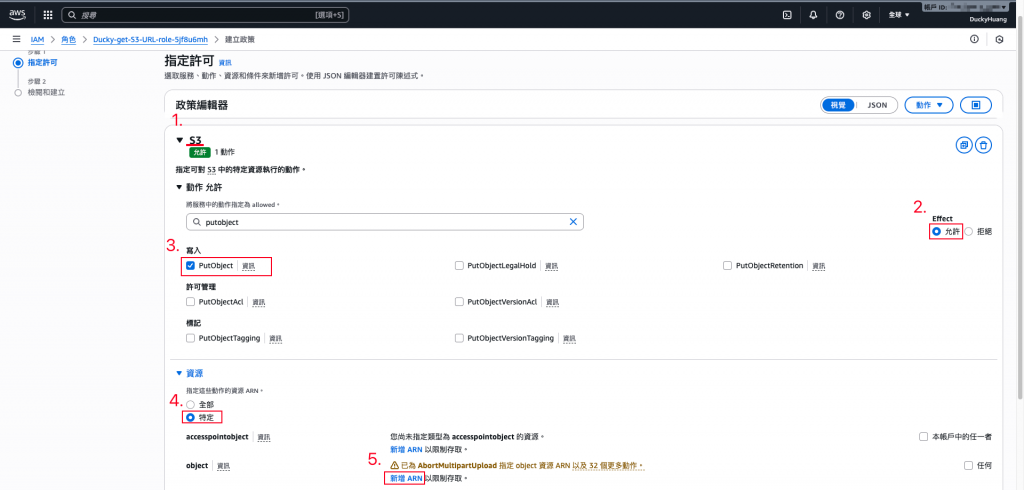
  4. 增加S3的「PutObject」權限。
    https://ithelp.ithome.com.tw/upload/images/20251001/20172743OFvS1oKe97.png

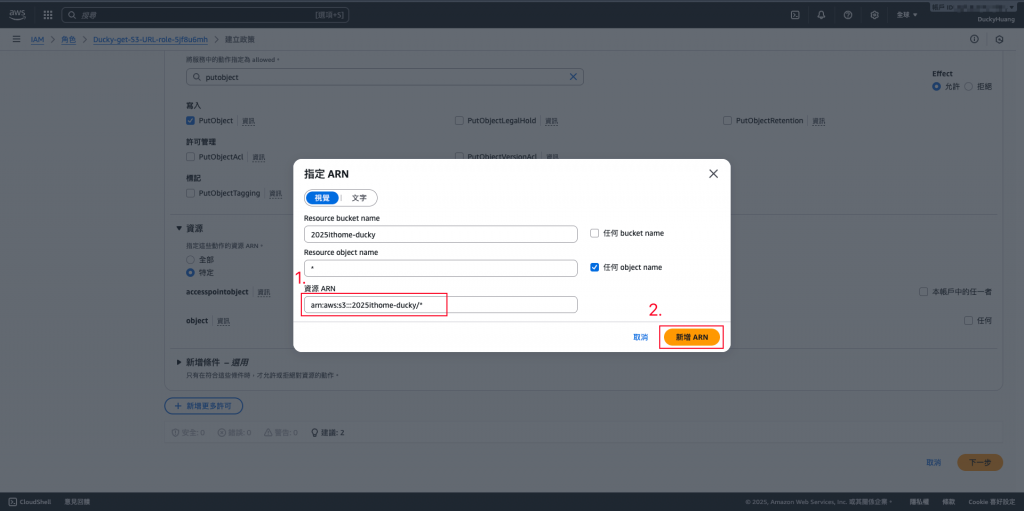
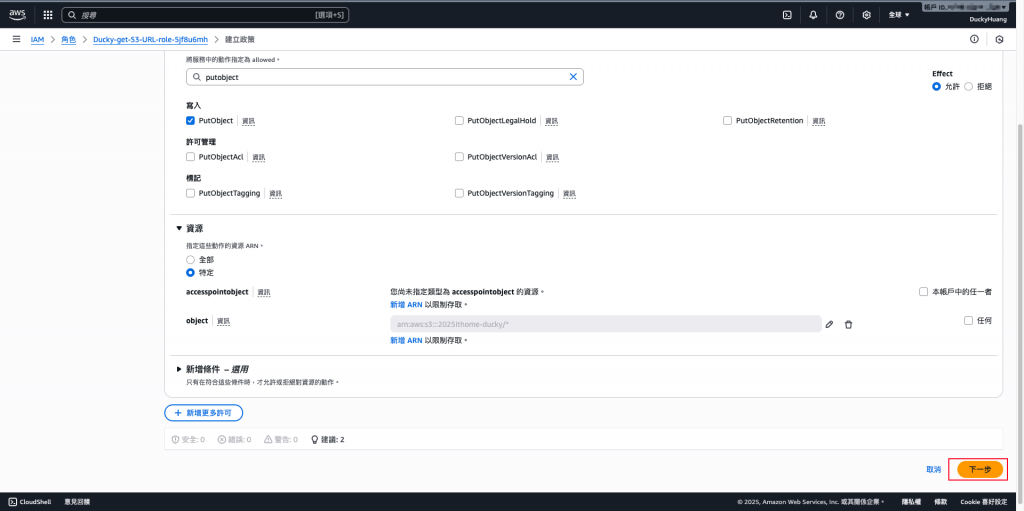
  5. 將授權調整為指定的S3。

    https://ithelp.ithome.com.tw/upload/images/20251001/20172743urAOe3sKW2.png
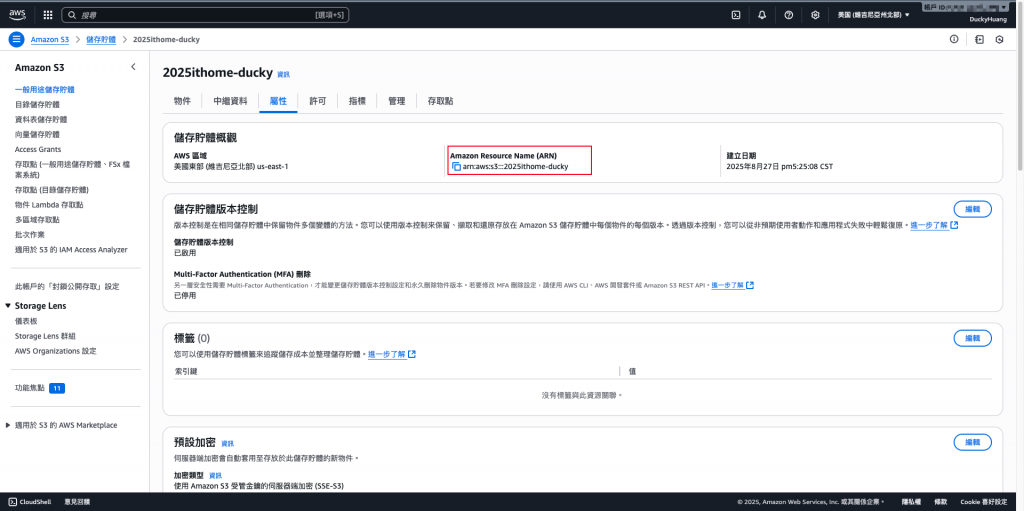
    - S3的ARN在哪?
    https://ithelp.ithome.com.tw/upload/images/20251001/20172743of4mwb9qYl.png

  6. 設定完成後,點選下一步。
    https://ithelp.ithome.com.tw/upload/images/20251001/20172743S01ujOGpOv.png

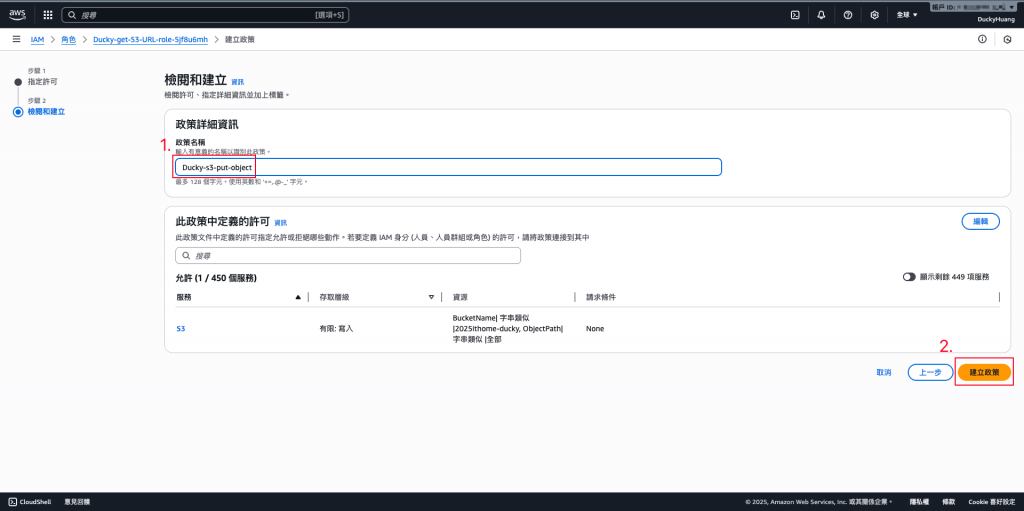
  7. 設定「許可政策」名稱。
    https://ithelp.ithome.com.tw/upload/images/20251001/20172743h7IoANPuRa.png

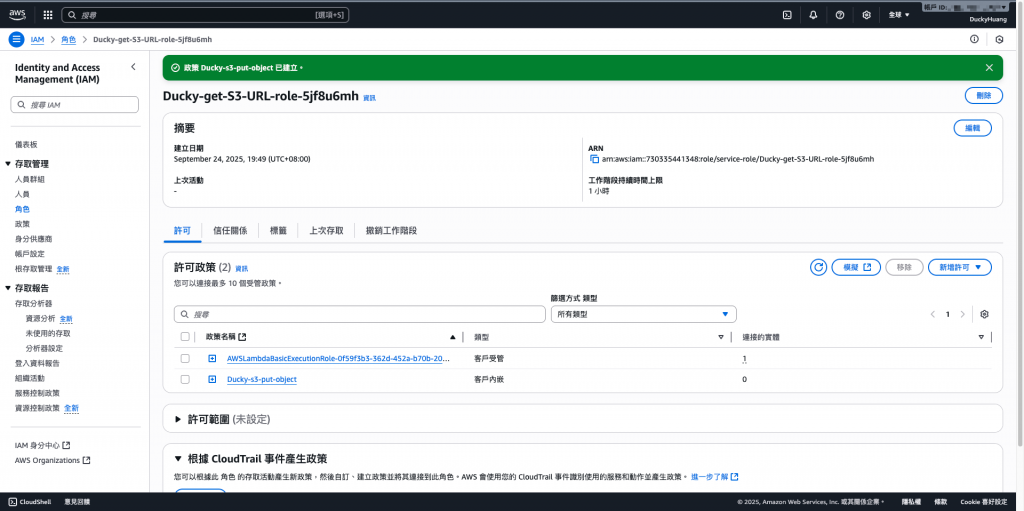
  8. 完成畫面。
    https://ithelp.ithome.com.tw/upload/images/20251001/2017274394yz60N7EQ.png

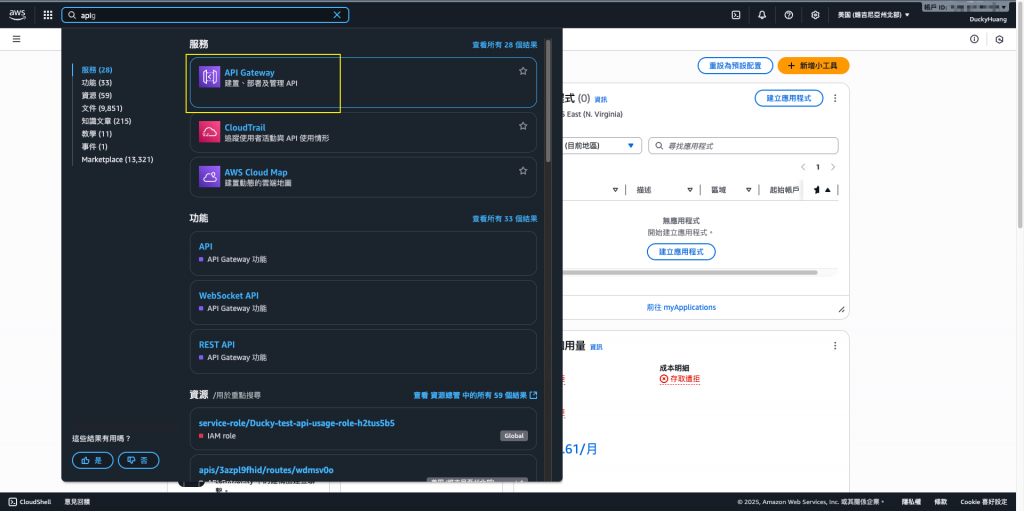
5. 將Lambda綁在 API Gateway HTTP API上。

  1. 進入「API Gateway」服務頁面。
    https://ithelp.ithome.com.tw/upload/images/20251001/20172743mL8ijiAuem.png

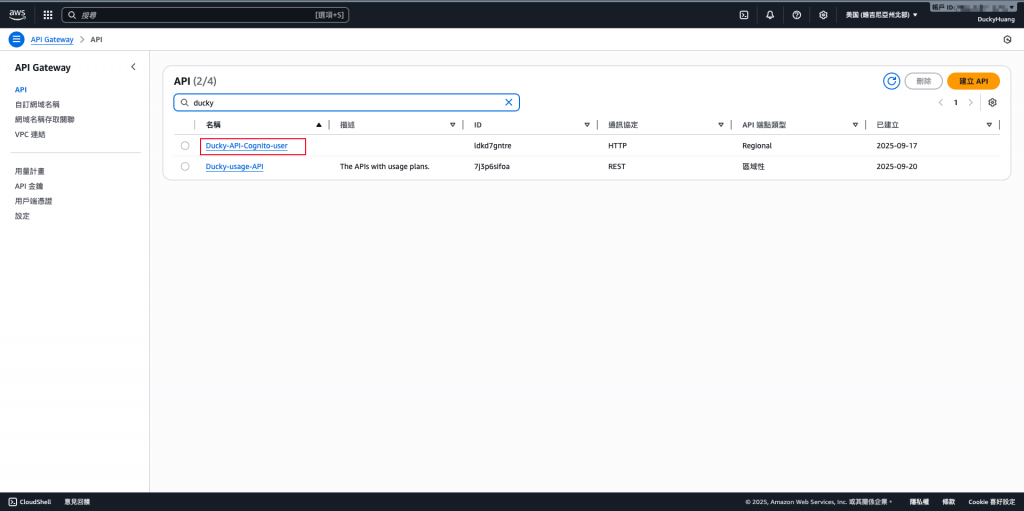
  2. 進入Day12創建的HTTP API Gateway。(主架構)
    https://ithelp.ithome.com.tw/upload/images/20251001/20172743BSuWDkAvXT.png

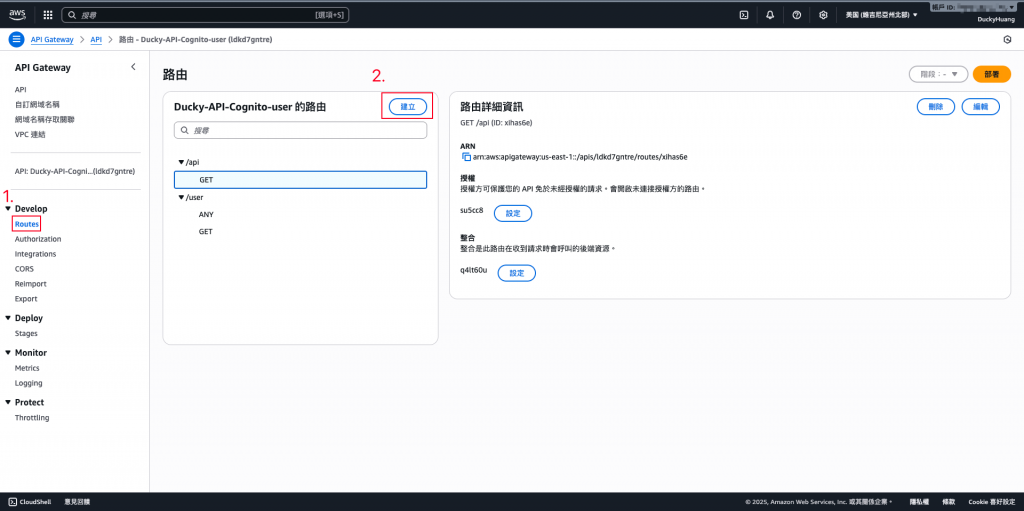
  3. 創建一個新的路由路徑。
    https://ithelp.ithome.com.tw/upload/images/20251001/20172743UHSb6N9J3F.png

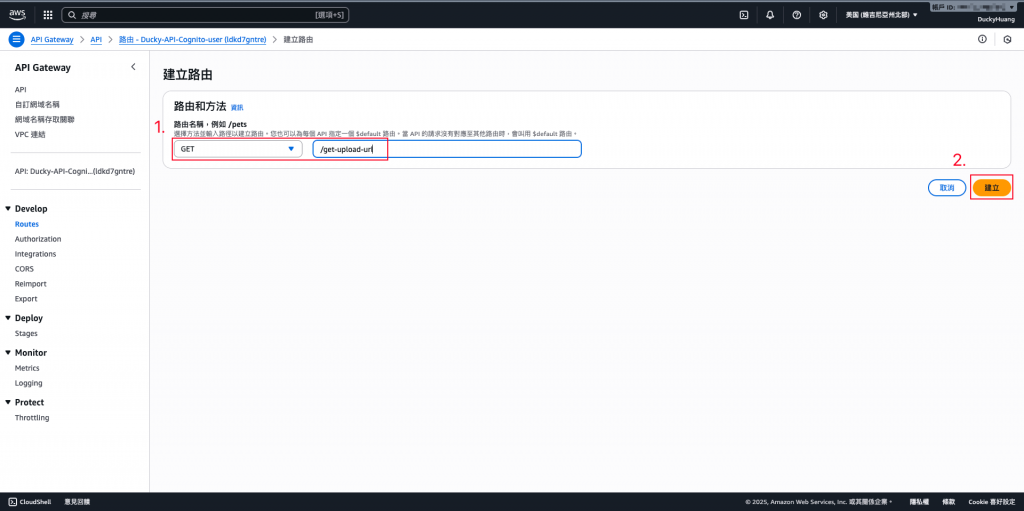
  4. 設定HTTP Method為「GET」,並自定義API路徑。(此次路徑設定為「/get-upload-url」)
    https://ithelp.ithome.com.tw/upload/images/20251001/20172743zTSmXSydJQ.png

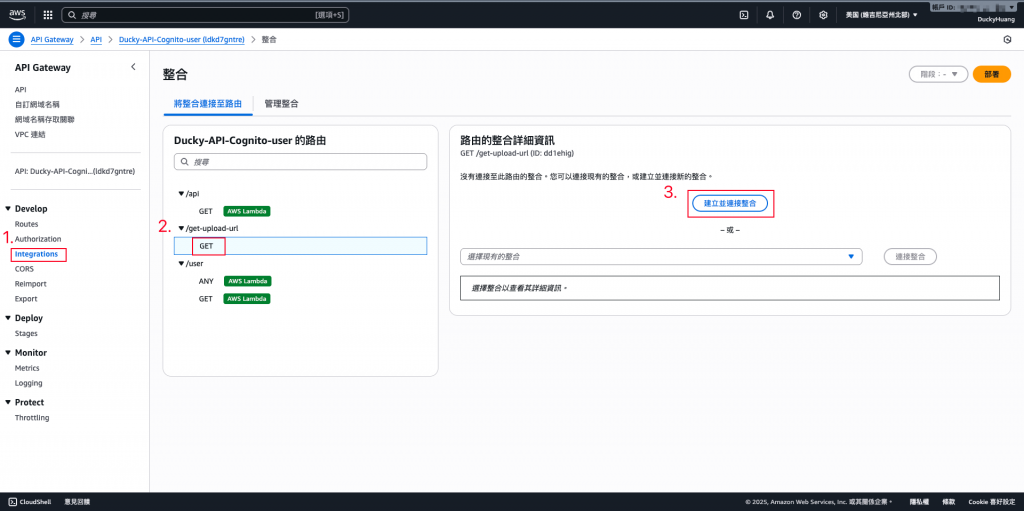
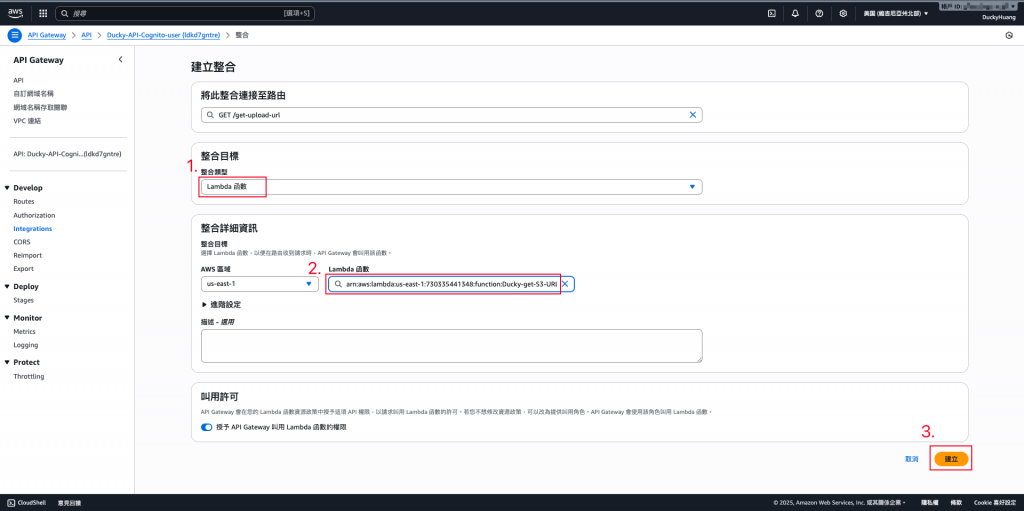
  5. 將路由整合新的應用。
    https://ithelp.ithome.com.tw/upload/images/20251001/20172743Y43kKxiwad.png

  6. 關聯剛剛創建的Lambda函數。
    https://ithelp.ithome.com.tw/upload/images/20251001/20172743HkwluPPB67.png

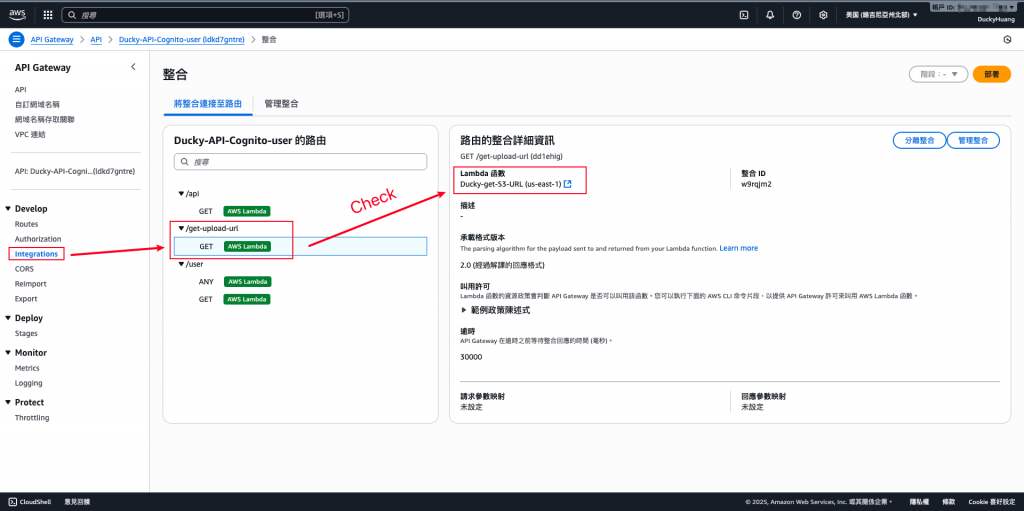
  7. 完成關聯。
    https://ithelp.ithome.com.tw/upload/images/20251001/20172743ayveG5a7DQ.png


3️⃣ 測試驗證

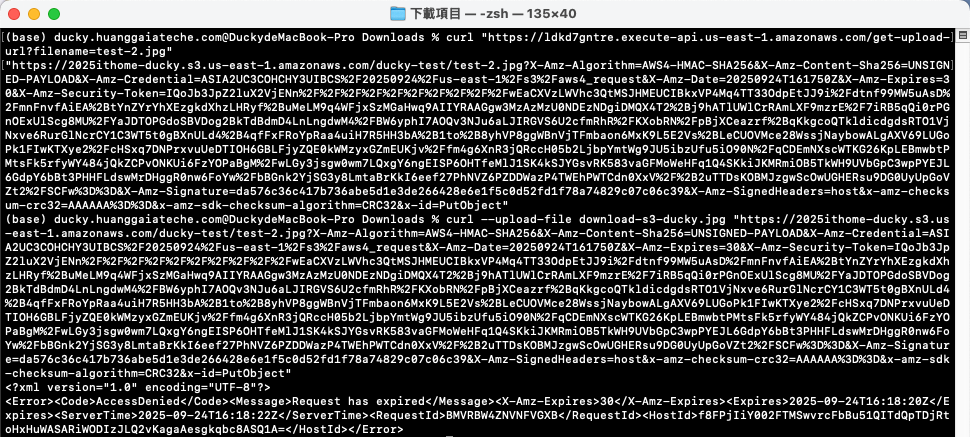
1. 呼叫 API Gateway,取得特定的 Presigned URL(包含命名上傳後檔名)

  • 指令範例

    curl "<YOUR_API_GATEWAY_URL>/get-upload-url?filename=<上傳後的檔案名稱>"
    

https://ithelp.ithome.com.tw/upload/images/20251001/20172743lfL0ryozgZ.png

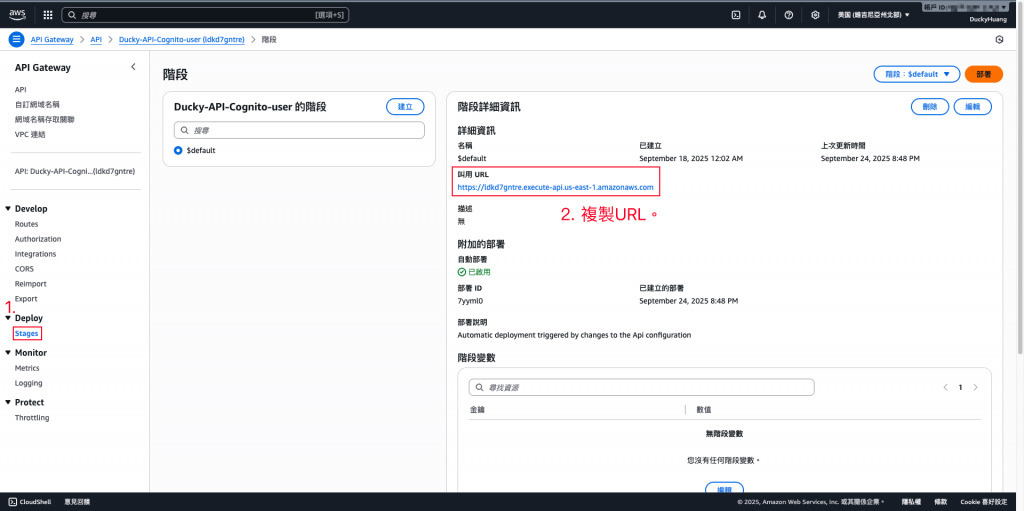
  • <YOUR_API_GATEWAY_URL>在哪獲得?
    https://ithelp.ithome.com.tw/upload/images/20251001/20172743qpckkUdpdL.png

2. 使用取得的 Presigned URL 上傳檔案

  • 指令範例

    curl --upload-file <本地檔案路徑.格式> "<YOUR_PRESIGNED_URL>"
    

https://ithelp.ithome.com.tw/upload/images/20251001/20172743kGrMPF4KlM.png

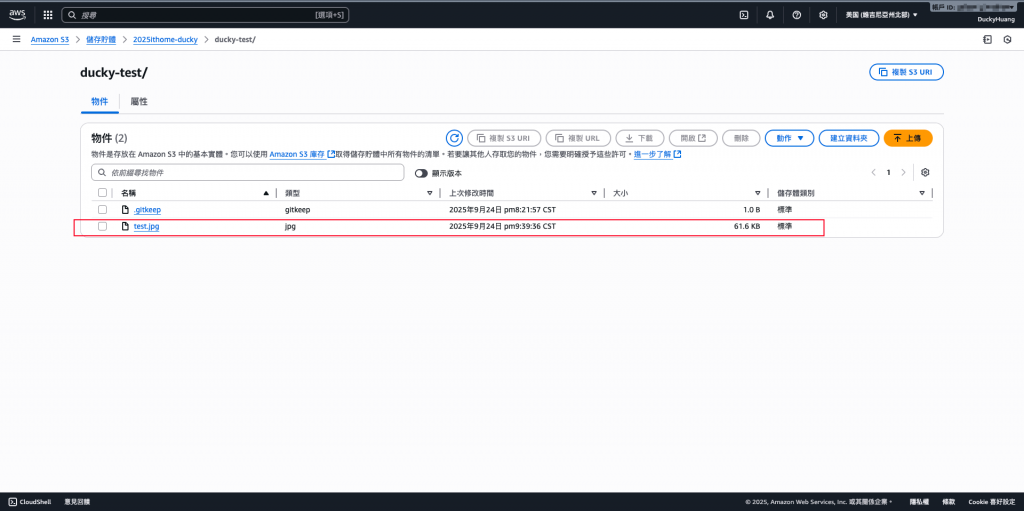
3. 驗證 S3 Bucket 是否有檔案

https://ithelp.ithome.com.tw/upload/images/20251001/20172743hMvG8D7W45.png

4. 測試逾時連結,等待設定的時間後,上傳的連結就會失效

https://ithelp.ithome.com.tw/upload/images/20251001/20172743HV3aBSHzl7.png

六、結語

本 Lab 展示如何透過 S3 Presigned URL 提供安全、限時的檔案上傳機制。

它解決了傳統架構中 Public Access 的安全問題,以及 Proxy 上傳的效能與成本問題。這種模式能大幅減少 API Gateway 與 Lambda 的流量負擔,並確保資料存取安全性,是 Serverless 架構中檔案上傳的最佳實踐之一。


上一篇
Day 16 資料庫效能優化:DynamoDB GSI/LSI 與 Query / Scan 應用
下一篇
Day 18 檔案存取控制:S3 x API x Presigned URL 實現安全/限時下載與預覽
系列文
從一個網站的誕生,看懂 AWS 架構與自動化的全流程!24
圖片
  熱門推薦
圖片
{{ item.channelVendor }} | {{ item.webinarstarted }} |
{{ formatDate(item.duration) }}
直播中

尚未有邦友留言

立即登入留言