
昨天把 Probe 都說明清楚了,今天要學 Resource Request 和 Limit,設定每個 Pod 能用多少 CPU 和記憶體 。
目前的 Todo App 每個 Pod 都沒有設定資源限制,這在生產環境是危險的。
假設 todo-api 突然接到大量請求,CPU 使用率飆升,開始吃掉同一台 Node 上其他 Pod 的資源。其他服務(例如 MySQL)因為拿不到足夠的 CPU,開始變慢甚至崩潰——一個服務的問題,拖垮了整台 Node 上的所有服務。
Resource Request 和 Limit 就是用來避免這個情況的。
Request(請求量):K8s 在調度 Pod 的時候,保留給這個 Pod 的資源量。
Scheduler 在決定 Pod 要跑在哪個 Node 的時候,會根據 Request 計算「這個 Node 還有沒有足夠的資源」。如果 Node 的可用資源小於 Pod 的 Request,這個 Pod 就不會被調度到這個 Node。
Limit(上限):Pod 最多能用多少資源。**
CPU:
1 = 1 顆 vCPU / 1 個核心0.5 或 500m = 半顆 CPU(m 是 millicores,1000m = 1 CPU)記憶體:
128Mi = 128 Mebibytes(1 Mi = 1024 * 1024 bytes)1Gi = 1 Gibibyte128M、1G 是 SI 單位(1 M = 1000 * 1000 bytes),K8s 建議用 Mi、Gi
今天目標:幫 todo-api、todo-frontend、MySQL 三個服務各加上 Resource Request 和 Limit,啟用 metrics-server 後用 kubectl top 確認各 Pod 的當前實際資源使用狀況。
更新 todo-api-deployment.yaml:
apiVersion: apps/v1
kind: Deployment
metadata:
  name: todo-api
spec:
  replicas: 2
  selector:
    matchLabels:
      app: todo-api
  template:
    metadata:
      labels:
        app: todo-api
        tier: backend
    spec:
      containers:
        - name: api
          image: yourname/todo-app-api:v1.0.0
          ports:
            - containerPort: 8000
          envFrom:
            - configMapRef:
                name: todo-api-config
            - secretRef:
                name: todo-api-secret
          livenessProbe:
            httpGet:
              path: /health
              port: 8000
            initialDelaySeconds: 15
            periodSeconds: 10
            failureThreshold: 3
          readinessProbe:
            httpGet:
              path: /ready
              port: 8000
            initialDelaySeconds: 5
            periodSeconds: 5
            failureThreshold: 3
          resources:
            requests:
              cpu: "100m"       # 最少需要 0.1 顆 CPU
              memory: "128Mi"   # 最少需要 128MB 記憶體
            limits:
              cpu: "500m"       # 最多使用 0.5 顆 CPU
              memory: "256Mi"   # 最多使用 256MB 記憶體
kubectl apply -f todo-api-deployment.yaml
前端是 nginx serve 靜態檔案,資源需求比後端少。
調整 todo-frontend-deployment.yaml :
apiVersion: apps/v1
kind: Deployment
metadata:
  name: todo-frontend
spec:
  replicas: 2
  selector:
    matchLabels:
      app: todo-frontend
  template:
    metadata:
      labels:
        app: todo-frontend
        tier: frontend
    spec:
      containers:
        - name: frontend
          image: yourname/todo-frontend:v1.0.0
          ports:
            - containerPort: 80
          resources:
            requests:
              cpu: "50m"      # 調度時保留 0.05 顆 CPU
              memory: "64Mi"  # 調度時保留 64MB 記憶體
            limits:
              cpu: "200m"     # 最多使用 0.2 顆 CPU,超過會被限流
              memory: "128Mi" # 最多使用 128MB 記憶體,超過會 OOMKilled
kubectl apply -f todo-frontend-deployment.yaml
資料庫需要比較多記憶體,調整 mysql-statefulset.yaml :
apiVersion: apps/v1
kind: StatefulSet
metadata:
  name: mysql
spec:
  serviceName: mysql-headless
  replicas: 1
  selector:
    matchLabels:
      app: mysql
  template:
    metadata:
      labels:
        app: mysql
        tier: database
    spec:
      containers:
        - name: mysql
          image: mysql:8.0
          ports:
            - containerPort: 3306
          env:
            - name: MYSQL_ROOT_PASSWORD
              valueFrom:
                secretKeyRef:
                  name: mysql-secret
                  key: MYSQL_ROOT_PASSWORD
            - name: MYSQL_DATABASE
              value: "tododb"
            - name: MYSQL_USER
              value: "user"
            - name: MYSQL_PASSWORD
              valueFrom:
                secretKeyRef:
                  name: mysql-secret
                  key: MYSQL_PASSWORD
          livenessProbe:
            exec:
              command:
                - /bin/sh
                - -c
                - mysqladmin ping -h localhost -u root -p${MYSQL_ROOT_PASSWORD}
            initialDelaySeconds: 30
            periodSeconds: 10
            timeoutSeconds: 5
            failureThreshold: 3
          volumeMounts:
            - name: mysql-data
              mountPath: /var/lib/mysql
          resources:
            requests:
              cpu: "500m"
              memory: "1Gi"
            limits:
              cpu: "500m"     # 和 request 相同,確保 Guaranteed
              memory: "1Gi"   # 和 request 相同,確保 Guaranteed
  volumeClaimTemplates:
    - metadata:
        name: mysql-data
      spec:
        accessModes:
          - ReadWriteOnce
        resources:
          requests:
            storage: 5Gi
kubectl apply -f mysql-statefulset.yaml
# 取得 Pod
kubectl get pod

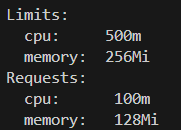
kubectl describe pod <todo-api-pod-name>
在輸出裡找 Limits 和 Requests 欄位:
前置步驟:啟用 metrics-server
kubectl top 需要 metrics-server 才能運作,minikube 預設沒有啟用,先執行:
minikube addons enable metrics-server
啟用後等約 1 分鐘讓它開始收集資料,再執行以下指令。
看當前 Node 資源使用:
kubectl top nodes

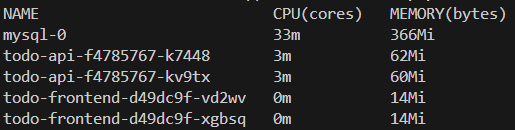
看當前各 Pod 的資源使用:
kubectl top pods
K8s 根據 Pod 的 Resource 設定,自動分配三種 QoS(Quality of Service)等級。當 Node 資源不足需要驅逐 Pod 的時候,K8s 會優先驅逐 QoS 等級低的 Pod。
resources:
  requests:
    cpu: "500m"
    memory: "256Mi"
  limits:
    cpu: "500m"      # 和 request 相同
    memory: "256Mi"  # 和 request 相同
resources:
  requests:
    cpu: "100m"
    memory: "128Mi"
  limits:
    cpu: "500m"
    memory: "256Mi"
今天學了 Resource Request 和 Limit:
明天會學 Namespace,把不同環境的資源隔離開來 !



 iThome鐵人賽
 看影片追技術