

在 Day 3 中,我們拆解過手動 new Service() 如何讓實例逃離 Nest Container 的管轄。當時我們關注的是 Service 與 Controller 之間的依賴;然而到了應用程式全域入口,這個問題常以更隱晦的方式重演。
不論是 Pipe、Interceptor、Filter 還是 Guard,我們經常會看到類似這樣的註冊方式:
// main.ts
app.useGlobalGuards(new RolesGuard(...));
路由確實都被保護了,Guard 也能正常執行,看起來沒有任何問題。但這行程式碼藏著一個容易被忽略的邊界:RolesGuard 是我們自己 new 出來的。Nest 只是接收並使用這個已經建立完成的實例,它本身並不在 Nest Container 的管理之下。
當 Guard 開始依賴 Reflector、UserRolesService 或其他 provider,main.ts 就得自己從容器取出這些依賴,再親手組裝 RolesGuard。
今天我們將以 RolesGuard 進行實作示範,深入探討這類全域元件在架構上的核心問題:全域元件的建立與組裝責任,到底應該歸誰?
我們透過一個簡化的角色授權流程來做示範:
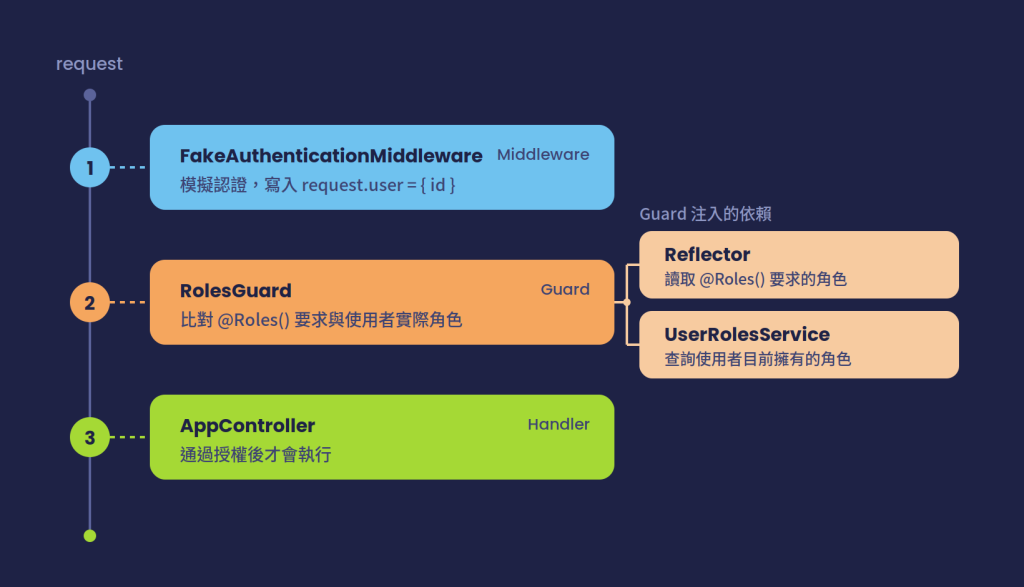
為了讓範例更貼近實務,這裡把認證與授權拆開:
FakeAuthenticationMiddleware:模擬 JWT 或 session 已完成驗證,只負責把使用者 ID 放進 request。RolesGuard:根據路由上的 metadata 與使用者目前的角色,決定是否放行。UserRolesService:用記憶體資料模擬實務上的角色查詢。資料固定有兩個使用者:
| x-user-id | 角色 |
|---|---|
| 1 | user |
| 2 | user、admin |
UserRolesService 模擬角色查詢:
@Injectable()
export class UserRolesService {
  private readonly roles = new Map<number, Role[]>([
    [1, [Role.User]],
    [2, [Role.User, Role.Admin]],
  ]);

  getRoles(userId: number): Role[] {
    return this.roles.get(userId) ?? [];
  }
}
AppController 提供兩支路由,/profile 沒有角色限制,/admin 則透過自訂的 @Roles(Role.Admin) 宣告只有管理員可以進入:
@Controller()
export class AppController {
  @Get('profile')
  getProfile(): string {
    return 'No specific role required';
  }

  @Roles(Role.Admin)
  @Get('admin')
  getAdmin(): string {
    return 'Admin only';
  }
}
接著是今天真正的主角 RolesGuard。它的建構子包含兩個依賴,分別負責查詢路由需求與使用者權限:
@Injectable()
export class RolesGuard implements CanActivate {
  constructor(
    private readonly reflector: Reflector,
    private readonly userRolesService: UserRolesService,
  ) {}

  canActivate(context: ExecutionContext): boolean {
    const requiredRoles = this.reflector.getAllAndOverride<Role[]>(ROLES_KEY, [
      context.getHandler(),
      context.getClass(),
    ]);

    if (!requiredRoles) {
      return true;
    }

    const request = context.switchToHttp().getRequest<AuthenticatedRequest>();
    const userId = request.user?.id;

    if (userId === undefined) {
      return false;
    }

    const userRoles = this.userRolesService.getRoles(userId);
    return requiredRoles.some((role) => userRoles.includes(role));
  }
}
前置情境準備完成,現在我們在 main.ts 把 RolesGuard 掛成全域 Guard:
app.useGlobalGuards(
  new RolesGuard(app.get(Reflector), app.get(UserRolesService)),
);
實際發送請求也完全正常:
# 一般使用者進入 /profile (允許)
curl -i http://localhost:3000/profile -H 'x-user-id: 1'
# HTTP/1.1 200 OK

# 一般使用者進入 /admin (阻擋)
curl -i http://localhost:3000/admin -H 'x-user-id: 1'
# HTTP/1.1 403 Forbidden

# 管理員進入 /admin (允許)
curl -i http://localhost:3000/admin -H 'x-user-id: 2'
# HTTP/1.1 200 OK
測試一路綠燈,存取控制也都正確。但這恰恰是陷阱所在:問題從來不是 canActivate() 的業務邏輯,而是實例建立的責任邊界。
正如在 Day 3 所討論的,@Injectable() 只是為類別留下 metadata,並不會攔截或改寫 JavaScript 原生的 new。
重新拆解這行程式: new RolesGuard(app.get(Reflector), app.get(UserRolesService)),雖然 Reflector 與 UserRolesService 是透過 app.get() 從容器取得,但 RolesGuard 本身卻是手動建立的。整條依賴鏈的建立過程因此被拆成兩半:
Nest Container
├── Reflector
└── UserRolesService

main.ts
└── RolesGuard
    ├── 手動接上 Reflector
    └── 手動接上 UserRolesService
useGlobalGuards() 接收到的是一個已經建立完成的 Guard 實例。它只負責將這個實例套用到全域路由,不負責解析 constructor 並將實例納入 Nest Container 管理。
當未來 RolesGuard 隨業務成長需要注入更多依賴(如 AuditService、PermissionService、FeatureFlagService):
app.useGlobalGuards(
  new RolesGuard(
    app.get(Reflector),
    app.get(UserRolesService),
    app.get(AuditService),
    app.get(PermissionService),
  ),
);
此時 RolesGuard 本身不受 Nest Container 管理,因此無法直接套用 Nest 對該 Guard 的作用域與生命週期鉤子(lifecycle hooks)等機制。需要注意的是,透過 app.get() 取得的其他依賴仍然是容器管理的實例。
首先將 RolesGuard 註冊進模組的 providers:
@Module({
  controllers: [AppController],
  providers: [UserRolesService, RolesGuard],
})
export class Day09GlobalEnhancerDiModule {}
接著在 main.ts 中,不要自己 new,而是透過 app.get() 取得 Nest 已經建立好並完成組裝的實例:
app.useGlobalGuards(app.get(RolesGuard));
這個改動讓 RolesGuard 的實例建立交還給容器管轄。不過,main.ts 仍然需要手動將其取出並宣告為全域元件。
更重要的是,app.get() 僅適用於單例(Singleton Scope)。若 Guard 或其依賴鏈包含了請求作用域的 provider,app.get() 便會無法解析,必須改用 moduleRef.resolve()。
為了讓「全域 Guard」這項組裝規則徹底回歸模組系統,Nest 提供了 APP_GUARD 這個專用 token:
import { APP_GUARD } from '@nestjs/core';

@Module({
  controllers: [AppController],
  providers: [
    UserRolesService,
    {
      provide: APP_GUARD,
      useClass: RolesGuard,
    },
  ],
})
export class Day09GlobalEnhancerDiModule {}
這段宣告告訴 Nest:
provide: APP_GUARD:這是一個應用程式層級的全域 Guard。useClass: RolesGuard:由 Nest Container 負責解析 RolesGuard 的依賴並建立實例。此時 main.ts 回歸單純的啟動職責,不需要處理 Guard 的建立與其依賴關係:
async function bootstrap() {
  const app = await NestFactory.create(Day09GlobalEnhancerDiModule);
  await app.listen(process.env.PORT ?? 3000);
}
未來即使 RolesGuard 新增再多依賴,只要該依賴在 module 作用域內可見,Nest 都會自動完成注入,完全不需改動 main.ts。
⚠️ 注意:切勿重複註冊
改用APP_GUARD後,務必移除原本在main.ts裡的app.useGlobalGuards()。否則同一個 Guard 會被觸發兩次,造成重複查詢權限資料庫、重複紀錄日誌等不必要的效能損耗與副作用。
| 註冊方式 | 實例建立者 | 容器自動注入 | 宣告全域位置 |
|---|---|---|---|
useGlobalGuards(new RolesGuard(...)) |
main.ts | ❌ | main.ts |
useGlobalGuards(app.get(RolesGuard)) |
Nest Container | ✅ | main.ts |
APP_GUARD + useClass |
Nest Container | ✅ | module 設定 |
除了 Guard,這個原則同樣適用於全域 Pipe (APP_PIPE)、Interceptor (APP_INTERCEPTOR) 與 Filter (APP_FILTER)。
但這並不代表專案中出現 new 就是錯誤。例如常見的全域 ValidationPipe:
app.useGlobalPipes(
  new ValidationPipe({
    whitelist: true,
    transform: true,
  }),
);
在這裡手動 new ValidationPipe(...) 是完全合理的。因為它只需要傳入靜態的設定選項(options),內部並沒有依賴任何由 Nest Container 管理的 provider(例如 UserService 或 ConfigService)。
真正的判斷關鍵不是「有沒有看到 new 」,而是評估 「這個全域元件是否需要 Nest Container 帶來的價值(如 DI、作用域、生命週期鉤子)?」
useGlobalGuards() 只負責註冊,不負責建立:傳入手動 new 出來的實例,並不會讓該實例自動納入 Nest Container 的管理。APP_GUARD 讓全域宣告回歸模組系統:它將 Guard 的實例建立、依賴解析與全域註冊規則,統一收斂至模組設定中,保持 main.ts 職責單純。new 的 Guard 授權邏輯雖能正常執行,但會讓 main.ts 承擔手動組裝依賴的責任,並使該全域元件無法直接使用容器的生命週期管理與依賴注入機制。ValidationPipe),手動 new 是簡潔且合理的做法;若需要注入其他 provider 或依賴容器生命週期,則建議將元件交由 Nest Container 建立與管理。

 iThome鐵人賽
 看影片追技術