
前幾天談過 Deployment、ReplicaSet 與 Pod 的關係,今天開始把 Day 4 介紹的服務搬進 Kubernetes。先用 api-a 看懂一份 Deployment,再讓 Portal、兩個功能前端、應用 Gateway 與另一個 API 各自擁有 Deployment。今天的成果是六種服務都有自己的 Pod;服務之間的固定存取名稱,下一篇再用 Service 補上。
假設 api-a 已經建成 container image,程式在 container 內監聽 8080。
registry.example.internal為範例 repo URL
實際在 pull image 時,要注意到該 repo 是否有公開權限可以不需登入帳號就可以成功抓 image 檔案。如果有限制權限,那就還得在 K8s 設定 docker registry 等相關設定,目前這邊我是假設在專案沒有權限的情況。
apiVersion: apps/v1
kind: Deployment
metadata:
  name: api-a
  namespace: team-a
spec:
  replicas: 2
  selector:
    matchLabels:
      app: api-a
  template:
    metadata:
      labels:
        app: api-a
    spec:
      containers:
        - name: api
          image: registry.example.internal/demo/api-a:v1
          ports:
            - name: http
              containerPort: 8080
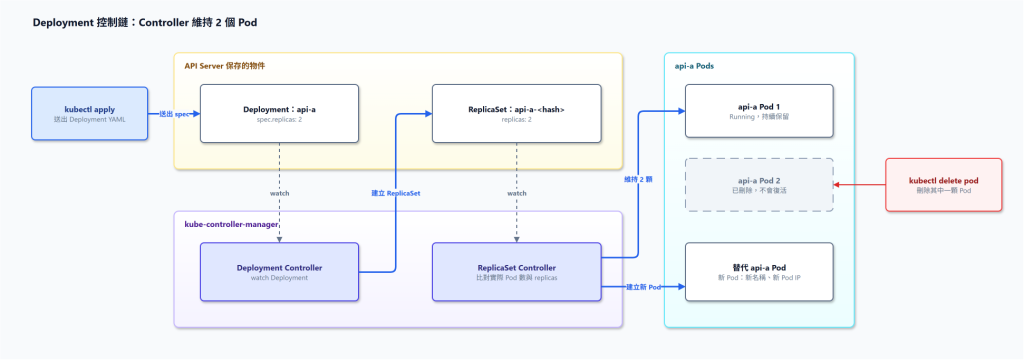
selector.matchLabels 必須與 Pod template 的 label 對上。Deployment 依 template 建立 ReplicaSet,再由 ReplicaSet 維持 Pod;replicas: 2 表示這個 API 暫時希望有兩顆 Pod。
containerPort 記錄應用實際監聽的 port,並把它命名為 http,供後續 Service 的 targetPort 引用。它不會讓程式開始監聽,也不會替 Pod 建立對內或對外的入口。
Day 4 的架構還有 portal-web、frontend-a、frontend-b、api-gateway 與 api-b。下面是它們各自的完整 Deployment。三個前端 image 假設已包含 SPA 靜態檔案與 Web server,並在 container 內監聽 80;Gateway 與 API image 假設監聽 8080。若你的 image 使用其他 port,請先確認程式或 Web server 的實際設定,再調整 YAML。
將上面的 api-a YAML 存成 api-a-deployment.yaml,再將以下五份以 --- 分隔的 YAML 存成 other-deployments.yaml。六個 image 都是教學佔位值,必須分別換成可用版本。
apiVersion: apps/v1
kind: Deployment
metadata:
  name: portal-web
  namespace: team-a
spec:
  replicas: 1
  selector:
    matchLabels:
      app: portal-web
  template:
    metadata:
      labels:
        app: portal-web
    spec:
      containers:
        - name: web
          image: registry.example.internal/demo/portal-web:v1
          ports:
            - name: http
              containerPort: 80
---
apiVersion: apps/v1
kind: Deployment
metadata:
  name: frontend-a
  namespace: team-a
spec:
  replicas: 1
  selector:
    matchLabels:
      app: frontend-a
  template:
    metadata:
      labels:
        app: frontend-a
    spec:
      containers:
        - name: web
          image: registry.example.internal/demo/frontend-a:v1
          ports:
            - name: http
              containerPort: 80
---
apiVersion: apps/v1
kind: Deployment
metadata:
  name: frontend-b
  namespace: team-a
spec:
  replicas: 1
  selector:
    matchLabels:
      app: frontend-b
  template:
    metadata:
      labels:
        app: frontend-b
    spec:
      containers:
        - name: web
          image: registry.example.internal/demo/frontend-b:v1
          ports:
            - name: http
              containerPort: 80
---
apiVersion: apps/v1
kind: Deployment
metadata:
  name: api-gateway
  namespace: team-a
spec:
  replicas: 1
  selector:
    matchLabels:
      app: api-gateway
  template:
    metadata:
      labels:
        app: api-gateway
    spec:
      containers:
        - name: gateway
          image: registry.example.internal/demo/api-gateway:v1
          ports:
            - name: http
              containerPort: 8080
---
apiVersion: apps/v1
kind: Deployment
metadata:
  name: api-b
  namespace: team-a
spec:
  replicas: 1
  selector:
    matchLabels:
      app: api-b
  template:
    metadata:
      labels:
        app: api-b
    spec:
      containers:
        - name: api
          image: registry.example.internal/demo/api-b:v1
          ports:
            - name: http
              containerPort: 8080
每個服務都有自己的 Deployment 名稱、image、Pod label 與 selector,才能獨立更新及擴縮。前端的 port 依其 Web server 設定,兩個 API 與 Gateway 則依各自的應用監聽設定。
api-b 呼叫 api-a、應用 Gateway 轉送到兩個 API,以及 Portal 載入功能前端,都還需要穩定的位址,所以會需要建立 Service 並處理服務間呼叫,但今天會先專注在 Deployment,Service 會在下一篇跟上。
目前我是選擇 k3d 來作為本次環境的單節點 cluster。執行前需安裝 Docker Desktop、k3d、kubectl,並確認主機 8080、8081 未被占用。
k3d cluster create ironman --port '8080:30080@server:0' --port '8081:80@loadbalancer'
kubectl create namespace team-a
kubectl apply -f api-a-deployment.yaml
kubectl apply -f other-deployments.yaml
kubectl -n team-a get deployments
kubectl -n team-a get pods -o wide
kubectl apply 成功代表 API Server 接受物件。要確認六個 workload 都已收斂,需再透過 get deployment, pod 來確認相關狀態:
kubectl -n team-a get deployment,replicaset,pod
這裡預期看到六個 Deployment,api-a 的期望副本為 2,其餘各為 1。所有 image 都可拉取且應用能持續執行時,總共會有七顆 Pod。
若出現 ImagePullBackOff,先看 image、registry 權限與 Pod Event;若 container 啟動後反覆退出,再看啟動參數與 log。Pod 是 Running 也只代表 container 在執行,後續仍要透過 Service、probe 與實際 request 驗證可用性。
要觀察 Controller 如何維持副本,可先記下 api-a 的兩顆 Pod 名稱,刪除其中一顆,再看新 Pod 如何補上:
kubectl -n team-a get pods -l app=api-a
kubectl -n team-a delete pod <其中一顆Pod名稱>
kubectl -n team-a get pods -l app=api-a -w
現在六個服務已各自由 Deployment 管理。下一篇會替它們建立穩定的 Service 名稱,讓 api-b 能呼叫 api-a,應用 Gateway 也能找到後端服務。



 iThome鐵人賽
 看影片追技術