
在開發 NestJS API 時,我們常需要替回應加上防護機制,確保不會不小心曝光資料庫裡的敏感欄位。假設我們剛完成了一支取得個人檔案的 API,測試時前端順利拿到了使用者資訊與文章數量。
但仔細一看 Response,裡面卻夾帶了一個絕對不該出現的欄位:
{
  "id": 1,
  "email": "tony@example.com",
  "passwordHash": "$2b$10$demo-password-hash",
  "postCount": 2
}
這已經不是單純的格式問題了,即便密碼經過雜湊處理,它依舊是絕對不能外流的敏感資訊,一旦被包含在 API 的回應中,就等同於嚴重的資料外洩。
奇怪的是,我們明明在 Response DTO 替 passwordHash 加了 @Exclude(),Controller 也啟用了 ClassSerializerInterceptor,為什麼防護機制完全沒有生效?
今天就來帶大家拆解 @Exclude() 失效背後的原因!
為了重現這個問題,我們先透過 TypeOrmModule 註冊 User、Post,以及對應的 Repository:
@Module({
  imports: [
    TypeOrmModule.forRoot({
      type: 'sqlite',
      database: ':memory:',
      entities: [User, Post],
      synchronize: true,
    }),
    TypeOrmModule.forFeature([User, Post]),
  ],
  controllers: [UsersController],
  providers: [UsersService],
})
export class AppModule {}
接著透過 OnModuleInit 在啟動時注入測試用的使用者與文章資料:
@Injectable()
export class UsersService implements OnModuleInit {
  constructor(
    @InjectRepository(User)
    private readonly usersRepository: Repository<User>,
    @InjectRepository(Post)
    private readonly postsRepository: Repository<Post>,
  ) {}

  async onModuleInit(): Promise<void> {
    await this.usersRepository.insert([
      {
        id: 1,
        email: 'tony@example.com',
        passwordHash: '$2b$10$demo-password-hash',
      },
      {
        id: 2,
        email: 'jennie@example.com',
        passwordHash: '$2b$10$another-demo-password-hash',
      },
    ]);

    await this.postsRepository.insert([
      { id: 1, authorId: 1 },
      { id: 2, authorId: 1 },
      { id: 3, authorId: 2 },
    ]);
  }
}
資料準備好後,我們在 UsersService 中實作查詢與資料組合的邏輯:
export type UserProfileData = Pick<
  User,
  'id' | 'email' | 'passwordHash'
> & {
  postCount: number;
};

async getProfileData(userId: number): Promise<UserProfileData> {
  const user = await this.usersRepository.findOneByOrFail({ id: userId });
  const postCount = await this.postsRepository.countBy({
    authorId: user.id,
  });

  // 透過展開運算子組合資料
  return { ...user, postCount };
}
接著,我們定義了個人檔案的 Response DTO,將敏感欄位標記為「序列化時排除」,並在 Controller 啟用了序列化攔截器,最後直接回傳 Service 的結果:
export class UserProfileResponseDto {
  id: number;
  email: string;
  postCount: number;

  @Exclude({ toPlainOnly: true }) // 標註只在轉為 Plain Object 時排除
  passwordHash: string;
}

@Controller('users')
@UseInterceptors(ClassSerializerInterceptor)
export class UsersController {
  @Get(':id/profile')
  getProfile(
    @Param('id', ParseIntPipe) id: number,
  ): Promise<UserProfileResponseDto> {
    return this.usersService.getProfileData(id);
  }
}
一切就緒,發送請求測試:
GET /users/1/profile
結果如文章一開始所述,API 順利運作,但 @Exclude() 卻失效把 passwordHash 傳給了前端。
ClassSerializerInterceptor 需要明確的目標類別問題的根源,出在我們組裝與回傳資料的方式。
在 Service 中,我們使用了物件展開運算子 return { ...user, postCount };。這個操作在執行期會建立一個標準的 JavaScript Plain Object(純物件),其 Prototype 只是普通的 Object,而不是 UserProfileResponseDto 的類別實例。
即便 Controller 方法在標頭寫明了回傳型別為 Promise<UserProfileResponseDto>,這也僅是編譯期的 TypeScript 型別檢查,並不會在執行期自動將 Plain Object 轉換為 DTO 類別實例。
當 Controller 處理完請求後,ClassSerializerInterceptor 會攔截回傳值,並呼叫底層 class-transformer 的 instanceToPlain() 來執行序列化。
序列化攔截器的運作流程如下:
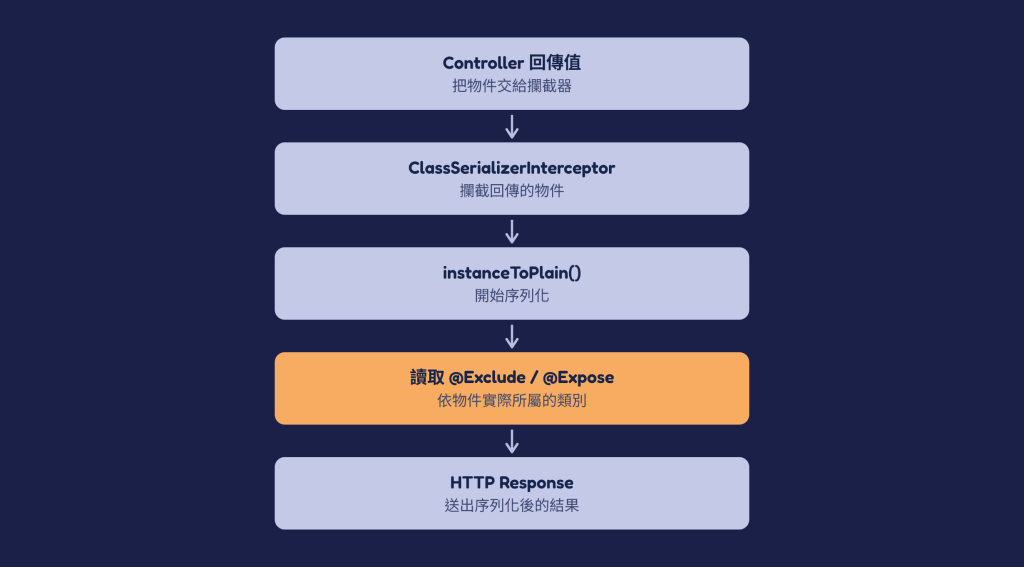
攔截器會根據回傳值在執行期對應的類別,尋找 @Exclude 或 @Expose 等 Metadata 標記。如果回傳的是真正的 DTO 實例(UserProfileResponseDto),序列化器就能找到 DTO 上的 @Exclude() 規則並執行排除。
但由於我們回傳的是 Plain Object,攔截器無從得知這份資料應該套用哪一個 DTO 的規則。既然找不到 UserProfileResponseDto 的過濾規則,所有欄位便會被原樣轉出,導致敏感資料直接洩漏。
所以,真正失效的不是 Decorator,也不是 Interceptor,而是我們在回傳前,缺少了把 Plain Object 轉換為 DTO 實例的動作(plain-to-instance)。
要讓序列化防護機制重新發揮作用,關鍵在於必須在執行期讓框架知道目標類別是誰。
plainToInstance() 明確映射主動將 Plain Object 轉換為 DTO 實例:
async getProfile(userId: number): Promise<UserProfileResponseDto> {
  const profileData = await this.getProfileData(userId);

  // 明確建立 DTO 實例
  return plainToInstance(UserProfileResponseDto, profileData);
}
@SerializeOptions({ type })如果你不想手動呼叫 plainToInstance,也可以透過 @SerializeOptions 指定目標 DTO 類別,告知攔截器將回傳的 Plain Object 統一依據該 DTO 進行序列化:
@Get(':id/profile')
@SerializeOptions({ type: UserProfileResponseDto }) // 指定目標類別
getProfile(
  @Param('id', ParseIntPipe) id: number,
): Promise<UserProfileResponseDto> {
  return this.usersService.getProfileData(id);
}
@Expose() 實作白名單機制前面兩種解法已經能讓 @Exclude() 順利運作,但這種「黑名單策略」依然留有一個地雷——你只能排除「有記得寫上去」的欄位,卻防不住「未來新增」的敏感資料。
假設未來 User 實體新增了 resetPasswordToken 欄位,而 Service 依然使用展開運算子組裝資料:
return { ...user, postCount };
如果 Response DTO 事先並未將其加入 @Exclude(),即使啟用了 ClassSerializerInterceptor,該欄位依然會被帶進 API 回應中,造成第二次資料外洩。
如果希望從根本上消除這種風險,更建議改用「白名單策略」:只放行明確標註 @Expose() 的欄位,其餘一律自動剔除。
首先,在 Response DTO 中使用 @Expose() 標記允許輸出的欄位:
import { Expose } from 'class-transformer';

export class UserProfileResponseDto {
  @Expose()
  id: number;

  @Expose()
  email: string;

  @Expose()
  postCount: number;
}
接著,在 Controller 配置 @SerializeOptions 並開啟 excludeExtraneousValues:
@Get(':id/profile')
@SerializeOptions({
  type: UserProfileResponseDto,
  excludeExtraneousValues: true, // 開啟白名單過濾
})
getProfile(
  @Param('id', ParseIntPipe) id: number,
): Promise<UserProfileResponseDto> {
  return this.usersService.getProfileData(id);
}
這項設定的作用如下:
type: UserProfileResponseDto:告知攔截器先將回傳的 Plain Object 轉為該 DTO 實例。excludeExtraneousValues: true:要求轉換過程中只保留有標註 @Expose() 的屬性。其餘未標註的欄位(包含 passwordHash 以及未來的 resetPasswordToken)都會被自動過濾。最終送出的 Response Body 將會非常乾淨:
{
  "id": 1,
  "email": "tony@example.com",
  "postCount": 2
}
兩種用法的差異如下:
@Exclude()(黑名單機制): 預設放行所有欄位,只封鎖指定的敏感資料。@Expose() + excludeExtraneousValues(白名單機制): 預設封鎖所有欄位,只放行明確宣告的資料。Promise<UserProfileResponseDto> 僅存在於編譯期型別檢查,執行期不會自動將 JavaScript 物件轉換為 DTO 類別實例。{ ...user, postCount } 運算子組裝資料時,產生的只是普通的 JavaScript 物件,會失去所有 DTO 類別上的 Metadata 裝飾器標記。ClassSerializerInterceptor 依賴執行期類別資訊:序列化攔截器必須透過物件的 Class Metadata 來讀取 @Exclude() 或 @Expose() 設定。若收到的只是 Plain Object,過濾機制便無法生效。plainToInstance() 主動建立 DTO 實例,或由 Controller 掛載 @SerializeOptions({ type }) 告知攔截器目標 DTO。@Expose() 與 excludeExtraneousValues: true,預設封鎖所有欄位,能防止未來資料庫新增敏感欄位時意外洩漏的資安風險。


 iThome鐵人賽
 看影片追技術