再進入手寫變識前最後要來定義Loss function,這邊使用Cross entropy。對於Cross entropy的作用可以參考這裡。需要花時間理解的就是@@
接下來跟著CODE跟著做一次,設成將來可使用tensorboard檢視
先讀入MNIST資料
import tensorflow as tf
from tensorflow.examples.tutorials.mnist import input_data

# 讀入 MNIST
mnist = input_data.read_data_sets("MNIST_data/", one_hot = True)
x_train = mnist.train.images
y_train = mnist.train.labels
x_test = mnist.test.images
y_test = mnist.test.labels
批次進去每次100張
# 設定參數
learning_rate = 0.5
training_steps = 1000
batch_size = 100 # 每次100張圖片否則時間太久
logs_path = 'TensorBoard/'
n_features = x_train.shape[1]
n_labels = y_train.shape[1]
# 建立 Feeds
with tf.name_scope('Inputs'):
x = tf.placeholder(tf.float32, [None, n_features], name = 'Input_Data')
with tf.name_scope('Labels'):
y = tf.placeholder(tf.float32, [None, n_labels], name = 'Label_Data')
# 建立 Variables
with tf.name_scope('ModelParameters'):
W = tf.Variable(tf.zeros([n_features, n_labels]), name = 'Weights')
b = tf.Variable(tf.zeros([n_labels]), name = 'Bias')
# 開始建構深度學習模型
with tf.name_scope('Model'):
# Softmax
prediction = tf.nn.softmax(tf.matmul(x, W) + b) #已經等於把隱藏層定義y=wx+b寫進去了
with tf.name_scope('CrossEntropy'):
# Cross-entropy
loss = tf.reduce_mean(-tf.reduce_sum(y * tf.log(prediction), reduction_indices = 1))
tf.summary.scalar("Loss", loss)
with tf.name_scope('GradientDescent'):
# Gradient Descent
optimizer = tf.train.GradientDescentOptimizer(learning_rate).minimize(loss)
with tf.name_scope('Accuracy'):
correct_prediction = tf.equal(tf.argmax(prediction, 1), tf.argmax(y, 1))#T or F
acc = tf.reduce_mean(tf.cast(correct_prediction, tf.float32)) #轉化布林取平均
tf.summary.scalar('Accuracy', acc)
# 初始化
init = tf.global_variables_initializer()
# 開始執行運算
sess = tf.Session()
sess.run(init)
# 將視覺化輸出
merged = tf.summary.merge_all()
writer = tf.summary.FileWriter(logs_path, graph = tf.get_default_graph())
# 訓練
for step in range(training_steps):
batch_xs, batch_ys = mnist.train.next_batch(batch_size) #批次學習
sess.run(optimizer, feed_dict = {x: batch_xs, y: batch_ys})
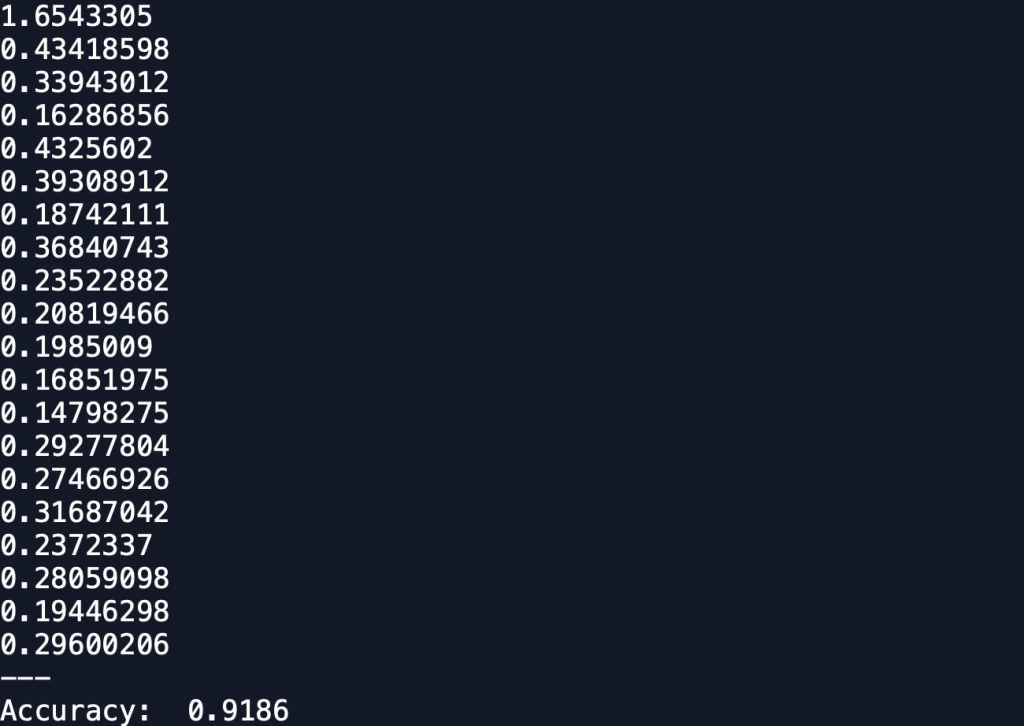
if step % 50 == 0: #每隔50步印出
print(sess.run(loss, feed_dict = {x: batch_xs, y: batch_ys}))
summary = sess.run(merged, feed_dict = {x: batch_xs, y: batch_ys})
writer.add_summary(summary, step)
print("---")
# 準確率
print("Accuracy: ", sess.run(acc, feed_dict={x: x_test, y: y_test}))
我們來把測試資料第一張畫出來順便比較預測值
print(sess.run(y[0,:], feed_dict={x: x_test, y: y_test}))

import matplotlib.pyplot as plt
import numpy as np
first_test_img = np.reshape(x_test[0, :], (28, 28))
plt.matshow(first_test_img, cmap = plt.get_cmap('gray'))  #把第一張圖畫出來
plt.show()


sess.close()
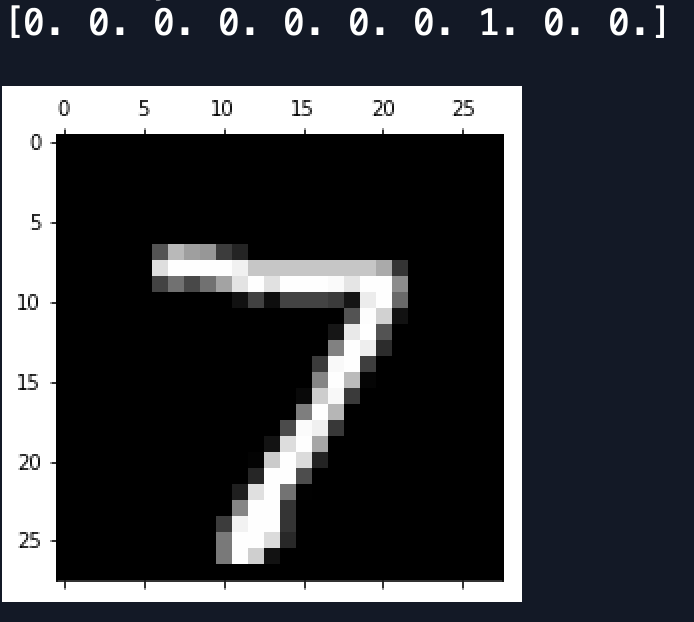
顯示結果有四捨五入,預測最大機率也是7那個位置(第一個位置從0開始)~
最後在終端機輸入--logdir='TensorBoard/'
guowenchens-iMac:~ neo$ --logdir='TensorBoard/'
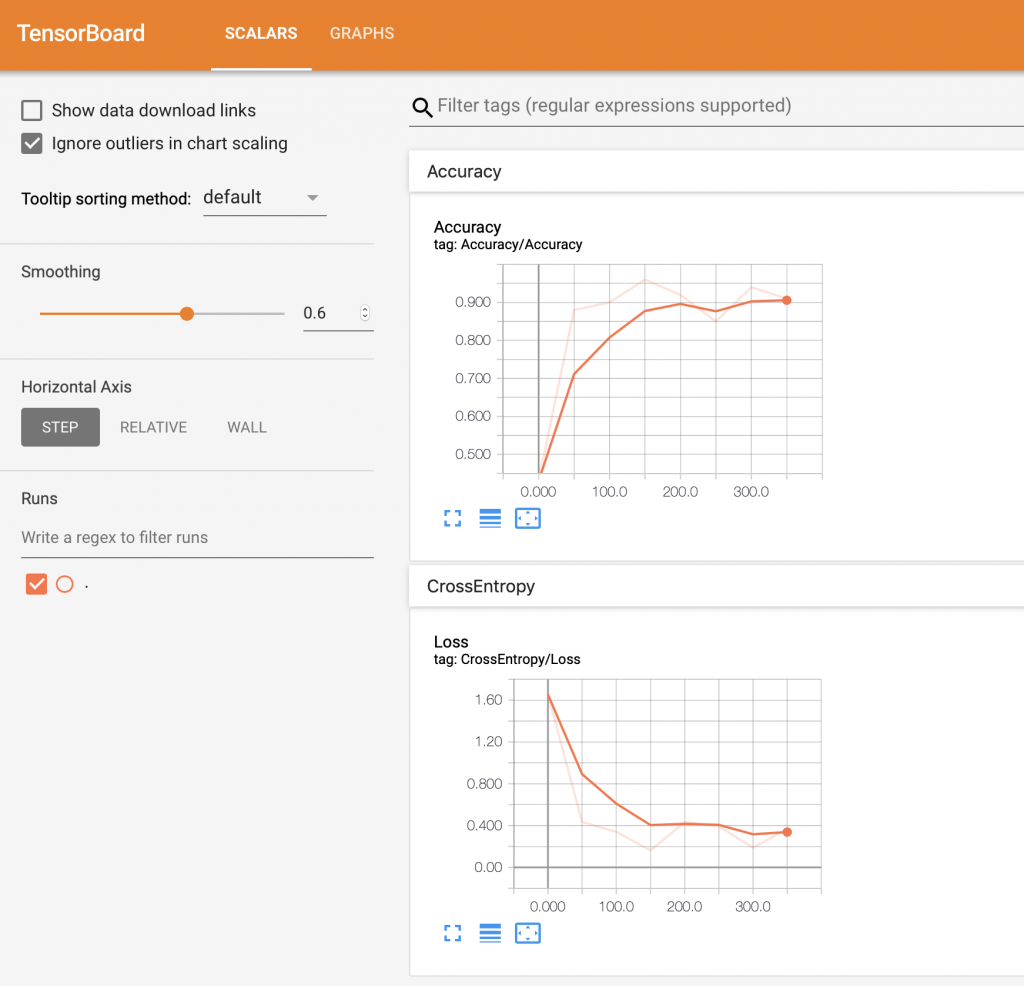
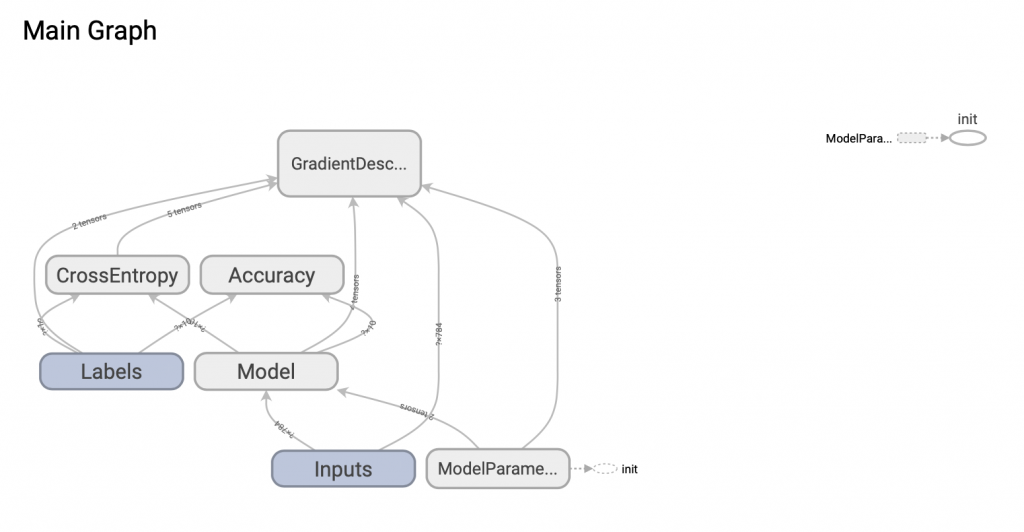
打開瀏覽器,在網址列輸入:localhost:6006 就可以看到剛剛訓練結果與神經網絡圖
明天再來學習卷積神經網絡(Convolutional Neural Network,CNN)就可以有更高準確率了~