講了那麼多觀念,差不多要開始進入實際開發的流程了。
現在最多人使用以及討論度最高的無非是TensorFlow,我習慣使用的keras也是建立在此套架構以上,我也是第一次實際接觸TensorFlow所以有講錯的地方也請大家多多指教。
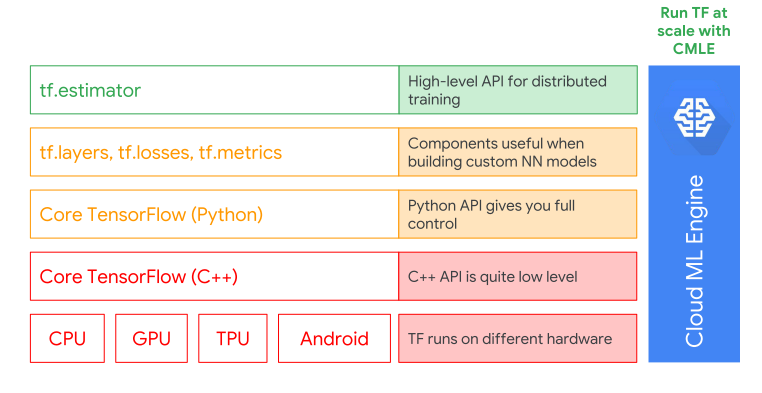
TensorFlow是開源的系統特別在數值運算中表現很好,並且擁有圖形化的呈現,這些優點使得TensorFlow在建構機器學習模型非常有優勢。除了這些以外,TensorFlow能夠直接應用在不同硬體設備上,不論是使用CPU、GPU都是能夠共用的,由此可見任何作業軟體都能夠相容,我拿哪一種手機都能享受到機器學習的好處;並且可以透過federated learning的方式為自己的設備進行更新,TensorFlow優點不勝枚舉。
下方這張圖就是使用TensorFlow開發的階級,從利用CMLE能夠建構出利用TensorFlow整體架構,從一開始要使用何種裝置到與裝置連結的C++API,再包裝成python的高階語言,接著建構訓練的Model與評估方式,最後利用estimator來進行訓練。
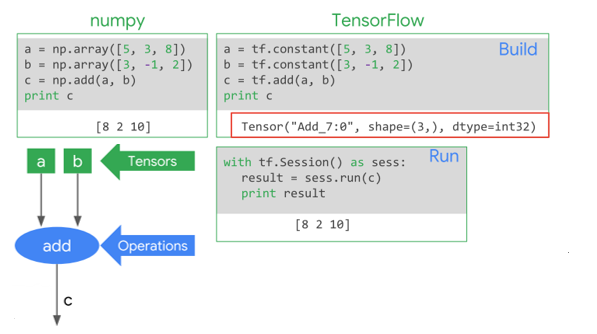
而利用TensorFlow跟其他方法不一樣的地方就是如下圖所示,numpy能夠快速的將數值進行運算,而TensorFlow必須先建立相關圖形,若是直接Print看到成果並不是數值輸出,需要利用呼叫圖形的方式來執行程式,才能看到數值輸出,所以TensorFlow被稱為lazy evaluation,使用這種方式的原因是可以進行分散式的計算,比起其他方式更加節省資源。
import as tf
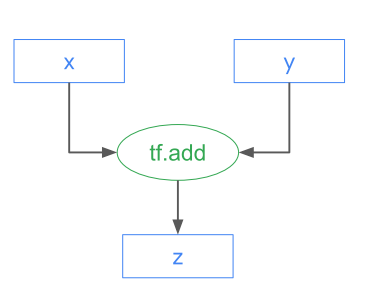
x = tf.constant([4, 5, 6])
y = tf.constant([1, 2, 3])
z = tf.add(x, y)
想利用上述變數查看結果的方法可以使用,達到的效果都是一樣的,唯一不同的是利用Session能夠一次執行多個圖形而eval()只能針對一個去做驗證:
with tf.Session() as sess:
 print sess.run(z)
 print z.eval()
 print sess.run([z])
以上方法結果都能看到[4 7 10]的結果,這也是其中一題test的題目
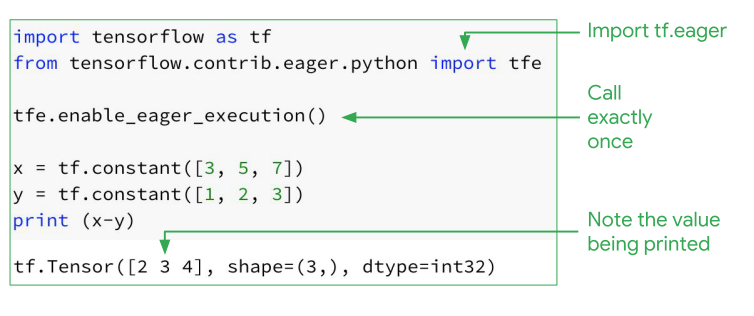
若是希望能夠不使用Session的架構,可以使用TensorFlow提供的Eager mode來求的數值。
tensor(張量)是一種N維的資料表示方法。
| 名字 | 維度 |
|---|---|
| 常數 | 0 |
| 向量 | 1 |
| 矩陣 | 2 |
| 3D tensor | 3 |
| nD tensor | n |
而tensor有是可以被sliced、reshape
#sliced
import tensorflow as tf
x = tf.constant([[1,2,3,4],[5,6,7,8]])
y = x[:,1]
with tf.Session() as sess:
    print y.eval()

output = [2,6]
#reshape
import tensorflow as tf
x = tf.constant([[1,2,3,4],[5,6,7,8]])
y = tf.reshape(x, [4,2])
with tf.Session() as sess:
    print y.eval()

output =
[[1 2]
 [3 4]
 [5 6]
 [7 8]]
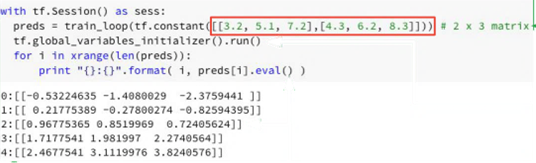
下方程式是利用迭代的方式來進行訓練,首先forward_pass是定義w與x相乘的function;train_loop將建置model並且初始化weights設定為1*2matrix;接著利用for迴圈迭代w結果並回傳。上述的定義結束後,就定義一個session來執行上述動作,首先要先在train_loop放入要計算的matrix,初始化變數後批次回傳預測結果。
也可以使用placeholder的方式來先創造一個變數來存放,直到呼叫圖形時將指定數值輸入,省去一開始就要建構所有數值的方法。
import tensorflow as tf
var_name1 = tf.placeholdr("your type", dim)
var_name2 = var_name1 * 100

with tf.Session() as sess:
    print(sess.run(b, feed_dict={var_name1:[12323,31,321,43,4,32,4,]}))
※圖片參考至 Intro to TensorFlow resource