之前有跟大家講到關於overfitting的問題,之前的文章並沒有仔細的解析如何解決這個問題
很多人會用提早停止訓練、加入更多參數、雜訊等方法,而我們今天要講的是加入懲罰參數這一部分
我們先從上面這個公式開始講起,今天J是整體的誤差,(y - y_hat)平方是本身每次迭代後計算所產生的誤差,lambda是懲罰函數乘上所有正規化後的結果,藉此改善整體誤差能有更多的選擇藉此更快收斂
那現在有個問題是要怎麼算後面這一項呢??
基本的數學方法有L1、L2的Norm其實概念非常簡單
L2的公式 : 
L1的公式 : 
那上述兩個公式實際應用會產生甚麼樣的效果呢?
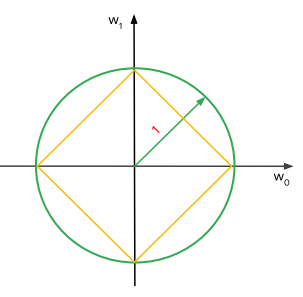
依下圖所示,此圖為公式圖像化的結果
在每次迭代更新時,會再加上圓圈或是正方形的範圍,適應更多的資料使得模型不那麼快擬合
而L1與L2之間的差別,在於能不能有最佳的解來做更新
我們可以看到L1是正方形所以當有多個點在同一個邊上,對於更新的效果並不是那麼好
上述所提到的功能都可以在tensorflow playground模擬有興趣的朋友可以利用以上的方法來嘗試看看。
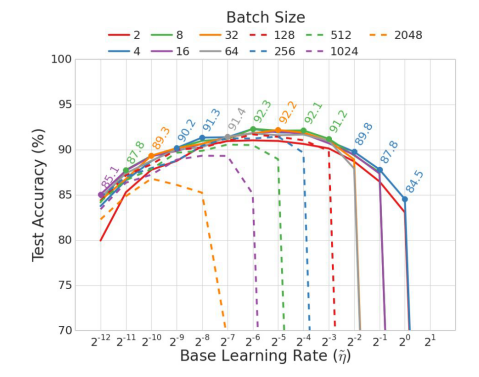
稍微分享一下學習速率與批次大小的問題,其實非常的簡單
根據Batch Size越大學習速率就要越小,這樣才不會有整批數據進去馬上就產生overfitting效果
由下圖所示在測試集準確率的表現會比較好
常見的最佳化方法有底下這些,大家有興趣可以依照下列優化器來比較它們之間的性能
今天要講的東西比較多,這邊我就不詳細說明了
GradientDescent、Momentum、AdaGrad、AdaDelta、Adam、Ftrl
這個實驗是要利用每個人分配到的房間,藉由手動調整的方式來預測房間價值的中位數,首先一樣先創建notebooks接著切換至training-data-analyst > courses > machine_learning > deepdive > 05_artandscience > labs 打開 a_handtuning.ipynb,開始進行實驗。
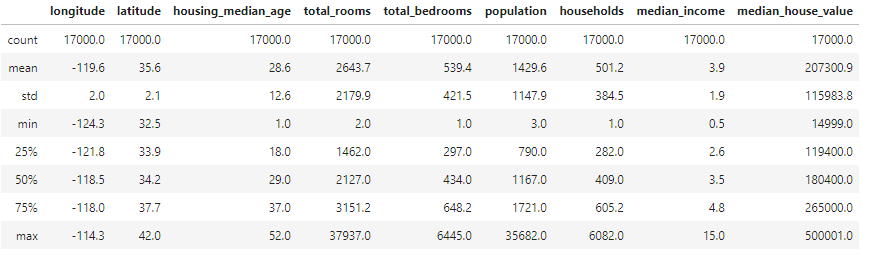
head()、 describe()查看相關數據內容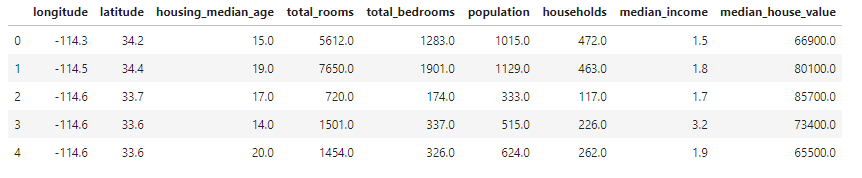
- 將數據依照80%、20%來分配訓練與驗證集msk = np.random.rand(len(df)) < 0.8 traindf = df[msk] evaldf = df[~msk]
先建造一開始完全沒有調整過的模型
LinearRegressor(model_dir = output_dir,
                feature_columns = [tf.feature_column.numeric_column('輸入特徵')])
return {'rmse': tf.metrics.root_mean_squared_error(labels, pred_values)}
estimator = tf.contrib.estimator.add_metrics(estimator,rmse)

train_spec=tf.estimator.TrainSpec(input_fn = tf.estimator.inputs.pandas_input_fn(x = "測試X", y = "測試Y",num_epochs = None, shuffle = True)

eval_spec=tf.estimator.EvalSpec(input_fn = tf.estimator.inputs.pandas_input_fn(x = "驗證X", y = "驗證Y",num_epochs = 1,shuffle = False)

這邊對於Y進行縮放,縮放比例為100000,因為我們可以從上面的數據來看房間價值的中位數與人數單位不同
y = "Y/100000"作為輸出數值,可以看到Loss降低非常多
最後改變learning rate and batch size來看看結果
myopt = tf.train.FtrlOptimizer(learning_rate = 0.1)
batch_size = 128

可以看到最後結果表現比上面兩個方法好非常多,這也就證明learning rate and batch size、Regularization的影響非常大
這個實驗跟前面的實驗基本上一樣,不同的地方是將相關參數寫入檔案中並透過雲端的方式來執行與修改參數,首先一樣先創建notebooks接著切換至training-data-analyst > courses > machine_learning > deepdive > 05_artandscience > labs 打開b_hyperparam.ipynb,開始進行實驗。
首先匯入相關套件後,設定環境變數與位置
PROJECT = 'xxx' #改成自己的參數
BUCKET = 'xxx'
REGION = 'xxx'
將參數與模型寫成檔案供雲端平台做讀取
parser = argparse.ArgumentParser()
parser.add_argument('--learning_rate',type = float, default = 0.01)
parser.add_argument('--batch_size', type = int, default = 30)
.
.
.
return {'rmse': tf.metrics.root_mean_squared_error(labels, pred_values)}
   estimator = tf.contrib.estimator.add_metrics(estimator,rmse)

   train_spec=tf.estimator.TrainSpec(input_fn = tf.estimator.inputs.pandas_input_fn(x = "測試X", y = "測試Y",num_epochs = None, shuffle = True)

   eval_spec=tf.estimator.EvalSpec(input_fn = tf.estimator.inputs.pandas_input_fn(x = "驗證X", y = "驗證Y",num_epochs = 1,shuffle = False)
接著寫hyperparam檔案,在訓練過程中用來選擇較好的參數做訓練,並在雲端做運行,可以在jobs裡看到各參數的結果,用以比較各項調整之數據,這邊跟前面的差別就是learning_rate設定太小所以結果沒上面實驗的那麼好
params:
- parameterName: batch_size
  type: INTEGER
  minValue: 8
  maxValue: 64
  scaleType: UNIT_LINEAR_SCALE
- parameterName: learning_rate
  type: DOUBLE
  minValue: 0.01
  maxValue: 0.1
  scaleType: UNIT_LOG_SCALE

※圖片參考至 Art and Science of Machine Learning slide