昨天稍微提到了「有限狀態機」的概念,今天要來看看如何把它跟 Bottender 做個結合。
想要在 JavaScript 裡面使用有限狀態機的話,我會推薦使用 xstate 這個 Library,這個 Library 不但能單獨使用,也有可以在網頁前端場景去整合 React 的 @xstate/react,我們則是開發了一個 bottender-xstate 來把它跟 Bottender 整合在一起。
在使用 xstate 時,有個一定要做的事情就是定義好有限狀態機的 config,以昨天提到的紅綠燈範例來說,我們設定初始值 (initial) 是 green,並定義以下三件事:
green 時,收到 TIMER 的 xstate event,會讓狀態變為 yellow
yellow 時,收到 TIMER 的 xstate event,會讓狀態變為 red
red 時,收到 TIMER 的 xstate event,會讓狀態變為 green
所以就像下面這樣:
const config = {
  id: 'light',
  initial: 'green',
  states: {
    green: {
      on: {
        TIMER: { target: 'yellow' },
      },
    },
    yellow: {
      on: {
        TIMER: { target: 'red' },
      },
    },
    red: {
      on: {
        TIMER: { target: 'green' },
      },
    },
  },
};
在跟 Bottender 整合的情況下,我們還需要定義 mapContextToXstateEvent 這個 Function 來把每個發生的 context 轉換成對應的 xstate event,在這個情況下收到 TIMER 字串,我們就當作一次 TIMER event:
const mapContextToXstateEvent = context => {
  if (context.event.text === 'TIMER') {
    return 'TIMER';
  }
};
(注意:bottender event 跟 xstate event 是不一樣的概念喔,雖然都是叫做 event)
接下來把這整個範例兜起來會是這樣:
const xstate = require('bottender-xstate');

const config = {
  id: 'light',
  initial: 'green',
  states: {
    green: {
      on: {
        TIMER: { target: 'yellow' },
      },
    },
    yellow: {
      on: {
        TIMER: { target: 'red' },
      },
    },
    red: {
      on: {
        TIMER: { target: 'green' },
      },
    },
  },
};

const mapContextToXstateEvent = context => {
  if (context.event.text === 'TIMER') {
    return 'TIMER';
  }
};

const StateMachine = xstate({
  config,
  mapContextToXstateEvent,
});

module.exports = async function App() {
  return StateMachine;
};
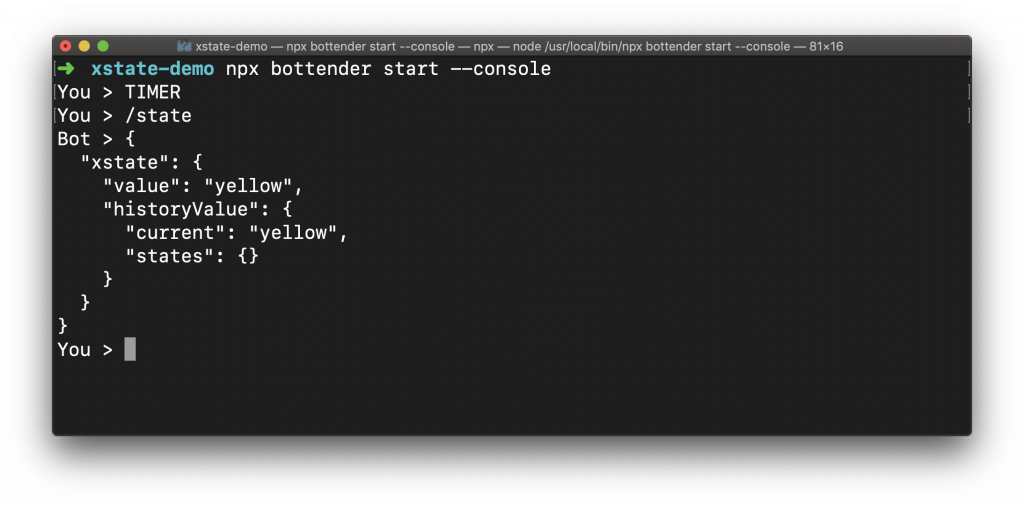
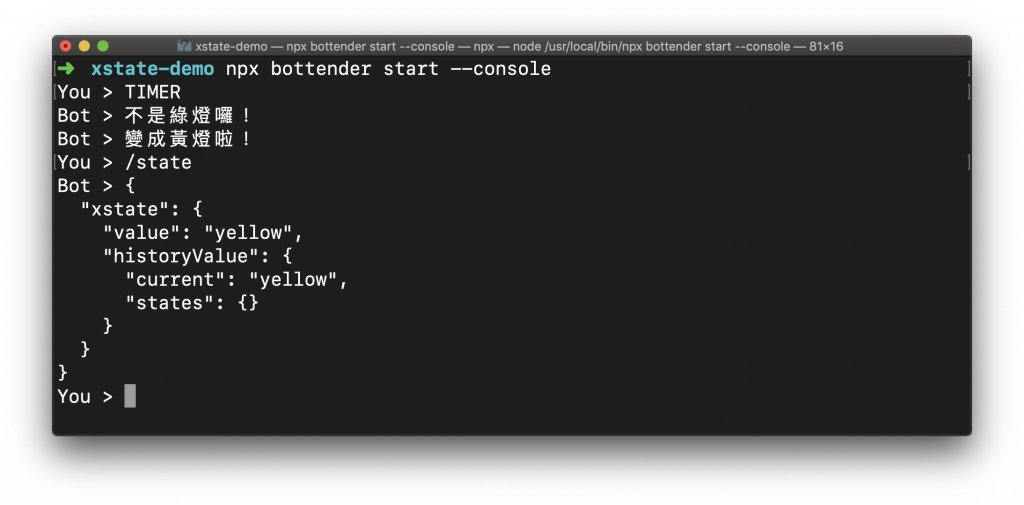
看看一下目前這樣有些怎樣的效果,當然我們現在都還沒讓機器人講話,所以只能透過 /state 指令看一下 state 的變化,這個狀態一般是存在 context.state.xstate.value 的位置。
第一次收到 TIMER 後,變成黃色 yellow:
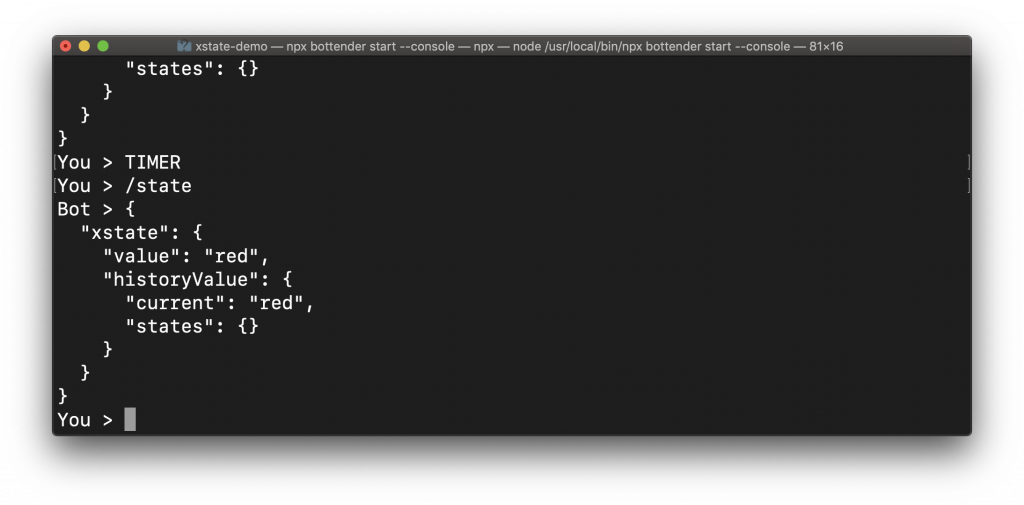
第二次收到 TIMER 後,變成紅色 red:
第三次收到 TIMER 後,變回最一開始的綠色 green:
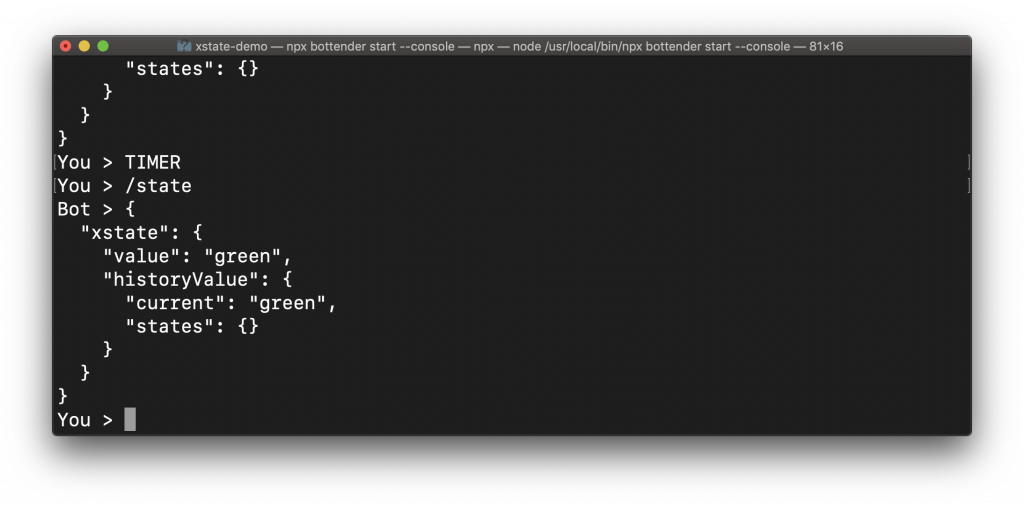
這就是基本的狀態轉移啦!
昨天的文章有提到,我們需要利用下面這四類動作(Action)來描述這個模型的行為:
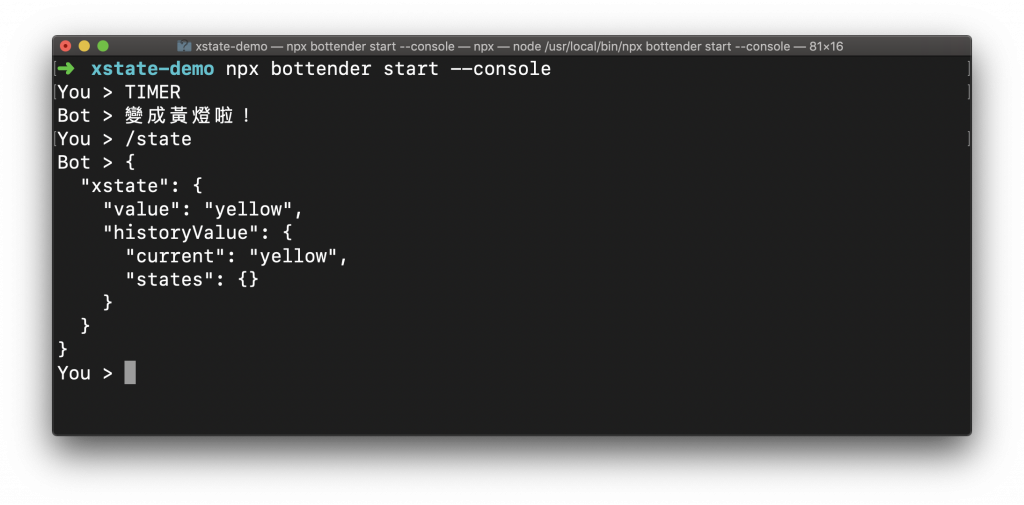
我們可以透過 onEntry 來定義進入某個 State 時必須執行的 Action,下面我們來讓進入 yellow 時要執行 entryYellow:
const config = {
  id: 'light',
  initial: 'green',
  states: {
    green: {
      on: {
        TIMER: { target: 'yellow' },
      },
    },
    yellow: {
      on: {
        TIMER: { target: 'red' },
      },
      onEntry: 'entryYellow', // 主要是加這行
    },
    red: {
      on: {
        TIMER: { target: 'green' },
      },
    },
  },
};

const StateMachine = xstate({
  config,
  mapContextToXstateEvent,
  actions: {
    // 還要加這個 Action
    entryYellow: async context => {
      await context.sendText('變成黃燈啦!');
    },
  },
});
還有要記得,我們必須在傳進去的 actions 上實作 entryYellow。
嘗試起來是這樣:
我們可以透過 onExit 來定義離開某個 State 時必須執行的 Action,下面我們來讓離開 green 時要執行 exitGreen:
const config = {
  id: 'light',
  initial: 'green',
  states: {
    green: {
      on: {
        TIMER: { target: 'yellow' },
      },
      onExit: 'exitGreen', // 主要是加這行
    },
    yellow: {
      on: {
        TIMER: { target: 'red' },
      },
      onEntry: 'entryYellow',
    },
    red: {
      on: {
        TIMER: { target: 'green' },
      },
    },
  },
};

const StateMachine = xstate({
  config,
  mapContextToXstateEvent,
  actions: {
    entryYellow: async context => {
      await context.sendText('變成黃燈啦!');
    },
    // 還要加這個 Action
    exitGreen: async context => {
      await context.sendText('不是綠燈囉!');
    },
  },
});
一樣記得要實作 exitGreen。
嘗試起來是這樣:
可以在收到 Event 時執行對應的 Action,但不用轉移 State,下面我們來讓在紅燈時對 WALk 執行 warning 做一個警告:
const config = {
  id: 'light',
  initial: 'green',
  states: {
    green: {
      on: {
        TIMER: { target: 'yellow' },
      },
      onExit: 'exitGreen',
    },
    yellow: {
      on: {
        TIMER: { target: 'red' },
      },
      onEntry: 'entryYellow',
    },
    red: {
      on: {
        TIMER: { target: 'green' },
        WALK: { actions: 'warning' }, // 主要是加這行
      },
    },
  },
};

// 修改一下 mapContextToXstateEvent 讓他可以也支援 WALK
const mapContextToXstateEvent = context => {
  return context.event.text;
};

const StateMachine = xstate({
  config,
  mapContextToXstateEvent,
  actions: {
    entryYellow: async context => {
      await context.sendText('變成黃燈啦!');
    },
    exitGreen: async context => {
      await context.sendText('不是綠燈囉!');
    },
    // 還要加這個 Action
    warning: async context => {
      await context.sendText('紅燈了,別走!');
    },
  },
});
嘗試起來是這樣:

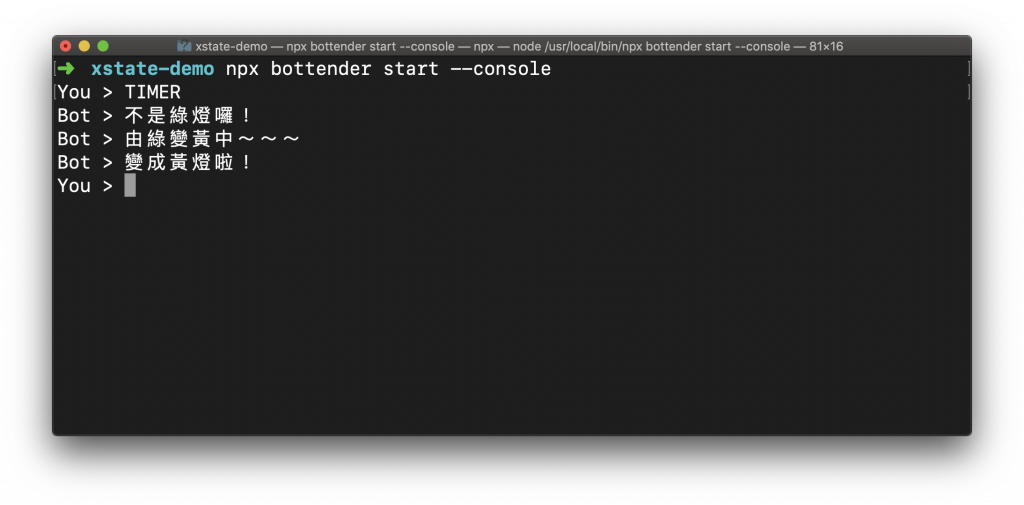
可以在轉移 State 時順便執行對應的 Action,下面我們來在由 green 轉 yellow 的過程中執行 fromGreenToYellow:
const config = {
  id: 'light',
  initial: 'green',
  states: {
    green: {
      on: {
        TIMER: {
          target: 'yellow',
          actions: 'fromGreenToYellow', // 主要是加這行
        },
      },
      onExit: 'exitGreen',
    },
    yellow: {
      on: {
        TIMER: { target: 'red' },
      },
      onEntry: 'entryYellow',
    },
    red: {
      on: {
        TIMER: { target: 'green' },
        WALK: { actions: 'warning' },
      },
    },
  },
};


const StateMachine = xstate({
  config,
  mapContextToXstateEvent,
  actions: {
    entryYellow: async context => {
      await context.sendText('變成黃燈啦!');
    },
    exitGreen: async context => {
      await context.sendText('不是綠燈囉!');
    },
    warning: async context => {
      await context.sendText('紅燈了,別走!');
    },
    // 還要加這個 Action
    fromGreenToYellow: async context => {
      await context.sendText('由綠變黃中~~~');
    },
  },
});
嘗試起來是這樣:
接連五天的介紹,終於把做機器人能用到常見模式都講到了,雖然每個模式都很好用很強大,但卻不是所有情況都是必要的,所以還是老話一句,記得要了解自己的機器人並選擇最適合他的模式來使用!


 iThome鐵人賽