繼昨天的最後問題:變更卻無法儲存的功能。
我們從GUI變更設定檔後,實際上並不會反應到設定檔mymod.cfg上面。這是因為下面這一段程式碼:
// 讀取設定檔
private static void loadConfiguration() {
    configuration.load();
    configuration.getBoolean("Check for Update", Configuration.CATEGORY_GENERAL, true, "Allow to check for updates");
    configuration.getString("Greeting", Configuration.CATEGORY_GENERAL, "Hello sam", "Greeting to someone");
    // 當設定檔有變更,才做儲存
    if(configuration.hasChanged()) {
        configuration.save();
    }
}
我們呼叫的時間點只有初始化init()時!
因此我們等等會先在設定檔變更事件ConfigChangedEvent.OnConfigChangedEvent加上呼叫loadConfiguration()方法,之後再繼續我們今天剩下的課題。
CustomConfig類別,在最後面加上下面程式碼:
@SubscribeEvent
public void onConfigurationChangeEvent(ConfigChangedEvent.OnConfigChangedEvent event) {
    if(event.modID.equalsIgnoreCase(Constants.MOD_ID)) {
        loadConfiguration();
    }
}
loadConfiguration方法(該方法會載入並儲存我們的設定)。CustomConfig.init(event);後面加上事件的註冊(由於設定檔變更是net.minecraftforge.fml.client.event套件下,我們需要使用的事件巴士必須是FMLCommonHandler.instance().bus()):
@EventHandler
public void preInit(FMLPreInitializationEvent event) {
    CustomConfig.init(event);
    FMLCommonHandler.instance().bus().register(new CustomConfig());

    proxy.preInit(event);
}
要來玩一點真的。我們來變更在[Day10]的實體跳躍事件中,跳躍的高度變成設定值吧!
我們先將昨天的測試參數移除:
// private static boolean updateCheck = true;
// private static String greeting = null;

// 讀取設定檔
private static void loadConfiguration() {
    // configuration.load();

    // configuration.getBoolean("Check for Update", Configuration.CATEGORY_GENERAL, true, "Allow to check for updates");
    // configuration.getString("Greeting", Configuration.CATEGORY_GENERAL, "Hello sam", "Greeting to someone");

    // 當設定檔有變更,才做儲存
    if(configuration.hasChanged()) {
        configuration.save();
    }
}
注意程式碼內有註解的地方。我們將昨天測試用的參數註解(或是你也可以移除),包含兩個參數宣告與使用configuration.getXXX的部分。
這邊需要額外注意的是,我們把configuration.load()也移除了,為什麼呢?
init()方法就會將configuration初始化並載入,由於我們loadConfiguration也會被設定檔變更的事件呼叫,避免設定檔變更前卻再次載入設定檔,我們將這段程式碼也移除。
回到MyMod,在自定義物品後面加上全域變數jumpY(因為這個變數需要被其他的類別使用,故使用全域變數):
// 自定義的方塊
public static Block enderBlock;

// 自定義的物品
public static Item pillItem;

// 自定義屬性
public static int jumpY;
到com.ithome.mymod.events套件目錄下,打開SuperJump類別,將jumpHigher方法的內使用的motionY值改成我們自定義的全域變數jumpY:
@SubscribeEvent
public void jumpHigher(LivingJumpEvent event) {
    if(event.entity instanceof EntityPlayer) {
        event.entity.motionY *= MyMod.jumpY;
    }
}
接下來再次回到CustomConfig這個檔案,並且修改loadConfiguration方法,我們設定這個jumpY變數是:
// 讀取設定檔
private static void loadConfiguration() {
// configuration.load();
// configuration.getBoolean("Check for Update", Configuration.CATEGORY_GENERAL, true, "Allow to check for updates");
// configuration.getString("Greeting", Configuration.CATEGORY_GENERAL, "Hello sam", "Greeting to someone");
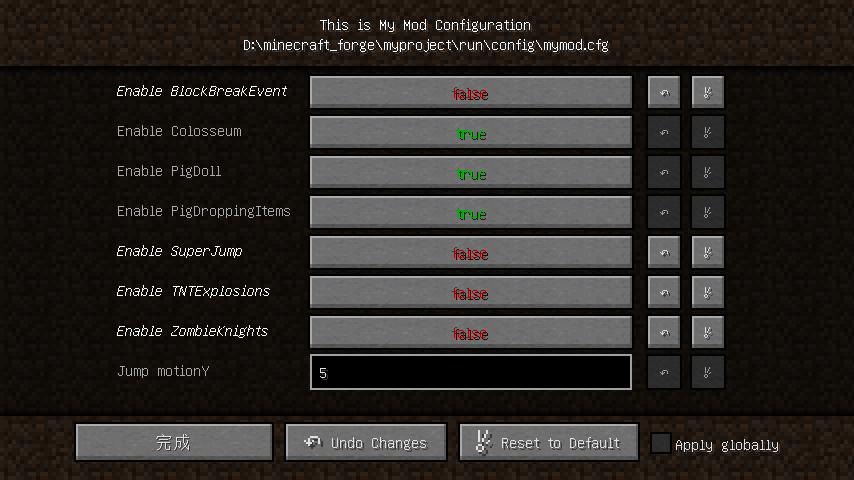
MyMod.jumpY = configuration.getInt("Jump motionY", Configuration.CATEGORY_GENERAL, 5, 1, 10, "How height you can jump");
// 當設定檔有變更,才做儲存
if(configuration.hasChanged()) {
configuration.save();
}
}
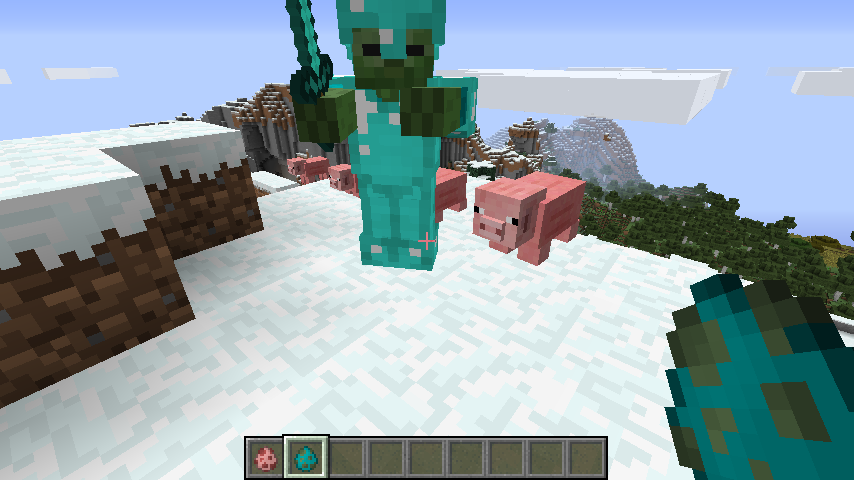
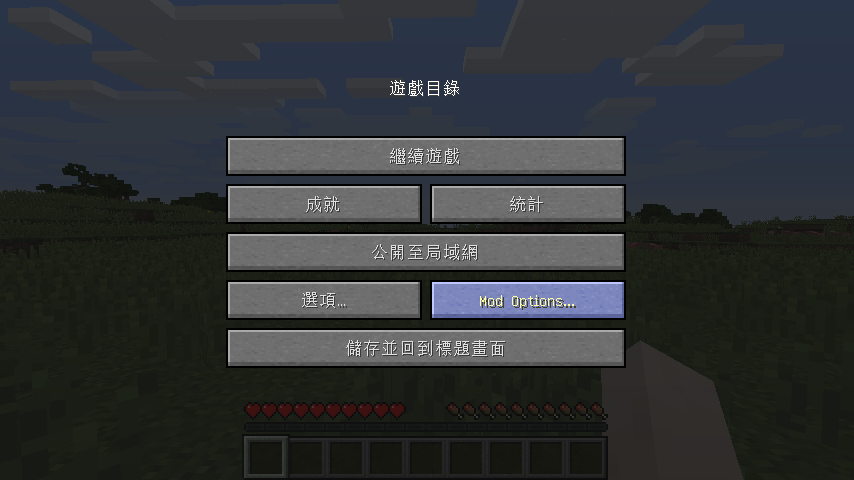
存檔進入遊戲,現在有兩個地方可以更改跳躍高度:一個是主畫面的Mod設定,另一個是在遊戲內透過Esc選單的Mod Options:嘗試去更新跳躍的高度,看看有什麼不一樣的結果吧!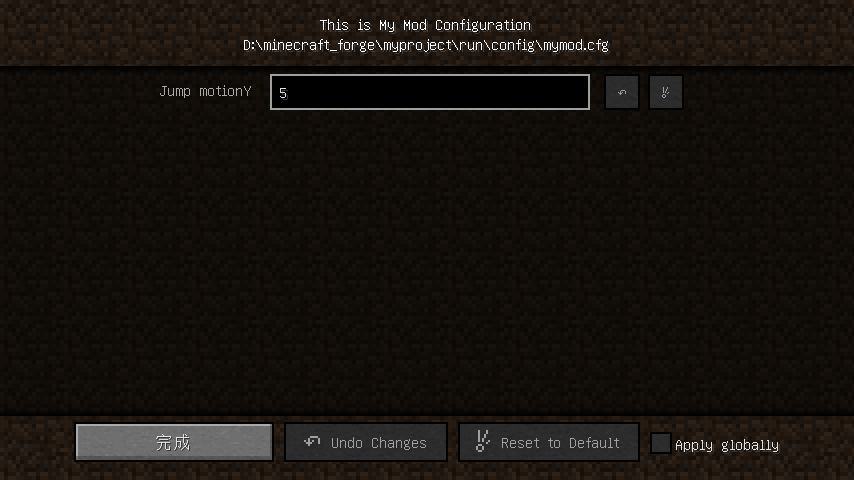
接下來進入到今天的主題,事件註冊動態決定。
我們在每一次完成事件的類別後,都要回到主程式內 (在[Day22]將這部分移動到ClientProxy類別內了),使用
MinecraftForge.EVENT_BUS.register()
或是
FMLCommonHandler.instance().bus().register()
來做註冊事件的動作。
其實在這些事件巴士的方法內,除了註冊(register)的功能,也一樣提供了取消註冊(unregister)的方法。
我們等等就要透過這個方法來動態設定我們事件的註冊。
開啟主程式MyMod,在上面定義我們jumpY後面,加上:
public static Map<Object, Boolean> eventTriggerMap = new HashMap<Object, Boolean>();
static {
    MyMod.eventTriggerMap.put(new BlockBreakEvent(), true);
    MyMod.eventTriggerMap.put(new TNTExplosions(), true);
    MyMod.eventTriggerMap.put(new PigDroppingItems(), true);
    MyMod.eventTriggerMap.put(new ZombieKnights(), true);
    MyMod.eventTriggerMap.put(new SuperJump(), true);
    MyMod.eventTriggerMap.put(new PigDoll(), true);
    MyMod.eventTriggerMap.put(new Colosseum(), true);
}
eventTriggerMap是一個Map物件,用來保存我們事件類別與是否要使用這個事件類別的boolean值;並且在後面用static{}方式初始化這個物件的值,把我們目前有的事件都加進去。
到ClientProxy類別,把我們註冊的動作都拿掉,透過剛剛的物件eventTriggerMap就可以註冊我們的所有事件,整個檔案看起來會是這樣:
package com.ithome.mymod.proxy;

import com.ithome.mymod.MyMod;
import com.ithome.mymod.events.*;
import net.minecraftforge.common.MinecraftForge;
import net.minecraftforge.fml.common.FMLCommonHandler;
import net.minecraftforge.fml.common.event.FMLInitializationEvent;
import net.minecraftforge.fml.common.event.FMLPostInitializationEvent;
import net.minecraftforge.fml.common.event.FMLPreInitializationEvent;
import net.minecraftforge.fml.common.event.FMLServerStartingEvent;

public class ClientProxy implements IProxy {

    @Override
    public void preInit(FMLPreInitializationEvent event) {
    }

    @Override
    public void init(FMLInitializationEvent event) {

        for(Object obj : MyMod.eventTriggerMap.keySet()) {
            MinecraftForge.EVENT_BUS.register(obj);

            // SuperJump內有事件(PlayerTickEvent)需要額外註冊到FMLCommonHandler事件巴士
            if(obj instanceof SuperJump) {
                FMLCommonHandler.instance().bus().register(obj);
            }
        }

        // 註冊GUI設定檔事件
        MinecraftForge.EVENT_BUS.register(new GuiEvent());
    }

    @Override
    public void postInit(FMLPostInitializationEvent event) {
    }

    @Override
    public void serverStarting(FMLServerStartingEvent event) {
        // 這個事件不應該不呼叫
    }
}
最後一步,到CustomConfig類別,在loadConfiguration方法,將我們的eventTriggerMap寫到設定檔內;並且建立新的事件方法ConfigChangedEvent.PostConfigChangedEvent,在我們設定檔儲存後,動態決定是否要註冊我們的事件,最後CustomConfig會長這樣:
package com.ithome.mymod.configs;

import com.ithome.mymod.MyMod;
import com.ithome.mymod.events.SuperJump;
import net.minecraftforge.common.MinecraftForge;
import net.minecraftforge.common.config.Configuration;
import net.minecraftforge.fml.client.event.ConfigChangedEvent;
import net.minecraftforge.fml.common.FMLCommonHandler;
import net.minecraftforge.fml.common.event.FMLPreInitializationEvent;
import net.minecraftforge.fml.common.eventhandler.SubscribeEvent;

import java.io.File;
import java.util.Map;

public class CustomConfig {
    public static Configuration configuration;
    // 初始化設定檔
    public static void init(FMLPreInitializationEvent event) {
        String configDir = event.getModConfigurationDirectory().toString();
        if(configuration == null) {
            File path = new File(configDir + "/" + Constants.MOD_ID + ".cfg");

            configuration = new Configuration(path);

            loadConfiguration();
        }
    }

    // 讀取設定檔
    private static void loadConfiguration() {
        MyMod.jumpY = configuration.getInt("Jump motionY", Configuration.CATEGORY_GENERAL, 5, 1, 10, "How height you can jump");

        // 透過eventTriggerMap的key name來寫入到設定檔,並且將設定檔內的value寫到透過eventTriggerMap內
        for(Map.Entry<Object, Boolean> entry : MyMod.eventTriggerMap.entrySet()) {
            Boolean b = configuration.get(Configuration.CATEGORY_GENERAL,"Enable " + entry.getKey().getClass().getSimpleName(), true).getBoolean();
            entry.setValue(b);
        }

        // 當設定檔有變更,才做儲存
        if(configuration.hasChanged()) {
            configuration.save();
        }
    }

    // 取得Configuration物件
    public static Configuration getConfiguration() {
        return configuration;
    }

    @SubscribeEvent
    public void onConfigurationChangeEvent(ConfigChangedEvent.OnConfigChangedEvent event) {
        if(event.modID.equalsIgnoreCase(Constants.MOD_ID)) {
            loadConfiguration();
        }
    }

    @SubscribeEvent
    public void postConfigChange(ConfigChangedEvent.PostConfigChangedEvent event) {
        for(Map.Entry<Object, Boolean> entry : MyMod.eventTriggerMap.entrySet()) {
            // 若該事件的設定是false,就取消註冊
            if(!entry.getValue()) {
                MinecraftForge.EVENT_BUS.unregister(entry.getKey());
                if(entry.getKey() instanceof SuperJump) {
                    FMLCommonHandler.instance().bus().unregister(entry.getKey());
                }
            // 反之,就註冊
            } else {
                MinecraftForge.EVENT_BUS.register(entry.getKey());
                if(entry.getKey() instanceof SuperJump) {
                    FMLCommonHandler.instance().bus().register(entry.getKey());
                }
            }
        }
    }
}
存檔進入遊戲,我們現在可以自由控制要讓那些Fancy的功能使用與否了!