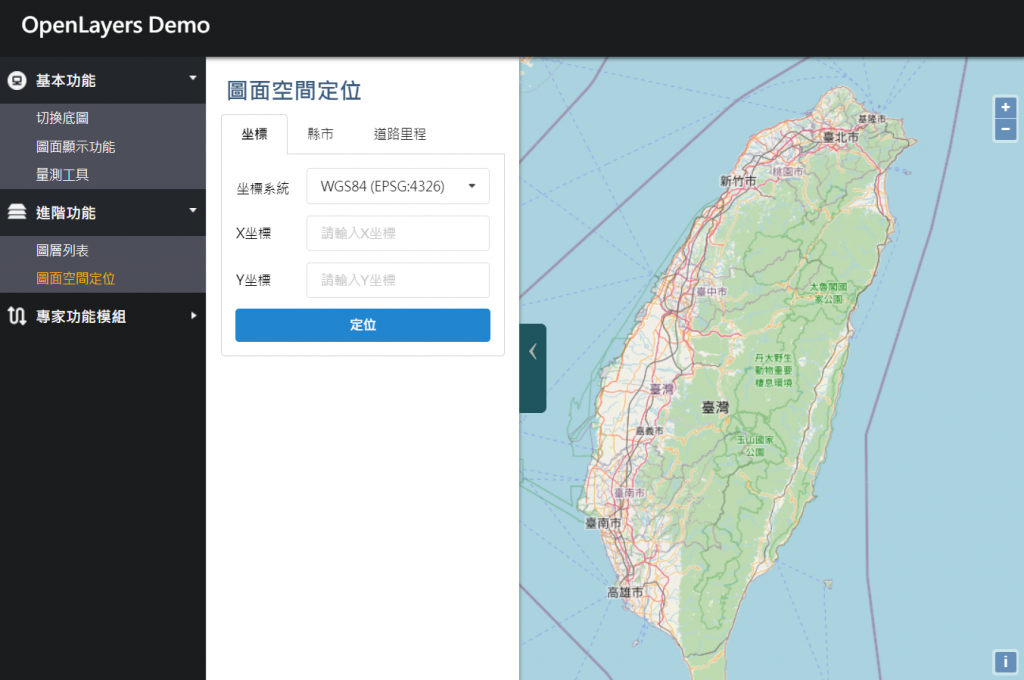
昨天我們學會了坐標系統的相關知識,並利用proj4進行坐標轉換,而今天我們就要把坐標轉換這個用於定位功能開發上。
我們的圖台底圖是介接OpenStreetMap等WMTS的資料,大多都為3857坐標系統,而台灣Opendata提供的資料不外乎就是TWD97或是WGS84的坐標,因此這之間若要套疊勢必一定要進行坐標轉換。
今天要建立的功能有三大個,分別為:坐標定位、縣市界定位與道路(里程)定位。
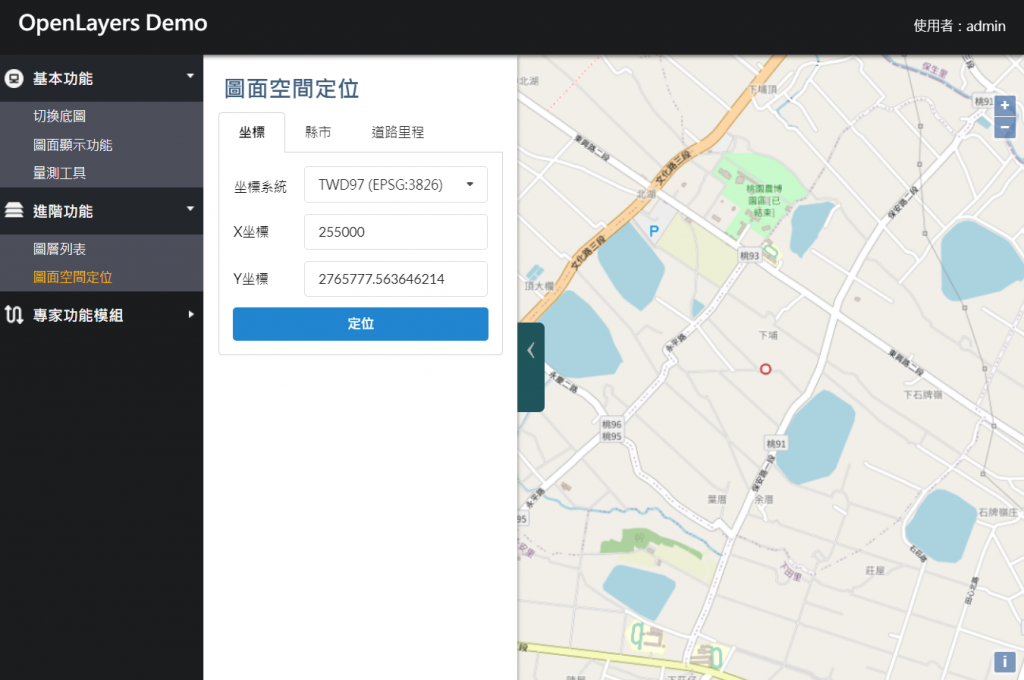
1. 坐標定位: 使用者可以輸入3826、4326、3857任何一個坐標系統的坐標,皆能在圖面上定位展示。
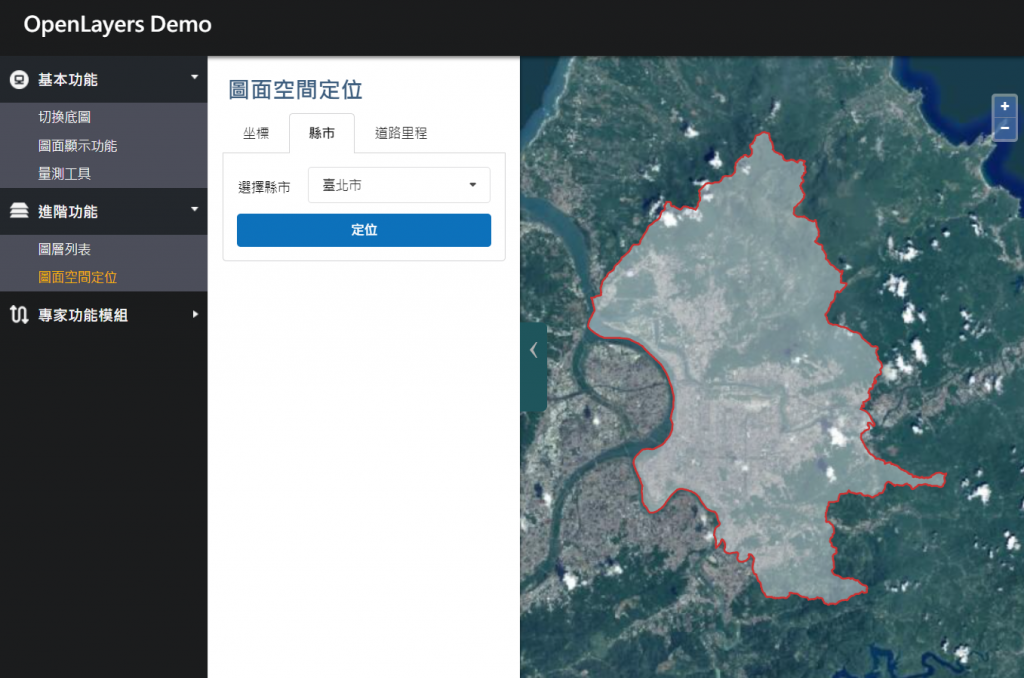
2. 縣市界定位: 選擇縣市即可定位到該縣市,並於圖面上顯示該縣市的行政區界範圍。
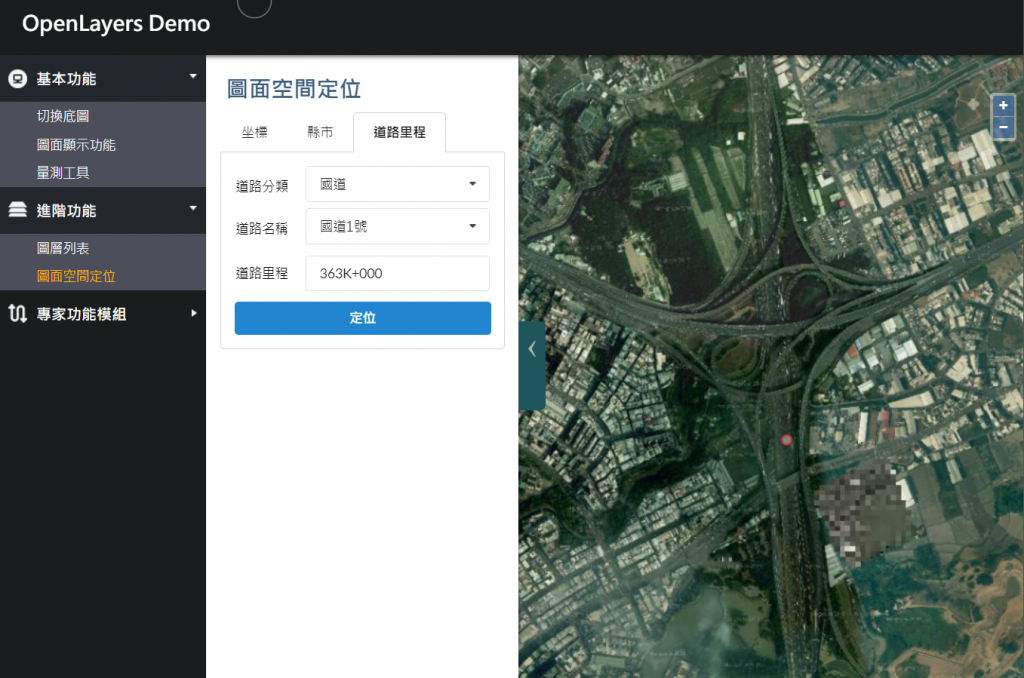
3. 道路里程定位: 可以定位國道、省道、市道、縣道任何一條道路,並定位到自行輸入的里程數。
當我們拿到上述的需求單以後,即可根據需求來進行OpenData或OpenAPI的尋找,規劃資料撈取處理方式與了解介接方法,後續會針對這部分進行說明。
首先,先來分析資料的輸入輸出分別需要哪些資訊,釐清需求。
proj4js套件坐標的定位是最單純的定位,只需要進行坐標轉換即可(與底圖同坐標系統的甚至可不用轉換),不需要前後端交互;昨天已經有試過了,我們直接來實作。
建立Locate.html頁面,並引用jLocate.js,這邊直接先把縣市界定位和道路定位的頁面一起寫進去了,套用Semantic UI的tabular menu功能,點選menu可切換下方顯示的tab資訊。
<!DOCTYPE html>
<html>
<head>
    <meta charset="utf-8" />
    <title></title>
    <style>
        .ui.attached.tab.segment div.input {
            margin: 5px 0px 5px 0px;
        }
        .ui.attached.tab.segment div.dropdown {
            margin: 0px 0px 5px 0px;
        }
    </style>
</head>
<body>
    <h2>圖面空間定位</h2>
    <div>
        <div class="ui top attached tabular menu">
            <a class="item active" data-tab="locate_xy">坐標</a>
            <a class="item" data-tab="locate_county">縣市</a>
            <a class="item" data-tab="locate_roadmile">道路里程</a>
        </div>
        <div class="ui bottom attached tab segment active" data-tab="locate_xy" id="locate_xy_tool">
            <table style="width:100%;">
                <tbody>
                    <tr>
                        <td style="width:75px;">坐標系統</td>
                        <td>
                            <select class="ui fluid dropdown" id="locatexy_epsg">
                                <option value="epsg4326" selected>WGS84 (EPSG:4326)</option>
                                <option value="epsg3826">TWD97 (EPSG:3826)</option>
                                <option value="epsg3857">WebMercator (EPSG:3857)</option>
                            </select>
                        </td>
                    </tr>
                    <tr>
                        <td>X坐標</td>
                        <td>
                            <div class="ui fluid icon input">
                                <input type="text" id="locatexy_x" placeholder="請輸入X坐標">
                            </div>
                        </td>
                    </tr>
                    <tr>
                        <td>Y坐標</td>
                        <td>
                            <div class="ui fluid icon input">
                                <input type="text" id="locatexy_y" placeholder="請輸入Y坐標">
                            </div>
                        </td>
                    </tr>
                </tbody>
            </table>
            <button class="fluid ui primary button" type="button" onclick="locate.locateXY()" style="margin-top:5px;">定位</button>
        </div>
        <div class="ui bottom attached tab segment" data-tab="locate_county" id="locate_county_tool">
            <table style="width:100%;">
                <tbody>
                    <tr>
                        <td style="width:75px;">選擇縣市</td>
                        <td>
                            <select class="ui fluid dropdown" id="ddl_County">
                                <option value="">請選擇</option>
                            </select>
                        </td>
                    </tr>
                </tbody>
            </table>
            <button class="fluid ui primary button" type="button" onclick="locate.locateCounty()" style="margin-top:5px;">定位</button>
        </div>
        <div class="ui bottom attached tab segment" data-tab="locate_roadmile" id="locate_roadmile_tool">
            <table style="width:100%;">
                <tbody>
                    <tr>
                        <td style="width:75px;">道路分類</td>
                        <td>
                            <select class="ui fluid dropdown" id="ddl_RoadClass" onchange="locate.getRoadIDList(this)">
                                <option value="">請選擇</option>
                                <option value="0">國道</option>
                                <option value="1">省道快速公路</option>
                                <option value="3">省道一般公路</option>
                                <option value="4">市道、縣道</option>
                            </select>
                        </td>
                    </tr>
                    <tr>
                        <td style="width:75px;">道路名稱</td>
                        <td>
                            <select class="ui fluid dropdown" id="ddl_RoadName">
                                <option value="">請先選擇道路分類</option>
                            </select>
                        </td>
                    </tr>
                    <tr>
                        <td style="width:75px;">道路里程</td>
                        <td>
                            <div class="ui fluid icon input">
                                <input type="text" id="input_Mileage" placeholder="範例:002K+000">
                            </div>
                        </td>
                    </tr>
                </tbody>
            </table>
            <button class="fluid ui primary button" type="button" onclick="locate.locateRoadMile()" style="margin-top:5px;">定位</button>
        </div>
    </div>
    <script type="text/javascript" src="map_module/widget/AdvanceTool/jLocate.js"></script>
    <script>
        $('.menu .item').tab();
        $('.ui.dropdown').dropdown();
        locate.getCountyList();
    </script>
</body>
</html>

接下來建立jLocate.js頁面,定義樣式與return函式
var locate = function () {
    // 填充
    var fill = new ol.style.Fill({
        color: 'rgba(255,255,255,0.4)'
    });
    // 線條
    var stroke = new ol.style.Stroke({
        color: '#cc3333',
        width: 2
    });
    // 設定樣式
    var styles = [
        new ol.style.Style({
            image: new ol.style.Circle({
                fill: fill,
                stroke: stroke,
                radius: 5
            }),
            fill: fill,
            stroke: stroke
        })
    ];
    var locateXYLyr;
    return {
        checkLayerValid: checkLayerValid,
        getCountyList: getCountyList,
        locateXY: locateXY,
        locateCounty: locateCounty,
        getRoadIDList: getRoadIDList,
        locateRoadMile: locateRoadMile
    };
}();
我習慣會將一個功能就建一個layer儲存該功能的圖面顯示資料,這樣要清除才可以單純又快速的清掉所有相關的圖形。
建立checkLayerValid()去驗證id為locateXYLyr的layer是否已建立,若沒建立則進行layer建置;若已建立則每次頁面載入後初始化清空它。
locateXY()則是執行坐標定位功能,從下拉式選單、X坐標輸入值、Y坐標輸入值這三個撈取資料後,利用 Day 13 所寫的helper的模組轉成3857後,建立feature塞進layer內在圖台上展示。
function checkLayerValid() {
    if (map.e_getLayer("locateXYLyr") === undefined) {
        locateXYLyr = new ol.layer.Vector({
            source: new ol.source.Vector({
            })
        });
        locateXYLyr.id = "locateXYLyr";
        map.addLayer(locateXYLyr);
    } else {
        locateXYLyr = map.e_getLayer("locateXYLyr");
        locateXYLyr.getSource().clear();
    }
}
function locateXY() {
    console.log("locateXY");
    var coorepsg = $("#locatexy_epsg").val();
    var locatexy_x = parseFloat($("#locatexy_x").val());
    var locatexy_y = parseFloat($("#locatexy_y").val());
    if (isNaN(locatexy_x) === false && isNaN(locatexy_y) === false) {
        var pointfeature = new ol.Feature({
            geometry: new ol.geom.Point([locatexy_x, locatexy_y])
        });
        if (coorepsg === "epsg3826") {
            pointfeature = helper.transOlGeometry_3826to3857(pointfeature);
        } else if (coorepsg === "epsg4326") {
            pointfeature = helper.transOlGeometry_4326to3857(pointfeature);
        } else if (coorepsg === "epsg3857") {
            pointfeature = pointfeature;
        }
        pointfeature.setStyle(styles);
        locate.checkLayerValid();
        locateXYLyr.getSource().addFeature(pointfeature);
        map.e_centerAndZoom(pointfeature, 5);
    } else {
        alert("請輸入正確格式之坐標");
    }
}
坐標定位頁面示意:
前面幾天我們已經把縣市界的資料匯入資料庫了,因此我們現在要進行縣市界的定位就直接撈取該資料進行展示就可以了。因為需要從資料庫撈資料,因此延續 Day 11 撰寫WebService進行資料撈取。
於App_Code/LayerService.cs新增以下Class Model。
public class CountyList
{
    public string countycode = "";
    public string countyname = "";
    public string geom = "";

    public CountyList(string _countycode, string _countyname, string _geom)
    {
        countycode = _countycode;
        countyname = _countyname;
        geom = _geom;
    }
    public CountyList() { }
}
撰寫getCountyList(),從資料庫撈取縣市編號、縣市名稱和縣市的Geometry,並以json格式進行傳輸。
注意:Geometry的資料記得要使用.STAsText() 先將它的格式進行轉換,避免不必要的錯誤發生。
[WebMethod(EnableSession = true)]
[ScriptMethod(ResponseFormat = ResponseFormat.Json)]
public string getCountyList()
{
    SqlConnection conn = new SqlConnection(ConfigurationManager.ConnectionStrings["OLDemoDB"].ConnectionString);
    SqlCommand cmd = new SqlCommand("SELECT distinct [countycode],[countyname] ,[geom].STAsText() as geom  FROM [OLDemo].[dbo].[COUNTY_MOI] order by [countycode] desc", conn);
    conn.Open();
    List<CountyList> arrList = new List<CountyList>();
    SqlDataReader dr = cmd.ExecuteReader();
    while (dr.Read())
    {
        arrList.Add(new CountyList()
        {
            countycode = dr["countycode"].ToString(),
            countyname = dr["countyname"].ToString(),
            geom = dr["geom"].ToString()
        });
    }
    conn.Close();
    dr.Dispose();
    cmd.Dispose();
    conn.Dispose();
    JavaScriptSerializer jss = new JavaScriptSerializer();
    jss.MaxJsonLength = int.MaxValue;
    return jss.Serialize(arrList);
}
撰寫完WS以後,在前端進行介接,從前面html建立時,會執行locate.getCountyList(),這支function是在撈出所有縣市,並寫成option一個個append進選擇縣市的Dropdown內。
function getCountyList() {
    $("#ddl_County").html('<option value="">請選擇</option>');
    $.ajax({
        type: "POST",
        url: config_WSLayerResource + "/getCountyList",
        dataType: "json",
        contentType: "application/json; charset=utf-8",
        success: function (d) {
            var data = $.parseJSON(d.d);
            $.each(data, function (index, item) {
                $("#ddl_County").append('<option value="' + item.geom + '">' + item.countyname + '</option>');
            });
        },
        error: function (jqXHR, exception) {
            ajaxError(jqXHR, exception);
        }
    });
}
撰寫按下定位按鈕的功能locateCounty(),由於從資料庫撈出來的資料為WKT的格式,因此利用Proj4將坐標參數註冊完後,使用Openlayers內的readFeature功能將Geometry讀入並轉至3857坐標系統,設定Style並放大顯示在圖面上,設定顯示時的padding四周內縮[80, 30, 80, 350]距離。
function locateCounty() {
    var wkt_county = $("#ddl_County").val();
    var format = new ol.format.WKT();
    var Countyfeature = format.readFeature(wkt_county, {
        dataProjection: 'EPSG:4326',
        featureProjection: 'EPSG:3857'
    });
    Countyfeature.setStyle(styles);
    locate.checkLayerValid();
    locateXYLyr.getSource().addFeature(Countyfeature);
    map.getView().fit(Countyfeature.getGeometry(), { padding: [80, 30, 80, 350] });
}
縣市界定位頁面示意:
道路里程介接GIS-T交通網路地理資訊倉儲系統的API,分別為:
此API支援OData查詢語法,以Get帶參數的方式進行資料撈取,可以採用$select、$filter、$format等讓使用者進行資料的篩選或格式的輸出
由上述html可以看出若ddl_RoadClass有變化,則執行locate.getRoadIDList(this),輸入{RoadClass}(國道、省道、市道、縣道)進行道路名稱與ID ({RoadID})撈取。
function getRoadIDList(dom) {
    $("#ddl_RoadName").html("");
    $("#ddl_RoadName").parent().addClass("loading");
    $.ajax({
        type: "GET",
        url: "https://gist.motc.gov.tw/gist_api/V3/Map/Basic/RoadClass/" + dom.value,
        dataType: "json",
        contentType: "application/json; charset=utf-8",
        success: function (data) {
            $.each(data, function (index, item) {
                $("#ddl_RoadName").append('<option value="' + item.RoadID + '">' + item.RoadName + '</option>');
            });
            $("#ddl_RoadName").parent().removeClass("loading");
        },
        error: function (jqXHR, exception) {
            ajaxError(jqXHR, exception);
        }
    });
}
接著讓使用者輸入里程數,執行locateRoadMile(),輸入{RoadClass}、{RoadID}、{Mileage}後即可撈出GeoJson(坐標系統為4326),利用 Day 11 載入GeoJson格式資料的方式進行feature建立,最後再用 helper的模組進行feature的坐標轉換,並在地圖上展點。
function locateRoadMile() {
    console.log("locateRoadMile");
    var RoadClass = $("#ddl_RoadClass").val();
    var RoadID = $("#ddl_RoadName").val();
    var Mileage = $("#input_Mileage").val();
    if (RoadID !== "" && Mileage !== "") {
        $.ajax({
            type: "GET",
            url: "https://gist.motc.gov.tw/gist_api/V3/Map/GeoCode/Coordinate/RoadClass/" + RoadClass + "/RoadID/" + RoadID + "/Mileage/" + Mileage + "?$format=GEOJSON",
            dataType: "json",
            contentType: "application/json; charset=utf-8",
            success: function (data) {
                var roadmilefeature = (new ol.format.GeoJSON()).readFeatures(data);
                var roadmilefeature3857 = roadmilefeature.map(f => {
                    var tmepf = helper.transOlGeometry_4326to3857(f);
                    tmepf.setStyle(styles);
                    return tmepf;
                });
                locate.checkLayerValid();
                locateXYLyr.getSource().addFeatures(roadmilefeature3857);
                map.e_centerAndZoom(roadmilefeature3857[0], 5);
            },
            error: function (jqXHR, exception) {
                ajaxError(jqXHR, exception);
            }
        });
    } else {
        alert("請輸入正確格式之道路資訊");
    }
}
道路里程定位頁面示意:
我怎麼把一個功能寫得看起來很複雜 ![]()
但是真的只是看起來很難而已,實際上很簡單!可以動手寫寫看~
今天主要就是學會各種定位,包含了用Openlayers裡面的function進行坐標轉換、用自己建立的helper進行坐標轉換、從資料庫撈出WKT格式的檔案進行定位。
明天我們要來說明:如果用坐標轉換無法轉出來的兩個坐標系之間,要如何進行套疊?
因為大家只要了解一下,注重的是邏輯、不用直接去寫,要用的話直接Copy就可以了,所以把它放在不寫程式改來學知識系列。
