前幾天講了EditText和Button,不過這兩者的樣式看上去總有些死板,甚至也不曾在自己手機裡的APP中看見他們以這個形式出現,所以今天就來講講怎麼讓他們改頭換面,看起來更美觀一點。
先帶各位認識一些簡單的標籤。
主要標籤
<shape>
接下來則是shape的屬性設定:
<solid>
<stroke>
<paddind>
<gradient>
<corner>
以上大致講解完各個標籤功能,接著就讓我們來看看實際的用法設定和效果。打開res/drawable資料夾並新增檔案,新增方式如圖。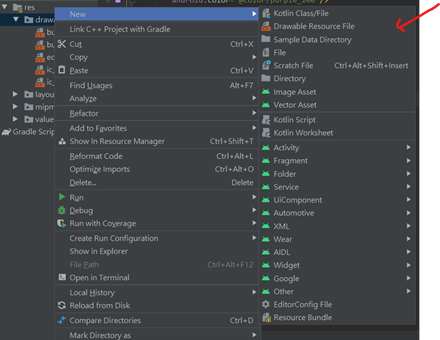
<shape xmlns:android="http://schemas.android.com/apk/res/android">
    <solid
        android:color="@color/purple_200"/>
    <stroke
        android:width="2dp"
        android:color="@color/teal_200"/>
    <corners
        android:radius="30dp"/>
    <padding
        android:left="10dp"/>
</shape>
<shape xmlns:android="http://schemas.android.com/apk/res/android"
    android:shape="oval">
    <stroke
        android:width="2dp"
        android:color="@color/purple_200"/>
    <gradient
        android:width="2dp"
        android:type="linear"
        android:startColor="@color/teal_200"
        android:endColor="@color/purple_700"/>
    <padding
        android:right="10dp"/>
</shape>
<shape xmlns:android="http://schemas.android.com/apk/res/android">
    <stroke
        android:width="1dp"
        android:color="@color/teal_200"/>
    <corners
        android:radius="20dp"/>
    <solid
        android:color="@android:color/transparent"/>
</shape>
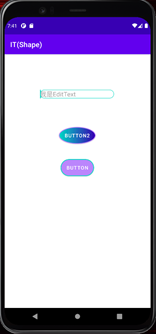
最後將這些檔案設置到各個元件的background中
<androidx.constraintlayout.widget.ConstraintLayout xmlns:android="http://schemas.android.com/apk/res/android"
    xmlns:app="http://schemas.android.com/apk/res-auto"
    xmlns:tools="http://schemas.android.com/tools"
    android:layout_width="match_parent"
    android:layout_height="match_parent"
    tools:context=".MainActivity">

    <LinearLayout
        android:layout_width="200dp"
        android:layout_height="30dp"
        android:layout_marginTop="100dp"
        android:layout_marginLeft="100dp"
        android:background="@drawable/edittext"
        android:orientation="vertical"
        app:layout_constraintStart_toStartOf="parent"
        app:layout_constraintTop_toTopOf="parent">

        <EditText
            android:id="@+id/editTextTextPersonName"
            android:layout_width="wrap_content"
            android:layout_height="wrap_content"
            android:layout_gravity="center_vertical"
            android:layout_marginLeft="10dp"
            android:ems="10"
            android:hint="我是EditText"
            android:textSize="20sp"
            android:inputType="textPersonName"
            android:background="@null" />

    </LinearLayout>

    <Button
        android:id="@+id/button"
        android:layout_width="wrap_content"
        android:layout_height="wrap_content"
        android:text="Button"
        android:background="@drawable/button"
        app:backgroundTint="@null"
        app:layout_constraintBottom_toBottomOf="parent"
        app:layout_constraintEnd_toEndOf="parent"
        app:layout_constraintHorizontal_bias="0.498"
        app:layout_constraintStart_toStartOf="parent"
        app:layout_constraintTop_toTopOf="parent"
        app:layout_constraintVertical_bias="0.443" />

    <Button
        android:id="@+id/button2"
        android:layout_width="wrap_content"
        android:layout_height="wrap_content"
        android:text="Button2"
        android:background="@drawable/button2"
        app:backgroundTint="@null"
        app:layout_constraintBottom_toBottomOf="parent"
        app:layout_constraintEnd_toEndOf="parent"
        app:layout_constraintHorizontal_bias="0.498"
        app:layout_constraintStart_toStartOf="parent"
        app:layout_constraintTop_toTopOf="parent"
        app:layout_constraintVertical_bias="0.307" />

</androidx.constraintlayout.widget.ConstraintLayout>
Button的顏色其實是可以透過android:backgroundTint=””的屬性修改的,不過如果是要套用xml檔中的顏色設定,則需要設定app:backgroundTint=”@null”,否則不會有顏色的改變喔。
今天客製化元件就講到這邊,謝謝大家~