databinding可用於將class的data與元件綁定,像是(findViewById、onClickListener)等UI綁定、監聽的代碼都可以用databinding來實現,在程式設計的越來越大時,算是相當好用的一個應用,那麼就開始今天的主題。
首先在gradle/android加入:
android {
    ...
    dataBinding {
        enabled = true
    }
}
等Sync now完之後就可以來更改布局。
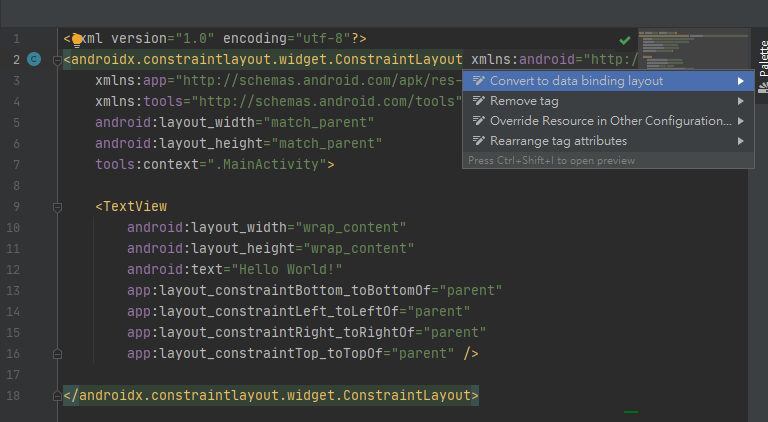
在最外層的布局中按alt+enter就會跑出這樣的畫面,然後點選Convert to data binding layout,他就會幫你設計成包data的格式。
<?xml version="1.0" encoding="utf-8"?>
<layout xmlns:android="http://schemas.android.com/apk/res/android"
    xmlns:app="http://schemas.android.com/apk/res-auto"
    xmlns:tools="http://schemas.android.com/tools">

    <data>
        <!--寫viewmodel-->
    </data>

    <androidx.constraintlayout.widget.ConstraintLayout
        android:layout_width="match_parent"
        android:layout_height="match_parent"
        tools:context=".MainActivity">

        <TextView
            android:layout_width="wrap_content"
            android:layout_height="wrap_content"
            android:text="Hello World!"
            app:layout_constraintBottom_toBottomOf="parent"
            app:layout_constraintLeft_toLeftOf="parent"
            app:layout_constraintRight_toRightOf="parent"
            app:layout_constraintTop_toTopOf="parent" />

    </androidx.constraintlayout.widget.ConstraintLayout>
</layout>
那麼等等再回來改布局的部分,接著先建一個Model的class,我設計的model帶有兩個欄位(name、phone)。
public class Model {
    private String name;
    private String phone;
    public Model(String name, String phone){
        this.name=name;
        this.phone=phone;
    }
    public String getName() {
        return "你的名字是:"+name;
    }

    public void setName(String name) {
        this.name = name;
    }

    public String getPhone() {
        return "你的電話是:"+phone;
    }

    public void setPhone(String phone) {
        this.phone = phone;
    }
    //button的onclick方法,談布局時會再提
    public void click(View view){
        Toast.makeText(view.getContext(),"SEND",Toast.LENGTH_SHORT).show();
    }
}
因為是單向綁定,所以我們沒辦法透過綁定edittext來使用其輸入,但我們可以透過回到MainActivity來設計,首先先到布局調整資料。
<?xml version="1.0" encoding="utf-8"?>
<layout xmlns:android="http://schemas.android.com/apk/res/android"
    xmlns:app="http://schemas.android.com/apk/res-auto"
    xmlns:tools="http://schemas.android.com/tools">
    <data>
        <variable
            name="Model"
            type="com.example.databinding.Model" />
    </data>

    <androidx.constraintlayout.widget.ConstraintLayout
        android:layout_width="match_parent"
        android:layout_height="match_parent"
        tools:context=".MainActivity">

        <TextView
            android:id="@+id/textview"
            android:layout_width="178dp"
            android:layout_height="44dp"
            android:gravity="left"
            android:text="@{Model.name}"
            app:layout_constraintBottom_toBottomOf="parent"
            app:layout_constraintHorizontal_bias="0.536"
            app:layout_constraintLeft_toLeftOf="parent"
            app:layout_constraintRight_toRightOf="parent"
            app:layout_constraintTop_toTopOf="parent"
            app:layout_constraintVertical_bias="0.263" />

        <TextView
            android:id="@+id/textview2"
            android:layout_width="178dp"
            android:layout_height="44dp"
            android:gravity="left"
            android:text="@{Model.phone}"
            app:layout_constraintBottom_toBottomOf="parent"
            app:layout_constraintHorizontal_bias="0.536"
            app:layout_constraintLeft_toLeftOf="parent"
            app:layout_constraintRight_toRightOf="parent"
            app:layout_constraintTop_toTopOf="parent"
            app:layout_constraintVertical_bias="0.391" />

        <Button
            android:id="@+id/button"
            android:layout_width="wrap_content"
            android:layout_height="wrap_content"
            android:layout_marginBottom="236dp"
            android:text="Button"
            android:onClick="@{Model::click}"
            app:layout_constraintBottom_toBottomOf="parent"
            app:layout_constraintEnd_toEndOf="parent"
            app:layout_constraintHorizontal_bias="0.498"
            app:layout_constraintStart_toStartOf="parent" />

    </androidx.constraintlayout.widget.ConstraintLayout>
</layout>
綁定的方法就是用自己variable設的name,另外透過getter來取得資料,像是@{Model.name}也就是從model裡面的getName方法來取得name值。
按鈕的話分很多種寫法,假設variable name是Model、而click是方法名,就像是:
android:onClick="@{Model.click}"
android:onClick="@{Model::click}"
android:onClick="@{{(view)->model.click(obj data(傳入資料),view(傳入view))}}"
大概還蠻多種的,但目前我比較常寫到的是這三種,按鈕都可以用這些方法來做監聽的動作,但都需要在你對應variable的type裡面宣告這個方法名。
public void click(View view){
//要做的事
}
//第三種(傳入資料、view)
public void click(obj data,View view){
//要做的事
}
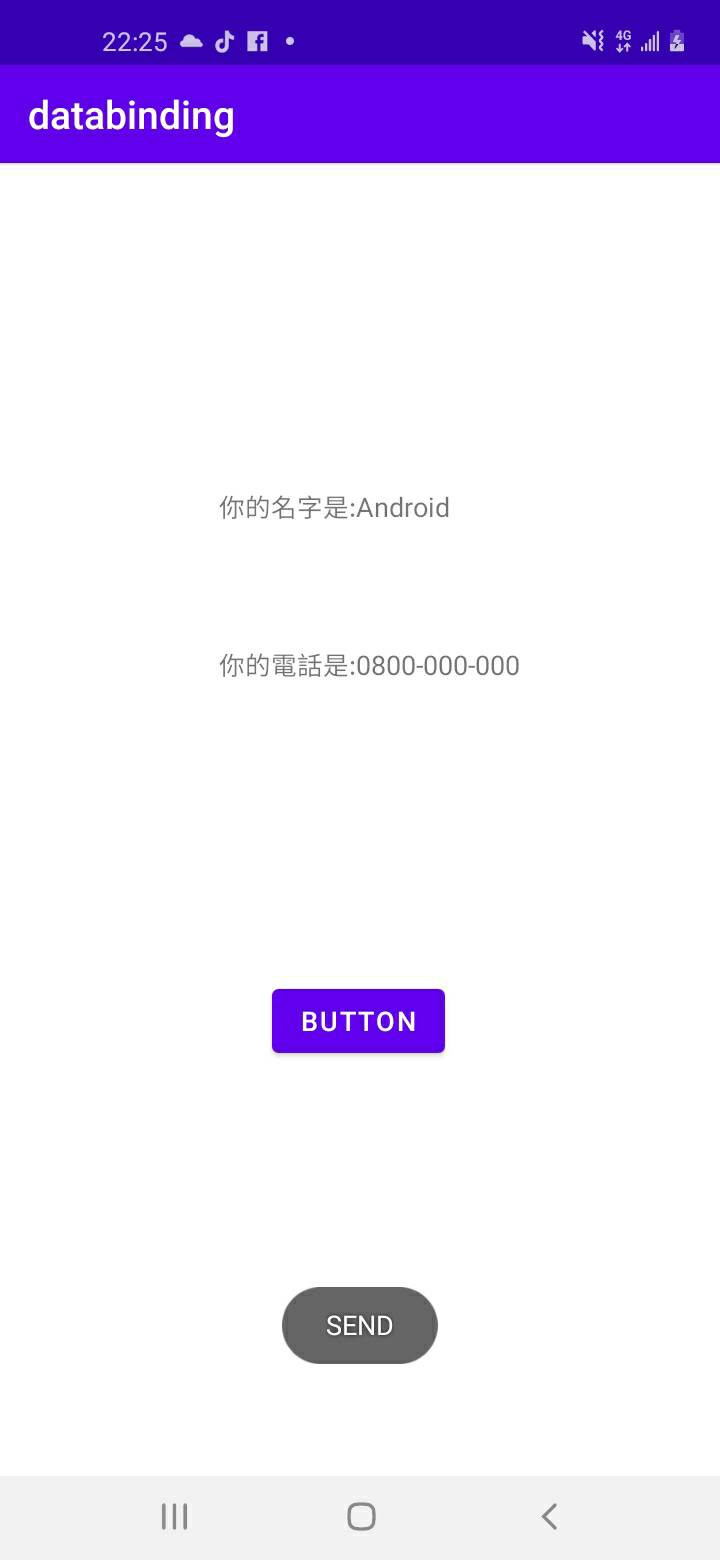
大約是這樣,那麼接著看到MainActivity來input資料。
public class MainActivity extends AppCompatActivity {
    @Override
    protected void onCreate(Bundle savedInstanceState) {
        super.onCreate(savedInstanceState);
        //setContentView(R.layout.activity_main);
        //ActivityMainBinding需先build(ctrl+f9)才會建立,使用Databinding的setContentView方法
        ActivityMainBinding binding = DataBindingUtil.setContentView(MainActivity.this,R.layout.activity_main);
        //建立data資料
        Model data = new Model("Android","0800-000-000");
        //設定資料
        binding.setModel(data);
    }
}
這樣就完成了簡易的databinding單向綁定,而雙向綁定則需要將model定義成ObservableField(如下)
public ObservableField<String> name = new ObservableField<>();
public ObservableField<String> phone = new ObservableField<>();
而佈局元件的綁定要多加"=",對edittext也綁定時,就能在edittext輸入值時,textview跟著顯示。
(以name來說,若以改為上面的ObservableField型態,在對應的元件都加入text屬性的綁定)
<!--edittext-->
android:text="@={Model.name}"
<!--textview-->
android:text="@={Model.name}"
這樣就算是簡單的雙向綁定了,另外其他更廣的應用可能就得使用@Bindable、@BindingAdapter或@InverseBindingAdapter。