前言:昨天簡單實作了鏈結串列,今天要來介紹進階一點的應用,第一個是利用之前寫的get()和set()進行下標元素符號的讀寫,第二個是要做鏈結串列的反轉。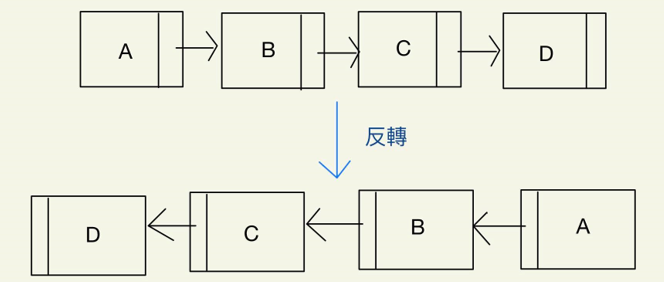
甚麼是下標?下標是一個可以快速存取及設置值的方式,光看中文可能不太清楚什麼意思,其實在前面章節介紹陣列及鏈結串列時已經有接觸過,緊接在名稱後的中括號[],括號內填入陣列的索引值,就可存取或設置值。
前言講完了就直接開始吧,打開之前鏈結串列的檔案就好,不用再創一個新的!
一. 下標運算符讀寫:
要先寫一個判斷鏈結串列大小的函示。
(上一篇忘記補上了,真對不起(≧д≦ヾ))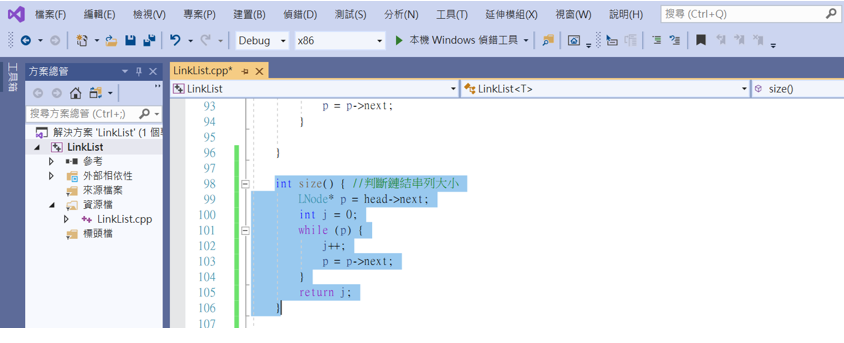
再來就是下標運算的讀寫了,因為和get()都是屬於讀寫類型,所以程式碼相似度很高。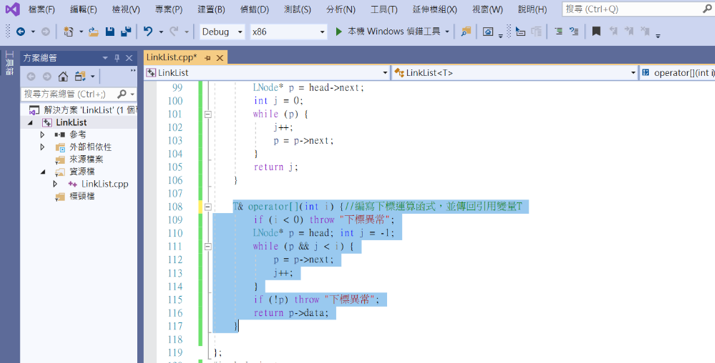
接著就是輸出結果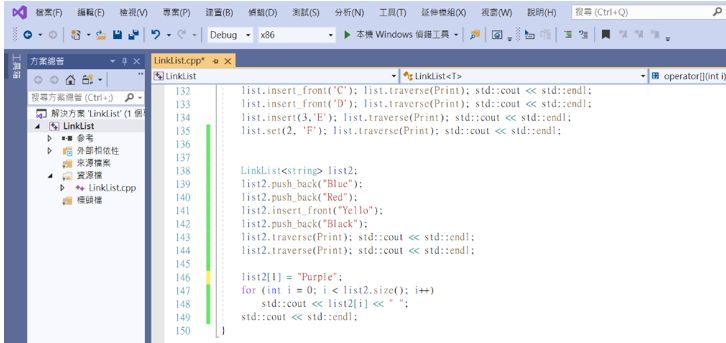
可以看到下標是1的Blue改成Purple了(Yello的下標是0)。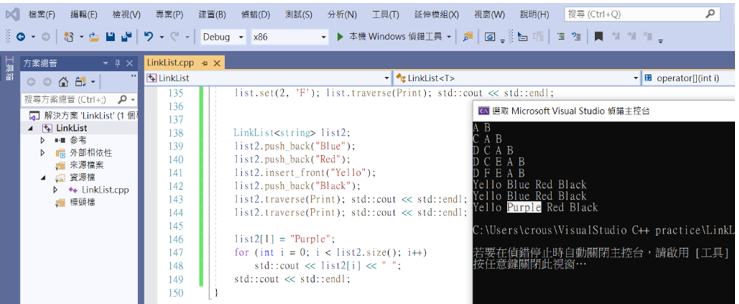
這樣就完成下標的讀寫了,這裡用字串呈現比較清楚,下一篇會解釋怎麼使用字串顯示資料。
二. 鏈結串列的反轉: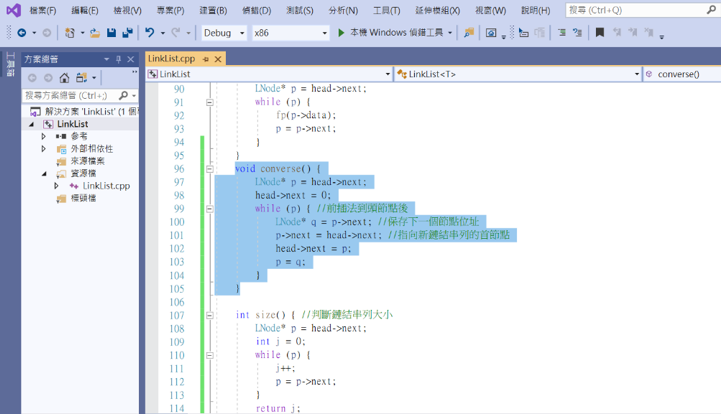
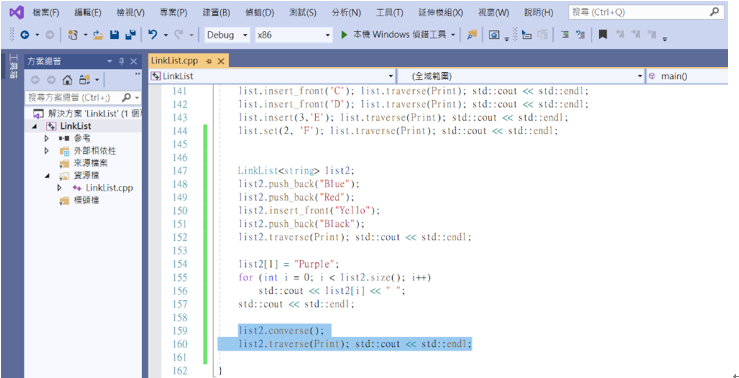
可以看到鏈結串列已經反轉成功了。
今日小結:這樣就討論完陣列跟鏈結串列了,辛苦各位了。但還有一段路要走,今天的內容比較少,偶爾這樣也不錯嘛( ̄▽ ̄)~*最後再用表格的方式幫大家複習陣列和鏈結串列的特性比較,明天就要進入下一個單元「堆疊」了。
| 陣列 | 鏈結串列 |
|---|---|
| 靜態資料結構 | 動態資料結構 |
| 必須先宣告容量和資料數量 | 不必事先宣告 |
| 程式執行時容量大小已經固定 | 程式執行時才做記憶體配置 |
| 較節省記憶體,無額外的鏈結空間 | 每一筆資料都必須多一個指標欄位連接,較浪費記憶體 |
| 加入、刪除資料時需大量移動資料位置 | 加入、刪除只需改變指標的指向 |
| 可運用索引值直接存取 | 無索引值,不能直接存取 |
最後在附上這一篇和上一篇的程式碼
template<typename T>
class LinkList {
	struct LNode //建立左節點結構
	{
		T data;
		LNode* next; //指向下一個元素的指針變量
	};
	LNode* head; //指向最前端的指針變量
public:
	LinkList() { //創建空的鏈結串列,並對head指針初始化
		head = new LNode();
		head->next = 0;
	}
	bool get(int i, T e) { //讀取鏈結串列的資料
		if (i <= 0) return false; //i結點小於0則錯誤
		LNode* p = head;
		int j = 0; //j為現在訪問的元素
		while (p && j < i) {
			p = p->next;
			j++;
		}
		if (!p) return false; //如果p是空指針則錯誤
		e = p->data; return true; //如果p找到i號節點的數據,則放入引用變量e
	}
	bool set(int i, T e) { //修改鏈結串列的資料,和get概念類似
		if (i <= 0) return false;
		LNode* p = head;
		int j = 0;
		while (p && j < i) {
			p = p->next;
			j++;
		}
		if (!p) return false;
		p->data = e; return true;
	}
	bool insert(int i, T e) { //插入元素至節點內
		if (i <= 0) return false;
		LNode* p = head;
		int j = 0;
		while (p && j < i-1) {
			p = p->next;
			j++;
		}
		if (!p) return false;
		LNode* s = new LNode(); //s為臨時的指針變量,存放新插入的元素
		s->data = e;
		s->next = p->next; //使p指向修改後的新節點
		p->next = s;
		return true;
	}
	bool remove(int i) { //刪除節點的函式,原理和insert相似
		if (i <= 0) return false;
		LNode* p = head;
		int j = 0;
		while (p && j < i) {
			p = p->next;
			j++;
		}
		if (!p) return false;
		LNode* q = p->next;
		p->next = q->next;
		delete q;
		return true;
	}
	bool insert_front(T e) { //插入節點在鏈結串列最前端
		LNode* s = new LNode();
		if (!s) return false;
		s->data = e;
		s->next = head->next;
		head->next = s;
		return true;
	}
	bool remove_front() { //刪除第一個節點
		LNode* q = head->next;
		head->next = q->next;
		delete q;
		return true;
	}
	bool push_back(T e) { //插入節點在鏈結串列最末端
		LNode* p = head;
		while (p->next)
			p = p->next;
		p->next = new LNode();
		if (!p->next) return false;
		p->next->next = 0; //p->next表示現在的尾節點,而p->next的下一個節點要成為新的尾節點
		p->next->data = e; //同時要把資料放進去
		return true;
	}
	void traverse(void (*fp)(T& e)) { //編寫遍歷操作,fp為函數指針,對p指向的data進行處理
		LNode* p = head->next;
		while (p) {
			fp(p->data);
			p = p->next;
		}
	}
	void converse() {
		LNode* p = head->next;
		head->next = 0;
		while (p) { //前插法到頭節點後
			LNode* q = p->next; //保存下一個節點位址
			p->next = head->next; //指向新鏈結串列的首節點
			head->next = p;
			p = q;
		}
	}

	int size() { //判斷鏈結串列大小
		LNode* p = head->next;
		int j = 0;
		while (p) {
			j++;
			p = p->next;
		}
		return j;
	}

	T& operator[](int i) {//編寫下標運算函式,並傳回引用變量T
		if (i < 0) throw "下標異常";
		LNode* p = head; int j = -1;
		while (p && j < i) {
			p = p->next;
			j++;
		}
		if (!p) throw "下標異常";
		return p->data;
	}

};
#include<iostream>
template<typename T>
void Print(T &ch) {
	std::cout << ch << " ";
}
主程式碼
#include <string>
using std::string;
int main(){
	LinkList<char> list;
	list.push_back('A'); list.traverse(Print); std::cout << std::endl;
	list.push_back('B'); list.traverse(Print); std::cout << std::endl;
	list.insert_front('C'); list.traverse(Print); std::cout << std::endl;
	list.insert_front('D'); list.traverse(Print); std::cout << std::endl;
	list.insert(3,'E'); list.traverse(Print); std::cout << std::endl;
	list.set(2, 'F'); list.traverse(Print); std::cout << std::endl;


	LinkList<string> list2;
	list2.push_back("Blue");
	list2.push_back("Red");
	list2.insert_front("Yello");
	list2.push_back("Black");
	list2.traverse(Print); std::cout << std::endl;

	list2[1] = "Purple";
	for (int i = 0; i < list2.size(); i++)
		std::cout << list2[i] << " ";
	std::cout << std::endl;

	list2.converse();
	list2.traverse(Print); std::cout << std::endl;

}
