
今天繼續我們未完成的建模大業吧!
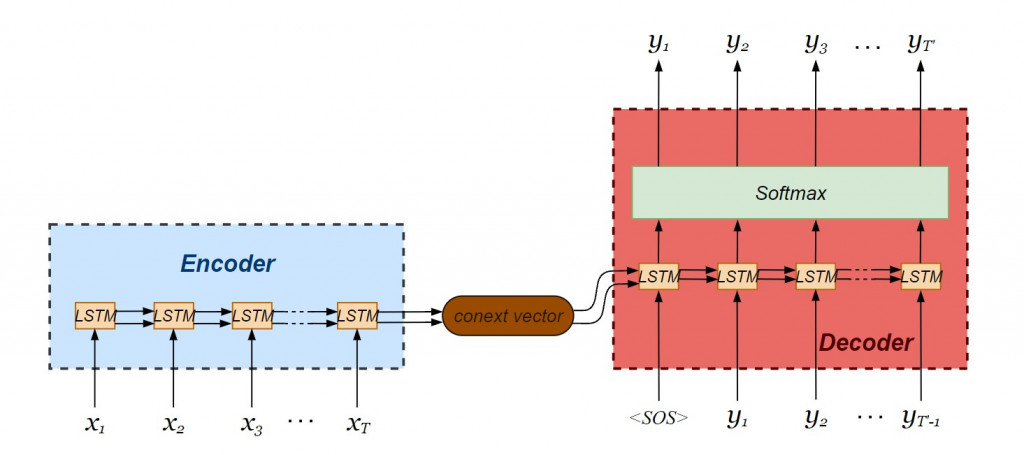
我們要建立的seq2seq模型由LSTM編碼器與解碼器串接而成:
我們使用 Keras API 進行建模。值得注意的是,值得注意的是 keras API 已經被整合進 tensorflow 框架當中,因此不建議直接引入 Keras ,而是從 tensorflow 中引入 Keras:
from tensorflow import keras as K
為了建立神經網絡模型,我們引入 Keras API 中寫好的單層神經元類別:
from tensorflow.keras.layers import Input, LSTM, Dense
from tensorflow.keras.models import Model
正式建立編碼器囉!注意的是我們希望 seq2seq 神經網絡能夠一次處理多筆資料,指定了輸入層資料張量維度以 None 最為開頭,並接續單筆資料的維度(不重複 tokens 的總數)。我們也透過 LSTM 物件指定編碼器內部 hidden state 與 cell state 皆為 256維向量,透過在實體化 LSTM 物件時設定 return_state = True 讓兩個內部狀態依時間序傳遞於各個 LSTM 小單元。而編碼器的輸出值不會被接收,不需使用變數承接。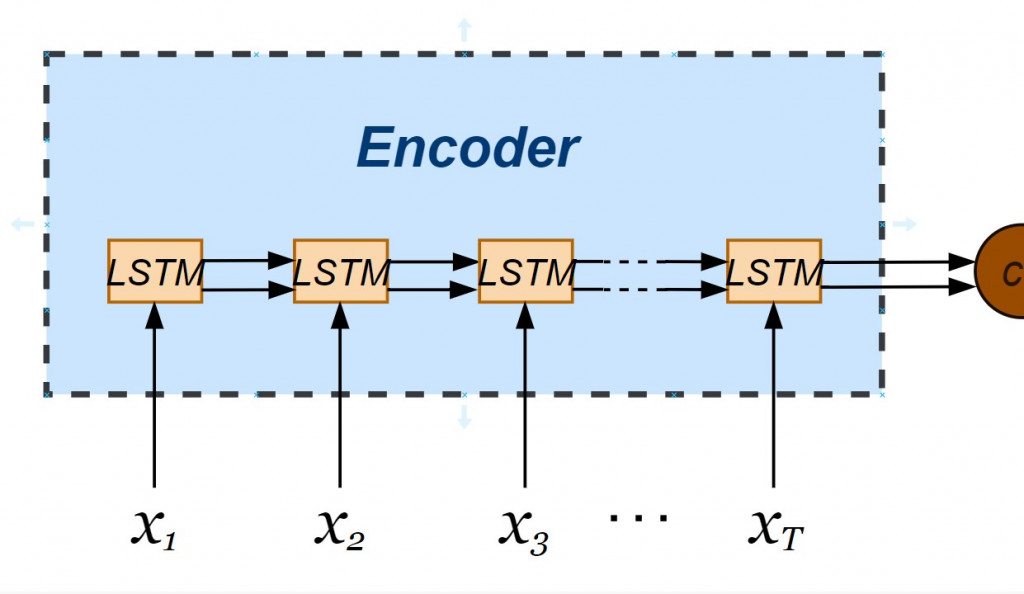
latent_dim = 256
# Build an encoder LSTM
encoder_inputs = Input(shape = (None, num_encoder_tokens))
encoder_lstm = LSTM(latent_dim, return_state = True)
# Discard encoder_outputs
_, state_hidden, state_cell = encoder_lstm(encoder_inputs)
encoder_states = [state_hidden, state_cell]
現在輪到解碼器的建構了!這裡要注意解碼器的內部會回傳前一個輸出值,因此必須在實體化 LSTM 物件時加入 return_sequences = True 的設定。在解碼器輸出之前會經過激活函數( activation function ),將當下時間的輸出分類到最可能出現的 token 。由於輸出向量中每個 tokens 的欄位皆被分配機率,屬於多類分類問題( multi-class classification ),我們採用 softmax 當作激活函數。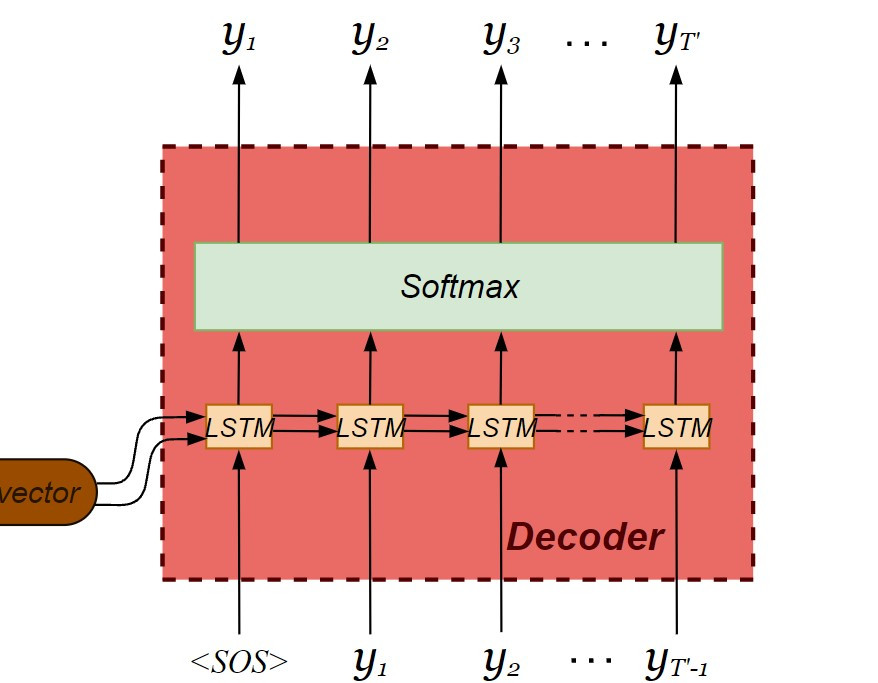
decoder_inputs = Input(shape = (None, num_decoder_tokens))
decoder_lstm = LSTM(latent_dim, return_sequences = True, return_state = True)
decoder_outputs, decoder_state_hidden, decoder_state_cell = decoder_lstm(decoder_inputs, initial_state = encoder_states)
decoder_dense = Dense(num_decoder_tokens, activation = "softmax")
decoder_outputs = decoder_dense(decoder_outputs)
並且利用 Model 類別串聯建立好的編碼器與解碼器,注意 seq2seq 模型整體的輸入分別為編碼器的輸入連同解碼器的輸入,整體的輸出則為僅為解碼器的輸出。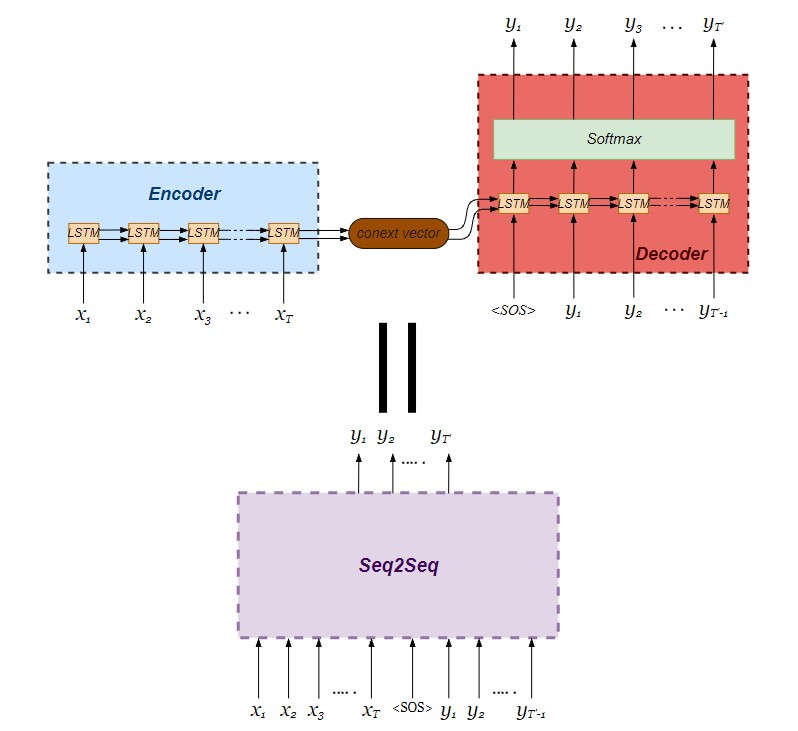
由於翻譯是多類分類問題,指定損失函數設定為 categorical_crossentropy ,找尋損失函數的梯度下降演算法為 Adam ,並且測量模型的精確度:
# Build a seq2seq model
my_seq2seq = Model([encoder_inputs, decoder_inputs], decoder_outputs, name = "seq2seq_Eng-Span_translator")
my_seq2seq.summary()
my_seq2seq.compile(
    optimizer = "adam",
    loss = "categorical_crossentropy",
    metrics = ["accuracy"]
)
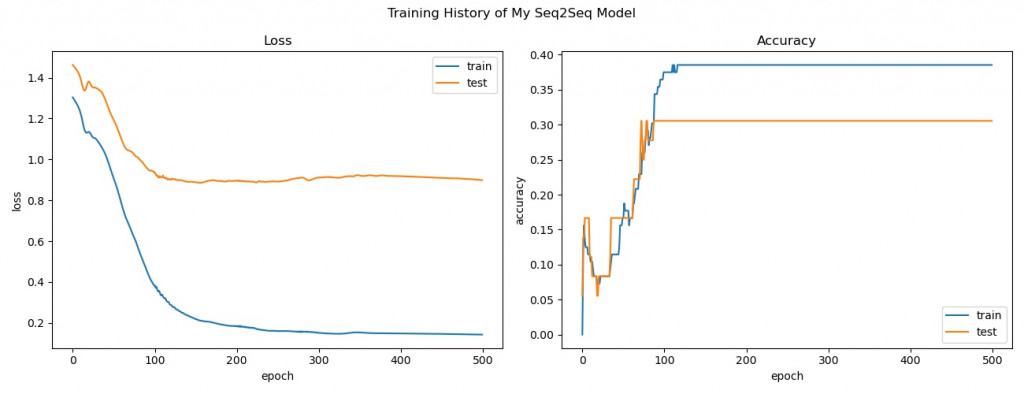
開始訓練翻譯器模型並回顧訓練過程中損失函數及準確度的變化:
batch_size = 50
epochs = 500

# Start training with a GPU
with tf.device("/GPU:0"):
    start = time.time()
    train_hist =  my_seq2seq.fit(
                        x = [encoder_input_data, decoder_input_data],
                        y = decoder_target_data,
                        batch_size = batch_size,
                        epochs = epochs,
                        shuffle = True,
                        verbose = 1,
                        validation_split = 0.2
                        )

# Review training history
print("All history keys: {}".format(train_hist.history.keys()))
fig, axes = plt.subplots(1, 2, figsize = (13, 5))
fig.suptitle("Training History of My Seq2Seq Model")
plt.tight_layout()
axes[0].set_title("Loss")
axes[0].plot(train_hist.history["loss"], label = "train")
axes[0].plot(train_hist.history["val_loss"], label = "test")
axes[0].set_xlabel("epoch")
axes[0].set_ylabel("loss")
axes[0].legend(loc = "upper right")
axes[1].set_title("Accuracy")
axes[1].plot(train_hist.history["accuracy"], label = "train")
axes[1].plot(train_hist.history["val_accuracy"], label = "test")
axes[1].set_xlabel("epoch")
axes[1].set_ylabel("accuracy")
axes[1].legend(loc = "lower right")
plt.show()
def translate_sentence(test_input):
    # Encode the input as state vectors
    encoder_states_value = encoder_model.predict(test_input)
    # Set decoder states equal to encoder final states
    decoder_states_value = encoder_states_value
    # Generate empty target sequence of length 1
    # (batch size, number of tokens to start with, number of tokens in our target vocabulary)
    target_seq = np.zeros((1, 1, num_decoder_tokens))

    # Populate the first token of target sequence with the start token:
    target_seq[0, 0, target_features_dict["<SOS>"]] = 1.

    decoded_sentence = ''
    stop_condition = False
    while not stop_condition:
        # Run the decoder model to get possible
        # output tokens (with probabilities) & states
        output_tokens, new_decoder_hidden_state, new_decoder_cell_state = decoder_model.predict(
        [target_seq] + decoder_states_value)

    # Choose token with highest probability
    sampled_token_index = np.argmax(output_tokens[0, -1, :])
    sampled_token = reverse_target_features_dict[sampled_token_index]
    decoded_sentence += ' ' + sampled_token

    # Exit condition: either hit max length or find <EOS>
    if (sampled_token == "<EOS>" or len(decoded_sentence) > max_decoder_seq_length):
        stop_condition = True
    # Update the target sequence (of length 1)
    target_seq = np.zeros((1, 1, num_decoder_tokens))
    target_seq[0, 0, sampled_token_index] = 1.

    # Update states
    decoder_states_value = [new_decoder_hidden_state, new_decoder_cell_state]
    return decoded_sentence


# Inference process
# Translate each English sentence in input_docs into Spanish
with device("/GPU:0"):
    for seq_idx in range(10):
        test_input = encoder_input_data[seq_idx: seq_idx + 1]
        translated_sentence = translate_sentence(test_input)
        print("---------------------------")
        print("Source sentence:", input_docs[seq_idx])
        print("Translated sentence:", translated_sentence)
        print("Ground truth target sentence: ", target_docs[seq_idx].lstrip("<SOS> ").rstrip(" <EOS>"))
執行翻譯結果,比對一下各句英文的西班牙譯文(模型預測)以及語料庫中的西班牙原文(真實):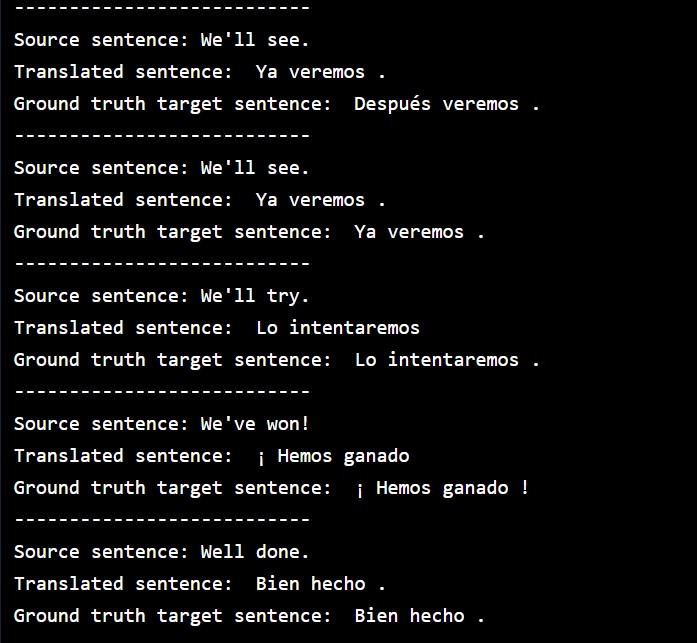
今天的例子中我們採用了極小型的雙語平行語料庫,裏頭只有意義相同的英文與西班牙文的文句各11句。在將單詞轉為向量時,我們為了方便說明,使用了 one-hot 編碼,很顯然模型的準確度並不會太高。在翻譯實際任務上,我們會改用 word2vec 的 word embedding 方式進行向量化,因其保留了語意關係,將大幅提升模型預測的準確度。
今天的文章就記錄到這裡,各位小夥伴晚安!



 iThome鐵人賽
 看影片追技術