
當環境準備就緒,今天就來實作 Edge AI Image Classification 影像分類吧!
ImageNet dataset
開始之前一樣先啟動 docker 便利我們後續的操作。
cd jetson-inference/
docker/run.sh
NVIDIA 的 hello AI world 專案有提供 C++ 與 python 範例程式,接下來我們皆使用 python 作為範例。切換目錄至 google jetson-inference/build/aarch64/bin 資料夾,所有的 python 範例也都放置於此。並且執行 imagenet.py 指令,參數分別為要進行推論的輸入影像資料,以及推論後的結果。所有預訓練模型皆是使用 imageNet 作為訓練的資料集,完成的分類名稱可以參考此檔案。
cd jetson-inference/build/aarch64/bin
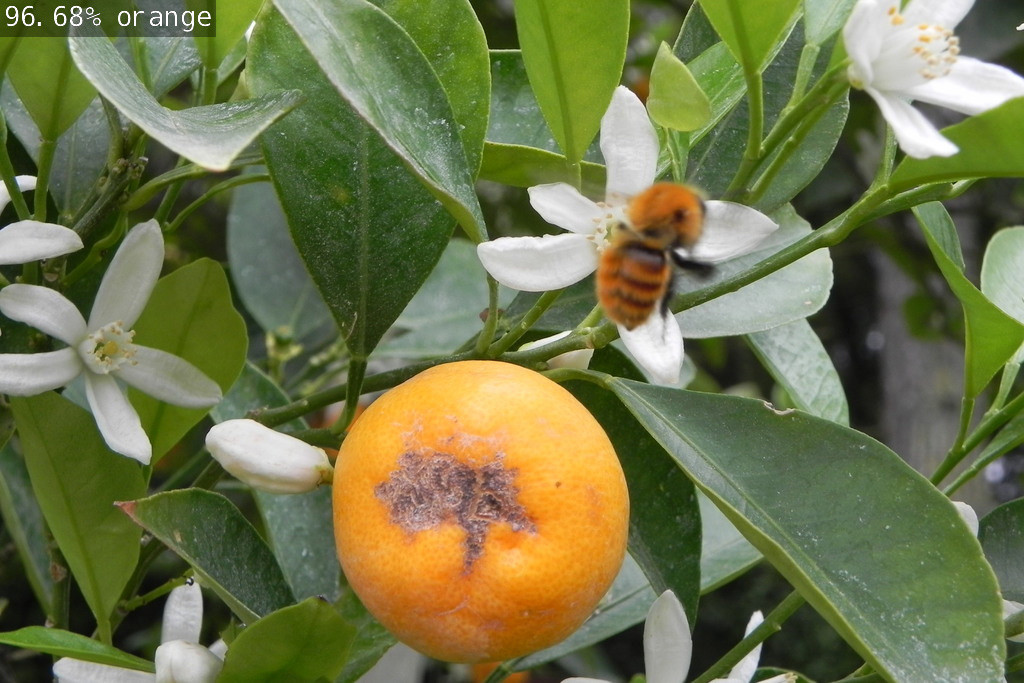
./imagenet.py images/orange_0.jpg images/test/output_0.jpg
預設的情況 imagenet.py 會使用 googlenet 預訓練模型作為推論的神經網路,一樣在初次執行會花費比較久的時間最佳化模型。完成後從資料夾瀏覽器開啟輸出的 output_0.jpg ,從左上角 96.68% orange 顯示,即便主體占比不大,且還有其他物體在畫面中,仍然能正確辨識出影像內容。
而 imagenet.py 可以支援多個不同預訓練模型,只要帶入參數 --network=<model> 就會使用指定的預訓練模型進行推論,而當前版本 <model> 支援以下模型選項。
接著我們可以嘗試使用不同的模型與檔案進行推論,並觀察其結果。
./imagenet.py --network=resnet-18 images/strawberry_0.jpg images/test/output_1.jpg
模型推估 99.28% 的機率是草莓。
由於前一篇在建置環境時並沒有一次下載所有模型,所以上述的 <model> 模型選項可能會找不到對應的模型。若不確定目前在 Jetson Nano 上有下載了那些模型,我們可以切換到模型存放的資料夾 jetson-inference/data/networks/ 使用 ls 來檢視所有檔案。
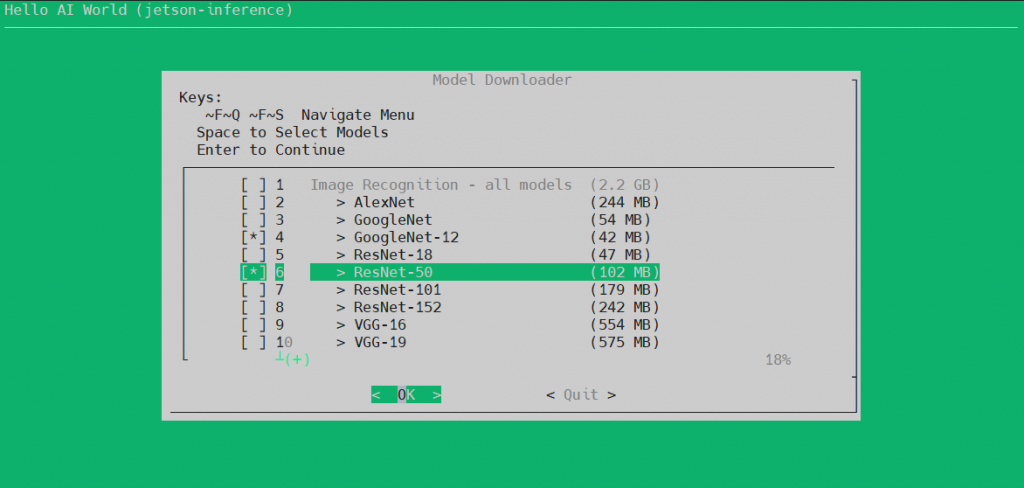
若要下載其他預訓練模型可以使用 download-models.sh 腳本,並操作互動式選單來下載模型。
cd /jetson-inference/tools/
./download-models.sh
需要注意的是,這邊依然會帶入預設的模型選項,若你的系統上已經有這些模型,務必要先取消選擇。因為此腳本並不會檢查系統上已經有哪些模型,一律重新下載選擇的模型,若沒先取消掉全部又重新下載一次,也是相當耗費時間。而模型右側有註明檔案的大小,檔案越大也就代表此模型要運算的參數量更多,會更耗費運算資源(推論時間拉長),但通常相應而來推論的結果也會更加精確,可以做為推論模型選用的參考依據。
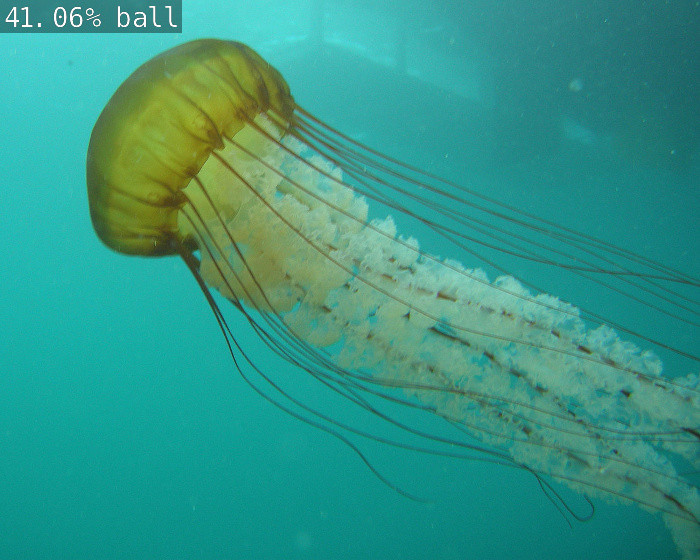
這邊額外下載 GoogleNet-12 與 ResNet-50 來測試,各位開發者也可以自行選擇要測試的模型。將工作路徑切換回 /jetson-inference/build/aarch64/bin/,並且執行 imagenet.py 帶入最輕量的模型 googlenet-12。看一下結果……什麼!?你居然說這個水母是球!? 是的,不管多執行幾次這結果是不會變的,這就是不同模型參數量可能會影響精確度的實證,各位可已嘗試代入不同模型與檔案測試看看,說不定會發生有趣的結果喔!
cd /jetson-inference/build/aarch64/bin/
./imagenet.py --network=googlenet-12 images/jellyfish.jpg images/test/output_jellyfish.jpg
範例程式也可以處理批量檔案的推論,輸入以下指令使用 resnet-50 推論所有 fruit_ 為開頭的檔名照片。從結果看起來並非所有影像的推論結果都是正確的,還是有不少時候會 ”出槌”。要改善這種狀況可以換不同模型測試,或是針對特定資料集重新訓練,將類別限縮提高單一類型的資料量等。
./imagenet.py --network=resnet-50 "/jetson-inference/data/images/fruit_*.jpg" "/jetson-inference/data/images/test/output_fruit_%i.jpg"
另外也可以輸入影片檔案進行推論,執行以下指令下載測試影片並解進行推論:
wget https://nvidia.box.com/shared/static/tlswont1jnyu3ix2tbf7utaekpzcx4rc.mkv -O jellyfish.mkv
./imagenet.py --network=resnet-18 jellyfish.mkv images/test/jellyfish_resnet18.mkv
最後也可以從 webcam 擷取影像作即時推論並存成影像檔,各位也可以測試看看:
./imagenet.py /dev/video0 images/test/output.mp4
開啟 imagenet.py 程式來看一下,發現程式碼相當精簡,不到 100 行就完成了這範例程式。程式碼前半在處理輸入參數所指定的模型、來源、輸出等。後半部 while 回圈內就是執行資料的載入、推論、打上結果字串、並重新渲染輸出直到資料完全結束。忽然之間兩眼就看完一個 Edge AI 應用程式了!?是的,因為大部分會使用到的功能皆已經被包在 jetson.inference 與 jetson.utils 這兩個模組中,這也讓開發者可以省是許多。關於 Jetson 模組完整 API 可參照API說明。
#!/usr/bin/python3
# Copyright (c) 2020, NVIDIA CORPORATION. All rights reserved.

import jetson.inference
import jetson.utils

import argparse
import sys

# parse the command line
parser = argparse.ArgumentParser(description="Classify a live camera stream using an image recognition DNN.",
                                 formatter_class=argparse.RawTextHelpFormatter, epilog=jetson.inference.imageNet.Usage() +
                                 jetson.utils.videoSource.Usage() + jetson.utils.videoOutput.Usage() + jetson.utils.logUsage())

parser.add_argument("input_URI", type=str, default="", nargs='?', help="URI of the input stream")
parser.add_argument("output_URI", type=str, default="", nargs='?', help="URI of the output stream")
parser.add_argument("--network", type=str, default="googlenet", help="pre-trained model to load (see below for options)")
parser.add_argument("--camera", type=str, default="0", help="index of the MIPI CSI camera to use (e.g. CSI camera 0)\nor for VL42 cameras, the /dev/video device to use.\nby default, MIPI CSI camera 0 will be used.")
parser.add_argument("--width", type=int, default=1280, help="desired width of camera stream (default is 1280 pixels)")
parser.add_argument("--height", type=int, default=720, help="desired height of camera stream (default is 720 pixels)")
parser.add_argument('--headless', action='store_true', default=(), help="run without display")

is_headless = ["--headless"] if sys.argv[0].find('console.py') != -1 else [""]

try:
        opt = parser.parse_known_args()[0]
except:
        print("")
        parser.print_help()
        sys.exit(0)

# load the recognition network
net = jetson.inference.imageNet(opt.network, sys.argv)

# create video sources & outputs
input = jetson.utils.videoSource(opt.input_URI, argv=sys.argv)
output = jetson.utils.videoOutput(opt.output_URI, argv=sys.argv+is_headless)
font = jetson.utils.cudaFont()

# process frames until the user exits
while True:
        # capture the next image
        img = input.Capture()

        # classify the image
        class_id, confidence = net.Classify(img)

        # find the object description
        class_desc = net.GetClassDesc(class_id)

        # overlay the result on the image
        font.OverlayText(img, img.width, img.height, "{:05.2f}% {:s}".format(confidence * 100, class_desc), 5, 5, font.White, font.Gray40)

        # render the image
        output.Render(img)

        # update the title bar
        output.SetStatus("{:s} | Network {:.0f} FPS".format(net.GetNetworkName(), net.GetNetworkFPS()))

        # print out performance info
        net.PrintProfilerTimes()

        # exit on input/output EOS
        if not input.IsStreaming() or not output.IsStreaming():
                break
影像分類作為 CNN 的基礎應用,其所需要的運算能力要求也較低,更容易佈署到邊緣裝置上。而 Hello AI World 專案所提供的 python 模組 API 也相當易用,對於初次嘗試開發 Edge AI 應用程式的開發者也能輕鬆上手。倘若 ImageNet 資料集的類別不符合使用情境須情呢?下一篇將來說明如何訓練自己的影像分類模型喔!


