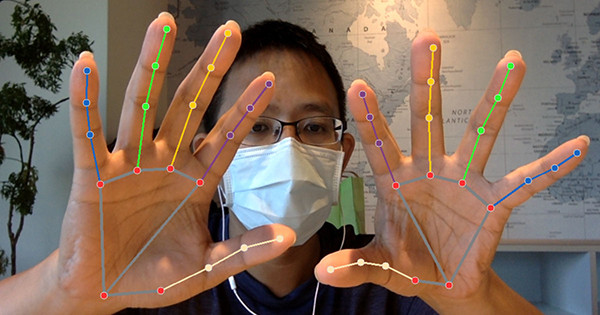
這篇教學會使用 MediaPipe 的手掌偵測模型 ( hands ) 偵測雙手的手掌,再透過 OpenCV 讀取攝影鏡頭影像進行辨識,在手掌與每隻手指標記骨架,最後還會簡單設計隔空觸碰的小遊戲。
因為程式使用 Jupyter 搭配 Tensorflow 進行開發,所以請先閱讀「使用 Anaconda」和「使用 MediaPipe」,安裝對應的套件,如果不要使用 Juputer,也可參考「使用 Python 虛擬環境」,建立虛擬環境進行實作。

MediaPipe Hands 利用多個模型協同工作,可以偵測手掌模型,返回手掌與每隻手指精確的 3D 關鍵點,MediaPipe Hand 除了可以偵測清晰的手掌形狀與動作,更可以判斷出被少部分被遮蔽的手指形狀和動作,再清晰的畫面下,針對手掌判斷的精準度可達 95.7%。
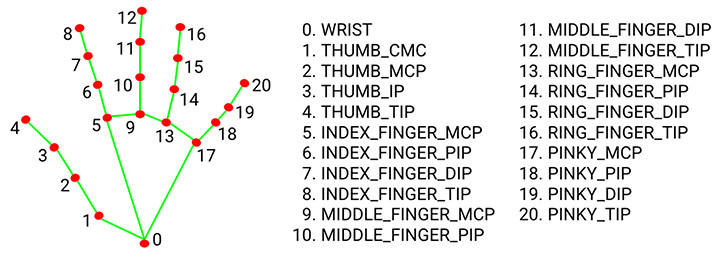
Mediapipe 偵測手掌後,會在手掌與手指上產生 21 個具有 x、y、z 座標的節點,透過包含立體深度的節點,就能在 3D 場景中做出多種不同的應用,下圖標示出每個節點的順序和位置 ( 圖片來源 )。
如果同時出現兩隻手,採用交錯偵測 ( 短時間內偵測兩次,一次偵測一隻手 ),最後仍然維持 21 個點的數據,如果只希望偵測一隻手,可設定 max_num_hands=1。

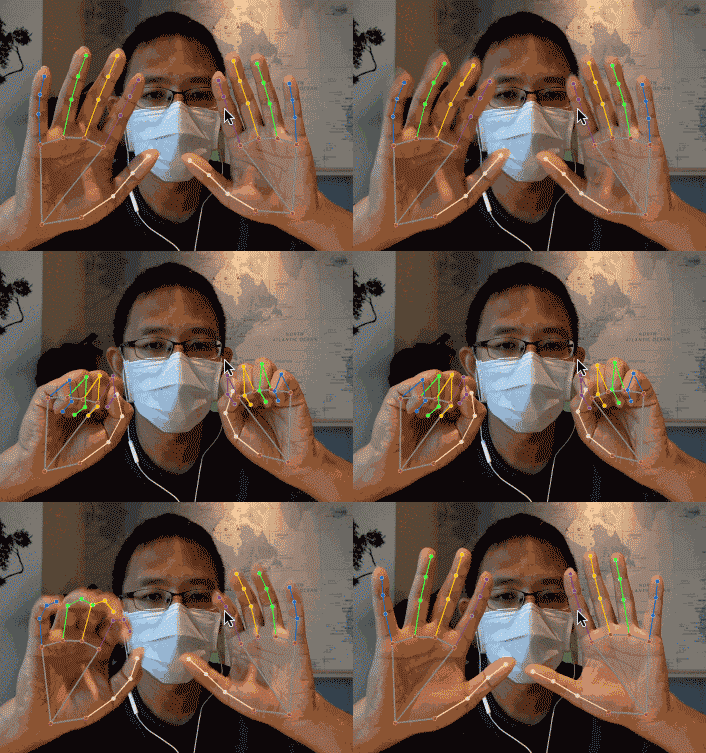
下方的程式碼延伸「讀取並播放影片」文章的範例,搭配 mediapipe 手掌偵測的方法,透過攝影鏡頭獲取影像後,即時標記出手掌骨架和動作。
import cv2
import mediapipe as mp

mp_drawing = mp.solutions.drawing_utils          # mediapipe 繪圖方法
mp_drawing_styles = mp.solutions.drawing_styles  # mediapipe 繪圖樣式
mp_hands = mp.solutions.hands                    # mediapipe 偵測手掌方法

cap = cv2.VideoCapture(0)

# mediapipe 啟用偵測手掌
with mp_hands.Hands(
    model_complexity=0,
    # max_num_hands=1,
    min_detection_confidence=0.5,
    min_tracking_confidence=0.5) as hands:

    if not cap.isOpened():
        print("Cannot open camera")
        exit()
    while True:
        ret, img = cap.read()
        if not ret:
            print("Cannot receive frame")
            break
        img2 = cv2.cvtColor(img, cv2.COLOR_BGR2RGB)   # 將 BGR 轉換成 RGB
        results = hands.process(img2)                 # 偵測手掌
        if results.multi_hand_landmarks:
            for hand_landmarks in results.multi_hand_landmarks:
                # 將節點和骨架繪製到影像中
                mp_drawing.draw_landmarks(
                    img,
                    hand_landmarks,
                    mp_hands.HAND_CONNECTIONS,
                    mp_drawing_styles.get_default_hand_landmarks_style(),
                    mp_drawing_styles.get_default_hand_connections_style())

        cv2.imshow('oxxostudio', img)
        if cv2.waitKey(5) == ord('q'):
            break    # 按下 q 鍵停止
cap.release()
cv2.destroyAllWindows()

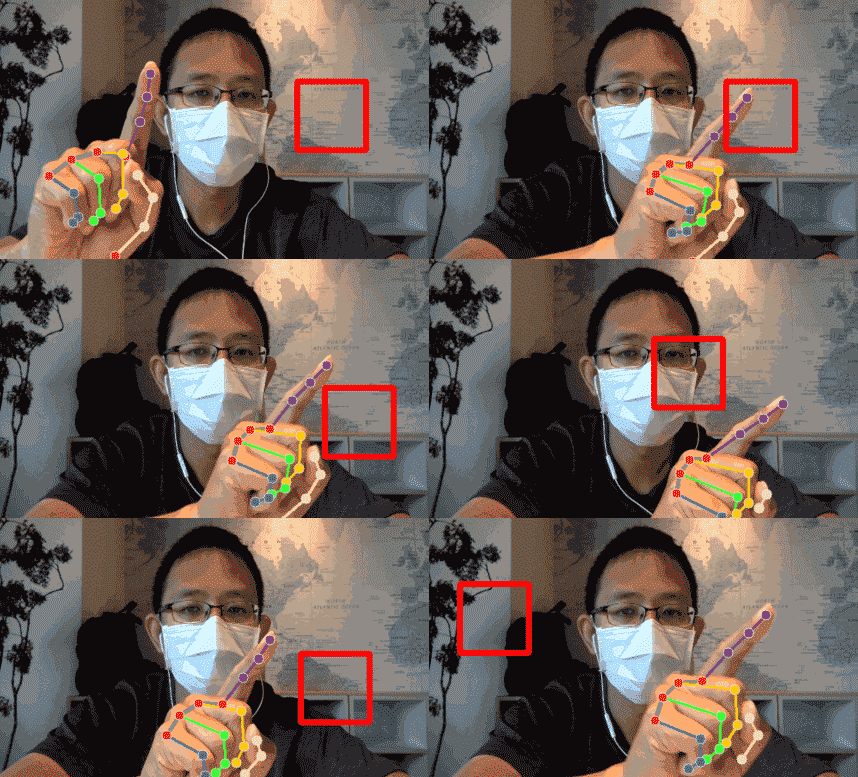
偵測到手掌後,就可取得 21 個節點的座標位置,下方的程式碼會在攝影機取得畫面時,在畫面上繪製一個正方形區域,當食指末端 ( 第 8 個節點 ) 觸碰到這個區域 ( 座標落在這個區域內 ),就將正方形區域移動到隨機的位置。
參考:rectangle() 畫四邊形、隨機整數、
import cv2
import mediapipe as mp
import random

mp_drawing = mp.solutions.drawing_utils          # mediapipe 繪圖方法
mp_drawing_styles = mp.solutions.drawing_styles  # mediapipe 繪圖樣式
mp_hands = mp.solutions.hands                    # mediapipe 偵測手掌方法

cap = cv2.VideoCapture(0)

# mediapipe 啟用偵測手掌
with mp_hands.Hands(
    model_complexity=0,
    min_detection_confidence=0.5,
    min_tracking_confidence=0.5) as hands:

    if not cap.isOpened():
        print("Cannot open camera")
        exit()

    run = True         # 設定是否更動觸碰區位置
    while True:
        ret, img = cap.read()
        if not ret:
            print("Cannot receive frame")
            break
        img = cv2.resize(img,(540,320))  # 調整畫面尺寸
        size = img.shape   # 取得攝影機影像尺寸
        w = size[1]        # 取得畫面寬度
        h = size[0]        # 取得畫面高度
        if run:
            run = False    # 如果沒有碰到,就一直是 False ( 不會更換位置 )
            rx = random.randint(50,w-50)    # 隨機 x 座標
            ry = random.randint(50,h-100)   # 隨機 y 座標
            print(rx, ry)
        img2 = cv2.cvtColor(img, cv2.COLOR_BGR2RGB)   # 將 BGR 轉換成 RGB
        results = hands.process(img2)                 # 偵測手掌
        if results.multi_hand_landmarks:
            for hand_landmarks in results.multi_hand_landmarks:
                x = hand_landmarks.landmark[7].x * w   # 取得食指末端 x 座標
                y = hand_landmarks.landmark[7].y * h   # 取得食指末端 y 座標
                print(x,y)
                if x>rx and x<(rx+80) and y>ry and y<(ry+80):
                    run = True
                # 將節點和骨架繪製到影像中
                mp_drawing.draw_landmarks(
                    img,
                    hand_landmarks,
                    mp_hands.HAND_CONNECTIONS,
                    mp_drawing_styles.get_default_hand_landmarks_style(),
                    mp_drawing_styles.get_default_hand_connections_style())

        cv2.rectangle(img,(rx,ry),(rx+80,ry+80),(0,0,255),5)   # 畫出觸碰區
        cv2.imshow('oxxostudio', img)
        if cv2.waitKey(5) == ord('q'):
            break    # 按下 q 鍵停止
cap.release()
cv2.destroyAllWindows()

大家好,我是 OXXO,是個即將邁入中年的斜槓青年,我已經寫了超過 400 篇 Python 的教學,有興趣可以參考下方連結呦~ ^_^
