這篇教學會使用 MediaPipe 的人臉網格模型 ( Face Mesh ) 偵測人臉,再透過 OpenCV 讀取攝影鏡頭影像進行辨識並在人臉上標記網格,最後還會做出只有 3D 人臉網格在移動的影片。
因為程式使用 Jupyter 搭配 Tensorflow 進行開發,所以請先閱讀「使用 Anaconda」和「使用 MediaPipe」,安裝對應的套件,如果不要使用 Juputer,也可參考「使用 Python 虛擬環境」,建立虛擬環境進行實作。
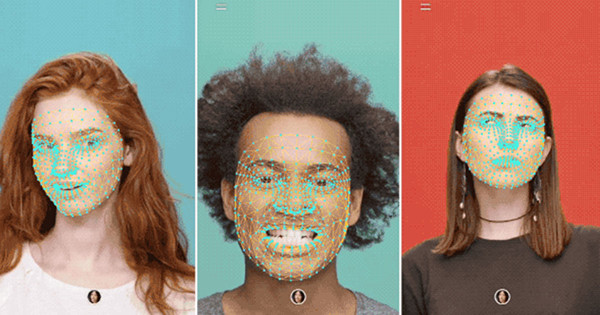
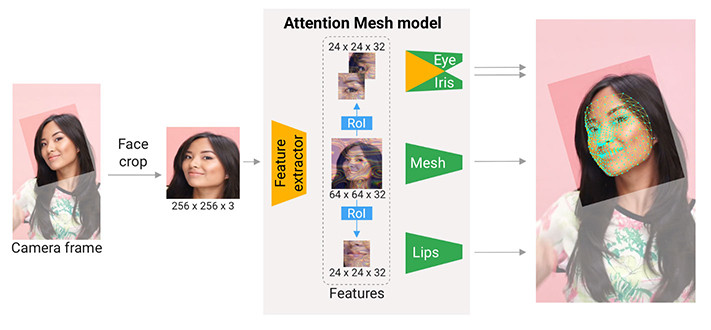
MediaPipe 的 Face Mesh 可以將人臉轉換為幾何網格模型,經由機器學習判斷人臉的表面和深度,再透過 468 個臉部標記 ( 面部姿態變換矩陣、三角形面部網格...等 ) 畫出 3D 的人臉網格,由於已經計算出立體空間的特性,這個方法常用於擴增實境 ( AR ) 相關的應用。
從 Mediapipe 官方介紹中可以知道,經過深度運算後的網格,可以更準確得標記出嘴唇、眼睛、鼻子...等立體的五官 ( 圖片來源 )。
下方的程式碼延伸「讀取並播放影片」文章的範例,搭配 mediapipe 人臉網格的方法,透過攝影鏡頭獲取影像後,即時標記出人臉網格。
import cv2
import mediapipe as mp

mp_drawing = mp.solutions.drawing_utils             # mediapipe 繪圖方法
mp_drawing_styles = mp.solutions.drawing_styles     # mediapipe 繪圖樣式
mp_face_mesh = mp.solutions.face_mesh               # mediapipe 人臉網格方法
drawing_spec = mp_drawing.DrawingSpec(thickness=1, circle_radius=1)  # 繪圖參數設定

cap = cv2.VideoCapture(0)

# 啟用人臉網格偵測,設定相關參數
with mp_face_mesh.FaceMesh(
    max_num_faces=1,       # 一次偵測最多幾個人臉
    refine_landmarks=True,
    min_detection_confidence=0.5,
    min_tracking_confidence=0.5) as face_mesh:

    if not cap.isOpened():
        print("Cannot open camera")
        exit()
    while True:
        ret, img = cap.read()
        if not ret:
            print("Cannot receive frame")
            break
        img2 = cv2.cvtColor(img, cv2.COLOR_BGR2RGB)   # 顏色 BGR 轉換為 RGB
        results = face_mesh.process(img2)             # 取得人臉網格資訊
        if results.multi_face_landmarks:
            for face_landmarks in results.multi_face_landmarks:
                # 繪製網格
                mp_drawing.draw_landmarks(
                    image=img,
                    landmark_list=face_landmarks,
                    connections=mp_face_mesh.FACEMESH_TESSELATION,
                    landmark_drawing_spec=None,
                    connection_drawing_spec=mp_drawing_styles
                    .get_default_face_mesh_tesselation_style())
                # 繪製輪廓
                mp_drawing.draw_landmarks(
                    image=img,
                    landmark_list=face_landmarks,
                    connections=mp_face_mesh.FACEMESH_CONTOURS,
                    landmark_drawing_spec=None,
                    connection_drawing_spec=mp_drawing_styles
                    .get_default_face_mesh_contours_style())
                # 繪製眼睛
                mp_drawing.draw_landmarks(
                    image=img,
                    landmark_list=face_landmarks,
                    connections=mp_face_mesh.FACEMESH_IRISES,
                    landmark_drawing_spec=None,
                    connection_drawing_spec=mp_drawing_styles
                    .get_default_face_mesh_iris_connections_style())

        cv2.imshow('oxxostudio', img)
        if cv2.waitKey(5) == ord('q'):
            break    # 按下 q 鍵停止
cap.release()
cv2.destroyAllWindows()
如果將原本攝影的畫面隱藏,就可以將產生的 3D 人臉網格套用在其他圖片裡,形成有趣的影像
import cv2
import mediapipe as mp
import numpy as np       # 載入 numpy 函式庫

mp_drawing = mp.solutions.drawing_utils
mp_drawing_styles = mp.solutions.drawing_styles
mp_face_mesh = mp.solutions.face_mesh
drawing_spec = mp_drawing.DrawingSpec(thickness=1, circle_radius=1)

cap = cv2.VideoCapture(0)

with mp_face_mesh.FaceMesh(
    max_num_faces=1,
    refine_landmarks=True,
    min_detection_confidence=0.5,
    min_tracking_confidence=0.5) as face_mesh:

    if not cap.isOpened():
        print("Cannot open camera")
        exit()
    while True:
        ret, img = cap.read()
        if not ret:
            print("Cannot receive frame")
            break
        img = cv2.resize(img,(480,320))                 # 調整影像尺寸為 480x320
        output = np.zeros((320,480,3), dtype='uint8')   # 繪製 480x320 的黑色畫布
        img2 = cv2.cvtColor(img, cv2.COLOR_BGR2RGB)
        results = face_mesh.process(img2)
        if results.multi_face_landmarks:
            for face_landmarks in results.multi_face_landmarks:
                # 繪製網格
                mp_drawing.draw_landmarks(
                    image=output,     # 繪製到 output
                    landmark_list=face_landmarks,
                    connections=mp_face_mesh.FACEMESH_TESSELATION,
                    landmark_drawing_spec=None,
                    connection_drawing_spec=mp_drawing_styles
                    .get_default_face_mesh_tesselation_style())
                # 繪製輪廓
                mp_drawing.draw_landmarks(
                    image=output,     # 繪製到 output
                    landmark_list=face_landmarks,
                    connections=mp_face_mesh.FACEMESH_CONTOURS,
                    landmark_drawing_spec=None,
                    connection_drawing_spec=mp_drawing_styles
                    .get_default_face_mesh_contours_style())
                # 繪製眼睛
                mp_drawing.draw_landmarks(
                    image=output,     # 繪製到 output
                    landmark_list=face_landmarks,
                    connections=mp_face_mesh.FACEMESH_IRISES,
                    landmark_drawing_spec=None,
                    connection_drawing_spec=mp_drawing_styles
                    .get_default_face_mesh_iris_connections_style())

        cv2.imshow('oxxostudio', output)     # 顯示 output
        if cv2.waitKey(5) == ord('q'):
            break    # 按下 q 鍵停止
cap.release()
cv2.destroyAllWindows()
大家好,我是 OXXO,是個即將邁入中年的斜槓青年,我已經寫了超過 400 篇 Python 的教學,有興趣可以參考下方連結呦~ ^_^


 iThome鐵人賽