在上一篇文章中,我們介紹了 TensorFlow 的基本概念與使用方法。本篇文章將繼續介紹 TensorFlow 的應用,我們這次使用 TensorFlow 來預測心血管疾病的發生機率,並做詳細解說
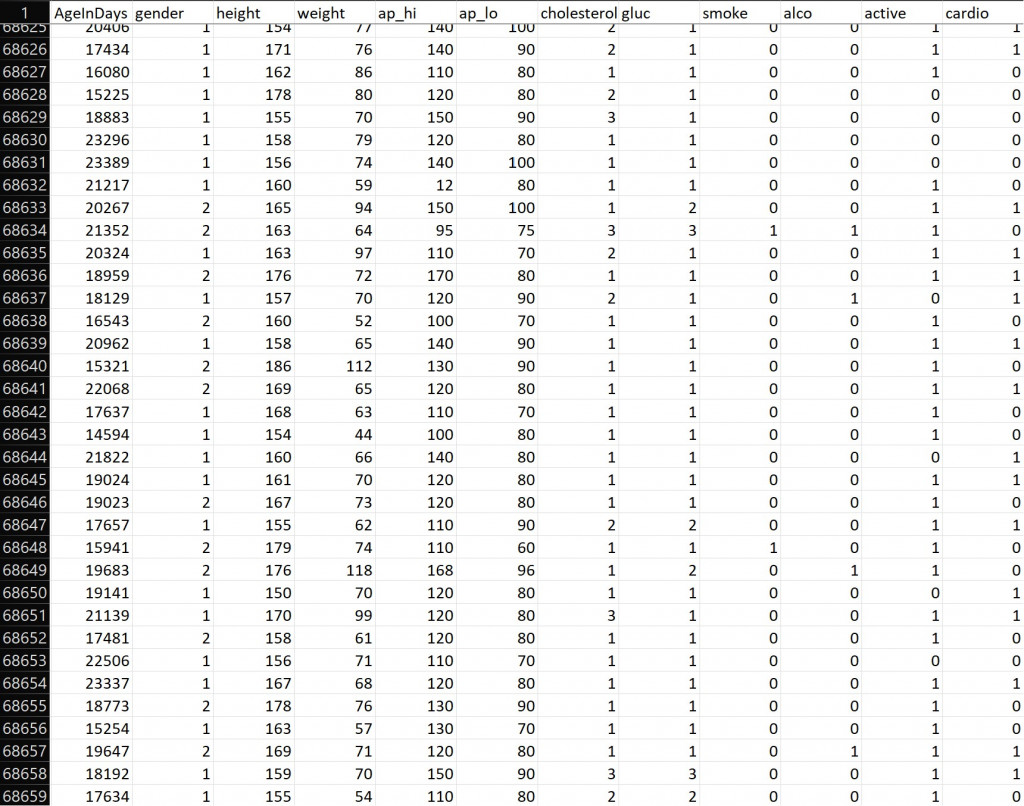
這是心血管疾病之病患的的去識別化公開資料[1]。首先,這些資料可以包含病患的性別、年齡、背景、生活習慣、醫療檢測結果等。
有關於如何準備 csv 檔案,可以參考:https://docs.python.org/3/library/csv.html
首先,我們先從 library 之中導入一些必要元素
import pandas as pd
import tensorflow as tf
from sklearn.model_selection import train_test_split
from sklearn.preprocessing import StandardScaler
from sklearn.metrics import classification_report, confusion_matrix, mean_squared_error
我們透過 Pandas 存取電腦內的 csv檔案。
df = pd.read_csv("<file path>\cardio_train.csv")
接下來我們要檢視 csv 檔案內有記錄到關於心血管疾病 cardio 的相關因素,我們就可以在令 x=df[features] 做訓練,並透過其來預測心血管疾病(令 y=df[cardio])。
features = ["AgeInDays", "height", "weight", "ap_hi", "ap_lo", "cholesterol", "gluc", "smoke", "alco", "active"]
X = df[features]
y = df["cardio"]
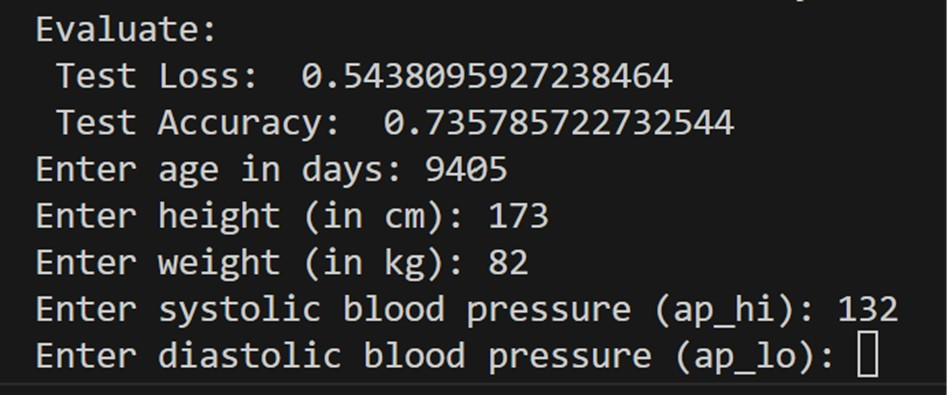
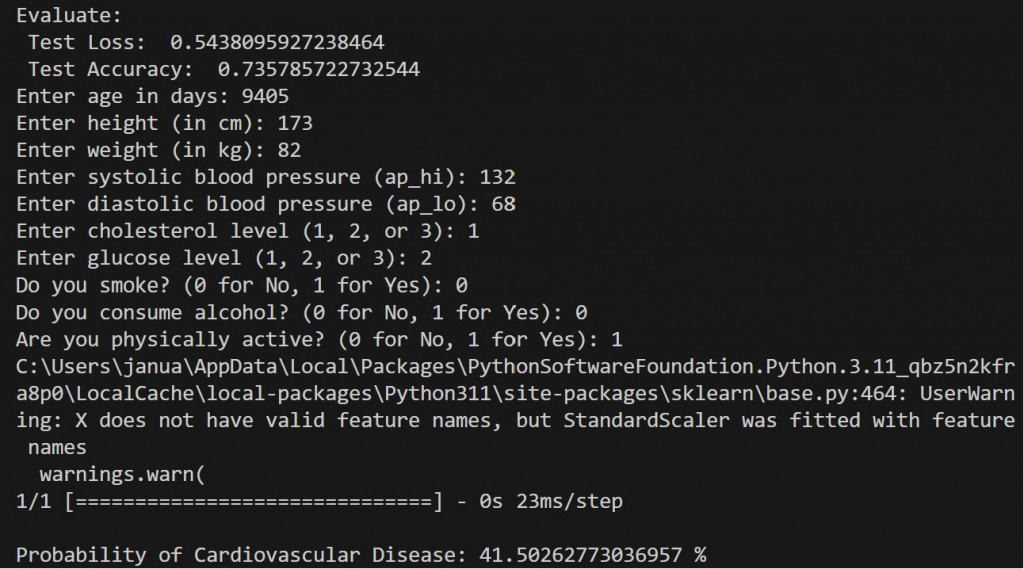
假設目前有一位檢測者有以下資料:
AgeInDays = 9405;height = 173;weight = 82;ap_hi = 132;ap_lo = 68;
  Cholesterol = 1;gluc = 2;smoke = 0;alco = 0;active = 1
我們就可以利用預訓練模型預測這位檢測者,目前罹患心血管疾病 cardio 的機率。
我們將資料分成以上兩組,就是為了確保我們的模型有能力做更準確的預測,所以我們會提供資料供模型判斷以達到測試,以避免發生過擬合 Overfitting 的狀態。一般會分成 80% 的訓練資料,及 20% 的測試資料,所以我們透過 test_size=0.2 來達成;而 random_state=42 便是確保每次程式碼,都能用相同的方式分類訓練組與測試組,以便我們比較不同的機器學習模型之間的性能。
X_train, X_test, y_train, y_test = train_test_split(X, y, test_size=0.2, random_state=42)
標準化特徵是在機器學習中很常見的步驟之一,他可以將 features 轉換為一個標準的規模,使特徵的平均值為 0、標準差為 1。標準化有以下好處[2]
fit_transform() 將 scalar 擬合到訓練數據內,再將訓練與測試用的資料透過 transform() 做轉換scaler = StandardScaler()
X_train = scaler.fit_transform(X_train)
X_test = scaler.transform(X_test)
這時 X_train 與 X_test 就有標準化特徵了,這樣我就可以把這些資料用來訓練與評估機器學習的模型。我們透過 matplotlib 顯示對比圖:

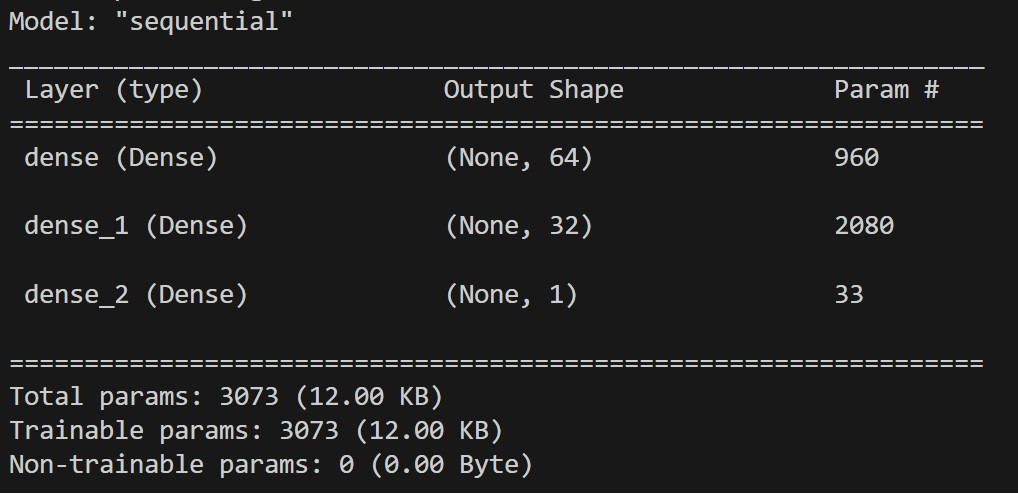
接下來我們便要定義神經網路的架構了!在神經網路模型中,每一層都會使用 Activation Function 對資料進行特定處理。有關選擇 Activation Function 並沒有標準答案,但我們仍可以根據模型架構和問題類型,並通過不斷嘗試以找到最合適的函數。
在這個程式碼中,我們使用 ReLU 函數作為前兩層的 Activation Function 來整頓線性單位函數。ReLU 函數會將輸入值為正的部分直接輸出、而輸入值為負的部分便輸出 0;最後一層使用 Sigmoid 函數,我們可以將輸出值視為目標類別的機率值。
model = tf.keras.Sequential([
    tf.keras.layers.Dense(64, activation='relu', input_shape=(X_train.shape[1],)),
    tf.keras.layers.Dense(32, activation='relu'),
    tf.keras.layers.Dense(1, activation='sigmoid')
    ])
其中,前兩層的數字 64 和 32 分別代表每層的輸出向量維度。第三層的 1 代表輸出向量維度為 1。
在模型被定義(Refine)之後,我們就可以將模型做編譯,我們可以自行指定要用甚麼樣的 Optimizer、Loss Function 以及 Metrics 做處理
model.compile(optimizer='adam', loss=tf.keras.losses.BinaryCrossentropy(), metrics=['accuracy'])
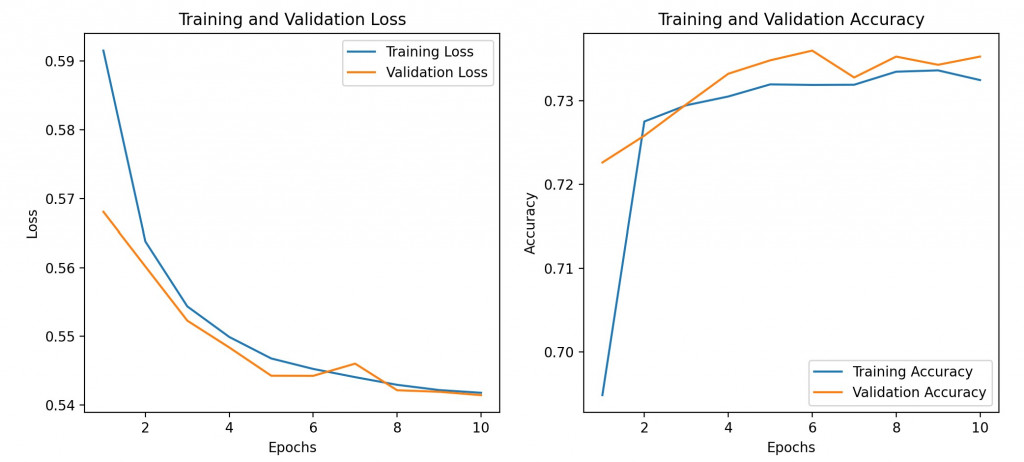
Adam:是一種自己適應學習率的 Optimizer,以將 BinaryCrossentropy() 做最小化為主。在訓練模型過程中,會去調整模型中的每個參數的學習率,使其在每一次跌代過程中會更加準確。BinaryCrossentropy():是一個會預測且計算得到正確輸出的機率,再將該機率值透過數學來取負對數函數的 Loss Function。因為其生成的函數值在圖形上是凸顯的(Convex),且該函數結果可微分,所以很常被大家使用。Metrics:該函數是用來評估一個機器學習模型的性能,常用的還有 precsion、recall、以及 F1 score。接下來就是將模型做訓練,得到 history 參數。其中 fit() 會將模型進行 epochs 次數的訓練。在每一個 epoch 中,模型將會被每一批來自訓練資料的樣本數做訓練;而這模型的性能將會在每一個 epoch 之後的驗證集(Validation Set)上做評估。
history = model.fit(X_train, y_train, epochs=10, batch_size=32, validationn_split=0.2)
我們便可以將訓練結果顯示出來:
在完成編譯與訓練模型後,代表模型有一定的能力預測新的資料了。我們可以用 的方法,藉由預測測試資料中,每類別於每樣本中的機率值,再將該機率值做四捨五入,直接顯示系統的判斷結果。
y_pred_probs = model.predict(X_test)
並把其他參數也呈現出來:
print("Confusion Matrix:\n", confusion_matrix(y_test, y_pred))
print("\nClassification Report:\n", classification_report(y_test, y_pred))
print("\nMean squared error:\n", mean_squared_error(y_test, y_pred))
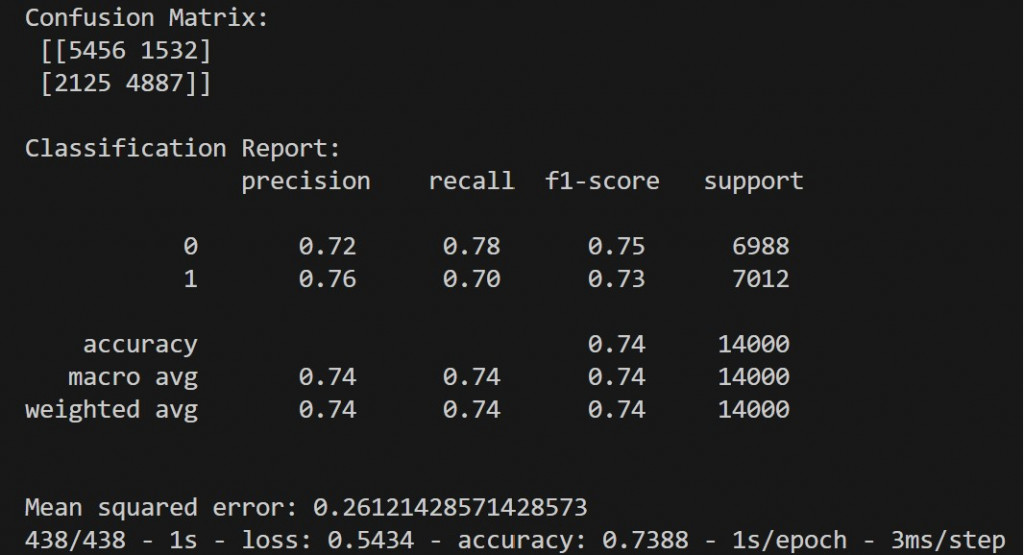
predict_res = model.evaluate(X_test, y_test, verbose=2)
print("\nEvaluate:\n   Test Loss: ", predict_res[0])
print("\n    Test Accuracy: ", predict_res[1])

我們可以讓這個程式更具有實用性:藉由使用戶自行輸入其身體數據,來判斷自己罹患心血管疾病的機率為多少,僅需透過定義函數,在蒐集相關數據之後,讓其進入模型中作分析後,顯示結果即可
1.定義函數:將蒐集的資料透過 NumPy 處理成陣列並確保其兼容性:
def get_user_inputs():
    age = float(input("Enter age in days: "))
    height = float(input("Enter height (in cm): "))
    weight = float(input("Enter weight (in kg): "))
    ap_hi = float(input("Enter systolic blood pressure (ap_hi): "))
    ap_lo = float(input("Enter diastolic blood pressure (ap_lo): "))
    cholesterol = int(input("Enter cholesterol level (1, 2, or 3): "))
    gluc = int(input("Enter glucose level (1, 2, or 3): "))
    smoke = int(input("Do you smoke? (0 for No, 1 for Yes): "))
    alco = int(input("Do you consume alcohol? (0 for No, 1 for Yes): "))
    active = int(input("Are you physically active? (0 for No, 1 for Yes): "))

    user_inputs = np.array([age, height, weight, ap_hi, ap_lo, cholesterol, gluc, smoke, alco, active], dtype=float)
    user_inputs = scaler.transform(user_inputs.reshape(1, -1))
    return user_inputs
2.蒐集資料:讓使用者自行輸入相關數值
user_inputs = get_user_inputs()
3.接下來便是輸出預測結果:
user_prediction_prob = model.predict(user_inputs)
print("\n Probability of Cardiovascular Disease:", user_prediction_prob[0][0])
在這兩次的程式示範中,我們把可用的功能做進一步的推展,也成功顯示出預測出的心血管疾病發生之機率。在接下來的文章中,就會提到有關神經網路的相關知識。並持續擴充與整合 TensorFlow 程式碼的運用。
[1] Cardiovascular Disease dataset:
https://www.kaggle.com/datasets/sulianova/cardiovascular-disease-dataset?resource=download
[2] Standardization features:
https://www.kaggle.com/code/harunshimanto/ml-for-diabetes-from-bangladesh/notebook
[3] Figure in this article are snipped from Microsoft VS Code


 iThome鐵人賽