
在【Day - 19】中,我們成功透過Function Calling功能讓GPT-3.5模型按照指定的格式進行輸出,並且保持了良好的回應速度。今天我們將把Function Calling實際整合到我們的APP中。另外,每次播放音訊時,我總覺得語音速度太快,無法跟上它的速度,一旦播放完就無法再次聆聽。因此,我計劃新增一個功能,允許使用者重複播放語音,以便能夠多次聆聽AI的回應。今天是Function Calling實戰的第二天,讓我們開始吧!
我在chatgpt.model.ts檔案中,新增了兩個新的Model。其中,ConversationDataModel是根據【Day - 19】中所定義的五個屬性,用以指定GPT-3.5模型透過Function Calling輸出的格式:
export type AIStyle = 'cheerful' | 'friendly' | 'excited' | '';

export interface ChatFunctionModel {
  name: string;
  description: string;
  parameters: {
    type: string;
    properties: {
      [key: string]: any;
    }
    required: string[];
  }
}

export interface ConversationDataModel {
  gptResponseText: string;
  gptResponseTextStyle: AIStyle;
  gptResponseTextStyleDegree: number;
  gptResponseEmphasisTexts: string[];
  gptResponseEmphasisStyles: string[];
}
接下來,我擴充了在【Day - 14】時建立的ChatMessageModel和ChatRequestModel,並加入了function_call屬性:
export interface ChatMessageModel {
  role?: ChatRole;
  name?: string;
  content: string;
  function_call?: {
    name: string;
    arguments: string;
  };
}

export interface ChatRequestModel {
  model: string;
  messages: ChatMessageModel[];
  functions?: ChatFunctionModel[];
  function_call?: string | {
    name: string;
  },
  temperature?: number;
  top_p?: number;
  stream?: boolean;
  max_tokens?: number;
}
在openai.service.ts檔案中,我調整了getConversationRequestData()方法。同時,根據Function Calling的設定,將【Day - 19】中定義好的JSON Schema加入其中:
private getConversationRequestData(): ChatRequestModel {
  return {
    model: 'gpt-3.5-turbo',
    messages: this.tokenizerCalcuation(), //Token計算
    temperature: 0.7,
    top_p: 1,
    functions: [
      {
        name: 'getEnglishTurtorConverstaionData',
        description: '',
        parameters: {
          type: 'object',
          properties: {
            gptResponseText: {
              type: 'string',
              description: '回覆的對話內容,請記得適時的延續或開啟新的話題。'
            },
            gptResponseTextStyle: {
              type: 'string',
              description: '根據回覆的對話內容相對應的語氣。可用:cheerful、friendly、excited'
            },
            gptResponseTextStyleDegree: {
              type: 'string',
              description: '對應gptResponseTextStyle語氣的強度。範圍在0.01到2。'
            },
            gptResponseEmphasisTexts: {
              type: 'array',
              description: '根據回覆的對話內容找出需要強調的句子或單字。',
              items: {
                type: 'string',
                description: ''
              }
            },
            gptResponseEmphasisStyles: {
              type: 'array',
              description: '對應gptResponseEmphasisTexts陣列的強調語氣。可用:reduced、none、moderate、strong',
              items: {
                type: 'string',
                description: ''
              }
            }
          },
          required: [
            'gptResponseText',
            'gptResponseTextStyle',
            'gptResponseTextStyleDegree',
            'gptResponseEmphasisTexts',
            'gptResponseEmphasisStyles'
          ]
        }
      }
    ],
    function_call: {
      name: 'getEnglishTurtorConverstaionData'
    }
  }
}
在使用Function Calling時,輸出的message.content不再包含值,而是被function_call屬性下的arguments所取代。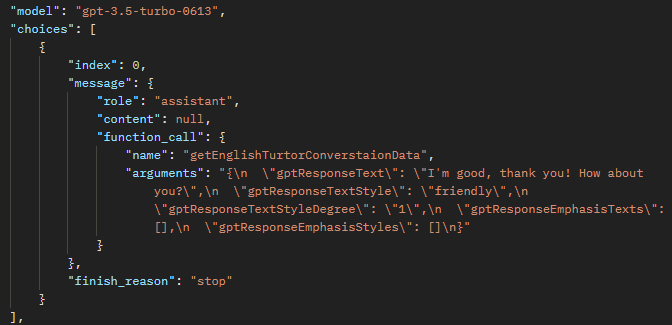
因此,我們需要調整chatAPI()這個方法。透過map Operator,我們可以將arguments的字串值轉換成物件,以確保後續處理和操作的資料格式都符合需求。此外,當添加歷史對話時,我們可以直接儲存gptResponseText,這樣就不必擔心每次的對話都包含SSML格式,導致Token數量增加,進而增加成本:
public chatAPI(contentData: string) {
  //添加使用者訊息
  this.addChatMessage('user', contentData);
  return this.http.post<ChatResponseModel>('https://api.openai.com/v1/chat/completions', this.getConversationRequestData(), { headers: this.headers }).pipe(
    map(chatAPIResult => {
      return JSON.parse(chatAPIResult.choices[0].message.function_call?.arguments!) as ConversationDataModel;
    }),
    //加入GPT回覆訊息
    tap(ConversationData => this.addChatMessage('assistant', ConversationData.gptResponseText))
  );
}
在speech.service.ts檔案中,建立一個conversationConvertToSSML()方法,這個方法負責組合SSML格式的輸出:
private conversationConvertToSSML(response: ConversationDataModel): string {
  //取得GPT的對話內容
  let text = response.gptResponseText;
  //添加每個要強調的句子或單字
  response.gptResponseEmphasisTexts.forEach((emphasisText, index) => {
    //如果未定義,則默認為moderate
    const emphasisLevel = response.gptResponseEmphasisStyles[index] || "moderate";
		//使用正則表達式替換所有匹配的文字
    const regex = new RegExp(emphasisText, 'g');
    text = text.replace(regex, `<emphasis level="${emphasisLevel}">${emphasisText}</emphasis>`);
  });
  //返回完整的SSML語法,其中包括語言、語氣和語氣強度等
  return `
  <speak xmlns="http://www.w3.org/2001/10/synthesis" xmlns:mstts="http://www.w3.org/2001/mstts" version="1.0" xml:lang="en-US">\n
    <voice name="en-US-GuyNeural">\n
      <mstts:express-as style="${response.gptResponseTextStyle}" styledegree="${response.gptResponseTextStyleDegree}">\n  ${text}\n</mstts:express-as>\n
    </voice>\n
  </speak>`;
}
由於ChatAPI()的輸出已變更為ConversationDataModel物件,我們必須調整Speech Service中的textToSpeech()方法。我們需要將參數型別更換為ConversationDataModel,然後將資料傳遞給conversationConvertToSSML()方法,以取得用於文字轉語音服務的完整SSML字串:
public textToSpeech(data: ConversationDataModel) {
  return this.http.post('https://<你的服務所在地區>.tts.speech.microsoft.com/cognitiveservices/v1', this.conversationConvertToSSML(data), {
    headers: this.headers,
    responseType: 'blob'
  });
}
最後,在OnGetRecordingBase64Text()中進行調整:
OnGetRecordingBase64Text(recordingBase64Data: RecordingData) {
  const requestData: AudioConvertRequestModel = {
    aacBase64Data: recordingBase64Data.value.recordDataBase64
  };
  //啟動讀取
  this.statusService.startLoading();
  //Audio Convert API
  this.http.post<AudioConvertResponseModel>('你的Web APP URL/AudioConvert/aac2m4a', requestData).pipe(
    //Whisper API
    switchMap(audioAPIResult => this.openaiService.whisperAPI(audioAPIResult.m4aBase64Data)),
    //Chat API
    switchMap(whisperAPIResult => this.openaiService.chatAPI(whisperAPIResult.text)),
    //Speech Service API
    switchMap(chatResult=> this.speechService.textToSpeech(chatResult)),
    finalize(() => {
      //停止讀取
      this.statusService.stopLoading();
    })
  ).subscribe(audioFileResult => this.statusService.playAudio(audioFileResult));
}
編譯後,在實體機上進行測試,經過一陣對話後,整個對話的體驗變得更為快速和流暢,展現了這些調整帶來的效能提升。另外,我們可以觀察Log內的歷史對話不再儲存包含SSML格式的文字。同時,GPT-3.5模型的輸出也成功的依照我預先設定的規則,輸出了對應的JSON格式資料。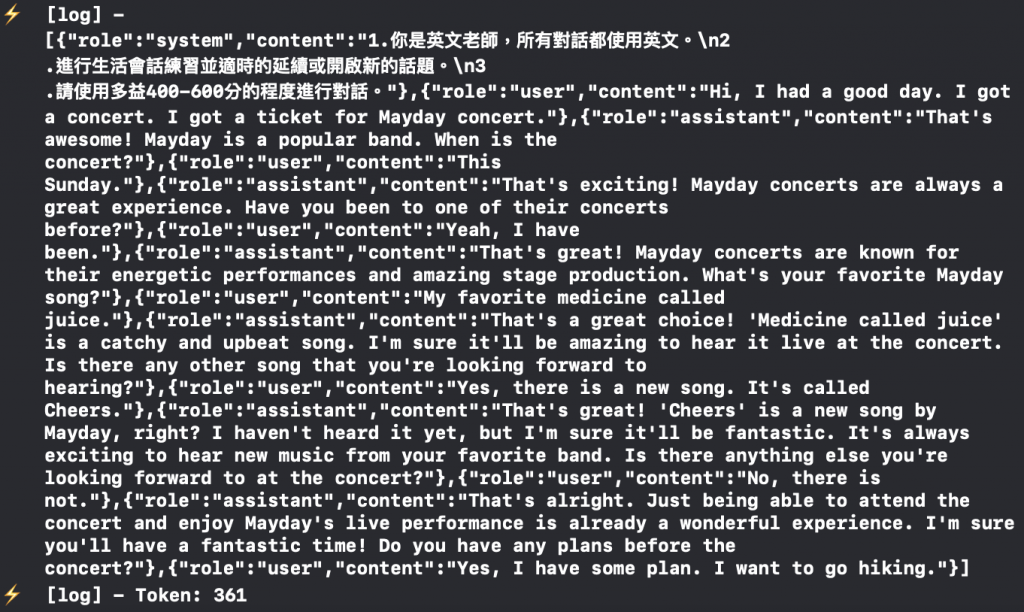

首先調整【Day - 12】建立的status.service.ts檔案,在裡面添加一個儲存音訊用的currentAudioSubject$和replayAudio()方法:
//讀取狀態
private isLoadingSubject$ = new BehaviorSubject<boolean>(false);
//音訊播放狀態
private playingStatusSubject$ = new BehaviorSubject<boolean>(false);
//當前儲存的音訊檔案
private currentAudioSubject$ = new BehaviorSubject<Blob | undefined>(undefined);
.
.
.
public playAudio(audioFile: Blob) {
  //儲存音訊檔案
  this.currentAudioSubject$.next(audioFile);
  this.audioPlay(audioFile).subscribe(isPlaying => this.playingStatusSubject$.next(isPlaying));
}

public replayAudio() {
  this.currentAudioSubject$.pipe(
    take(1),
    switchMap(audioFile => audioFile ? this.audioPlay(audioFile) : of(false))
  ).subscribe(isPlaying => this.playingStatusSubject$.next(isPlaying));
}
接著,建立一個ReplayAudio的元件,專門用於重複播放語音。在replayaudio.component.ts檔案中,訂閱isAudioPlaying$和isLoading$,以便根據這些狀態改變按鈕的外觀:
constructor(private statusService: StatusService) { }

get isLoading$(): Observable<boolean> {
  return this.statusService.isLoading$;
}

get isAudioPlaying$(): Observable<boolean> {
  return this.statusService.isAudioPlaying$;
}

onReplayAudio() {
  this.statusService.replayAudio();
}
<div class="flex flex-row items-center">
  <ng-container *ngIf="(isAudioPlaying$ | async) || (isLoading$ | async) else isNotPlayingAudioTemplate">
    <div class="w-full h-full flex flex-col items-center rounded-full mt-5">
      <div
        class="rounded-full bg-gradient-to-br from-gray-300 to-gray-200 border-4 border-gray-100 flex items-center p-3">
        <ion-icon class="text-3xl text-white" name="ear-outline"></ion-icon>
      </div>
    </div>
  </ng-container>
  <ng-template #isNotPlayingAudioTemplate>
    <div class="w-full h-full flex flex-col items-center rounded-full mt-5">
      <div
        class="ion-activatable relative overflow-hidden rounded-full bg-gradient-to-br from-purple-500 to-orange-300 border-2 border-gray-300 flex items-center p-3" (click)="onReplayAudio()">
        <ion-icon class="text-3xl text-white" name="ear-outline"></ion-icon>
        <ion-ripple-effect></ion-ripple-effect>
      </div>
    </div>
  </ng-template>
</div>
轉到VoiceRecording元件的voicerecording.component.ts檔案中,注入Status Service,並在ngOnInit()裡,我們訂閱播放狀態以確保在播放音訊時,錄音功能不會被啟動:
ngOnInit(): void {
  .
  .
  .
  //訂閱播放狀態
  this.statusService.isAudioPlaying$.pipe(
    takeUntil(this.destroy$)
  ).subscribe(audioPlayingState => {
    if (this.longPressGesture) {
      if (audioPlayingState) {
        this.longPressGesture.enable(false);
      } else {
        this.longPressGesture.enable();
      }
    }
  });
}
還需要在voicerecording.component.html中訂閱isPlayingAudio$,以改變錄音按鈕的外觀。此外,我還在調整了一下Tailwind CSS和新增了播放的動畫效果:
.
.
.
<div class="text-xl font-bold text-rose-500 text-center h-5 mb-2">
  <span *ngIf="(isRecording$ | async)">{{ (timer$ | async)?.minutes }} : {{ (timer$ | async)?.seconds }}</span>
</div>
<div #recordingButtonElement class="w-24 h-24 flex flex-col items-center rounded-full">
  <!-- 添加播放動畫 -->
  <ng-container *ngIf="(isAudioPlaying$ | async) else isNotPlayingAudioTemplate">
    <div class="ripple">
      <div
        class="rounded-full bg-gradient-to-br from-purple-500 to-blue-400 border-4 border-gray-300 flex items-center p-5 z-10">
        <ion-icon class="text-5xl text-white" name="volume-high-outline"></ion-icon>
      </div>
      <span style="--i:1"></span>
      <span style="--i:2"></span>
    </div>
  </ng-container>
  <ng-template #isNotPlayingAudioTemplate>
    <ng-container *ngIf="(isLoading$ | async) else isNotLoadingTemplate">
      <!--讀取時-->
      <div
        class="rounded-full bg-gradient-to-br from-gray-300 to-gray-200 border-4 border-gray-100 flex items-center p-5">
        <span class="loader"></span>
      </div>
    </ng-container>
    .
    .
    .
  </ng-template>
</div>
這是一個類似波紋的動畫,一樣是透過CSS來實現:
.ripple {
  width: 6rem;
  height: 6rem;
  display: flex;
  justify-content: center;
  align-items: center;
}

.ripple span {
  position: absolute;
  box-sizing: border-box;
  border: 2px solid #bfdbfe;
  border-radius: 50%;
  animation: rippleAnimate 1s linear infinite;
  animation-delay: calc(0.5s * var(--i));
}

.ripple:nth-child(2) span {
  border: none;
  background: rgba(0, 255, 0, 0.25)
}

@keyframes rippleAnimate {
  0% {
    width: 6rem;
    height: 6rem;
  }

  50% {
    opacity: 1;
  }

  100% {
    width: 9rem;
    height: 9rem;
    opacity: 0.01;
    border: 2px solid #ffffff;;
  }
}
最後將ReplayAudio元件添加到Home主頁上,並且在實體機上測試重播功能:
<div class="w-full h-full bg-white">
  <div class="flex flex-col w-full h-full">
    <div class="relative flex flex-col w-full h-full">
      <!-- 3D機器人動畫 -->
      <app-robot3d class="flex-grow flex-shrink w-full py-20"></app-robot3d>
    </div>
    <div class="flex-none flex flex-row justify-between items-center pb-20 relative">
      <div class="flex-grow">
        <!-- 重播按鈕 -->
        <app-replayaudio></app-replayaudio>
      </div>
      <div class="flex-grow">
        <!-- 錄音按鈕 -->
        <app-voicerecording (getRecordingBase64Text)="OnGetRecordingBase64Text($event)"></app-voicerecording>
      </div>
      <div class="flex-grow">
        <div class="w-14"></div>
      </div>
    </div>
  </div>
</div>
成功!
今天我們透過使用Function Calling的方式,重新調整了SSML的建立方法,並改用GPT-3.5模型。這些調整為整個速度上帶來了明顯的提升,並讓整個使用者體驗有了極大的改善。雖然GPT-3.5模型的回覆質量沒有GPT-4模型來得好,但這個改動為目前的問題提供了暫時的解決方案。也許未來,隨著OpenAI對GPT-4模型速度的改進,我們就可以期待更好的效能與品質相結合的解決方案哦!
Github專案程式碼:Ionic結合ChatGPT - Day20
