昨天介紹完DenseNet之後,我們今天就一如既往地通過實戰的方式來討論具體的模型架構吧!
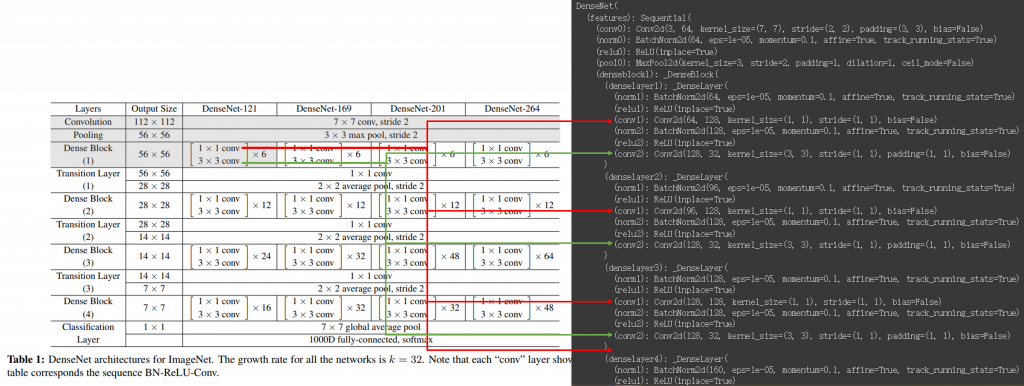
DenseNet的整體架構可以用下圖來表示:
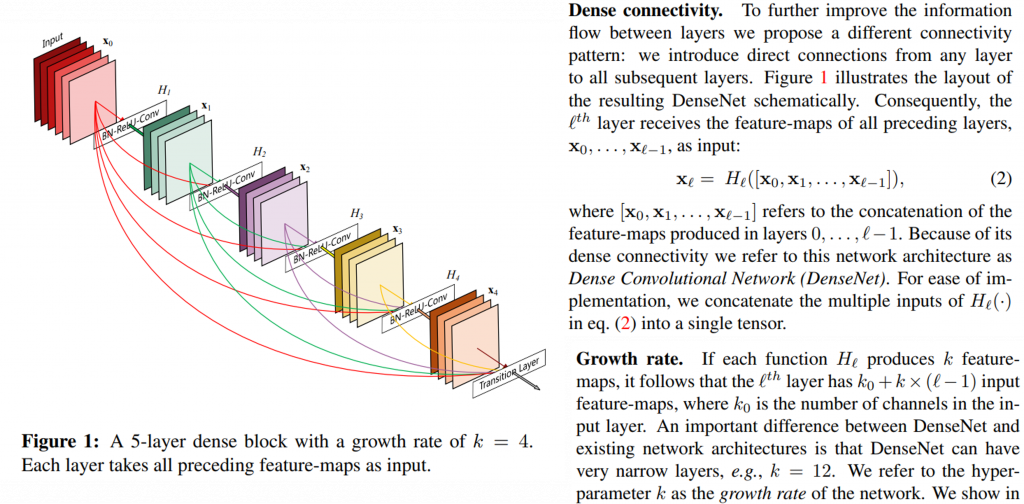
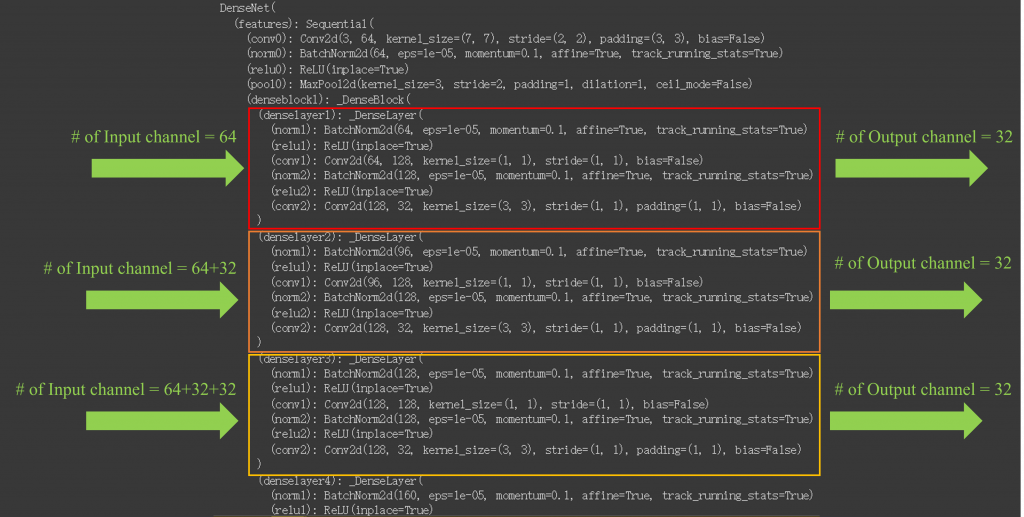
裡面會有許多的Dense Block,每個Dense Block中會有特定數量的捲積層,而Dense Block中間會需要使用Transition Layer調整特徵圖的大小。
和之前介紹過的模型類似,如果要建構DenseNet的話,可以選擇使用預訓練模型或是自己從頭建構,下面讓我們以DenseNet121為例依序介紹這兩種方法。
import torch
import torchvision.models as models

# Load pretrained DenseNet model
pretrained_densenet = models.densenet121(pretrained=True)

# Print the architecture of the pretrained model
print(pretrained_densenet)


import torch
import torch.nn as nn

# Define the DenseNet block with batch normalization and ReLU
class DenseBlock(nn.Module):
    def __init__(self, in_channels, growth_rate):
        super(DenseBlock, self).__init__()
        self.bn1 = nn.BatchNorm2d(in_channels)
        self.relu = nn.ReLU(inplace=True)
        self.conv1 = nn.Conv2d(in_channels, 4 * growth_rate, kernel_size=1, bias=False)
        self.bn2 = nn.BatchNorm2d(4 * growth_rate)
        self.conv2 = nn.Conv2d(4 * growth_rate, growth_rate, kernel_size=3, padding=1, bias=False)

    def forward(self, x):
        out = self.bn1(x)
        out = self.relu(out)
        out = self.conv1(out)
        out = self.bn2(out)
        out = self.relu(out)
        out = self.conv2(out)
        return torch.cat((x, out), 1)

# Define the transition layer with batch normalization and average pooling
class TransitionLayer(nn.Module):
    def __init__(self, in_channels, out_channels):
        super(TransitionLayer, self).__init__()
        self.bn = nn.BatchNorm2d(in_channels)
        self.relu = nn.ReLU(inplace=True)
        self.conv = nn.Conv2d(in_channels, out_channels, kernel_size=1, bias=False)
        self.avgpool = nn.AvgPool2d(kernel_size=2, stride=2)

    def forward(self, x):
        out = self.bn(x)
        out = self.relu(out)
        out = self.conv(out)
        out = self.avgpool(out)
        return out

# Define the DenseNet model
class DenseNet(nn.Module):
    def __init__(self, num_classes=1000, growth_rate=32, num_blocks=[6, 12, 24, 16], theta=0.5):
        super(DenseNet, self).__init__()
        self.growth_rate = growth_rate

        # Initial convolution layer
        self.conv1 = nn.Conv2d(3, 2 * growth_rate, kernel_size=7, stride=2, padding=3, bias=False)
        self.pool1 = nn.MaxPool2d(kernel_size=3, stride=2, padding=1)

        # Blocks
        in_channels = 2 * growth_rate
        for i, num_layers in enumerate(num_blocks):
            block = self._make_dense_block(in_channels, num_layers)
            setattr(self, f'denseblock{i + 1}', block)
            in_channels += num_layers * growth_rate
            if i < len(num_blocks) - 1:
                transition = self._make_transition_layer(in_channels, int(in_channels * theta))
                setattr(self, f'transition{i + 1}', transition)
                in_channels = int(in_channels * theta)

        # Final layers
        self.bn_final = nn.BatchNorm2d(in_channels)
        self.relu_final = nn.ReLU(inplace=True)
        self.avgpool = nn.AdaptiveAvgPool2d((1, 1))
        self.fc = nn.Linear(in_channels, num_classes)

    def _make_dense_block(self, in_channels, num_layers):
        layers = []
        for i in range(num_layers):
            layers.append(DenseBlock(in_channels + i * self.growth_rate, self.growth_rate))
        return nn.Sequential(*layers)

    def _make_transition_layer(self, in_channels, out_channels):
        return TransitionLayer(in_channels, out_channels)

    def forward(self, x):
        x = self.conv1(x)
        x = self.pool1(x)
        for i in range(4):
            x = getattr(self, f'denseblock{i + 1}')(x)
            if i < 3:
                x = getattr(self, f'transition{i + 1}')(x)
        x = self.bn_final(x)
        x = self.relu_final(x)
        x = self.avgpool(x)
        x = x.view(x.size(0), -1)
        x = self.fc(x)
        return x

# Create a DenseNet model
model = DenseNet(num_classes=1000)

# Print the architecture of the model
print(model)
import torch
import torch.nn as nn
import torch.optim as optim
import torchvision
import torchvision.transforms as transforms

# Hyperparameters
batch_size = 64
learning_rate = 0.001
num_epochs = 10


device = torch.device("cuda" if torch.cuda.is_available() else "cpu")

# Data preprocessing and loading
transform = transforms.Compose([transforms.ToTensor(), transforms.Normalize((0.5, 0.5, 0.5), (0.5, 0.5, 0.5))])

train_dataset = torchvision.datasets.CIFAR10(root='./data', train=True, transform=transform, download=True)
train_loader = torch.utils.data.DataLoader(dataset=train_dataset, batch_size=batch_size, shuffle=True)

test_dataset = torchvision.datasets.CIFAR10(root='./data', train=False, transform=transform)
test_loader = torch.utils.data.DataLoader(dataset=test_dataset, batch_size=batch_size, shuffle=False)

# Initialize the DenseNet model
model = DenseNet(num_classes=10).to(device)
# Loss and optimizer
criterion = nn.CrossEntropyLoss()  # Cross-entropy loss for classification
optimizer = optim.Adam(model.parameters(), lr=learning_rate)

# Training loop
total_step = len(train_loader)
for epoch in range(num_epochs):
    model.train()
    for i, (images, labels) in enumerate(train_loader):
        outputs = model(images.to(device))
        loss = criterion(outputs, labels.to(device))
        optimizer.zero_grad()
        loss.backward()
        optimizer.step()
        if (i + 1) % 100 == 0:
            print(f'Epoch [{epoch+1}/{num_epochs}], Step [{i+1}/{total_step}], Loss: {loss.item():.4f}')

# Evaluation
model.eval()
with torch.no_grad():
    correct = 0
    total = 0
    for images, labels in test_loader:
        outputs = model(images.to(device))
        _, predicted = torch.max(outputs.data, 1)
        total += labels.size(0)
        correct += (predicted == labels.to(device)).sum().item()

print(f'Test Accuracy: {100 * correct / total}%')
import torch
import torchvision.models as models
import torch.nn as nn

# Load pretrained DenseNet model
pretrained_densenet = models.densenet121(pretrained=True) # 有使用預訓練權重
# pretrained_densenet = models.densenet121() # 僅使用預訓練模型架構
pretrained_densenet.classifier = nn.Linear(in_features=1024, out_features=10, bias=True)

# Print the architecture of the pretrained model
print(pretrained_densenet)
